■Troubleshooting
If the following trouble occurs when the RHH130 is used, please check the following
points before asking your dealer for assistance.
What to check
Problem
Is the RHH130 properly con-
nected to the DTX Series Drum
Trigger Module using the two
supplied stereo cables?
Refer to the previous [Connections] section and make sure
that all connections are proper.
Is the Level Adjustment Screw on
the RHH130 set too low?
If the Level Adjustment Screw is set too low, the single pro-
duced by the pad will be too low to produce sufficient volume
from the drum trigger module’s tone generator even though
the pad is struck.
Is the module properly con-
nected to a pair of headphones
or an external audio device such
as an amplifier, speaker, etc.?
Check the connections between the external device and the
position of the power switch and volume level.
Are module settings correct?
Check the volume setting of the voice assigned to the INPUT
number to which the RHH130 is connected (refer to the previ-
ous [Adjusting the Voice Volume] section), or make sure the
headphones volume level is not set too low, etc.
●Hitting the pad once produces multiple sounds (Double trigger)
What to checkProblem
Is the level adjustment on the
RHH130 set too high?
Too high of a the level adjustment setting causes the drum
module to produce multiple sounds because the large signal
produced by the high settings sustains for too long of a time.
Refer to the [Output Level Adjustment] section described
above to properly set the pad's output level.
●No Sound, Volume is Low
●The edge and/or pad sections do not produce any sound. The Control Func-
tion does not function.
What to check
Problem
Is the RHH130 connected to the
proper INPUT number on the
DTX Series Drum Trigger Module
using the two supplied stereo
cables?
Refer to the [Connections] section described above and make
sure that the RHH130 is connected to the proper INPUT num-
ber on the module. The RHH130 will not operate using a
monaural cable.
Are module settings correct? Refer to the section on trigger settings in the Owner's Manual
that came with your module and make sure settings are cor-
rect.
●A pad voice sounds when the foot is removed from the hi-hat pedal. (Noise)
What to checkProblem
Is the clutch base making con-
tact with the top unit inside of the
main unit?
Check [step 4 in the Setup] section described above.
Also, please refer to the Owner's Manual that came with your DTX Series Drum Trigger Module
(DTXTREME/DTX/DTXPRESS) for more information regarding the problems described above and any
other problems that you may be experiencing.
If a solution can not be found to the problem after consulting the manuals, please contact the dealer from
whom you purchased the product.
Printed in Indonesia
WF75970
3
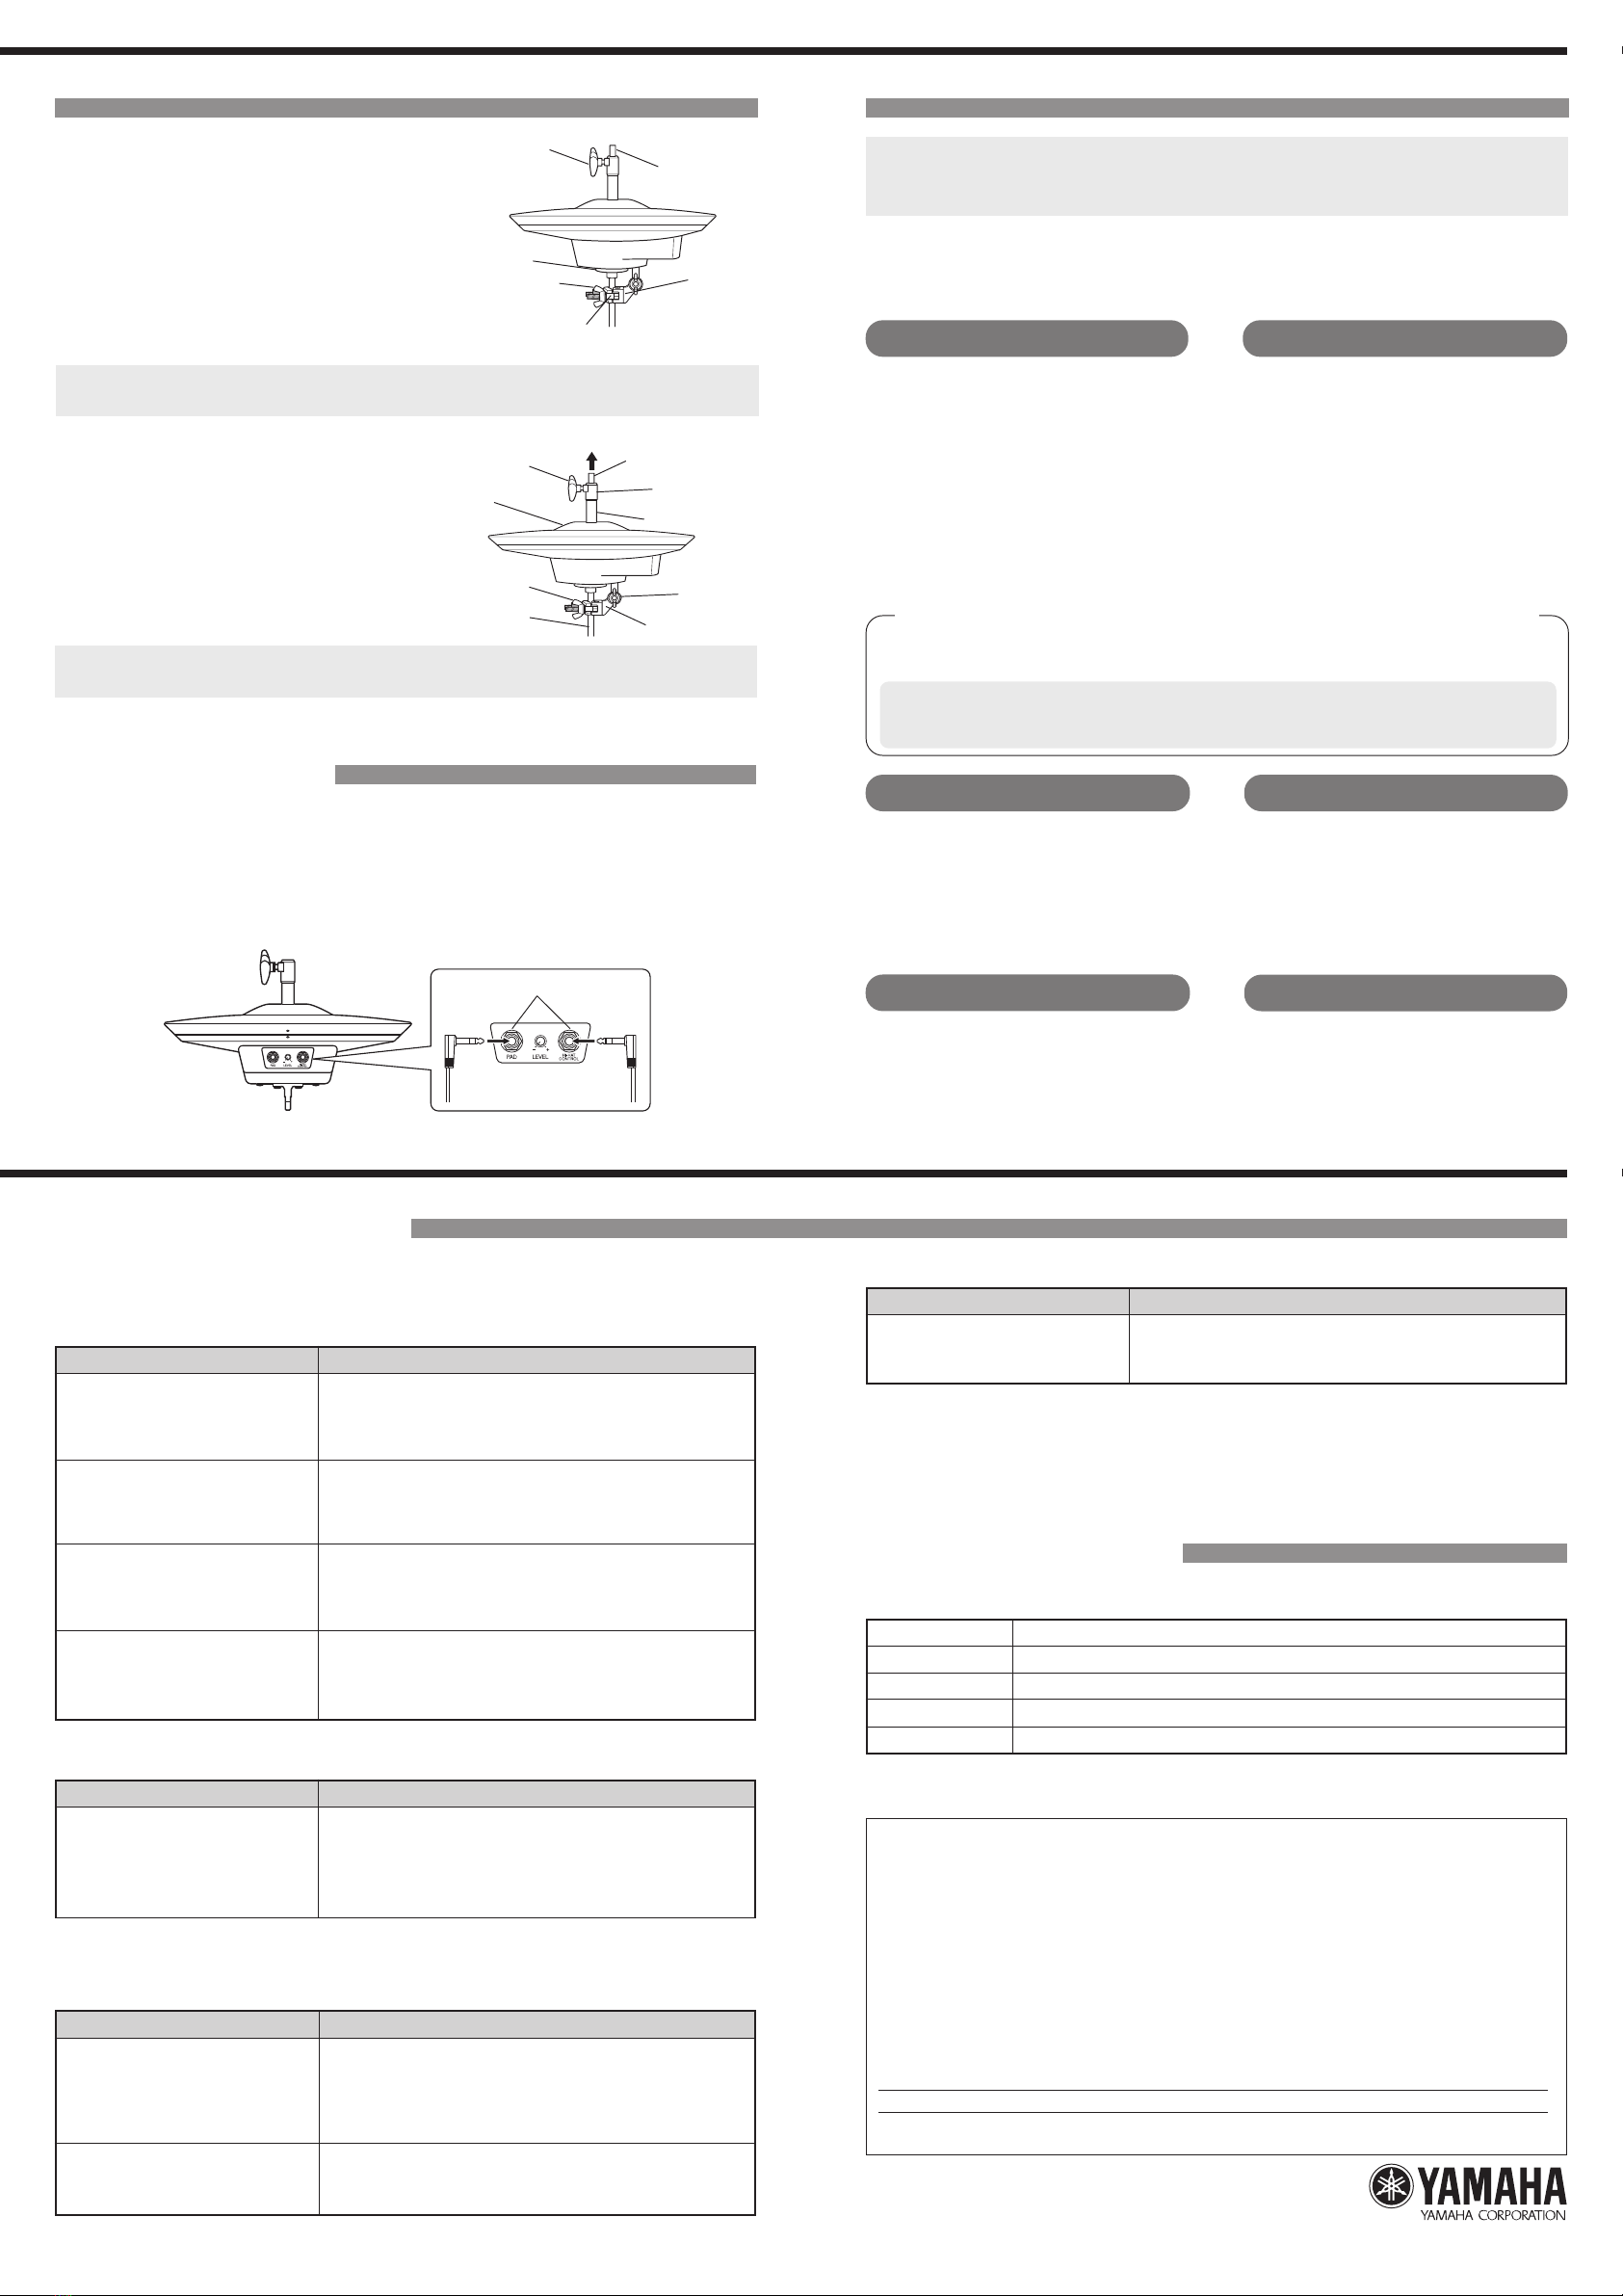
After loosening the wing bolt on the
RHH130, slide the RHH130 onto the hi-
hat stand shaft then set the RHH130
so that it is horizontal to the cymbal
support plate. Swivel the clamp base
up so that the hi-hat stand's vertical pipe
can be clamped between the clamp
base and open clamp. Then tighten the
nut to secure the clamp base.
Wing Bolt
Clamp Base
Open Clamp
Hi-Hat Shaft
Cymbal Support
Plate Nut
4Raise the clutch base to a suitable
height, and tighten the wing bolt to se-
cure the hi-hat shaft to the clutch base.
As the upper position of the clutch base
represents the open hi-hat position (the
space between the open cymbals), set
clutch base position according to your
playing style.
■Connections
Using the two supplied stereo phone cables, connect the RHH130's output jacks to the
input jacks on your DTX Series Drum Trigger Module (DTXTREME/DTX/DTXPRESS).
First, connect the RHH130's [PAD] output jack to the module's [HI-HAT] input jack, then
the RHH130's [HI-HAT CONTROL] output jack to the module's [HI-HAT CONTROL] in-
put jack. The L-shaped connectors should be connected to the RHH130.
●Module Settings
The following changes to settings should be made according to the type of tone
module you are using. Please refer to the your tone module for further information.
Wing Bolt
Clamp Base
Open Clamp
Nut
Clutch Base
Top Unit
Hi-Hat Shaft
Nut
Raise
Center Shaft
*Make sure that the main unit is set horizontally in relation to the cymbal support plate. If not, the
RHH130 may not function properly, or cause the hi-hat shaft to bend.
*Setting too wide of a stroke may result in the clutch base making contact with the top unit inside of
the cymbal pad and producing unexpected sounds while playing.
Output Jack
Insert Insert
*The RHH130 incorporates switches in its edge and controller sections. Make sure that a stereo
cable is used when making connections between the RHH130 and the module. The RHH130 will
not operate using a monaural cable.
Setting Up Connections
The RHH130 is especially designed to take advantage of the powerful features offered
by the DTXTERME
II
s and DTXPRESS
III
. The RHH130 can be used with the older
model tone modules listed below as long as changes to settings, also described below,
are made. However, be aware that the RHH130’s performance will not be the same as
that with the DTXTREME
II
s or DTXPRESS
III
.
SPECIAL MESSAGE SECTION
NOTICE: Service charges incurred due to a lack of knowledge relating to how a function or effect works (when the unit is operating as designed) are
not covered by the manufacturer’s warranty, and are therefore the owners responsibility. Please study this manual carefully and consult your dealer
before requesting service.
ENVIRONMENTAL ISSUES: Yamaha strives to produce products that are both user safe and environmentally friendly.We sincerely believe that our
products and the production methods used to produce them, meet these goals. In keeping with both the letter and the spirit of the law, we want you
to be aware of the following:
Warning: Do not attempt to disassemble.
Disposal Notice: Should this product become damaged beyond repair, or for some reason its useful life is considered to be at an end, please
observe all local, state, and federal regulations that relate to the disposal of products that contain lead, plastics, etc. If your dealer is unable to assist
you, please contact Yamaha directly.
NAME PLATE LOCATION: The name plate is located on the bottom of the product. The model number, serial number, are located on this plate.
You should record the model number, serial number, and the date of purchase in the spaces provided below and retain this manual as a permanent
record of your purchase.
Model : RHH130 Serial No.
Purchase Date
PLEASE KEEP THIS MANUAL
DTXTREME
II
s
●Special settings are not required.
(The RHH130 is compatible with this
module’s factory settings.)
DTXPRESS
III
●Set the Trigger Setup setting (refer to the
Owner’s Manual that came with the
DTXPRESS
III
) to “4. SP Med.”
DTXPRESS
II
1.In the Utility Mode Hi-Hat Offset, set the
HH OffS value to “–5”.
2.In the Trigger Setup Edit Mode Gain,
Minimum Velocity, set the Gain to
“40%”.
DTXTREME
1.In the Utility Mode [UT 7] SYSTEM3,
set the FCoffset value to “–5”.
2.In the Trigger Edit Mode TrgSens2 (trig-
ger sense 2), set the minimum level
to “20%”.
DTXPRESS
1.In the Utility Mode Hi-Hat Offset, set the
HH OffS value to “–5”.
2.
In the Trigger Setup Edit Mode Gain,
Minimum Velocity, set the Gain to “40%”.
DTXver.2
1.In the Utility Mode 8.FC offset, set the
FCoffset value to “–5”.
2.
In the Trigger Edit Mode 5. Level Range,
set the minimum level to “20%”.
For the modules listed below, first proceed with the setting in Step 1.
In some cases, cross-talk generated from a foot-closed sound may trigger a hi-hat sound even
though the setting in Step 1. has been carried out.If cross-talk is obvious, proceed to Step 2..
*Since the setting in Step 2. makes low velocity triggers harder to detect, we recom-
mend that you experiment with the setting’s values to best match your playing style
and conditions.
Dimensions ø329 x 106(H) mm (Clamp not included)
Weight 2.3kg (Clamp not included)
Sensor Type Tr igger Sensor (piezo-electric) x1/switch x1 (edge)
Controller Type Multi-step Switch
Output Jacks Standard Stereo Phone Jack x2
■Specifications
* Improvements may result in a change in the specifications and/or design of the product without notice.
●RH130 Real Hi-Hat Pad


