Yamaha Digital Sound Projector YSP-900 User manual

YAMAHA ELECTRONICS CORPORATION, USA
6660 ORANGETHORPE AVE., BUENA PARK, CALIF. 90620, U.S.A.
YAMAHA CANADA MUSIC LTD.
135 MILNER AVE., SCARBOROUGH, ONTARIO M1S 3R1, CANADA
YAMAHA ELECTRONIK EUROPA G.m.b.H.
SIEMENSSTR. 22-34, 25462 RELLINGEN BEI HAMBURG, GERMANY
YAMAHA ELECTRONIQUE FRANCE S.A.
RUE AMBROISE CROIZAT BP70 CROISSY-BEAUBOURG 77312 MARNE-LA-VALLEE CEDEX02, FRANCE
YAMAHA ELECTRONICS (UK) LTD.
YAMAHA HOUSE, 200 RICKMANSWORTH ROAD WATFORD, HERTS WD18 7GQ, ENGLAND
YAMAHA SCANDINAVIA A.B.
J A WETTERGRENS GATA 1, BOX 30053, 400 43 VÄSTRA FRÖLUNDA, SWEDEN
YAMAHA MUSIC AUSTRALIA PTY, LTD.
17-33 MARKET ST., SOUTH MELBOURNE, 3205 VIC., AUSTRALIA
©
2006 All rights reserved.
YSP-900
Printed in Malaysia WH82980
YSP-900
Digital Sound Projector
OWNER’S MANUAL
MANUAL DE INSTRUCCIONES
VLT
00_YSP-900_VLT-cv.fm Page 1 Friday, August 11, 2006 2:55 PM

CAUTION: READ THIS BEFORE OPERATING THIS UNIT.
i En
1 To assure the finest performance, please read this manual
carefully. Keep it in a safe place for future reference.
2 Install this sound system in a well ventilated, cool, dry, clean
place with at least 5 cm of space above (or below) this unit –
away from direct sunlight, heat sources, vibration, dust, moisture,
and/or cold.
3 Locate this unit away from other electrical appliances, motors, or
transformers to avoid humming sounds.
4 Do not expose this unit to sudden temperature changes from cold
to hot, and do not locate this unit in an environment with high
humidity (i.e. a room with a humidifier) to prevent condensation
inside this unit, which may cause an electrical shock, fire,
damage to this unit, and/or personal injury.
5 Avoid installing this unit where foreign object may fall onto this
unit and/or this unit may be exposed to liquid dripping or
splashing. On the top of this unit, do not place:
– Other components, as they may cause damage and/or
discoloration on the surface of this unit.
– Burning objects (i.e. candles), as they may cause fire, damage
to this unit, and/or personal injury.
– Containers with liquid in them, as they may fall and liquid
may cause electrical shock to the user and/or damage to this
unit.
6 Do not cover this unit with a newspaper, tablecloth, curtain, etc.
in order not to obstruct heat radiation. If the temperature inside
this unit rises, it may cause fire, damage to this unit, and/or
personal injury.
7 Do not plug in this unit to a wall outlet until all connections are
complete.
8 Do not operate this unit upside-down. It may overheat, possibly
causing damage.
9 Do not use force on switches, knobs and/or cords.
10 When disconnecting the power cable from the wall outlet, grasp
the plug; do not pull the cable.
11 Do not clean this unit with chemical solvents; this might damage
the finish. Use a clean, dry cloth.
12 Only voltage specified on this unit must be used. Using this unit
with a higher voltage than specified is dangerous and may cause
fire, damage to this unit, and/or personal injury. YAMAHA will
not be held responsible for any damage resulting from use of this
unit with a voltage other than specified.
13 To prevent damage by lightning, keep the power cable
disconnected from a wall outlet or this unit during a lightning
storm.
14 Do not attempt to modify or fix this unit. Contact qualified
YAMAHA service personnel when any service is needed.
The cabinet should never be opened for any reasons.
15 When not planning to use this unit for long periods of time (i.e.
vacation), disconnect the AC power plug from the wall outlet.
16 Be sure to read the “TROUBLESHOOTING” section on
common operating errors before concluding that this unit is
faulty.
17 Before moving this unit, press STANDBY/ON to set this unit in
standby mode, and disconnect the AC power plug from the wall
outlet.
18 Condensation will form when the surrounding temperature
changes suddenly. Disconnect the power cable from the outlet,
then leave the unit alone.
19 When using the unit for a long time, the unit may become warm.
Turn the power off, then leave the unit alone for cooling.
20 Install this unit near the AC outlet and where the AC power plug
can be reached easily.
CAUTION: READ THIS BEFORE OPERATING THIS UNIT.
WARNING
TO REDUCE THE RISK OF FIRE OR ELECTRIC SHOCK,
DO NOT EXPOSE THIS UNIT TO RAIN OR MOISTURE.
This unit is not disconnected from the AC power source as
long as it is connected to the AC wall outlet, even if this unit
itself is turned off. This state is called the standby mode. In
this state, this unit is designed to consume a very small
quantity of power.
CAUTION
Danger of explosion if battery is incorrectly replaced. Replace
only with the same or equivalent type.
CAUTION
Use of controls or adjustments or performance of procedures
other than those specified herein may result in hazardous
radiation exposure.

1 En
PREPARATIONINTRODUCTION
BASIC
OPERATION
ADVANCED
OPERATION ADDITIONAL
INFORMATION
SETUP English
OVERVIEW ........................................................... 2
FEATURES............................................................. 3
USING THIS MANUAL........................................ 4
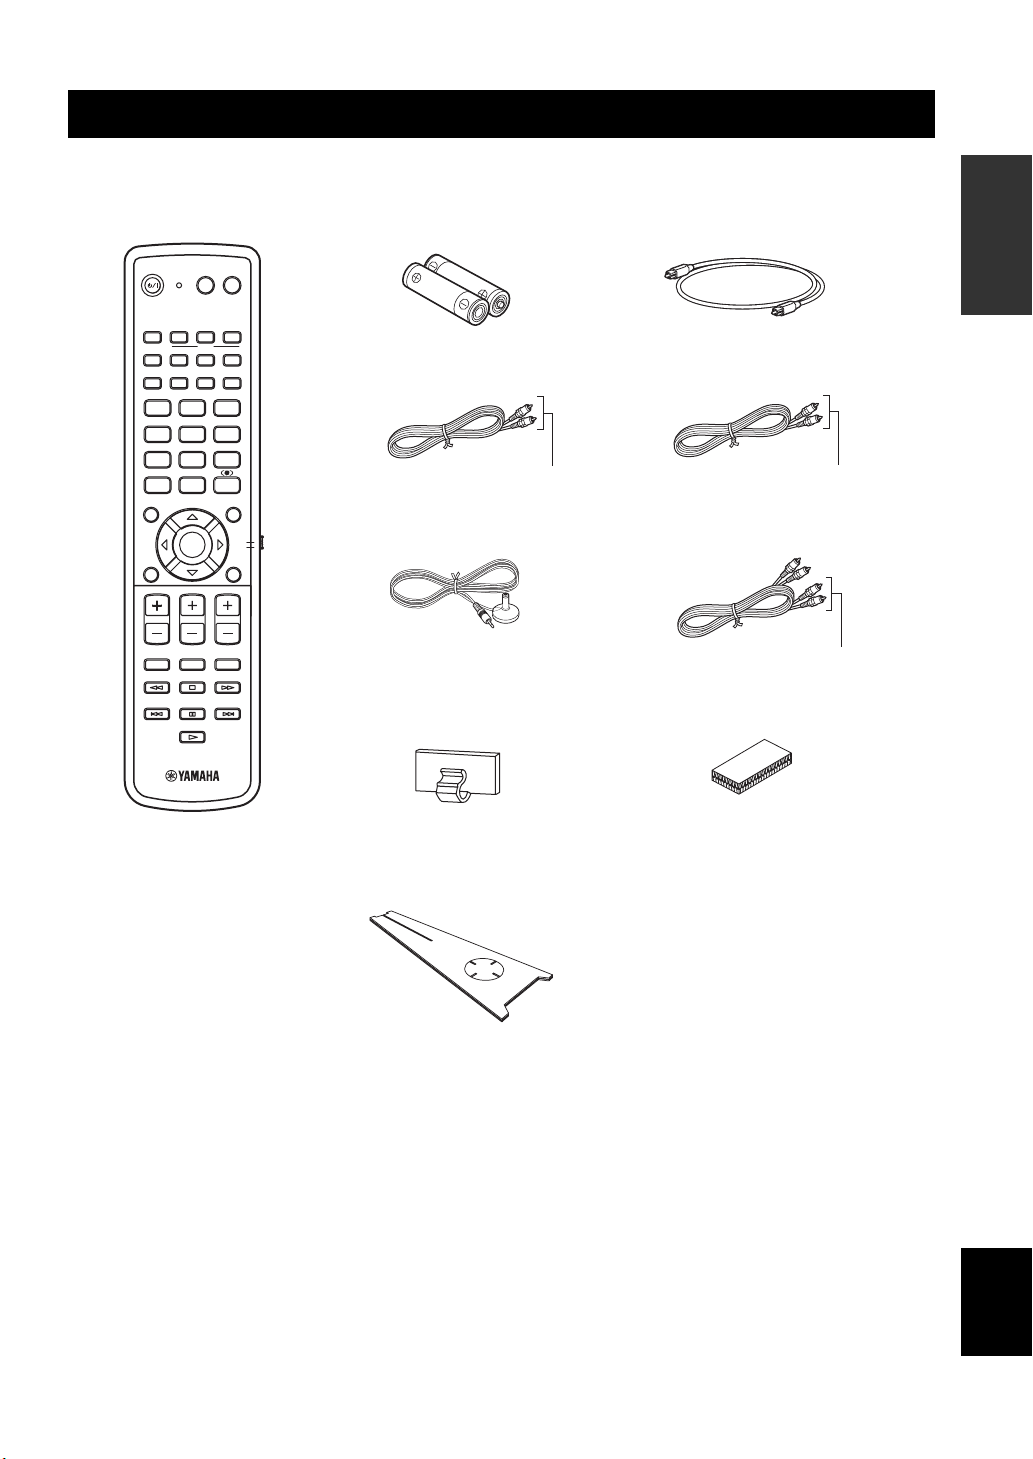
SUPPLIED ACCESSORIES ................................. 5
CONTROLS AND FUNCTIONS ......................... 6
Front panel................................................................. 6
Front panel display .................................................... 7
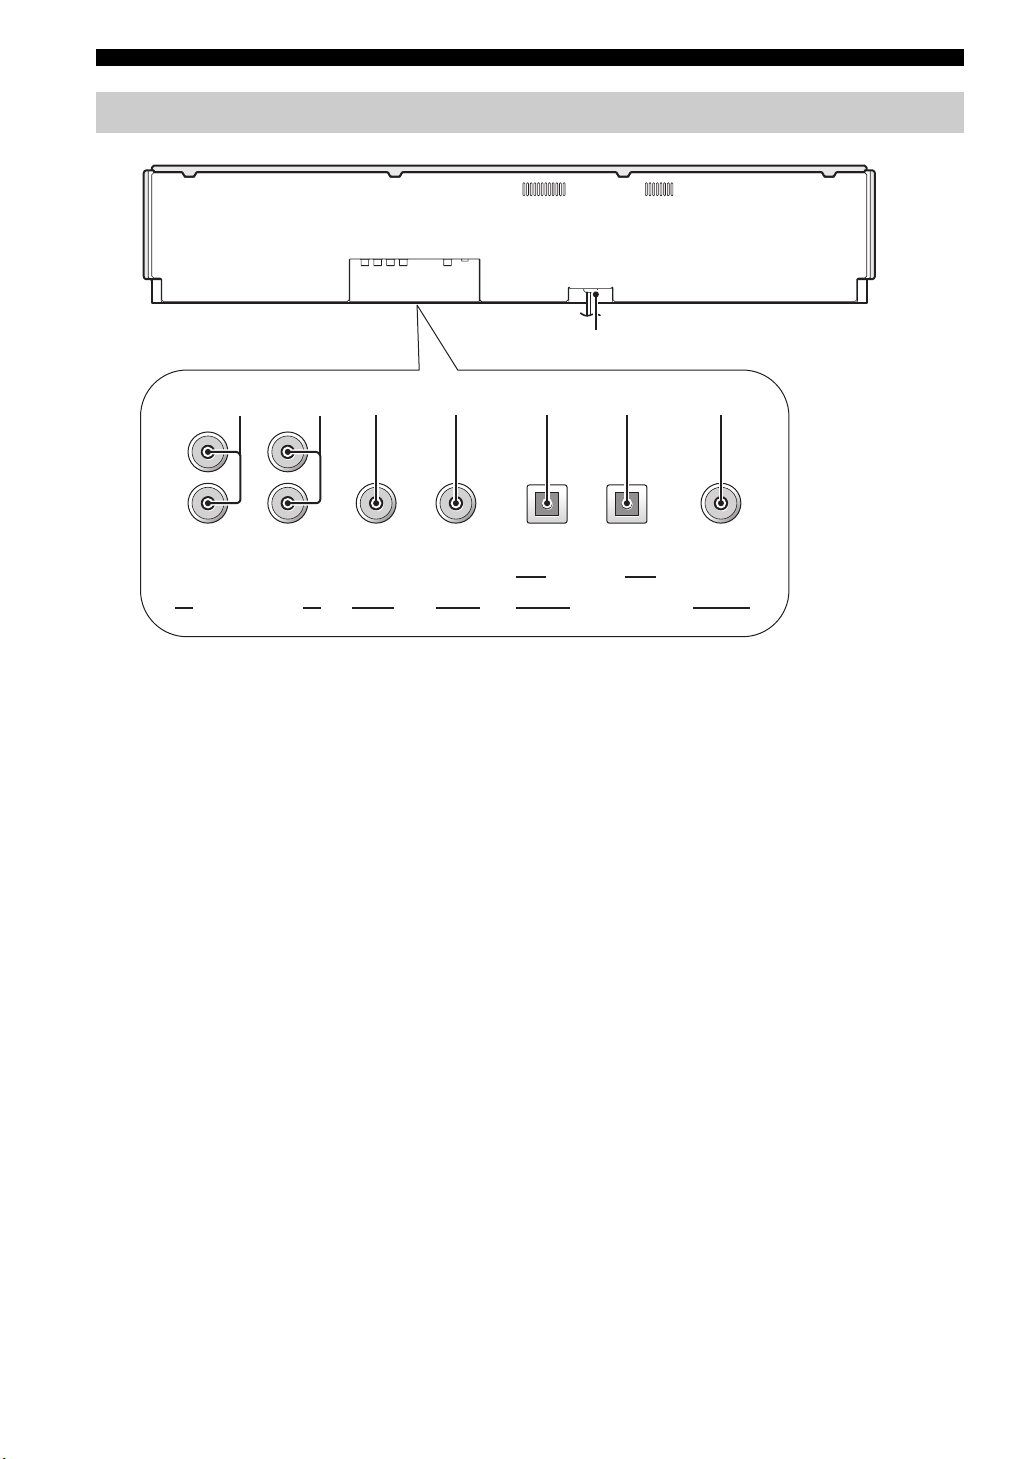
Rear panel .................................................................. 8
Remote control........................................................... 9
INSTALLATION ................................................. 11
Before installing this unit......................................... 11
Installing this unit .................................................... 11
CONNECTIONS .................................................. 14
Connecting a TV...................................................... 15
Connecting a DVD player/recorder ......................... 16
Connecting a VCR................................................... 17
Connecting a digital satellite tuner or
a cable TV tuner .................................................. 18
Connecting other external components ................... 19
Connecting a subwoofer .......................................... 20
Connecting the power supply cable......................... 21
GETTING STARTED.......................................... 22
Installing batteries in the remote control ................. 22
Operation range of the remote control..................... 22
Using the remote control ......................................... 23
Turning on the power............................................... 23
USING SET MENU.............................................. 24
Displaying the OSD................................................. 24
The flow chart of SET MENU................................. 25
CHANGING OSD LANGUAGE ........................ 26
AUTO SETUP (IntelliBeam)............................... 27
The flow chart of AUTO SETUP ............................ 27
Installing the optimizer microphone........................ 28
Using AUTO SETUP (IntelliBeam)........................ 29
USING THE SYSTEM MEMORY .................... 34
Convenient usage of the system memory ................ 34
Saving settings......................................................... 34
Loading settings....................................................... 35
PLAYBACK.......................................................... 37
Selecting the input source........................................ 37
Playing back sources................................................ 38
Adjusting the volume............................................... 39
Muting the sound ..................................................... 39
ENJOYING SURROUND SOUND .................... 40
5 beam...................................................................... 40
Stereo plus 3 beam................................................... 41
3 beam...................................................................... 41
Enjoying 2-channel sources
in surround sound ................................................ 43
Enjoying TV in surround sound .............................. 44
Adjusting surround mode parameters...................... 45
ENJOYING STEREO SOUND ...........................46
Stereo playback........................................................ 46
PLAYING BACK SOUND CLEARLY
(My beam)..........................................................47
Using auto-adjust function....................................... 47
Using manual-adjust function.................................. 48
USING SOUND FIELD PROGRAMS................49
What is a sound field? ............................................. 49
Turning on CINEMA DSP programs ...................... 50
Turning off CINEMA DSP programs ..................... 51
Adjusting CINEMA DSP effect levels.................... 51
USING THE VOLUME MODE
(Night listening mode/TV volume
equal mode)........................................................52
USING BASS SOUND ENHANCER
(TruBass)............................................................54
USING THE SLEEP TIMER ..............................55
Setting the sleep timer ............................................. 55
Canceling the sleep timer ........................................ 56
MANUAL SETUP.................................................57
Using MANUAL SETUP........................................ 58
BEAM MENU......................................................... 59
SOUND MENU....................................................... 63
INPUT MENU......................................................... 65
DISPLAY MENU.................................................... 67
ADJUSTING THE AUDIO BALANCE .............68
Using the test tone ................................................... 68
Using the audio output being played back............... 69
SELECTING THE INPUT MODE .....................71
ADJUSTING SYSTEM PARAMETERS ...........72
Using the system parameters ................................... 72
Setting the MEMORY PROTECT .......................... 72
Setting the MAX VOLUME.................................... 73
Setting the TURN ON VOLUME ........................... 74
Setting the DEMO MODE ...................................... 74
Setting the FACTORY PRESET............................. 75
REMOTE CONTROL FEATURES ...................77
Setting remote control codes ................................... 77
Controlling other components ................................. 78
Using the TV macro ................................................ 80
TROUBLESHOOTING .......................................82
GLOSSARY...........................................................85
Audio formats .......................................................... 85
Audio information ................................................... 85
INDEX....................................................................86
SPECIFICATIONS...............................................87
LIST OF REMOTE CONTROL CODES ....................i
CONTENTS
INTRODUCTION
PREPARATION
SETUP
BASIC OPERATION
ADVANCED OPERATION
ADDITIONAL INFORMATION

OVERVIEW
2 En
It is generally accepted that in order to fully enjoy the benefits of surround sound at home, you must endure the agony of
wiring and installing a great number of speakers in the hope that your listening room will give you the same kind of
surround sound experience as your local movie theater.
YAMAHA YSP-900 Digital Sound Projector challenges this preconception that complicated speaker setup and
troublesome wiring go hand-in-hand with the enjoyment of multi-channel surround sound.
This slimline unit does away with the need for complicated wiring and installation worries, leaving you with a unit that is
not only easy to set up, but which is also capable of reproducing the kind of powerful surround sound you have been
waiting for from its built-in 2 woofers and 21 full-range small speakers.
You can fine-tune the parameters of this unit to adjust the delay time for separate sound beams, resulting in highly
directional sound that comes in on the listening position from all directions.
The YSP-900 projects sound beams containing surround sound information for the front right (R), front left (L), surround
right (SR) and surround left (SL) speaker positions, which are reflected off the walls of your listening room before
reaching the actual listening position. With the addition of center (C) sound beams, this Digital Sound Projector creates
true-to-life 5.1 channel surround sound that makes you feel as if there are actual speakers around the room.
Sit back and enjoy the real sound experience of this simple, yet stylish Digital Sound Projector.
OVERVIEW
SL
SR
R
L
C
Listening position
Imaginary
surround left
speaker
Imaginary
surround right
speaker
Imaginary
front left
speaker
Imaginary
front right
speaker
Imaginary
center
speaker

FEATURES
3 En
INTRODUCTION English
Digital Sound Projector
This unit employs the digital sound projector technology
that allows one slim unit to control and steer multiple
channels of sound to generate multi channel surround
sound, thus eliminating the need for satellite loudspeakers
and cabling normally associated with conventional
surround sound systems. This unit is also equipped with
the following beam modes so that you can enjoy the
surround sound.
◆5 beam
◆Stereo plus 3 beam
◆3 beam
This unit also employs the stereo playback and my beam.
My beam
This unit employs the my beam so that you can achieve a
clear sound in noisy environment. You can adjust the
beam angle manually or automatically using the supplied
remote control.
Cinema DSP Digital
This unit employs the Cinema DSP Digital technology
developed by YAMAHA Electronics Corp. so that you can
experience movies at home with all the dramatic sound
impact that the director intended to convey.
Versatile Remote Control
The supplied remote control come with preset remote
control codes to be used to control the DVD player, VCR,
cable TV tuner and digital satellite tuner connected to this
unit. In addition, the remote control is equipped with the
macro capability so that you can perform a series of
operations with the press of a single button.
AUTO SETUP (IntelliBeam)
This unit employs the automatic sound beam and acoustic
optimization technology with the aid of the supplied
optimizer microphone so that you can avoid troublesome
listening-based speaker setup and achieve highly accurate
sound beam adjustments that best match your listening
environment.
Compatibility with the Newest Technologies
This unit employs decoders compatible with Dolby
Digital, DTS (Digital Theater Systems), Dolby Pro Logic,
Dolby Pro Logic II and DTS Neo:6.
◆Dolby Digital
This is the standard audio signal format used on DVDs and
other purely digital media. This surround technology deliver
high-quality digital audio for up to 5.1 discrete channels to
produce a directional and more realistic effect.
◆DTS (Digital Theater Systems)
This is an audio signal format used on DVDs and other purely
digital media. This surround technology deliver high-quality
digital audio for up to 5.1 discrete channels to produce a
directional and more realistic effect.
◆Dolby Pro Logic
This sophisticated, matrix decoding technology up-converts
any 2 channel source audio to a 5.1 channel full bandwidth
playback, resulting in a surround sound experience.
◆Dolby Pro Logic II
This is fundamentally a redesigned version of Dolby Pro
Logic that employs 2 stereo surround channels, a subwoofer
and a greatly enhanced steering logic. As a result, this
improved technology provides an exceptionally stable sound
field that simulates 5.1 to a much greater degree than the
original Dolby Pro Logic. In addition, Dolby Pro Logic II
features Movie, Music and Game modes specifically designed
for movies, music and games respectively.
◆DTS Neo:6
This technology decodes the conventional 2 channel sources
for 6 channel playback, enabling playback with the full-range
channels with higher separation. Music mode and Cinema
mode are available to play back music and movie sources
respectively.
The “ ” logo and “IntelliBeam” are trademarks of
YAMAHA Corporation.
The “ ” logo and “Cinema DSP” are registered
trademarks of YAMAHA Corporation.
Manufactured under license from Dolby Laboratories.
“Dolby”, “Pro Logic”, and the double-D symbol are trademarks
of Dolby Laboratories.
“DTS” and “Neo:6” are trademarks of Digital Theater Systems,
Inc.
Manufactured under license from 1 Ltd. Worldwide patents
applied for.
The “ ” logo and “Digital Sound Projector™” are trademarks
of 1 Ltd.
TruBass, SRS and the “ ” symbol are registered trademarks
of SRS Labs, Inc. TruBass technology is incorporated under
license from SRS Labs, Inc.
FEATURES
Other manuals for Digital Sound Projector YSP-900
4
Table of contents
Languages:
Other Yamaha Recording Equipment manuals

Yamaha
Yamaha FX550 User manual

Yamaha
Yamaha GQ1031C User manual

Yamaha
Yamaha Q1027 User manual

Yamaha
Yamaha SPX900 User manual

Yamaha
Yamaha VL1-m User manual

Yamaha
Yamaha RS7000 Ver.1.2 User manual

Yamaha
Yamaha TG300 User manual

Yamaha
Yamaha SPX50D User manual

Yamaha
Yamaha CBX-T3 User manual

Yamaha
Yamaha FX770 User manual

Yamaha
Yamaha 01V96i User manual

Yamaha
Yamaha RSio64-D User manual

Yamaha
Yamaha TG100 Parts list manual

Yamaha
Yamaha MQT-8023 User manual

Yamaha
Yamaha DSR1 User manual

Yamaha
Yamaha CBX-T3 User manual

Yamaha
Yamaha Q2031B User manual

Yamaha
Yamaha QY22 User manual

Yamaha
Yamaha MU15 User manual

Yamaha
Yamaha TG-33 User manual