Yamaha DX9 User manual

DIGITAL PROGRAMMABLE ALGORITHM SYNTHESIZER
Operating Manual

CONGRATULATIONS
Thank you for choosing the Yamaha DX9 Digital Programmable Algorithm Synthesizer.
The DX9 employs unique and sophisticated FM digital tone generation technology
combined with microcomputer control to permit creation of voices that are more "live"
than voices available with any other system available.
We urge you to read this owner's manual thoroughly to ensure proper operation and
maximum performance of the instrument.
Features
•The DX9 has a20-voice internal memory, while
external cassette tape can be used to store and
load other voices. The DX9 is provided with a
voice tape containing 120 pre-programmed voices.
•Extensive microcomputer programming control
makes it possible to edit existing voices to change
their character, or produce entirely new voices.
New voices can also be created "from scratch."
•Edited or new voices can be stored either in the
instrument's internal memory, or on an external
cassette tape, so sounds you create can be saved
for future use.
CONTENTS
PRECAUTIONS 1
DX9 OUTLINE 2
CONNECTIONS 4
PLAY MODE 5
FUNCTION MODE 6
FM TONE GENERATION 9
EDIT MODE 12
KEY TRANSPOSE 16
STORE /SAVE /LOAD 17
MIDI 21
LET'S ACTUALLY CREATE AVOICE 23
LFO BLOCKDIAGRAM 26
SPECIFICATIONS 27
VOICE DATA LIST 28
^
PRECAUTIONS
LOCATION
Avoid placing your synthesizer In direct sunlight or close to
asource of heat. It is also important to avoid locations in
which the instrument is likely to be subjected to vibration,
excessive dust, cold or moisture.
HANDLING
Avoid applying excessive force to the instruments's knobs
and switches.
POWER CORD
Always grip the power plug directly when unplugging.
Removing the power plug from the wall socket by pulling
on the power cord can result in damage to or shorting of
the power cord.
Be sure to unplug your synthesizer if you will not be using
it for an extended period of time.
RELOCATION
When moving the synthesizer once it has been set up, be sure
to disconnect all cords that connect to other equipment.
This will help prevent accidental damage to or shorting of
interconnection cables.
<I>
CONNECTION
Carefully follow the "CONNECTION" instructions given
in this manual when setting up your synthesizer.
Connection errors can lead to serious damage to the instru-
ment, amplifier, and speakers.
CLEANING
Do not use solvents such as benzine or thinner to clean
your synthesizer as these may cause discoloration or
staining of the instrument's exterior. Use asoft, dry cloth.
SAVE THIS MANUAL
After studying this manual thoroughly, it should be stored
in asafe place for future reference.
LIGHTNING
In the event of an electrical storm, the instrument's power
cord should be unplugged to eliminate the possibility of
serious damage.
OTHER APPLIANCES
Use your synthesizer where its digital circuitry cannot
be influenced by electromagnetic radiation from appliances
such as televisions, radios, etc.
^

DX9 OUTLINE
As stated in the feature summary on page 1,the DX9 can be used to play pre-programmed voices, pre-programmed
voices can be edited to alter their character, or completely new voices can be created from scratch. Newly created
voices can be memorized for future use,
To accomplish all this, the DX9 has four main operating modes:
•PLAY-MEMORY SELECT Mode
This Is the normal performance mode, and the mode in which pre-programmed voices can be selected.
•FUNCTION Mode
This mode permits setting parameters pertaining to the effect of the controllers (thumbwheel, breath controller)
and is also used for loading and saving data.
•EDIT Mode
This mode permits setting parameters that determine the character of the voices, and is used for editing existing
voices or creating entirely new voices.
•STORE Mode
Edited or newly created voices can be programmed into the memory in this mode.
All functions of the DX9 are performed in one of the above modes. Proper understanding of the functions of each
mode is the key to successful operation of and performance with the DX9.
I.Votume
Connector jacks
2. DATA ENTRY section
3. Mode Select key section
4. Display pane!
5. Voice/Parameter
Select key section
Power switch
7. Modulation wheel
6Pitch bend wheel
Headphone, breath controller connector jacks 8. Keyboard
1VOLUME
This controls the output level of the DX9 and at the same
time controls the volume of the headphones.
2DATA ENTRY
This combination of keys and linear control is used to enter
and modify data.
DATA ENTRY
MAX.
MIN. ^These keys are for increasing or
decreasing the values by 1,for
turning afunction on or off.
NO YES
-1 <1„i
This control is used for coarse value adjustment.
This slide controller covers the entire range for
each paranneter from minimum to maximum.
<2>

3MODE SELECT KEY
Selects four operating modes of the DX9 (PLAY, EDIT,
FUNCTION, STORE).
6PITCH BEND WHEEL
The pitch bend range is set in the FUNCTION mode. The
pitch bend wheel then permits upward and downward
pitch bend throughout the set range.
STORE FUNCTION
This key sets the
STORE mode.
This l<ey sets the
FUNCTION mode.
EDIT/
COMPARE MEMORY
SELECT
This l<ey sets the
EDIT mode.
"piiyr This key sets the
PLAY mode.
4DISPLAY PANEL
This Liquid Crystal Display panel displays the parameters
in each mode.
MEMORV SELECT
riPSTER TUNE PDJ
Preset voice number display
Display the current state of the system.
7MODULATION WHEEL
The modulation depth range is set in the FUNCTION mode.
The modulation wheel then permits variation of modu-
lation depth throughout the set range,
8KEYBOARD
The DX9 has a61-key keyboard with 16-voice polyphonic
capability (a monophonic mode is also selectable).
•CASSETTE INTERFACE
An inexpensive cassette recorder can be connected to the
cassette interface terminals, permitting saving and loading
voices to and from standard compact cassette tapes. The
DX9 is supplied with avoice cassette containing 120
voices in 6groups of 20 voices each.
"^^
5VOICE/PARAMETER SELECT KEY
These keys select the voices in the instrument's internal
memory. The same keys are also used to select parameters
in the FUNCTION or EDIT modes. One key can have a
maximum of four different functions.
The function of these keys is determined by the Mode
Select key.
Voice Parameter^
OPERATOR ON-OFF/EG COPY
MASTER
TUNE ADJ POLY/MONO /PITCH BEND MODE
/RANGE
ALGORITHM LFO
1234/FEEDBACK WAVE
12P456
TIME
PORTAMENTO
Voice Number Function Parameter
<3>

CONNECTIONS
•Setting Up and Applying Power
The DX9 does not have an internal power amplifier, therefore either headphones or an
external amplifier/speaker system are required. Ahigh-quality keyboard amplifier system
is recommended.
Hook up your DX9 as shown in the diagram below.
Connections For details concerning the
CASSETTE connectors
refer to page 18.
AC wall outlet
Foot switch
(portamento) Foot switch Foot controller Mixer
(sustain) (volume)
Headphones
(8 -150 ohms}
Breath controller
(BCD
Speaker system with
built-in amplifier
Music stand
Attach the music stand
as shown in the figure
•Turn POWER ON
The DX9 power switch is located to the right of the rear
panel (viewed from keyboard side). Turn the POWER
switch ON only after all connections to other equipment
(and to the AC supply) have been properly made. The
display pane! will appear as in the illustration below im-
mediately after power is switched on.
After afew seconds, the same mode that was engaged
before power was turned off is re-engaged. For example, if
the PLAY mode was previously engaged, the PLAY mode
will be re-engaged and the previously selected voice will be
ready for performance. The same applies to the EDIT and
FUNCTION modes.
+VflMflHR D;K9 +
*SVNTHESIZER +
<4>

PLAY MODE
•Playing the Internal Voices
The DX9 has 20 internal voices, any one of which can be
selected simply by pressing the |MEMORY SELECfl l<ey,
and then by pressing the appropriate Voice Select key.
Each Voice Select key has alarge numeral that corresponds
to the voice number at its ieft edge.
Select and play each voice to get afeel for the kind of
sounds that are available.
_] Press the Memory Select key,
V] set to the Play mode.
voice number
Display at the Play mode
MEMORV
MfiSTER SELECT
TUHE flDJ
Display shows the last parameter
at the Function mode.
•Set the desired VOLUME level
With power to the DX9 and your amplifier system ON,
gradually raise the volume control while playing anote on
the keyboard until the desired volume level is reached. Set
the volume control on your amplifier so the optimum
volume is attained with the DX9 volume control set at
about "8"
•Playing the External Voices
The voice data contained on the voice data cassette must be
loaded into the instrument before it can be played. Refer to
the "LOAD" section on page 19 for loading instructions.
When data entry is initiated while in the PLAY mode,
the parameter selected at the end of the FUNCTION
mode can be controlled.
Fine adjustment of volume while playing can be
achieved using an optional FC-3A foot controller
plugged into the VOLUME jack on the DX9 rear
panel. Remember that the DX9 and amplifier volume
controls should be set high enough that adequate
volume control range is available using the foot
controller.
<5>

FUNCTION MODE
•FUNCTION Mode .... Applying Effects
The FUNCTION mode permits tuning, pitcli bend, modu-
lation, and application of other effects while playing, as
well as voice data load/save operations.
Press the IFUNCTIONI key to enter the FUNCTION mode.
Setting controller range parameters, etc., is carried out
using the DATA ENTRY controls.
•Function parameters are memorized and maintained
even when power to the DX9 Is cut off. Unlike voice
data, however, function parameters cannot be saved In
internal or external memory.
OPERATOR ON-OFF/EG COPY ALGORI'
123 4 /FEEDB/
12345
MASTER
TUNE ADJ POLY/MONO PITCH BEND MODE
RANGE PORTAMENTO
OSCILLATOR EG
OPERATOR
SELECT FREQUENCY
COARSE FREQUENCY
FINE DETUNE/
SYNC RATE
11 12 13\ 14 15
RANGE PITCH AMPLITUDE EG BIAS RANGE
MODULATION WHEEL-
•MASTER TUNE
Function Parameter
MASTtR
TUNE ADJ
MASTER TUNE adjusts the overall tuning of the DX9 to
match Its pitch with other instruments. Pitch is variable
over a150 cent range. Press |MASTERT
U
NE] and then use
the linear DATA ENTRY control for tuning.
DATA ENTRY
Only the linear control in
the DATA ENTRY sec-
tion functions for
MASTER TUNE. Fine
adjustments using the +1
,
—1 keys is not possible.
-1 +1
POLY/MONO
POLY/MONO
Determines whether the DX9 will function in the poly-
phonic or monophonic mode. Press the DATA ENTRY
I—1 Ikey for polyphonic operation, and the I+1
1
key for
monophonic operation.
•The range of the portamento effect is different in the
polyphonic and monophonic modes. Refer to the
PORTAMENTO section below.
#PITCH BEND RAMGE
PITCH BEND
RANGE
The range of pitch bend can be set from to 12. range
is equivalent to no pitch bend. Asetting of 12 permits
pitch bend over a±1200 cent (2 octave) range. If the range
is set at 7, then pitch bend will be possible over a±700
cent range (i.e. plus or minus one fifth}.
Pitch bend wheel
Add pitch bend effects
PORTAMENTO
45
TIME
PORTAMENTO
The portamento effect varies according to whether the DX9
is in the polyphonic or monophonic mode.
MONOPHONIC MODE:
In this mode press the DATA ENTRY [TT] key to activate
"FINGERED PORTA". In this mode the legato effect Is
applied only when asecond note is played while aprevi-
ously played note is still held.
Press the DATA ENTRY pi] key to activate "FULL TIME
PORTA". In this mode portamento is always applied.
POLYPHONIC MODE:
In the polyphonic mode "FULL TIME PORTA" is always
activated.
TIME:
Adjusts the speed of the portamento effect from to 99.
Asetting results in no effect, while asetting of 99 pro-
duces the longest (slowest) portamento.
<6>

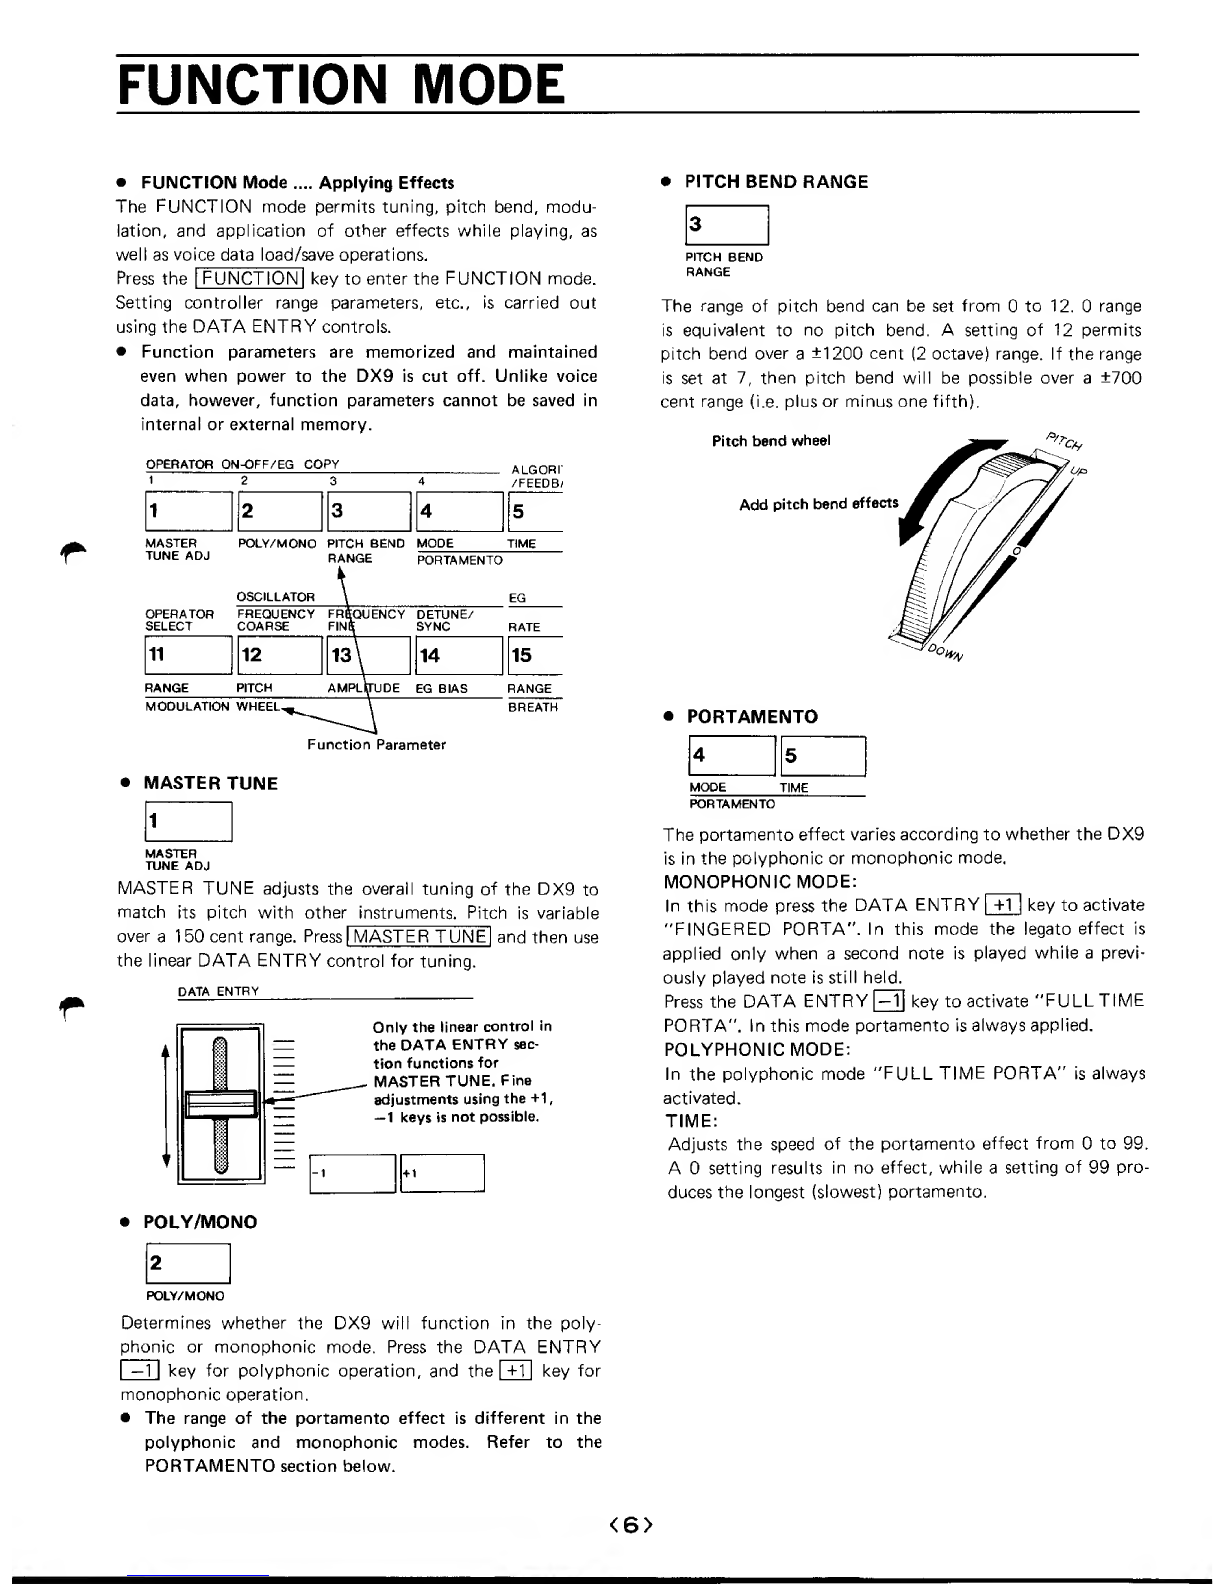
•The portamento effect can also be turned ON or OFF
using an optional FC-4 or FC-5 foot pedal once the
portamento function has been turned on in the "FULL
TIME PORTA" mode. Pressing the foot pedal turns the
effect ON. The effect is OFF when the foot pedal is
released.
The portamento effect cannot be turned ON or OFF
in the "FINGERED PORTA" mode.
•An FC-4 or FC-5 foot pedal can also be connected for
sustain pedal control, In the monophonic mode, akey
pressed while another key is held will take priority, and
the sustain effect will apply to the new key.
Releasing the pedal turns the sustain effect OFF.
•CASSETTE
•MODULATIONWHEEL /BREATH CONTROLLER
78910
SAVE /VERIFY LOAD LOAD SINGLE REMOTE
CASSETTE
These keys permit saving all 20 interna) memory voices to
an external cassette tape, or loading 20 voices or aspecified
single voice from an external cassette tape.
SAVE/VERIFY, LOAD, LOAD SINGLE, and REMOTE
keys are provided. Refer to the STORE/SAVE/LOAD
instructions on page 17.
SAVE/VERIFY:
The SAVE function saves all 20 voices in the internal
memory to an external cassette tape, while the VERIFY
function checks to make sure that all the voices were prop-
erly saved.
Pressing the |SAVE/VERIFY |key repeatedly alternates
between the "SAVE TO TAPE?" and "VERIFY TAPE?"
displays.
LOAD:
This key permits loading 20 voices at atime from an
external cassette tape into the internal memory.
LOAD SINGLE:
This key permits loading aspecified single voice from a
group of voices previously saved on acassette tape. The
number of the voice in the group from which the desired
voice wilt be loaded must be specified (1 —20).
REMOTE:
This key permits remote control of cassette recorders that
have aREMOTE terminal. Normally when the cassette
recorder's remote terminal is connected to the DX9, the
tape will not run until! either the LOAD or SAVE function
is initiated even if the Play or Record controls are engaged.
The REMOTE function makes it possible to start or stop
the tape to facilitate locating the beginning of voice groupes,
etc.
11 12 13 14
RANGE PITCH AMPLITUDE EG BIAS
MC«>ULATKDN WHEEL
15 16 17 18
RANGE PITCH AMPLITUDE EG BIAS
BREATH CONTROL
The modulation wheel or breath controller can be used to
control LEO modulation depth applied to pitch, amplitude
or envelope producing controllable tremolo or vibrato
effects while playing. Setting the RANGE, PITCH, AM-
PLITUDE and ENVELOPE GENERATOR BIAS para-
meters for each controller is basically the same process, so
we'll concentrate mainly on the MODULATION wheel.
Since LFO modulation is the effect in question, the voice
used must have non-zero set for PITCH and/or AMPLI-
TUDE MODULATION SENSITIVITY parameters in the
EDIT mode.
Refer to the MODULATION SENSITIVITY section on
page 13 for details.
1. MODULATIONWHEEL
To add modulation effects
RANGE:
Range can be set from to 99. No effect is produced with
asetting, and asetting of 99 produces maximum effect.
PITCH:
Determines whether LFO modulation Is applied to pitch.
Pitch is modulated if ON, and not modulated if OFF.
AMPLITUDE:
Determines whether LFO modulation is applied to ampli-
tude. Amplitude is modulated If ON, and not modulated
if OFF.
^
T
<7>

EG (ENVELOPE GENERATOR} BIAS:
When EG BIAS is ON, volume or brilliance (wow) variation
effects can be added with the controllers by varying the
level of each operator's envelope generator. MOD. SENSI-
TIVITY (AMPLITUDE) is used to set the sensitivity
(refer to page 13.)
Applying EG BIAS to amodulator results in brilliance
effects, while applied to acarrier it results in volume
variation effects. In some cases, if the carrier sensitivity
is maximum and the controller is set to its minimum, no
sound will be produced.
As for "modulator" and "carrier", refer to the FM TONE
GENERATION section on page 9.
2. BREATH CONTROL
The LFO modulation effect programmed can be controlled
using an optional BC1 breath controller. The effect is
controlled by blowing into the BCl mouthpiece. The
effect will not be audible unless breath Is applied to the
controller.
VOICE INIT (Voice Initialize):
This function sets up the basic voice data for creating new
voices. Press the lVOICE INITl key and the display panel
will read "VOICE INIT?" Press the |YES| key and the
DX9 will respond with "ARE YOU SURE?" Verify by
pressing the lYESi key second time. This sets up the basic
voice data and activates the DX9 EDIT mode.
•BATTERY CHECK
Abackup battery power supply is built into the DX9 so
that voice data will be maintained even when power to
the instrument is off. The state of the backup system can
be checked by pressing the IEDIT RECALL/VOICE INITl
key. The operational battery voltage range is from 2.2 volts
to 3.3 volts. If the backup battery voltage drops below 2.2
volts, replacement of the backup system is necessary. The
backup system consists of special batteries which can be
replaced only by aYamaha dealer. Contact your nearest
Yamaha dealer when replacement becomes necessary.
•MEMORY PROTECT
20
MEMORY
PROTECT
The DX9's internal MEMORY PROTECTION function will
prevent any accidental erasure of the internal voice data.
You will first have to turn the MEMORY PROTECT OFF
in order to STORE or LOAD the voice data. Also, do not
forget to turn the MEMORY PROTECT function back ON
after storing or loading operation.
(Please refer to page 17
)
•EDIT RECALL /VOICE INIT
Pressing this key alternately switches to EDIT RECALL
and VOICE INIT.
19
EOrr RECALL
/VOICE INIT
EDIT RECALL:
This function makes it possible to recall avoice that was
previously being edited or created.
If, for example, the PLAY mode is accidentally or pur-
posely entered while editing, the voice that was being
edited can be recalled with this function,
If the IEDIT RECALL |key is pressed, the display shows
"EDIT RECALL?". Pressing the DATA ENTRY [YES]
key then causes the "ARE YOU SURE?" display. Verify
by pressing the [YES Ikey again, and the voice previously
being edited will be restored.
<8>

FM TONE GENERATION
FM Tone Generation .... Understanding the Basics
The DX9 is an entirely new type of synthesizer employing
an entirely new FM digital tone generation system. This
unique Yamaha system permits finer control over subtle
musical nuances and vastly expanded voice creation poten-
tial compared to conventional synthesizers.
1. The Meaning of FM
FM stands for Frequency Modulation. FM radio broadcasts
use the same principle. One signal-the modulator-modu-
lates asecond signal—the carrier.
In FM radio the carrier is an extremely high "ratio" fre-
quency and the modulator is the music signal to be braod-
cast. In effect, the carrier "carries" the modulator signal
through the atmosphere to your receiving antenna.
FM broadcasting
Carrier wave
Sound signal
(signal to be modulated)
(modulator signal)
Extremely high carrier/
FM signal (modulated signal) modulator frequency
ratio. The "density" of
the transmitted carrier
waveform varies accord-
ing to the modulating
signal.
~r
2. FM Tone Generation In the DX9
In the DX9, the carrier signal determines the pitch of the
note produced and modulator determines the shape of the
waveform produced and therefore its timbre. This explana-
tion may make it look like the carrier and modulator are
two entirely separate things. In fact, they are one and the
same. Aspecial oscillator unit called an "operator" can be
used as either acarrier or modulator in the DX9.
Pitch
frequency data
Operator
ata II
Modulation data\Y
osc AMP -m!)—^
EG
Output
The frequency data and
modulation data are
combined here
Envelope data
Loose wave Dense wave
1
)
Pitch Frequency Data
Pitch frequency data from the DX9's microcomputer sys-
tem determines the operator's oscillation frequency. When
the operator is used as acarrier, this frequency is equivalent
to the pitch of the note produced. When the operator is
being used as amodulator, the ratio of its frequency to that
of the carrier determines the timbre of the note produced.
2) Modulation Data
This is the modulation data received from the previous
operator's (modulator) output.
The FM tone generator system is similar in principle, but in
this case both the carrier and modulator are audible signals,
and their frequencies can be almost equal.
FM tone generation
Carrier
(sound to be modulated)
Modulator
(modulator signal)
FM sound (modulated sound)
Close carrier/modulator
frequency ratio results
In FM sound.
3) Envelope Data
When the operator Is used as acarrier the envelope data de-
termines the volume envelope of the note produced. When
the operator is used as amodulator the envelope data de-
termines the timbre envelope of the note produced.
For example, the pitch frequency data applied to an oper-
ator used as acarrier determines the frequency of the sine
wave output from the operator. Inputting envelope data
results in an output waveform similar to that shown in the
figure.
Numerical
value —M^
Operator Wmj Sine wave
J—
^
+
,
PITCH
^*-
—OSC —
^
AMP
,i
MOD.c EG
/"^ Envelope data
^
<9>

•Basic Operator Functions
1)Relationship of Carrier to Modulator
An operator can be used as either acarrier or modulator.
These two basic operator functions are the basis for the FM
tone generation system. Two operators can be combined in
two different ways.
1. Modulator and carrier combinations
Modulator Carrier
PITCH -^ —^Output
2. Carrier and carrier combinations
PITCH 0P1
Carrier
OP 2
Output
2) Carrier and Carrier
This configuration results in apure sine wave output from
both operators. The combination of these waveforms can
sound much like aconventional organ.
•Carrier and carrier combinations
Operator 1
PITCH
PITCH
Output
Carrier
3) Modulator and Carrier
In the modulator/carrier configuration using two operators,
shown in the figure, the operator on the left is the modu-
lator and the operator on the right is the carrier. In the FM
system, the last operator in achain of two or more oper-
•Modulator and carrier combinations
Operator 1
ators is the carrier. By varying the ratio of the modulator
and carrier frequencies, and by varying the envelope of the
modulator, an extremely broad range of highly complex
waveforms (complex harmonic structure) can be created.
PITCH Operator 2
PITCH Output
<I0>

Examples of output waveforms
•Modulator and carrier combinations •Carrier and carrier combinations
Frequency ratio of modulator to carrier equals 1:1 Frequency ratio
+1 -!
Carrier 1
1
Carrier 2
-1 -
Frequency of modulator to carrier equals 2:1
+1 -
Carrier 1
Carrier 2
Frequency of modulator to carrier equals 3:1
+1 -Carrier 1
Carrier 2
Output
wave form
Output
wave form
^
Output
wave form
3. Algorithms .... Combining Several Operators
The DX9 has atotal of four operators. The way in which
these operators are combined is known as an "algorithm."
The DX9 has 8different pre-programmed algorithms. The
8algorithms are displayed graphically on the control panel.
Taking algorithm number 5as an example, the lowest two
operators— 1and 3— are carriers. The two operators above
the carriers will function as modulators. The output of
operator 4is fed back (feedback) to its input.
The above is abrief decription of the internal workings of
the FM tone generator system. By varying the pitch fre-
quency, modulation and envelope data it is possible to
edit pre-programmed voices or to create entirely new
voices.
5^
Algorithm 5
^J [T
m3
Divided in two sections
Modulates
<M>

EDIT MODE
•EDIT MODE .... Creating Voices
The EDIT mode can be used to edit pre-programnned
voices or to create entirely new voices. Press the |EDIT/
COMPARE] function key to enter the EDIT mode.
Edit Mode Parameter
ALGORit
/FEEDBAC
LFO
WAVE
4»/678
MODE TIME /SAVE /VERIFY LOAD
PORTAMENTO /
EG f
CASSETTE
KEYBOARD SCALING
DETUNE/
SYNC RATE LEVEL RATE LEVEL
14 15 16 17 18
EG BIAS RANGE PITCH AMPLITUDE EG BIAS
OPERATOR ON-OFF:
Pressing keys I1Ithrough will result in the
corresponding operator being turned OFF, indicated by a
"0" in the appropriate location on the display panel (the
group of four 1's and/or O's corresponds to operators 1
through 4). Press the key again to turn the operator back
on-indicated by a"1 "on the display.
1:Signifies that the operator is activated
/0: Signifies that the
operator is disabled
flL6 41100 0P2
RATE SCRLINB =6
BREATH CONTROL
•No sound will be produced
if the carrier operators
have all been disabled.
Setting and modifying parameters is carried out using the
DATA ENTRY controls just as in the FUNCTION mode.
Asmall dot will appear next to the voice number in the
display if any data is modified. The original voice can be
recalled at any time while editing by pressing the
IEDIT/COMPARE |key again. The voice number will
flash indicating that you are hearing the original voice.
To continue editing press the |EDIT/COMPARE |button
again.
Now for an explanation of the DX9's functions and opera-
tion.
•The indicators display for EDIT mode
The number of the al-
gorithm which is being
used for that particular
preset voice
Voice
number
/B\
X
Display the current
state of the operators
fromOPI through 0P4
begining at the left
The dot will appear
when any data has
been modified.
HLQ 11111 OPl
FCOfiRSE= 1.96
-^
Displays each
parameter
The operator selected
will be displayed only
for the parameters that
can modified
OPERATOR ON-OFF/EG COPY
OPERATOR ON -OFF/ EG COPY
123
12 3 4
In the EDIT mode these keys permit turning any of the
operators on or off, and copying the EG data of any
operator to any other operator (EG COPY).
EG COPY:
This function copys the EG data from one operator to
another. While holding the selector [STORE |key, press
the number of the operator from which you want to
copy EG data.
While pressing
STORE
The display panel when the
Store key has been pressed.
key.
EG COPV
fron CIP2 to OP?
4C^
.\^-^\
N*
press the key for the operator
number that you wish to copy.
EG COPV
fron 0P2 to OPl
This signifies that the
EG data of 0P2 are
being copied to OPl,
•ALGORITHM /FEEDBACK
Pressing this key alternately switches to ALGORITHM
and FEEDBACK.
ALGORITHM
/FEEDBACK
ALGORITHM:
This key permits selection of one of the 8algorithms.
Press the DATA ENTRY |+1 |key to increment (advance)
the number of the selected algorithm, and the |-1 |key
to decrement the algorithm number. The slide control
can be used for lager variations.
This value will change.
J-
flLG 1110
ALGORITHM SELECT
<I2>

FEEDBACK:
One operator in each of the 8algorithms has its output fed
back to its input. This is the f.eedbacl< operator. The
amount of feedbacl< applied can be adjusted over arange
of to 7. By increasing the FEEDBACK level the harmon-
ics are increased, resulting in the generation of noise-like
sounds.
RLQ 11111
FEEDBfiCK =7
i
2
This value wiil change
Set the feedback level
from "0" to "7"
LFO
LFO
WAVE SPEED DELAY PMD/AMD
6789
The Low Frequency Oscillator produces low-frequency
sine, saw-tooth or square waves, or aSAMPLE/HOLD
waveform. The LFO waveform can be used to apply vibrato,
tremolo or "wow" effects to the voices. The amount of
LFO modulation applied can be controlled using the
modulation wheel, or breath controller once appropriate
WAVE,SPEED and DELAY parameters are set. (Refer to
page 26}
WAVE:
This selects the waveform output by the LFO. Any of the
six waveforms shown below can be selected.
RLG 4nil
LFO UlflUE=TRIflNGL
TRIANGL
SAW DWN
SAW UP
SQUARE
SINE
S/HOLD
This display will change
/\^ (Triangular wave)
|^^\ (Number 1sawtooth waveform)
.y^''^ (Number 2sawtooth waveform)
IIISquare wave
'\y Sine wave
Sample and hold
HLG 11111
LFO SPEED 99 fiLG
LFO 11111
DELfiV =99
SPEED:
The speed (frequency) of the LFO can be set from to
99. is the slowest LFO speed while 99 is the fastest.
DELAY:
This creates adelay between initial key closure and ap-
plication of LFO modulation. Asetting of results in no
delay -LFO modulation begins the instant akey is pressed
—and asetting of 99 creates the longest delay.
PMD/AMD:
Pressing this key alternately switches to PMD and AMD.
fiLG 1nil
LFO PM DEPTH= 99 filLG 4nil
LFO AM DEPTH= 99
-This value will change- J
PMD (Pitch Modulation Depth):
Varies, over ato 99 range, the depth of LFO modulation
applied to pitch. Asetting produces no pitch modulation,
and asetting of 99 produces maximum modulation.
The PMD function is separate from the effect of the con-
trollers, and can be used to apply vibrato effects that are
entirely independent of the controller settings.
AMD (Amplitude Modulation Depth):
Varies, over ato 99 range, the depth of LFO modula-
tion applied to amplitude. Asetting produces no ampli-
tude modulation, and asetting of 99 produces maximum
modulation.
The AMD function is separate from the effect of the con-
trollers, and can be used to apply tremolo effects that are
entirely independent of the controller settings.
•MODULATION SENSITIVITY
MOD SENS
PITCH/ AMP
10
This adjusts the sensitivity (depth) of pitch and amplitude
modulation. This parameter must be greater than before
any amplitude or pitch modulation can be applied.
Be sure to check this parameter before using the modula-
tion wheel or other controllers.
flLG 1nil
PMOD SENS. =1
HLG 1nil OPl
fl MOD SENS. =
—A'This value will change
-
PITCH:
Sensitivity to pitch modulation is variable from to 7.
This value sets the modulation sensitivity for all oper-
ators. Applying pitch modulation results in vibrato type
effects.
i^
-This value will change-
<I3>

AMPLITUDE:
Sensitivity to amplitude modulation is variable from to 3.
Amplitude modulation sensitivity is set independently tor
each operator. Applying amplitude modulation to amod-
ulator creates "wow" effects, while applied to acarrier it
results in tremolo effects.
Operators are selected using the jOPERATOR SE-
LECT |key. Pressing the |OPERATOR SELECTi key
successively selects the operators in order from 1to
4. The number of the selected operator is displayed
in the upper right hand corner of the display panel.
Operators that are turned OFF will be "skipped"
and the number of the next active operator will be
displayed.
Disabled operator
cannot be selected
Depress to select
the operator
RLG 11011 OPl
RATE SCflLIHG= 9
OSCILLATOR
OSCILLATOR
FREQUENCY FREQUENCY DETUNE/
COARSe FINE SYNC
12 13 14
These keys set the pitch data for each operator.
RLG 1nil OPl
FCnflRSE= 1.00 RLG 1nil OPl
FFINE --1.00
IThis value will change i
FREQUENCY COARSE/FREQUENCY FINE:
The oscillation frequency of each oscillator is set using the
IFREQUENCY COARSE! and IFREQUENCY FINEJ keys.
With avalue of 1.00 as standard (8 feet), the FREQUENCY
COARSE control can be used to set the frequency between
0.5 and 32 times. The FREQUENCY FINE control then
permits fine frequency adjustment between 1and 1.99
times.
DETUNE /SYNC:
Pressing this key alternately switches to DETUNE and
SYNC.
RLG 1nil •OPl
05C DETUNE =?
This value will change I
OLG 1nil
OSC KEV SVHriQFF
This display wilt change J
DETUNE:
The operator frequencies as determined by the FRE-
QUENCY COARSE and FREQUENCY FINE controls can
be detuned over a—7 to +7 range.
+7
Positive pitch detune
Negative pitch detune
t
0-
I
-7
Frequency set with the
frequency coarse and fine
controls
SYNC (Synchronize):
When the SYNC function is ON, all operators begin oscilla-
tion from the same phase angle {0 degrees). With SYNC
OFF the phase angle at which an operator begins oscilla-
tion is carried over smoothly from the preceding note. In
the polyphonic mode, for example, maximum simultaneous
output is 16 notes. If a17th key is pressed the first note
makes asmooth transition to the 17th note.
16notes at once
First note
Second note-
Sixteenth note
Seventeen note
When on, oscillation
will always begin
from phase
First note fades away
-Previous note —h-<-
EG (Envelope Generator)
EG
When off, asmooth
transition occurs to
the next note
-Next note ^
RATE LEVEL
15 16
The envelope generator determines how the amplitude
(volume) or timbre (tone) of anote will vary over time.
Envelope modulation of amodulator results in time-based
timbre variations, while envelope modulation of a carrier
produces amplitude variations.
<I4>

The parameters which determine the "shape" of the enve-
lope are RATE 1through RATE 4and LEVEL 1through
LEVEL 4. The RATE parameters determine how long it
takes the envelope to reach one LEVEL from another.
The envelope applied to each operator can be set individual-
ly, permitting an essentially infinite range of envelope
combinations.
LEVEL 1
RATE 3
{LEVEL 4)
f
KEYOIM
PITCH
1
Modulator 0P1
MOD.
1
PITCH
Carrier OP 2
EG
EG
A
Tone will change
outT Volume will change
RLS 11111 OPl
EG RRTE 1-99 PLG 1nil OPl
EG LEUEL 1^99
-This value will change _J
RATE Ikey successively selects RATE para-
RATE:
Pressing the
meters 1through 4. Each RATE parameters can be set
from to 99. Asetting produces the longest (slowest)
RATE, and a99 setting produces the fastest RATE.
LEVEL:
Pressing the |LEVELI key successively selects LEVEL
parameters 1through 4. Each LEVEL parameter can be
set from to 99. is no output, while 99 is maximum
level.
•Normally LEVEL 4will be set at "0". In this case
LEVEL 1should be greater than "50" to ensure proper
EG operation.
•KEYBOARD SCALING
KEYBOARD SCALING
RATE LEVEL
17 18
The EG RATE and LEVEL parameters can be varied as
the frequency of the notes increases.
flL6 1nil OPl
RRTE SCflLIHG= 9
I
flLG 1nil OPl
LUL SCflLIHG= e
-This value will change.
RATE:
The EG RATE of each operator can be set to get shorter
as the frequency of the notes increases -- similar to apiano.
RATE can be set from to 7.
LEVEL:
The EG LEVEL of each operator can be set to decrease as
the frequency of the notes increases.
LE VE Lcan be set from to 99.
LEVEL 3RATE 4
LEVEL4
3!
•OPERATOR
OPERATOR
OUTPUT
LEVEL
1
KEYOFF 19
flL6 11111 DPI
OUTPUT LEUEL^ 99
_t
This value wilt change
Permits setting the output level of each operator.
OUTPUT LEVEL:
Controls overall EG level, like the EG DEPTH controls in
conventional synthesizers. OUTPUT LEVEL can be set
between and 99.
For example, if aspecific operator is found to be unneces-
sary once avoice has been created, its output level can be
set to 0.
•Since the OPERATOR ON-OFF function operates
only in the EDIT mode and OPERATOR ON-OFF
data is not stored in memory, the OUTPUT LEVEL of
all unnecessary operators should be set to 0.
In order to maintain constant overall output level even
when changing algorithms, the output level of all the
carrier operators have been preset to asuitable value.
•KEY TRANSPOSE
KEY
TRANSPOSE
20
nie 1
MIDDLE nil
c=i_. .3
This value will change 3
Transposes pitch over a±1 octave range in semitone steps
with C3 as standard. Press the |KEY TRANSPOSE |,and
then the keyboard key corresponding to the desired
amount of transposition according to the illustration on
page 16. To transpose up one octave, for example, press
the IKEY TRANSPOSE |key and then press C4 on the key-
board.
^
^
<I5>

KEY TRANSPOSE
^^^^_
^^^^H
^I^^B
^^^^
^^^^_
^
—
^^^^^
^^^^^
^^^^^
^^^B
^^^^_
^^^^*
^^^^_
*^ ^^^^^
u^^^^^
^^^^"
*n ^^^^^
Q^^^^*
^^. ^^^^_
<t ^^^^^
41- ^^^^^
U- ^JJ^^H
^^^^^
M
U^^^^*
^^^^^
^^^^^
^^^^^
^^^^*
^^^^_
I^^H
c3t-
O)
c
O'a-',
D-
t/>
C11
ro ^—
1
M'-H II
c•*—
1
^^o
5
>^LU
—-<D —•-J
^G o
^°too
a: '~ _!•-«
i^^ crsi
o
O
x:
o7^t^^^—
H
ii2-S=3- —-"
CO
O
OL
w
z
<
cc
\-
>
o
c
Ero
<I6>

STORE/SAVE /LOAD
STORE/SAVE/LOAD
The DX9 used the following functions to move voice data
from one location to another:
1. STORE
Stores avoice being edited in the "edit buffer" into one
of the preset memory locations.
2. SAVE
Saves all 20 voices from the internal memory onto an
external cassette tape.
3. LOAD
Loads aentire block of 20 voices or asingle voice from
external cassette tape into the internal memory.
•SAVE/LOAD Cautions
Note the following points when loading voices from the
supplied voice tape or when saving or verifying newly
created voices onto atape:
1) The supplied voice data cassette tape (master tape) con-
tains the same data on both sides Aand B. However, the
method in which the recordings were made differs be-
tween sides Aand Bto provide compatibility with all
types of cassette tape recorders. If an error occurs during
aLOAD operation, and if adjusting the level (volume)
fails to correct the error, reverse the cassette tape and
LOAD the data from side B. This should correct the
problem.
2} During aSAVE or LOAD operation, don't pick the tape
recorder up and move it, and don't subject it to ashock
of any kind. Be careful not to touch the connections
either, since doing so may cause an error.
3) Always use the same cassette recorder when handling
DX9 data. Using adifferent tape recorder may make
LOAD operations difficult to execute.
4) It's agood idea to make abackup copy of the master
voice data cassette tape, and always use your backup
copies for day to day operations. That way, if your
tape is damaged in any way, you can always make
another new backup copy from the master. Refer to
the section on loading data. When making abackup
copy, LOAD the data from the master tape into the
DX9 memory, group by group. Then, put afresh tape
in the cassette recorder and read the data back onto
the new tape with the SAVE command.
5} Before you SAVE voice data onto acassette tape, index
the tape by making amicrophone recording of the
information you need prior to the start of voice data
recording on the tape.
6} It's not possible to copy voice data from one tape to
another by dubbing the tape between cassette recorders.
Always LOAD the data into the DX9 memory first,
then SAVE it on afresh cassette tape.
1. MEMORY PROTECT
When voices are loaded from external cassette tape or
edited voices are stored in memory, the previous voice is
erased. Turning the MEMORY PROTECT function ON
makes it impossible to accidentally erase voice data. MEM-
ORY PROTECT must be turned OFF in order to carry
out any LOAD or STORE operation. MEMORY PROTECT
is automatically turned ON whenever the instrument's
power switch is turned ON. Always be sure to turn the
MEMORY PROTECT function back ON after loading or
storing voices.
FUNCTION
Set to Function
mode, and press the
FUNCTION CONTROL
MEM. PROTECT! OFF
Data Entry controls
Set the display to
"ON" or "OFF".
2. STORE
Voices that have been edited or entirely new voices are
not automatically programmed into one of the internal
memory locations. Voices are edited and created in a
buffer, and must be STORED in one of the memory
locations for use.
1) Turn MEMORY PROTECT OFF.
2) Press MEMORY SELECT, then hold the ISTOREJ key
and press the preset key to which you want to program
the new voice.
^
MEMORY
SELECT
Set to
Function mode,
and set the Memory Protect
to "OFF".
—
V
^V] Press the Memory Select key.
STORE
^While pressing
the Store key,
1'\ 20:
:^\
press the key for the voice
number to be stored.
When avoice is STORED in this manner, the voice data
that was previously in that memory location is erased, so
be sure that you either have acopy of the voice on tape
or don't need the voice before erasing it with aSTORE
operation. Be sure to turn MEMORY PROTECT back on
after the STORE OPERATION.
^
<I7>

r
r
•Connecting aCassette Recorder
Connect the cassette recorder to the DX9 using the
supplied connection cable as follows:
Connections
Handytype
Cassette tape
recorder to the EARPHONE jack
'=LkJlJl3ni'
to the MIC jack
to the REMOTE jack
White cord
Red cord
Black cord
1) Connect the DX9 "IN" terminal and the cassette
recorder's "EARPHONE" or "HEADPHONE"
jack with the white cord.
2) Connect the DX9 "OUT" terminal and the cas-
sette recorder's "MIC" jack with the red cord.
3) Connect the DX9 "REMOTE" terminal and the
cassette recorder's "REMOTE" terminal with the
black cord. (No connection required for cassette
recorders that do not have aREMOTE terminal)
3. SAVE
The SAVE functions saves all 20 voices in the internal
memory to an external cassette tape.
1) Make sure the cassette recorder is connected properly
and load the cassette tape to which you wish to SAVE
the DX9's internal voices.
2) Enter the FUNCTION mode and set the display to read
"SAVE TO TAPE? "using the |SAVE/VERI FY| key.
3) Press the |YES| key and the display will read "from
MEM to TAPE all ready?". Press the |YES| key again
and the "ready" portion of the display will disappear
and the SAVE operation will begin.
Press the
^^. key
y
key
key again
FUNCTION CONTROL
SRUE TO TftPE "
SAVE K\
Press the
YES fron MEM to TAPE
all ready?
:iV\
Press the
YES fron MEM to TAPE
all .
ON \^
The "ready" portion will disappear
and Save operation will begin.
4} After abrief pause anumber "1" will appear in place of
"ready" indicating that the first voice Is being saved.
Each voice is indicated as it is saved (1—20).
When the SAVE operation Is completed, the display will
read "VERIFY TAPE ready?".
4. VERIFY
The VERIFY funcion checks to make sure that all the
voices were properly saved on external cassette tape by a
SAVE operation. It is advisable to always use the VERIFY
function after saving agroup of voices to prevent accidental
loss of voices due to improper connections or other faults
during the SAVE process. Also, be sure to VERIFY the
same group of voices that were saved or an ERROR mes-
sage will result.
1) Set the cassette tape to the beginning of the voice
group to be verified.
2) Make sure that the cassette recorder headphone jack
is properly connected to the DX9.
3) Press the cassette recorder PLAY button, then press
the DX9 lYESl key. The tape will begin to play and a
pilot tone will be heard.
<I8>

4) Adjust the cassette recorder volume control so that
the pilot tone is at acomfortable listening level.
5) When the data signal begins {a discontinuous tone)
the bottom right hand corner of the display should
read "1" through "20" as each voice is verified. When
verification is complete the display will read "OK"
followed by "VERIFY COMPLETED".
UERIF'- TfiPE
1-Display will read
"1" through "20"
UERIF
OK
!
I.) TAPE
20
Display shows indicats "OK!",
The VERIFY operation can be carried out directly
(not necessarily immediately following aSAVE opera-
tion} by using the 1SAVE/VERIFY |key to set the
display to "VERIFY TAPE?" in the FUNCTION
mode.
•REMOTE
Normally when the cassette recorder's remote termi-
nal is connected to the DX9 with the FUNCTION
CONTROL TAPE REMOTE OFF, the tape will not
run until either the LOAD or SAVE function Is initi-
ated even if the Play or Record controls are engaged.
The REMOTE function makes it possible to start or
stop the tape to facilitate locating the beginning of
voice groups, etc.
1} Press the [REMOTE] key.
10
REMO
FUNCTION CONTROL
TAPE REMOTE :OFF
2} Press the ION |key.
FUNCTION CONTROL
TRPE REMOTE :ON
YES
This turns remote control ON so the tape recorder
can be run as required.
5. LOAD
Two types of LOAD functions are provided: LOAD, with
which an entire group of 20 voices is loaded, and LOAD
SINGLE, with which any desired single voice can be loaded.
1) LOADing an entire 20-voice group.
(1) Make sure the cassette recorder is properly con-
nected to the DX9, insert the cassette containing the
desired voice group, and set the tape to the beginning of
that voice group (disengage the remote control function
to do this). Stop the cassette recorder.
(2) Turn MEMORY PROTECT OFF.
FUHCTIOH CONTROL
MEn. PROTECT: OFF
(3) Press the |LOAD |key and then the |YES| key and
the display will read "from TAPE to MEM all ready? "
(the remote control function is re-engaged),
(4} Make sure the cassette recorder's headphone jack
is connected to the DX9 and press the cassette recorder
PLAY button.
(5) Press the |YES |key and the "ready?" portion of the
display will disappear, the tape will begin to run, and the
pilot tone will be heard.
(6) Adjust the cassette recorder volume control to set
the pilot tone at acomfortable listening level.
(7) When the data signal begins the bottom right hand
corner of the display will read "1" through "20" as the
corresponding voices are loaded into the internal memory.
frori TOPE to MEM
all 1Display will read
""1" through "20"
(8) When the LOAD operation is completed the DX9
PLAY mode will be engaged and the cassette recorder
will stop.
•Using aCassette Recorder with No REMOTE Terminal
The SAVE and LOAD procedures are basically same for
cassette recorders with or without aREMOTE terminal.
When there is no REMOTE terminal, the cassette recorder
must manually be set to the record or piay mode after the
ISAVE Ior ILOAD \and |YES |keys have been pressed
("ready?" display}.
^^
^^.
<I9>
Other manuals for DX9
4
Other Yamaha Synthesizer manuals

Yamaha
Yamaha Clavinova CVP-609 User manual

Yamaha
Yamaha CS-10 User manual

Yamaha
Yamaha Clavinova CVP-98/CVP-96 User manual

Yamaha
Yamaha DX9 User manual

Yamaha
Yamaha SY-2 User manual

Yamaha
Yamaha S90 Instruction Manual

Yamaha
Yamaha MOTIF 6 Instruction Manual

Yamaha
Yamaha PF-1500 User manual

Yamaha
Yamaha PortaTone PSR-8000 User manual

Yamaha
Yamaha Clavinova CLP-300 User manual