Yardbird 21833 User manual

Operator’s Manual
Original Operating Instructions
Manuel de l’utilisateur
Manual del operador
Chicken Plucker
Plumeuse à volaille
Desplumadora de pollos
P/N: 23510
ECN: 10960
REV1: 12/22/2015
©2015 Ardisam, Inc.
All Rights Reserved.
Tous droits réservés
Todos los derechos reservados.
Get parts online at
Pièces détachées en ligne à
Obtenga piezas en línea en
www.yardbirdpluckers.com
GAS/OIL
RATIO
50:1
SN
Includes Model - Inclut le modèle - Incluye el modelo:
21833

Operator’s Manual
Chicken Plucker
Check for parts online at www.yardbirdpluckers.com or call 800-345-6007 M-F 8-5
2
INTRODUCTION
Thank you for purchasing a plucker from Yardbird. We have worked to ensure that this plucker meets the highest standards for
usability and durability. With proper care, your plucker will provide many years of service.
Please read this entire manual before installation and use. Yardbird reserves the right to change, alter or improve the product and
this document at any time without prior notice.
CONTENTS
Introduction/Registration and Service.................................................................................................................................................................................2
Features ...........................................................................................................................................................................................................................................3
Specications.................................................................................................................................................................................................................................4
Wiring Diagram.............................................................................................................................................................................................................................4
Warnings and Safety Precautions...........................................................................................................................................................................................5
Safety Decals..................................................................................................................................................................................................................................6
General Operating Safety...................................................................................................................................................................................................... 7-8
Assembly.................................................................................................................................................................................................................................... 8-9
Operation......................................................................................................................................................................................................................................10
Tips and Recommendations............................................................................................................................................................................................10-11
Maintenance ................................................................................................................................................................................................................................11
Troubleshooting Chart.............................................................................................................................................................................................................11
Illustrated Parts Breakdown............................................................................................................................................................................................. 12-14
Warranty ........................................................................................................................................................................................................................................15
Registration and Service
Record the product model number and serial number in the space provided for
easy reference when ordering parts or requesting technical support. The war-
ranty is valid only if the completed registration is received by Yardbird within
30 days of purchase. (SEE WARRANTY SECTION FOR MORE INFORMATION)
You can register your warranty online by visiting www.yardbirdpluckers.com,
or by mailing it to:Yardbird, 1160 8th Avenue, Cumberland,WI 54829. You may
also call our customer service department at (800) 345-6007 Mondays through
Fridays from 8 a.m. to 5 p.m. CST.
SERIAL
NUMBER
DECAL
OWNERSHIP RECORDS
Owner’s Name:
Owner’s Address:
City: State/Province: Zip Code/Postal Code:
Model Number: Serial Number:
Date of Purchase:
Notes:
Read and keep this manual for future reference. This manual contains important information on SAFETY, ASSEMBLY, OP-
ERATION, AND MAINTENANCE. The owner must be certain that all the product information is included with the unit. This
information includes the MANUAL, the REPLACEMENT PARTS and the WARRANTIES. This information must be included to
make sure state laws and other laws are followed. All persons to whom rent/loan this unit must have access to and under-
stand this information. This manual should remain with the product even if it is resold.

Operator’s Manual
Chicken Plucker
Check for parts online at www.yardbirdpluckers.com or call 800-345-6007 M-F 8-5 3
FEATURES
GFCI PLUG
LONG LEGS
SAFETY
PROXIMITY
SWITCH
SHORT LEG
TRANSPORT
WHEELS
CIRCUIT
BREAKER
ON/OFF
SWITCH
TUB
FEATHER
PLATE
FEATHER
CHUTE
FEATHER
PAN

Operator’s Manual
Chicken Plucker
Check for parts online at www.yardbirdpluckers.com or call 800-345-6007 M-F 8-5
4
POWER TYPE 120V SINGLE PHASE
WHEELS INCLUDED YES, 2
HORSEPOWER 1.5
ROTATIONAL SPEED RPM 300
FINGERS 110
CARTON HEIGHT TOP TO BOTTOM INCHES 20.7
CARTON WIDTH SIDE TO SIDE INCHES 21.6
CARTON DEPTH FRONT TO BACK INCHES 21.6
ASSEMBLED HEIGHT TOP TO BOTTOM INCHES 36
ASSEMBLED WIDTH SIDE TO SIDE INCHES 30.6
ASSEMBLED DEPTH FRONT TO BACK INCHES 26.7
VOLTAGE VOLTS 120
WATTAGE WATTS 1100
MINIMUM CIRCUIT RATING AMPS 15
GROSS WEIGHT POUNDS 88
NET WEIGHT POUNDS 83
REMOVABLE TUB YES
DRIVE TYPE GEAR
DRIVE DETAILS HELICAL CUT ALLOY STEEL GEARS
IRRIGATION RING YES
FINISH STAINLESS STEEL AND POWDER COAT
SPECIFICATIONS
HARDWARE FINISH CLEAR ZINC
PRIMARY MATERIAL STAINLESS STEEL
PIECES INCLUDED 1 TUB, 1 FEATHERPLATE, 1 WARRANTY
CARD, 1 SET HARDWARE, 1 DRIVE ASSEMBLY, 3 LEGS,
2 WHEELS, 1 OWNER’S MANUAL, 2 AXLES
WEATHER RESISTANT YES
CORROSION RESISTANT YES
UV RESISTANT YES
ANTIMICROBIAL YES
HEAVY DUTY YES
CORD INCLUDED YES
TUB PROXIMITY SAFETY SWITCH YES
OUTDOOR USE YES
COMMERCIAL USE NO
CORD LENGTH INCHES 72
GFCI YES
ASSEMBLY REQUIRED YES
TOOLS NEEDED FOR ASSEMBLY WRENCHES
PRODUCT WARRANTY ONE YEAR
CSA CERTIFIED YES
~
Leakage Protection
L1 2 1 2
L
E
E
Green
Grounding
1 2 1 2
ZJ
Toggle Switch
Relay
Magnetic Switch
Start Winding
Run Winding
Capacitor
WIRING DIAGRAM
~
Leakage Protection
L1 2 1 2
L
E
E
Green
Grounding
1 2 1 2
ZJ
Toggle Switch
Relay
Magnetic Switch
Start Winding
Run Winding
Capacitor

Operator’s Manual
Chicken Plucker
Check for parts online at www.yardbirdpluckers.com or call 800-345-6007 M-F 8-5 5
WARNINGS AND SAFETY PRECAUTIONS
Owner’s Responsibility
Accurate assembly, and safe and eective use of the plucker is
the owner’s responsibility.
• Read and follow all safety instructions.
• Carefully follow all assembly instructions.
• Maintain the plucker according to directions and
schedule included in this Yardbird operator’s manual.
• Ensure that anyone who uses the plucker is familiar
with all controls and safety precautions.
Special Messages
Your manual contains special messages to bring attention to
potential safety concerns, machine damage as well as helpful
operating and servicing information. Please read all the infor-
mation carefully to avoid injury and machine damage.
NOTE: General information is given throughout the
manual that may help the operator in the
operation or service of the machine.
Important Safety Precautions
Please read this section carefully. Operate the plucker accord-
ing to the safety instructions and recommendations outlined
here and inserted throughout the text. Anyone who uses this
plucker must read the instructions and be familiar with the
controls. Learn how to control the chicken plucker at all times.
This symbol points out important safety
instructions which if not followed could endan-
ger your personal safety. Read and follow all
instructions in this manual before attempting
to operate this equipment.
• Do not allow children to operate this chicken plucker. Keep
small children away from the area while chicken plucker is
in use. Do not allow adults to operate the chicken plucker
without proper instruction.
DANGER
DANGER INDICATES A SERIOUS INJURY OR FATALITY
WILL RESULT IF THE SAFETY INSTRUCTIONS THAT
FOLLOW THIS SIGNAL WORD ARE NOT OBEYED.
WARNING
WARNING INDICATES A HAZARD WHICH, IF NOT
AVOIDED, COULD RESULT IN DEATH OR SERIOUS
INJURY AND/OR PROPERTY DAMAGE.
CAUTION
CAUTION INDICATES YOU OR YOUR EQUIPMENT
CAN BE HURT IF THE SAFETY INSTRUCTIONS THAT
FOLLOW THIS SIGNAL WORD ARE NOT OBEYED.
WARNING
YOU MUST READ, UNDERSTAND AND COMPLY WITH
ALL SAFETY AND OPERATING INSTRUCTIONS IN
THIS MANUAL BEFORE ATTEMPTING TO SETUP AND
OPERATE YOUR PLUCKER.
FAILURE TO COMPLY WITH ALL SAFETY AND
OPERATING INSTRUCTIONS CAN RESULT IN LOSS OF
MACHINE CONTROL, SERIOUS PERSONAL INJURY TO
YOU AND/OR BYSTANDERS,AND RISK OF EQUIPMENT
AND PROPERTY DAMAGE.THETRIANGLE INTHE TEXT
SIGNIFIES IMPORTANT CAUTIONS OR WARNINGS
WHICH MUST BE FOLLOWED.
IMPORTANT
IMPORTANT INDICATES HELPFUL INFORMATION
FOR PROPER ASSEMBLY, OPERATION, OR
MAINTENANCE OF YOUR EQUIPMENT.
WARNING
CALIFORNIA PROPOSITION 65 WARNING
THIS PRODUCT CONTAINS CHEMICALS KNOWN
TO THE STATE OF CALIFORNIA TO CAUSE CANCER,
BIRTHDEFECTS,OR OTHERREPRODUCTIVEHARM.
Intended Use /
Foreseeable Misuse
This is a plucker designed to remove feathers
from poultry. It shall not be used for any other purpose.

Operator’s Manual
Chicken Plucker
Check for parts online at www.yardbirdpluckers.com or call 800-345-6007 M-F 8-5
6
SAFETY DECALS
This unit has been designed and manufactured to provide you with the safety and reliability you would expect from an industry
leader in outdoor power equipment manufacturing.
Although reading this manual and the safety instructions it contains will provide you with the necessary basic knowledge to oper-
ate this equipment safely and eectively, we have placed several safety labels on the unit to remind you of this important infor-
mation while you are operating your unit.
All DANGER, WARNING, CAUTION and instructional messages on your unit should be carefully read and obeyed. Personal
bodily injury can result when these instructions are not followed. The information is for your safety and it is important! The safety
decals below are on your unit.
If any of these decals are lost or damaged, replace them at once. See your local dealer or contact Yardbird directly for replace-
ments.
These labels are easily applied and will act as a constant visual reminder to you, and others who may use the equipment, to follow
the safety instructions necessary for safe, eective operation.
Part No. 23723
HIGH TORQUE MOTOR
Tub Decal
Part No. 23724
ELECTRICAL SHOCK HAZARD
Tub Decal
Part No. 23725
KEEP HANDS CLEAR
Tub Decal

Operator’s Manual
Chicken Plucker
Check for parts online at www.yardbirdpluckers.com or call 800-345-6007 M-F 8-5 7
GENERAL OPERATING SAFETY
• Read, understand, and follow all instructions in the
manual and on the unit before starting
• Dress appropriately when operating the machine.
Always wear sturdy footwear and safety goggles. Never
wear sandals, sneakers or open shoes, and never operate
the plucker with bare feet. Do not wear loose clothing
that might get caught in moving parts.
• Only allow responsible adults, who are familiar with the
instructions, to operate the unit.
• Do not allow children to operate this machine. Adults
should not operate the machine without proper
instruction.
• Always maintain secure footing and solid balance while
starting or operating the chicken plucker.
• Operate the machine only in daylight or good articial
light.
• Do not operate the unit while under the inuence of
alcohol or drugs.
• Always wear eye protection when operating this unit.
• Keep in mind the operator is responsible for accidents
occurring to other people or property.
• Never operate the machine without proper guards,
plates, or other safety protective devices in place.
PRODUCTSPECIFIC SAFETY
• Do not put hands or feet near rotating parts or under
the machine. Keep clear of the discharge openings at all
times.
• Keep all screws, nuts and bolts tight.
• Never leave the machine running unattended. Always
move the unit to a safe storage area when not in use.
• Unplug the unit before performing any maintenance,
repairs, or adjustments while the unit is running.
• Never put live birds in the plucker. All birds must be
properly killed and scalded before processed in the
plucker.
• Turn o machine and wait for plucker to come to a
complete stop before removing birds or feathers from
the machine. Do not place arms, hands, or other body
parts inside machine while processing or spinning.
• Keep hands out of feather chute. Do not attempt to clear
feathers or other debris from feather chute with the unit
plugged in. Unplug unit before cleaning or removing
foreign matter, such as bird heads, from the plucker.
• Never tamper with, disable, or remove the GFCI (Ground-
Fault Circuit Interupter).
DANGER
ELECTRICAL SHOCK HAZARD.THIS UNIT IS EQUIPPED
WITH A GFCI GROUNDFAULT CIRCUIT INTERUPTER
THAT PRTOECTS THE OPERATOR. NEVER TAMPER
WITH, DISABLE, OR REMOVE THE GFCI.
DANGER
THIS PRODUCT HAS A HIGH TORQUE MORTOR. TO
PREVENT SERIOUS PERSONAL INJURY DO NOT WEAR
LOOSE CLOTHING. HAIR MUST BE PULLED BACK.
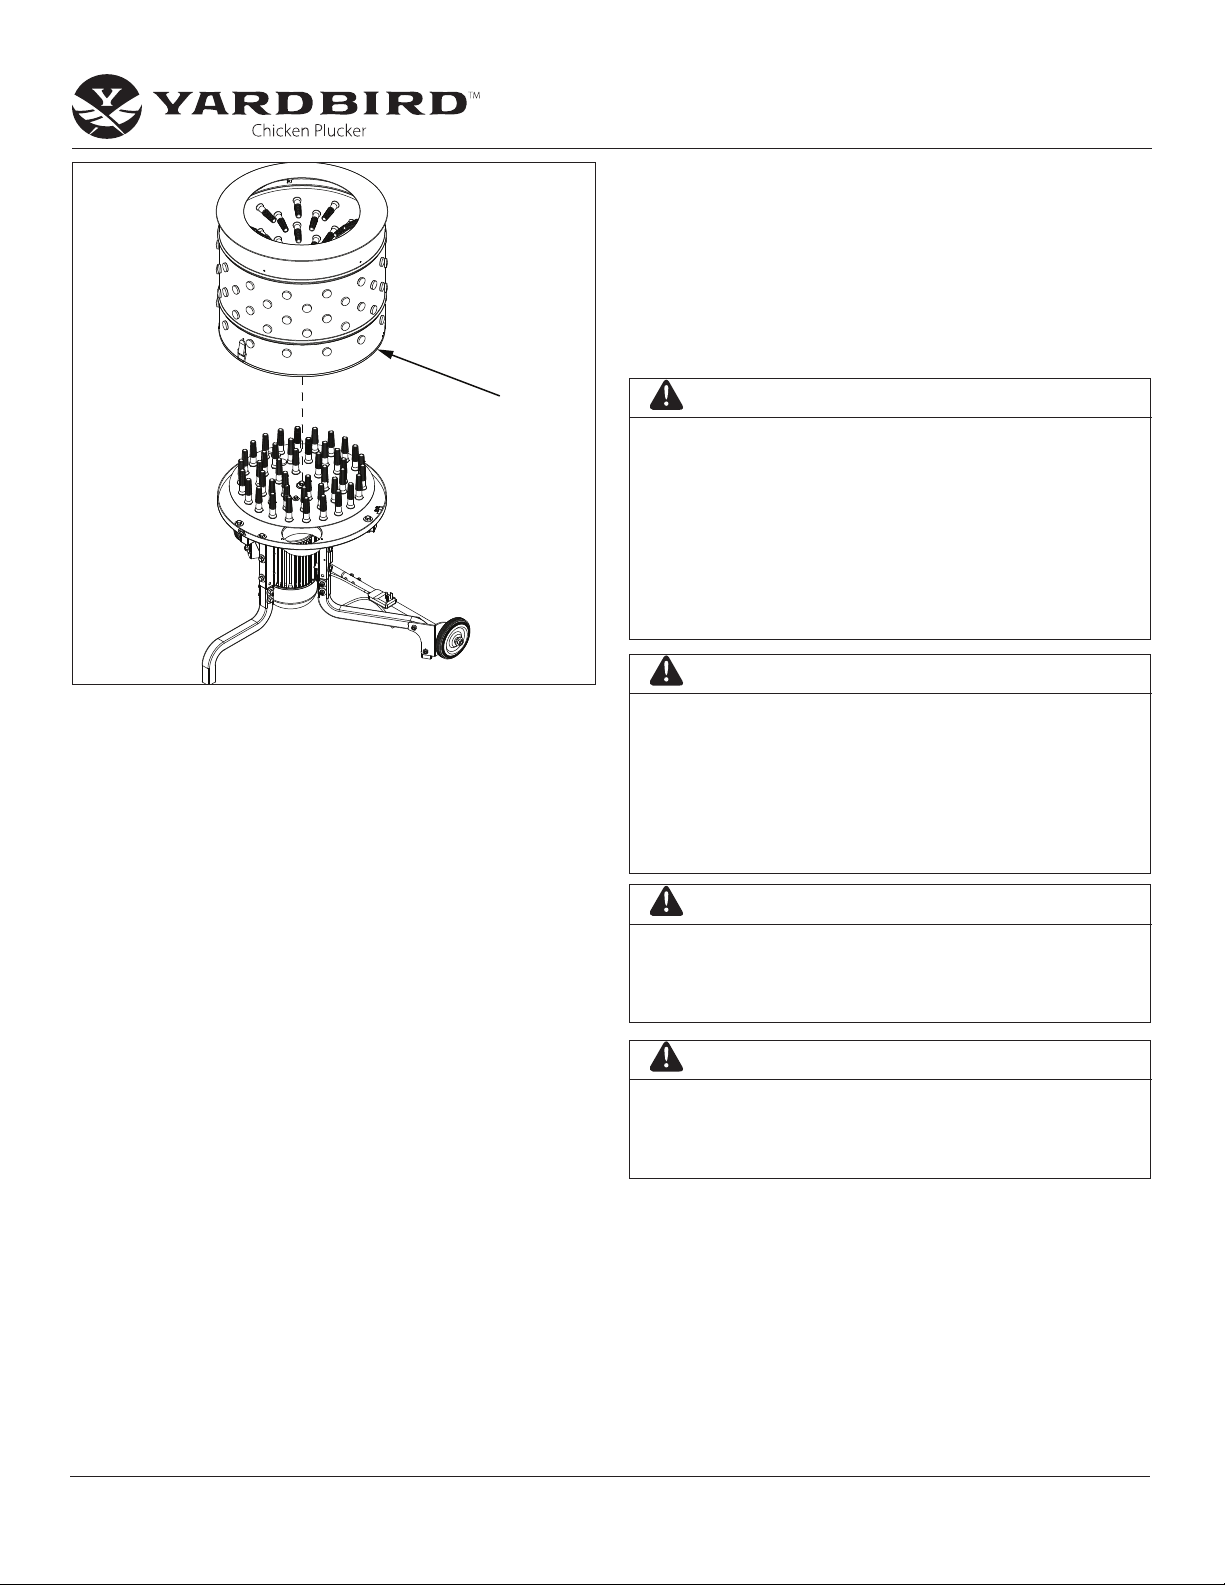
DANGER
NEVER OPERATE MACHINE WITHOUT THE PLUCKING
TUB IN PLACE, AS BODY PARTS CAN GET WRAPPED
BETWEEN THE FEATHER PLATE AND THE FEATHER
PAN. A SAFETY PROXIMITY SWTICH DOES NOT ALLOW
OPERATION WITHOUT THE TUB. DO NOT DISABLE
THIS SWITCH.
IF SWTICH DOES NOT STOP UNIT OPERATION WHEN
TUB IS REMOVED FROM FEATHER PAN, REPLACE
SWITCH.
WARNING
KEEP HANDS CLEAR OF THE MOVING PARTS. NEVER
PUT HANDS OR ANY OTHER BODY PARTS BELOW THE
TOP OF THE PLANE OF THE PLUCKING TUB WHILE THE
PLUCKER IS RUNNING.
DANGER
KEEP HANDS OUT OF FEATHER CHUTE. DO NOT
ATTEMPT TO CLEAR FEATHERS OR OTHER DEBRIS
FROM FEATHER CHUTE WITH THE UNIT PLUGGED IN.
UNPLUG THE UNIT BEFORE CLEANING OR REMOVING
FOREIGN MATTER, SUCH AS BIRD HEADS, FROM THE
PLUCKER.
DANGER
KEEP ELECTRICAL CORDS SUSPENDED ABOVE
SURFACES THAT COLLECT WATER. THIS DEVICE USES
ELECTRICITY AND WATER TO EFFICIENTLY AND
EFFECTIVELY PLUCK BIRDS. TAKE NOTE OF WHERE
THE WATER IS POOLING AND KEEP ELECTRICAL
CONNECTIONS AWAY FROM POOLS OF WATER.
ELECTRICAL CONNECTIONS AND CORDS SHOULD
NEVER BE SUBMERGED.

Operator’s Manual
Chicken Plucker
Check for parts online at www.yardbirdpluckers.com or call 800-345-6007 M-F 8-5
8
• Keep all electrical cords and connections away from
pools of water. Electrical cords and connections should
never be submerged in water.
UNPACKING AND ASSEMBLY
Tools Required for Assembly:
• 10mm wrench (2)
• 13mm wrench (2)
• 16mm wrench (1)
ASSEMBLY
1. Open top of carton and remove the Styrofoam inner
pack with the hole in the middle. SEE FIGURE 1
2. Place Styrofoam on a level surface in your assembly
area. Remove the gear-motor/feather pan assembly and
place it shaft down (motor up) through the hole in the
Styrofoam.
3. Remove the remaining contents of the package and
verty that you have recieved:
a. Carton contents:
• Axle (2)
• Feather plate
• Feather tub
• Long Legs (2)
• Short leg
• Wheel (2)
b. One parts bag containing:
• Bolt M8 x 1.25 x 40 (6)
• Bolt M8 x 1.25 x 20 (1)
• Bolt M6 x 1.0 x 28 (2)
• Washer M8 x 24 x 2.2 Flat (12)
• Washer M8 Spring Lock (7)
• Washer M8 x 30 Domed (1)
• Washer M6 Spring Lock (2)
• Washer M10 Flat (2)
• Nut M6 x 1.0 Nylock (2)
• Nut M10 Nylock (2)
• Carabiner (4)
4. Assemble wheel to axle (SEE FIGURE 2). For each axle
component:
a. Install wheel onto threaded end of axle component.
b. Install M10 washer against outside of wheel,
then a M10 nut against the washer. Use a 16mm
wrench to tighten the wheel nut until it bottoms out
on the washer and the nylon locking feature on the
nut is fully engaged by the axle thread.
5. Assemble legs to gear-motor/feather pan assembly.
(SEE FIGURE 3)
a. Assemble two long legs on either side of the motor
junction box and align holes. Insert short leg in the
remaining leg post.
NOTE: Each leg is unique and not interchangeable. The
long legs with the axle brackets attached should be
assembled so that the axle brackets are parallel with
each other. (SEE FIGURE 3)
b. For each leg, install two M8x40 bolts and two M8 at
washers through one side of the leg, and insert two M8
at washers, two M8 spring lock washers, and two M8
nylock nuts on the opposite side. Tighten using a 13mm
wrench.
6. Assemble axle to legs. (SEE FIGURE 4 & 5)
a. Slide axle components through each axel bracket and
align holes. Assemble two axle components together
using two M6 bolts, two M6 spring lock washers, and
two M6 nylock nuts.
b. Flip gear-motor/feather pan right side up so it stands
on the legs.
7. Remove feather plate from tub.
NOTE: Removal of feather plate is easiest if plate is
turned on its side and lifted out at an angle.
8. Insert key in output shaft. (SEE FIGURE 6)
9. Align keyway in feather plate with key in shaft and push
down into place.
NOTE: Notch in feather plate does not always align with
the keyway in the feather plate hub.
10. Assemble 8mm bolt, M8 lock washer, and 8mm domed
spacer over shaft. Tighten with 13mm wrench.
(SEE FIGURE 6)
11. a. Place tub in feather pan.
NOTE: Magnetic read switch in feather pan MUST align
with magnet in tub. Align arrow label on tub to arrow
on feather pan. (SEE FIGURE 7)
b. Lock latches into place. Carabiners are included for
secure locking.
c. Place bucket (not included) under feather chute.
d. Attach garden hose (not included).
NOTE: It is recommended that you attach a valve to tub
and then attach a garden hose. This allows the operator
to shut the water o locally and not at the spigot.
If a “Y” valve is used, a second hose can be used for
washdown and scalder lling.

Operator’s Manual
Chicken Plucker
Check for parts online at www.yardbirdpluckers.com or call 800-345-6007 M-F 8-5 9
FIGURE 1
M8 NYLOCK
NUT M8
WASHER
WHEEL AXLE
ASSEMBLED WHEEL
AND AXLE SET
FIGURE 2
M8 X 40 BOLT
M8 WASHER M8 NYLOCK
NUT
M8 SPRING
LOCK WASHER
FIGURE 3
M6 BOLT
M6 SPRING
LOCK WASHER
M6 NYLOCK
NUT
FIGURE 4
FIGURE 5
KEY FEATHER
PLATE
DOMED
SPACER
M8 NYLOCK
NUT
M8 X 20
BOLT
FIGURE 6

Operator’s Manual
Chicken Plucker
Check for parts online at www.yardbirdpluckers.com or call 800-345-6007 M-F 8-5
10
OPERATION
Pre-Start Inspection
1. Make sure all safety features are opeartional, including
the GFCI and tub proximity switch.
2. Check that all nuts and bolts are secure.
NOTE: All hardware (nuts, bolts, etc) should be checked
for tightness before each use. Vibration of machine
can cause them to loosen.
3. Keep electrical connections out of areas where water can
pool.
Start Up
1. Each time the chicken plucker is plugged in, you must
press the reset button on the GFCI. The machine will not
start without this step.
NOTE: Never disable the GFCI. The operator is often
standing in a pool of water while operating this
electrical device. The GFCI ensures that all of the power
is used by the motor and none of the power becomes a
shock hazard.
2. Flip the toggle switch to the ON position before putting
the birds into the plucker. Starting the plucker with
birds in contact with the feather plate add to the current
draw of the machine and lessen the life of the electrical
components.
3. Turn irrigation ring on.
4. Drop one or two properly scalded birds into plucker and
let machine process until feathers are removed.
Tips and Recommendations
1. Yardbird recommends handling birds by the feet and slit-
ting the carotid artery while the bird is contained in a kill
cone to limit bruising and trauma. The birds will also pluck
better if they are not stressed.
2. Scalding water should be approximately 140-150 degrees
Fahrenheit. Scald water is hot enough to burn the opera-
tor. Using thick rubber gloves is recommended. Plunging
the birds in and out of the water while wearing thick
rubber gloves allows the water to penetrate to the skin of
WARNING
KEEP HANDS CLEAR OF THE MOVING PARTS. NEVER
PUT HANDS OR ANY OTHER BODY PARTS BELOW THE
TOP OF THE PLANE OF THE PLUCKING TUB WHILE THE
PLUCKER IS RUNNING.
DANGER
KEEP ELECTRICAL CORDS SUSPENDED ABOVE
SURFACES THAT COLLECT WATER. THIS DEVICE USES
ELECTRICITY AND WATER TO EFFICIENTLY AND
EFFECTIVELY PLUCK BIRDS. TAKE NOTE OF WHERE
THE WATER IS POOLING AND KEEP ELECTRICAL
CONNECTIONS AWAY FROM POOLS OF WATER.
ELECTRICAL CONNECTIONS AND CORDS SHOULD
NEVER BE SUBMERGED.
DANGER
ELECTRICAL SHOCK HAZARD.THIS UNIT IS EQUIPPED
WITH A GFCI GROUNDFAULT CIRCUIT INTERUPTER
THAT PRTOECTS THE OPERATOR. NEVER TAMPER
WITH, DISABLE, OR REMOVE THE GFCI.
DANGER
NEVER OPERATE MACHINE WITHOUT THE PLUCKING
TUB IN PLACE, AS BODY PARTS CAN GET WRAPPED
BETWEEN THE FEATHER PLATE AND THE FEATHER
PAN. A SAFETY PROXIMITY SWTICH DOES NOT ALLOW
OPERATION WITHOUT THE TUB. DO NOT DISABLE
THIS SWITCH.
IF SWITCH DOES NOT STOP UNIT OPERATION WHEN
TUB IS REMOVED FROM FEATHER PAN, REPLACE
SWITCH.
TUB
FIGURE 7
A properly scalded bird will pluck in about 15 seconds.
Shut Down
1. To shut down the chicken plucker, ip the toggle switch
to the OFF position.
NOTE: Do NOT retrieve bird unless unit has come to a
complete stop.
2. Unplug GFCI when you are done using the machine.

Operator’s Manual
Chicken Plucker
Check for parts online at www.yardbirdpluckers.com or call 800-345-6007 M-F 8-5 11
the bird and keeps hands cool.
3. Mixing dish soap with the scald water allows the hot water
to penetrate to the skin. Birds have oil on their feathers
and breaking down the oil allows the hot water to get to
the skin. The hot water relaxes the muscles holding the
feathers in place.
4. Change the scald water when it gets dirty and/or oily.
5. The birds should go directly from the scalder to the pluck-
er. The more time between the two steps allows rigor to
set in and the wings and legs will shield portions of the
bird if they get too sti.
6. For poultry, use the largest feathers to test the scalding
process. Once the largeset feather can be pulled out easily
by hand, the plucker will rapidly remove all of the feathers.
Large feathers are on the wings and tail.
7. If the plucker is ripping the skin of bird, the bird was scald-
ed too long or the scald water is too hot.
8. The Yardbird can handle up to two eight pound birds at
the same time.
9. There are many resources for killing, scalding, and evis-
cerating on the internet. One technique does not t the
needs of every user and over time you will hone the pro-
cess to your needs.
10. Waterfowl are much more dicult to pluck than poultry.
However, waterfowl have been plucked successfully with
the Yardbird plucker.
Waterfowl are extremely oily and require more soap in
the scald water to break down the oil. Unlike poultry, test
feathers on waterfowl should be pulled from the regions
that hold feathers fast (breast and pelvis).
When plucking waterfowl, monitor the build up of oil
in the scald water. Change the water or add dish soap
accordingly.
MAINTENANCE
Cleaning
Clean chicken plucker after every use.
To clean chicken plucker:
1. Run the plucker for two minutes with the irrigation ring
on. This will ush most of the feathers on the plate and in
the feather pan out of the unit through the feather chute.
2. Disassemble tub from feather pan. Remove feathers and
debris.
NOTE: Water and bleach are recommended as cleaning
agents.
3. Tip remainder of unit away from user and spray water
under feather plate to remove any feathers or debris be-
tween the feather plate and the feather pan.
4. Disassemble feather plate, inspect area around shaft and
clean out feathers and debris.
NOTE: This step only needs to be done once a year.
• The Yardbird has no belts and the motor and the gearbox
are sealed and maintenance free.
• Whenever the feather plate is disassembled (once a year)
grease the shaft with a food grade grease so that the
feather plate can be disassembled with ease the next year.
• Inspect natural rubber plucker ngers for cracks and tears.
Replace with Yardbird plucker ngers.
• Even though the plucker is designed to run outdoors,
exposed to water and sunlight, it is best to keep the unit
stored indoors or covered. This will preserve the life of the
rubber ngers and motor components.
DANGER
KEEP HANDS OUT OF FEATHER CHUTE. DO NOT
ATTEMPT TO CLEAR FEATHERS OR OTHER DEBRIS
FROM FEATHER CHUTE WITH THE UNIT PLUGGED IN.
UNPLUG THE UNIT BEFORE CLEANING OR REMOVING
FOREIGN MATTER, SUCH AS BIRD HEADS, FROM THE
PLUCKER.
TROUBLESHOOTING AND REPAIR
In the event you experience trouble operating your plucker, follow the suggestions in the troubleshooting guide in this section. The guide
will help you pinpoint the causes of common problems and identify remedies.
In case of a service problem, DO NOT send unit back to retailer. Contact Yardbird, at 800-345-6007, Monday through Friday, 8am to 5pm.
PROBLEM REMEDY/ACTION
Unit will not start • Reset GFCI
• Turn toggle switch to the ON position
• Be sure magnet in tub is poitioned over magnetic read
swtich on feather pan.
NOTE: Magnet must be adjusted close enough to mag-
netic read switch in order to function properly.
* Please contact 800-345-6007 for service parts

Operator’s Manual
Chicken Plucker
Check for parts online at www.yardbirdpluckers.com or call 800-345-6007 M-F 8-5
12
ILLUSTRATED PARTS BREAKDOWN: MAIN UNIT

Operator’s Manual
Chicken Plucker
Check for parts online at www.yardbirdpluckers.com or call 800-345-6007 M-F 8-5 13
ITEM
NO. PART # DESCRIPTION QTY.
1 23632 HOSE TUB WATER SPRAYER 1
2 24018 ASSY DRUM W/HOSE CLIPS 1
3 22577 FINGER REPLACEMENT 98 MM 95
4 22697 FINGER REPLACEMENT 46 MM 13
5 23646 BUCKLE CLAMP 4
6 23649 FITTING TEE 3/4 NPT X BARB
X BARB 1
7 23924 O-RING 24 X 26 X 3.5 MM 1
8 23844 FITTING 3/4 FNPT X GARDEN
HOSE SWIVEL 1
9 10677 BOLT M6 X 1.0 X 30 HEX 2
10 18130 WASHER M6 SPRING LOCK 10
11 23840 WASHER M8 X 30 DOMED 1
12 24016 KEY SQUARE 6 X 6 X 17.4 1
13 W1265V0904 BOLT M8 X 1.25 X 20 HEX 1
14 23639 FEATHER PLATE 1
15 400023 NUT M8 NYLOCK 16
16 4650 NUT M6 X 1.0 NYLOCK 5
17 24032 BOLT M8 X 1.25 X 45 PHILIPS 4
18 3245 WASHER M8 X 24 X 2.2 FLAT 32
19 24033 BOLT M8 X 1.25 X 20 PHILIPS 2
20 23925 O-RING 26 X 21 X 3 MM 1
21 23636 PLUG SQUARE TUBE 30 MM 6
22 23637 FEATHER CHUTE 1
ITEM
NO. PART # DESCRIPTION QTY.
23 4692 WASHER M4 FLAT 3
24 22024 WASHER M4 SPRING LOCK 3
25 12419 BOLT M4 X 0.7 X 8 PHILIPS 3
26 23104 AXLE LEG TOP 30 MM 2
27 18098 BOLT M8 X 1.25 X 45 HEX 8
28 21640 WASHER M8 SPRING LOCK 6
29 12770 BOLT M8 X 1.25 X 40 HEX 3
30 23089 SUPPORT LEG TOP 30 MM 1
31* W1265V0903 NUT M10 X 1.5 NYLOCK 2
32* 19905 WASHER M10 X 20 X 2 FLAT 2
33* 11919 WHEEL KIT WITH HARDWARE 1
34 23107 SUPPORT LEG BOTTOM 30 MM 1
35 23110 SUPPORT BRACKET AXLE FEM 1
36 23108 AXLE LEG BOTTOM 30 MM 2
37 23795 ASSY AXLE FEMALE PLUCKER 1
38 23864 ASSY AXLE MALE PLUCKER 1
39 23111 SUPPORT BRACKET AXLE
MALE 1
40 23638 FEATHER PAN 1
41** --- MOTOR ASSEMBLY 1
42 23112 WELDMENT FEATHER PLATE
HUB 1
43 24017 CARABINER PLUCKER 4
* PARTS W1265V0903 AND 19905 INCLUDED IN KIT 11919
**MOTOR ASSEMBLY PARTS LIST LOCATED ON PAGE 14.

Operator’s Manual
Chicken Plucker
Check for parts online at www.yardbirdpluckers.com or call 800-345-6007 M-F 8-5
14
1
2
3
4
5
6
7
8
9
10
11
12
13
11
2
3
14
15
16
17
18
19
20
21
22
23
24
25
11
15
26
27 28 29 30
ITEM NO. PART # DESCRIPTION QTY.
1 23119 OUTPUT SHAFT MOTOR 1
2 24004 BOLT M5 X 0.8 X 30 HEX 9
3 24005 WASHER M5 SPRING LOCK 9
4 23115 OIL SEAL RUBBER 35 MM OD 1
5 23120 FRONT MOTOR COVER 1
6 23128 BEARING 6205RS 1
7 24006 PIN 5MM X 12 GEAR BOX 2
8 23118 OUTPUT SHAFT GEAR 1
9 23129 BEARING 6003RS 1
10 23117 GASKET FRONT UPPER COVER 1
11 23122 OIL SEAL RUBBER 30 MM OD 3
12 23130 BEARING 6004RS 1
13* --- ASSY ROTOR ---
14 23131 BEARING 6203RS 1
15 23121 GASKET MOTOR HOUSING 2
16* --- ASSY MOTOR HOUSING ---
17 24014 REED SWITCH 1
18 24009 CAPACITOR MOTOR 1.5 HP 1
19 24008 SWITCH RESET MOTOR 1.5 HP 1
20 24012 GASKET TERMINAL BOX 1
21 24013 PLUG GFCI MOTOR 1
22 24015 COVER TERMINAL BOX 1
23 W1200202 FAN SHROUD MOTOR 1.5 HP 1
24 W1200236 FAN MOTOR 1.5 HP 1
25 24010 SWITCH ON/OFF MOTOR 1
26 24076 RELAY 120V X 120V 1
27 23866 NUT M4 X 0.7 X 3 HEX 2
28 23846 MAGNET SWITCH SHUT OFF 1
29 24082 SPACER PLASTIC SWITCH 1
30 24034 BOLT M4 X 0.7 X 25 PHILIPS 2
* PARTS ARE NOT SERVICABLE. ORDER PART 21833 FOR REPLACEMENT.
ILLUSTRATED PARTS BREAKDOWN: MOTOR GROUP

Operator’s Manual
Chicken Plucker
Check for parts online at www.yardbirdpluckers.com or call 800-345-6007 M-F 8-5 15
PRODUCT WARRANTY: 1YEAR LIMITED WARRANTY
Ardisam, Inc. (Ardisam), a manufacturing company, warrants this product to be free from defects in the
material or workmanship for a period of one year from the date of purchase. If there is insucient evidence
of the purchase date, the eective date of this warranty will begin on the plucker’s date of manufacture.
During the one-year warranty of this product, Ardisam will furnish, at their discretion, parts and labor to
correct any defect caused by faulty material or workmanship. In no event shall recovery of any kind be
greater than the amount of the purchase price of the product sold. Ardisam reserves the right to inspect
any incoming units returned under warranty to determine if the warranty applies before performing any
warranty related work (including parts and components). Any unit used in a commercial application, or
producing income is covered for a period of 90 days after purchase. This warranty applies to the original
owner with a proof of purchase and is not transferable. For the warranty to be valid, the product must
be registered online, or the warranty card must be lled out and received by Ardisam, within 30 days of
purchase. This warranty excludes ngers due to normal wear, wear items such as o-rings, seals, and lubri-
cants. *These warranties apply only to products which have not been subjected to negligent use, abuse,
misuse, overload, improper installation, alteration, accident, lightning, acts of God (or other events beyond
Ardisam’s control), vandalism, unauthorized parts, failure to use proper power source, or if repairs have
been performed at a non-authorized service facility. These warranties shall not cover damage from nor-
mal wear and tear, normal maintenance parts and services; nor improper installation, operation, storage,
or maintenance; nor operating the equipment above recommended maximums as stated in this manual.
These warranties supersede all other warranties either expressed or implied and all other obligations or
liabilities on the part of Ardisam. Ardisam, does not assume, and does not authorize any other person to
assume for Ardisam, any liability in connection with the sale of Ardisam products. To be at “No Charge,”
warranty work must be sent directly to and performed by Ardisam or an Ardisam Authorized Warranty
Service Facility. To obtain warranty service and/or replacement instructions, contact the Ardisam Custom-
er Service Department at 800-345-6007. If you choose to ship your product to Ardisam for warranty repair,
you must rst have prior approval from Ardisam by calling the Ardisam Customer Service Department for
a return material authorization number (RMA#). Under these circumstances, all items must be shipped
prepaid. Ardisam will at no charge, repair or replace, at the discretion of Ardisam, any defective part which
falls under the conditions stated above. Ardisam retains the right to change models, specications and
price without notice. Ardisam shall not be obligated to ship any repair or replacement product to any lo-
cation outside of the United States of America or Canada. Some states and countries do not allow the lim-
itations on how long an implied warranty lasts, or the exclusion or limitation of incidental or consequential
damages, so the above limitation may not apply to you. This warranty gives you specic legal rights, and
you may also have other rights which vary from state to state and country to country.
WARRANTY TERMS AND CONDITIONS

Manuel de l’utilisateur
Plumeuse à volaille
Voir les pièces détachées en ligne à www.yardbirdpluckers.com ou composer le 800-345-6007 L-V 8h-17h
16
INTRODUCTION
Merci d’avoir acheté une plumeuse Yardbird. Nous nous sommes attachés à ce que cette plumeuse réponde aux plus hautes normes d’utilisation
et de durabilité. Moyennant des soins corrects, elle orira de nombreuses années de service able.
Lire ce manuel en entier avant installation et utilisation. Yardbird se réserve le droit de changer, modier ou améliorer ce produit et cette
documentation à tout moment sans préavis.
SOMMAIRE
Introduction / Enregistrement et service après-vente..............................................................................................................................................................................16
Caractéristiques ......................................................................................................................................................................................................................................................17
Données techniques.............................................................................................................................................................................................................................................18
Schéma de câblage ...............................................................................................................................................................................................................................................18
Avertissements et mesures de précaution....................................................................................................................................................................................................19
Autocollants de sécurité......................................................................................................................................................................................................................................20
Consignes générales de sécurité................................................................................................................................................................................................................21-22
Assemblage....................................................................................................................................................................................................................................................... 22-23
Utilisation.................................................................................................................................................................................................................................................................. 24
Conseils et recommandations.....................................................................................................................................................................................................................24-25
Entretien....................................................................................................................................................................................................................................................................25
Dépannage...............................................................................................................................................................................................................................................................25
Illustration des pièces détachées ...............................................................................................................................................................................................................26-28
Garantie .....................................................................................................................................................................................................................................................................29
Enregistrement et service après-vente
Consigner le numéro de modèle et le numéro de série du produit dans l’espace prévu
pour y accéder facilement lors des commandes de pièces détachées ou demandes
d’assistance technique. La garantie est valable uniquement si l’enregistrement
dûment rempli est reçu par Yardbird dans les 30 jours après l’achat. (POUR PLUS
DE RENSEIGNEMENTS, VOIR LA SECTION SUR LA GARANTIE.) L’enregistrement
de la garantie peut se faire en ligne à www.yardbirdpluckers.com ou par courrier à:
Yardbird, 1160 8th Avenue, Cumberland, WI 54829, États-Unis. Il est aussi possible
d’appeler notre service après-vente au (800) 345-6007 du lundi au vendredi de 8h00 à
17h00 HNC.
AUTOCOLLANT
DE NUMÉRO
DE SÉRIE
RENSEIGNEMENTS SUR LE PROPRIÉTAIRE
Nom du propriétaire:
Adresse du propriétaire:
Ville : État/Province: Code postal:
Numéro de modèle: Numéro de série:
Date d’achat:
Notes:
Lire ce manuel et le conserver pour toute consultation ultérieure. Ce manuel contient des renseignements importants sur la SÉCURITÉ,
l’ASSEMBLAGE, l’UTILISATION et l’ENTRETIEN. Le client doit s’assurer que toute la documentation sur le produit est fournie avec
l’appareil. Cette documentation comprend le MANUEL, la liste des PIÈCES DE RECHANGE et les GARANTIES. Cette documentation doit
être fournie en vertu de la réglementation en vigueur. Toutes les personnes à qui cette machine est louée/prêtée doivent avoir accès à
ces informations et les comprendre. Le présent manuel doit rester avec le produit, notamment s’il est revendu.

Manuel de l’utilisateur
Plumeuse à volaille
Voir les pièces détachées en ligne à www.yardbirdpluckers.com ou composer le 800-345-6007 L-V 8h-17h 17
CARACTÉRISTIQUES
FICHE GFCI
PIEDS LONGS
CONTACTEUR
DE PROXIMITÉ
PIED COURT
ROUES DE
TRANSPORT
DISJONCTEUR
INTERRUPTEUR
MARCHE/ARRÊT
FÛT
PLATEAU DE
PLUMAISON
GOULOTTE
À PLUMES
BAC À
PLUMES

Manuel de l’utilisateur
Plumeuse à volaille
Voir les pièces détachées en ligne à www.yardbirdpluckers.com ou composer le 800-345-6007 L-V 8h-17h
18
DONNÉES TECHNIQUES
~
Protection contre
les fuites
L1 2 1 2
L
E
E
Vert
Mise à la terre
1 2 1 2
ZJ
Interrupteur
à bascule
Relais
Contacteur magnétique
Enroulement de démarrage
Enroulement
de marche
Condensateur
SCHÉMA DE CÂBLAGE
~
Protection contre
les fuites
L1 2 1 2
L
E
E
Vert
Mise à la terre
1 2 1 2
ZJ
Interrupteur
à bascule
Relais
Contacteur magnétique
Enroulement de démarrage
Enroulement
de marche
Condensateur
TYPE D’ALIMENTATION 120V MONOPHASÉ
ROUES FOURNIES OUI, 2
PUISSANCE HP 1,5
VITESSE DE ROTATION TR/MIN 300
DOIGTS 110
HAUTEUR DE L’EMBALLAGE MM POUCES 526 20,7
LARGEUR DE L’EMBALLAGE MM POUCES 549 21,6
PROFONDEUR DE L’EMBALLAGE MM POUCES 549 21,6
HAUTEUR ASSEMBLÉE MM POUCES 914 36
LARGEUR ASSEMBLÉE MM POUCES 777 30,6
PROFONDEUR ASSEMBLÉE MM POUCES 678 26,7
TENSION V 120
PUISSANCE W 1100
INTENSITÉ NOMINALE MINIMALE A 15
POIDS BRUT KG LB 39,9 88
POIDS NET KG LB 37,6 83
FÛT AMOVIBLE OUI
TYPE DE TRANSMISSION ENGRENAGES
DÉTAILS DE LA TRANSMISSION ENGRENAGES HÉLICOÏDAUX
EN ACIER ALLIÉ
COURONNE D’ARROSAGE OUI
FINITION ACIER INOXYDABLE ET REVÊTEMENT POUDRE
FINITION DE LA VISSERIE ZINGUÉE
MATIÈRE PREMIÈRE ACIER INOXYDABLE
PIÈCES INCLUSES 1 FÛT, 1 PLATEAU DE PLUMAISON, 1 CARTE DE
GARANTIE, 1 VISSERIE DE FIXATION, 1 GROUPE MOTEUR, 3 PIEDS,
2 ROUES, 1 MANUEL DE L’UTILISATEUR, 2 ÉLÉMENTS D’AXE
RÉSISTE AUX INTEMPÉRIES OUI
RÉSISTE À LA CORROSION OUI
RÉSISTE AUX UV OUI
ANTIMICROBIEN OUI
SERVICE INTENSIF OUI
CORDON ÉLECTRIQUE FOURNI OUI
CONTACTEUR DE PROXIMITÉ DE SÉCURITÉ DU FÛT OUI
UTILISATION À L’EXTÉRIEUR OUI
UTILISATION COMMERCIALE NON
LONGUEUR DU CORDON MM POUCES 1829 72
DISJONCTEUR DIFFÉRENTIEL GFCI OUI
ASSEMBLAGE REQUIS OUI
OUTILLAGE NÉCESSAIRE POUR L’ASSEMBLAGE CLÉS
GARANTIE PRODUIT UN AN
CERTIFIÉ CSA OUI

Manuel de l’utilisateur
Plumeuse à volaille
Voir les pièces détachées en ligne à www.yardbirdpluckers.com ou composer le 800-345-6007 L-V 8h-17h 19
AVERTISSEMENTS ET MESURES DE PRÉCAUTION
Responsabilité du propriétaire
L’assemblage correct et l’utilisation sûre et ecace de la plumeuse
relèvent de la responsabilité de l’utilisateur.
• Lire et suivre toutes les instructions de sécurité.
• Suivre avec attention toutes les instructions d’assemblage.
• Entretenir la plumeuse conformément aux instructions et au
calendrier gurant dans le manuel de l’utilisateur Yardbird.
• S’assurer que quiconque utilise la plumeuse est bien
familiarisé avec toutes les commandes et mesures de
précaution.
Messages spéciaux
Ce manuel contient des messages spéciaux attirant l’attention sur des
problèmes de sécurité et dommages potentiels à la machine, ainsi
que des informations utiles sur l’utilisation et l’entretien. Veiller à lire
toutes ces informations avec attention pour éviter les blessures et les
dommages à la machine.
REMARQUE: Des informations générales sont fournies à
travers ce manuel pouvant aider l’opérateur dans
l’utilisation ou l’entretien de la machine.
Mesures de précaution importantes
Veiller à lire cette section avec attention. Utiliser la plumeuse
conformément aux instructions et conseils de sécurité fournis ici
et tout au long du manuel. Quiconque utilise cette plumeuse doit
lire les instructions et être familiarisé avec les commandes. Veiller
à apprendre à contrôler la plumeuse à volaille dans toutes les
situations.
Ce symbole signale des instructions de sécurité
importantes qui doivent être respectées pour ne pas
mettre en danger la sécurité des personnes. Lire et
respecter toutes les instructions du manuel avant de
tenter de faire fonctionner cet appareil.
• Ne pas laisser d’enfant utiliser cette plumeuse à volaille. Tenir
les jeunes enfants à l’écart durant la marche de la plumeuse à
volaille. Ne pas laisser d’adulte utiliser cette plumeuse à volaille
sans instruction appropriée.
DANGER
DANGER INDIQUE QUE DES BLESSURES GRAVES OU
LA MORT RÉSULTERAIENT SI LES INSTRUCTIONS DE
SÉCURITÉ QUI SUIVENT CE MOTINDICATEUR NE SONT PAS
RESPECTÉES.
AVERTISSEMENT
AVERTISSEMENT INDIQUE UN DANGER QUI, S’IL N’EST PAS
ÉVITÉ, PEUT PROVOQUER LA MORT OU DES BLESSURES
CORPORELLES ET/OU DÉGÂTS MATÉRIELS GRAVES.
ATTENTION
ATTENTION INDIQUE LE RISQUE DE BLESSURES OU
DE DOMMAGES MATÉRIELS SI LES INSTRUCTIONS DE
SÉCURITÉ QUI SUIVENT CE MOTINDICATEUR NE SONT PAS
RESPECTÉES.
AVERTISSEMENT
VEILLER À LIRE, À COMPRENDRE ET À RESPECTER TOUTES
LES INSTRUCTIONS DE SÉCURITÉ ET D’UTILISATION
FIGURANT DANS CE MANUEL AVANT DE TENTER
D’INSTALLER ET DE FAIRE FONCTIONNER LA PLUMEUSE.
TOUT MANQUEMENT À OBSERVER LES INSTRUCTIONS
DE SÉCURITÉ ET D’UTILISATION PEUT PROVOQUER DES
BLESSURES CORPORELLES GRAVES POUR L’UTILISATEUR
ET D’AUTRES PERSONNES PRÉSENTES ET DES DÉGÂTS
MATÉRIELS. LE TRIANGLE DANS LE TEXTE SIGNIFIE QUE
DES MISES EN GARDES ET AVERTISSEMENT IMPORTANTS
DOIVENT ÊTRE SUIVIS.
AVERTISSEMENT
AVERTISSEMENT PROPOSITION 65 DE CALIFORNIE
CE PRODUIT CONTIENT DES SUBSTANCES
CHIMIQUES DÉCLARÉES RESPONSABLES DE CANCER,
MALFORMATIONS CONGÉNITALES OU AUTRES
ANOMALIES DE LA REPRODUCTION PAR L’ÉTAT DE
CALIFORNIE.
Emploi prévu /
Emploi détourné prévisible
Ceci est une plumeuse conçue pour enlever les
plumes de la volaille. Elle ne doit être utilisée à aucune autre n.
IMPORTANT
IMPORTANT SIGNALE DES INFORMATIONS UTILES
CONCERNANT L’ASSEMBLAGE, L’UTILISATION OU
L’ENTRETIEN DU MATÉRIEL.

Manuel de l’utilisateur
Plumeuse à volaille
Voir les pièces détachées en ligne à www.yardbirdpluckers.com ou composer le 800-345-6007 L-V 8h-17h
20
AUTOCOLLANTS DE SÉCURITÉ
Cette machine est conçue et fabriquée pour orir toute la sécurité et la abilité qu’on est en droit d’attendre d’un leader du marché de l’outillage
motorisé pour travaux extérieurs.
Bien que le présent manuel et les instructions de sécurité qu’il contient fournissent les connaissances de base nécessaires pour utiliser ce
matériel ecacement et en toute sécurité, nous avons apposé plusieurs autocollants de sécurité sur la machine pour rappeler certaines
informations importantes à l’opérateur durant l’utilisation de la machine.
Tous les messages DANGER, AVERTISSEMENT, ATTENTION et d’instructions gurant sur la machine devront être lus avec attention et obéis.
Tout manquement à respecter ces instructions peuvent provoquer des blessures corporelles. Ces informations de sécurité sont importantes! Les
autocollants de sécurité ci-dessous sont apposés sur la machine.
Si certains manquent ou sont endommagés, veiller à les remplacer sans délai. Pour obtenir des autocollants de rechange, s’adresser au
concessionnaire local ou directement à Yardbird.
Ces autocollants sont faciles à appliquer et constituent pour les utilisateurs un rappel visuel constant à respecter les mesures de précaution
nécessaires à une exploitation sécuritaire et ecace de la machine.
N° réf. 23723
MOTEUR DE COUPLE ÉLEVÉ
Autocollant sur le fût
N° réf. 23724
DANGER DE CHOC ÉLECTRIQUE
Autocollant sur le fût
N° réf. 23725
TENIR LES MAINS À L’ÉCART
Autocollant sur le fût
Table of contents
Languages:
Popular Kitchen Appliance manuals by other brands

La Cornue
La Cornue Broche Flamberge Installation, operation and maintenance manual

Gasmate
Gasmate BQ1011P manual

NUTRIBULLET
NUTRIBULLET Baby Turbo Steamer user guide

FIRST AUSTRIA
FIRST AUSTRIA FA-5448 instruction manual

Orbegozo
Orbegozo VT 1810 instruction manual

Milantoast
Milantoast 15050 Instructions for use