YILKAR YH COMFORT User manual

EN
Operating instructions
YH COMFORT Control Panel
YH Comfort

Contents
1.1 Warranty and liability ........................................................ 4
1.Instruction ................................................................................... 4
2.Safety ......................................................................................... 4
3.Overview ..................................................................................... 5
3.1 Control Panel .................................................................... 5
3.2 Buttons .............................................................................. 5
3.3 Symbols ............................................................................ 6
3.4 Heating level selection ...................................................... 6
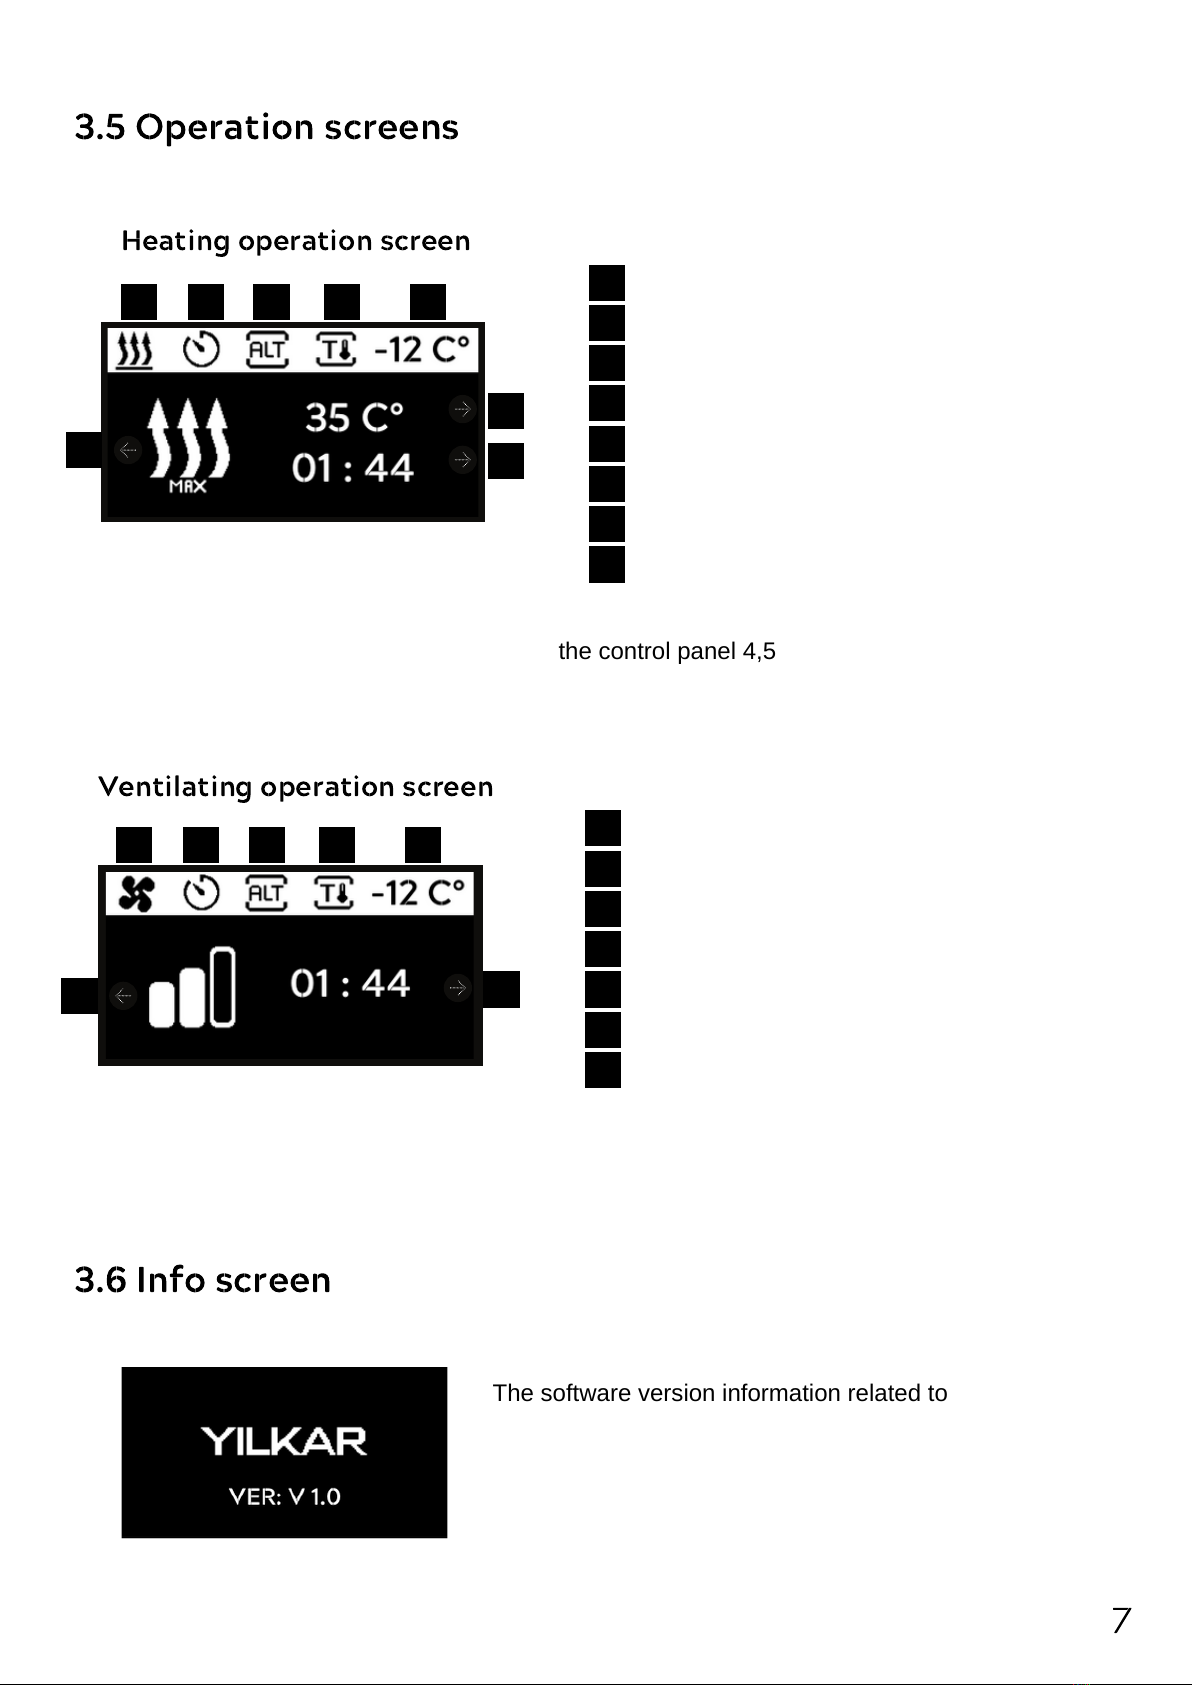
3.5 Operation screens ............................................................ 7
3.6 Info screen ........................................................................ 7
4.Heating operation ....................................................................... 8
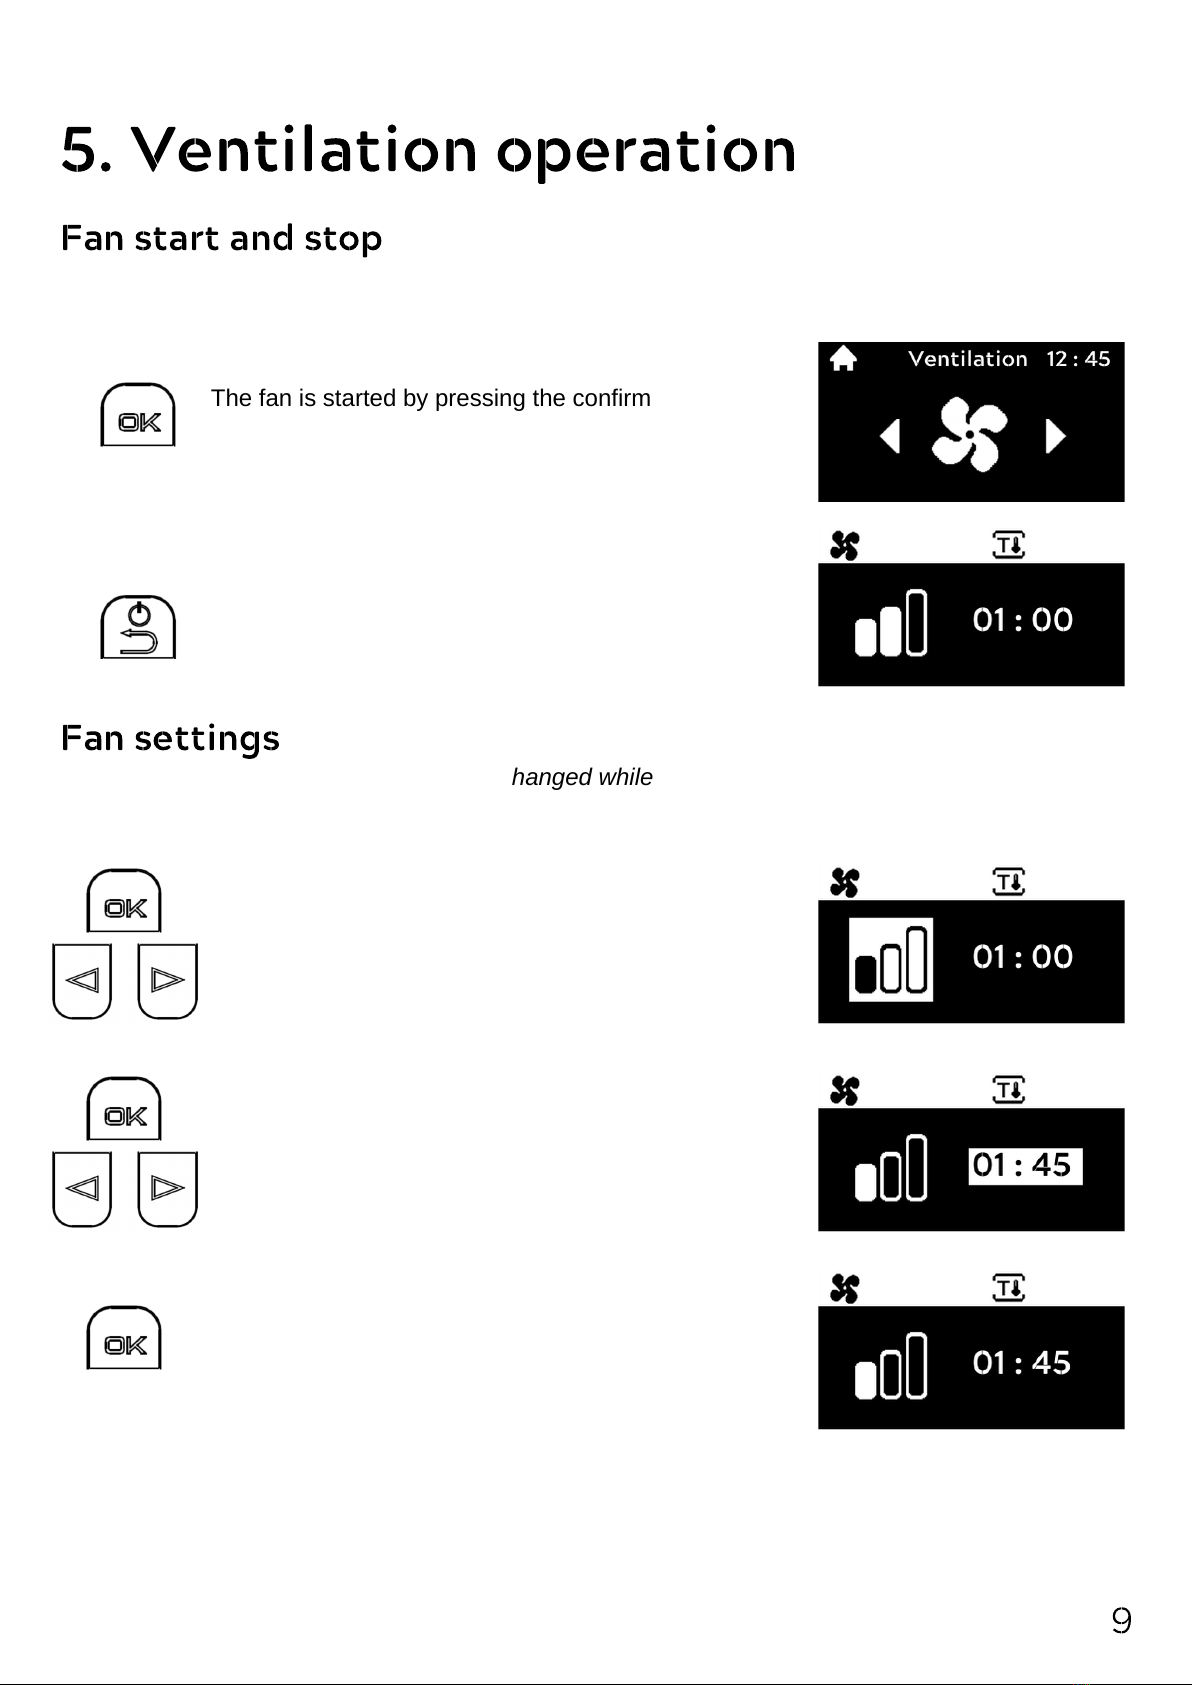
5.Ventilation operation ................................................................... 9
6.Timer program ............................................................................ 10
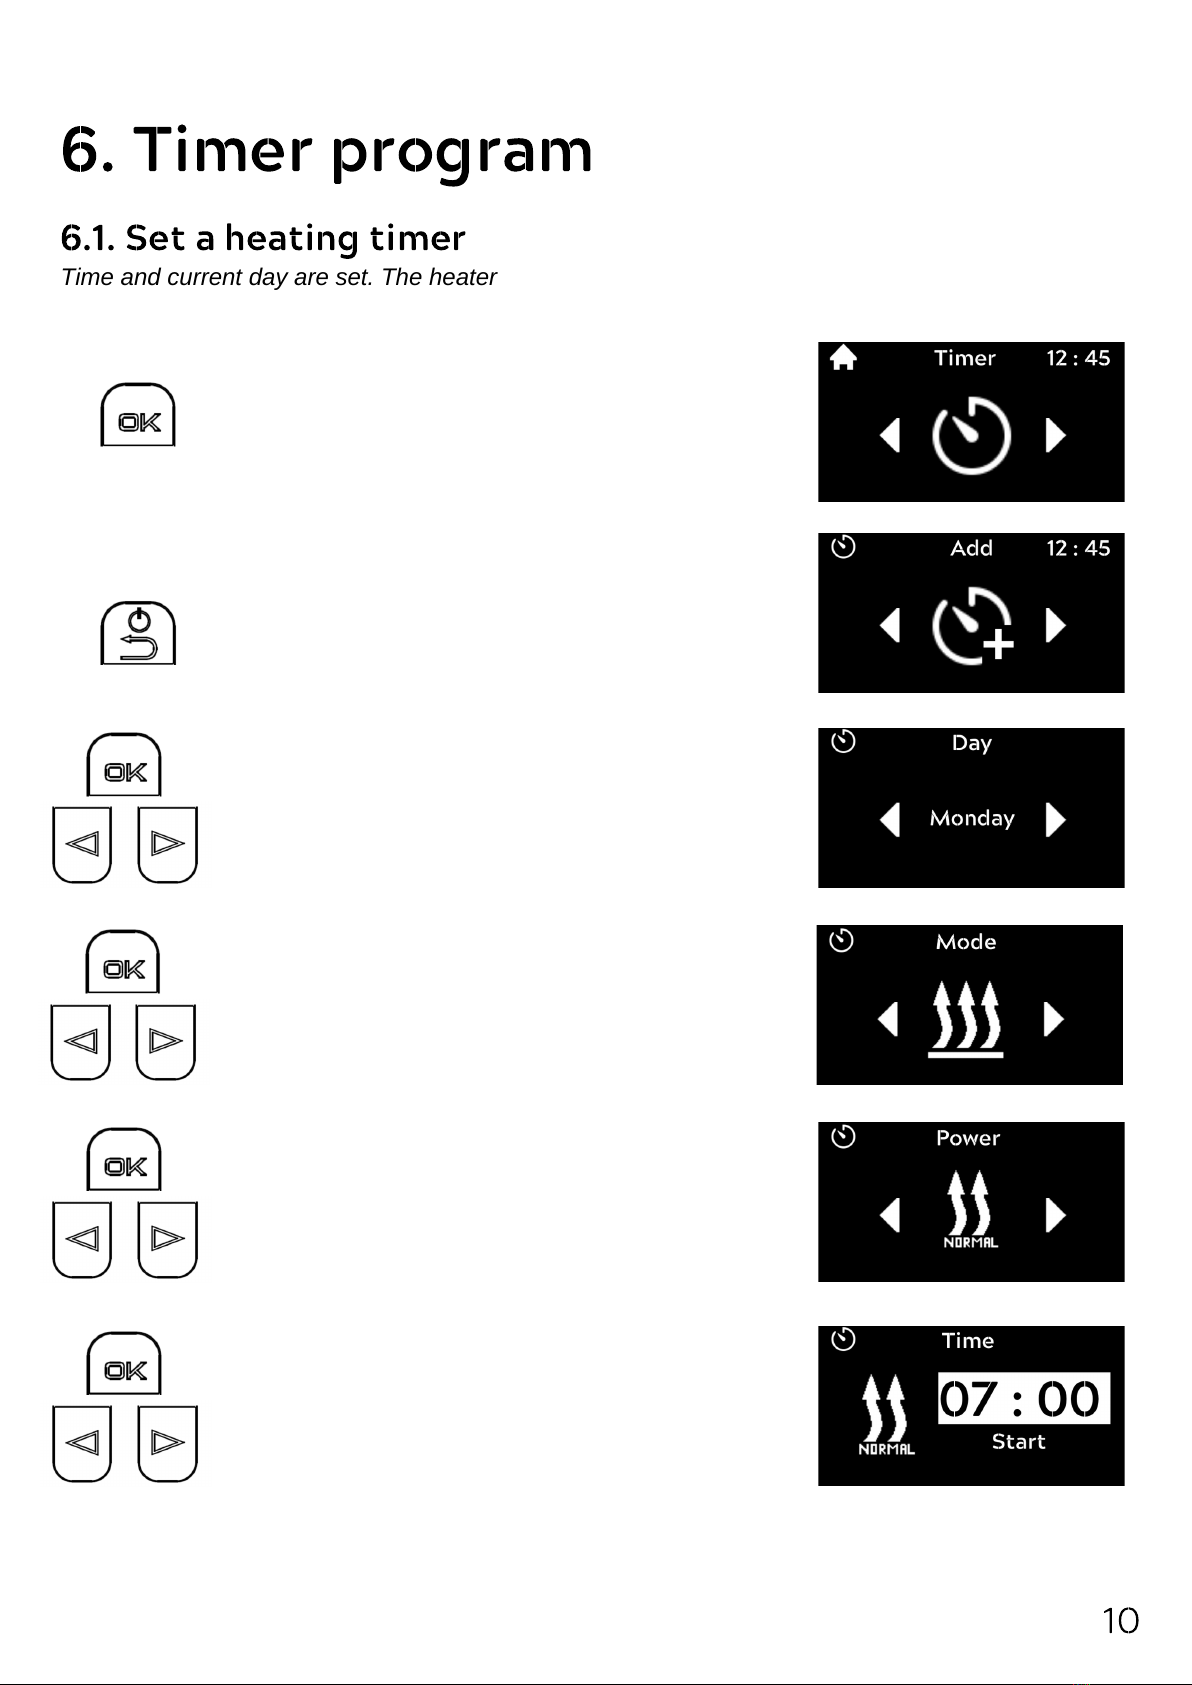
6.1 Set a heating timer ............................................................ 10
6.2 Set a ventilation timer ....................................................... 12
6.3 Timer editing ..................................................................... 13
6.4 Timer deleting ................................................................... 14
6.5 Timer installation errors .................................................... 15
7.Settings ....................................................................................... 16
7.1 General information .......................................................... 16
7.2 Quick start setting ............................................................. 16
7.3 Time and day setting ........................................................ 18
7.4 Language setting .............................................................. 18
7.5 System settings ................................................................ 19
7.5.1 Unit Setting ....................................................... 19

7.5.2 Altitude Setting ................................................. 19
7.5.3 Screen time setting .......................................... 20
7.5.4 Setting reset ..................................................... 20
7.5.5 Info ................................................................... 20
8.Cleaning ..................................................................................... 21
9.Error Statement and reset .......................................................... 21
10.Error codes ............................................................................... 22
11.Technical information ............................................................... 28

1. Introduction
To fully enjoy the comfort of your Yılkar heater, please read this user manual carefully. If you have
additional questions regarding assembly or operation, please contact your specialist dealer or
Yılkar service. The experts here will gladly provide you with reliable and expert knowledge.
Please keep this manual carefully.
We wish you a good trip.
This manual is part of the device and contains information for the user to use the device safely.
The operator's manual describes all the functions of the control panel. If you have any questions,
please contact service and / or customer service.
This user manual should be forwarded to the next owner of the device.
1.1 Warranty and liability
Yılkar accepts no liability for defects, damage and damages caused by non-compliance with the
installation instructions and user manual, as well as the warnings provided within them.
This disclaimer applies especially to:
Improper use
Repairs not carried out by a Yılkar service workshop
Use of non-genuine parts
Conversion of the unit without permission from Yılkar
2. Safety
Explosion hazard in environments with flammable vapors, flammable gas and hazardous
materials (eg gas stations, storage tanks, fuel, coal, wood or grain tanks)
Do not switch on or operate the heater !!
Warning !
4
Inhalation of toxic gases in confined spaces, danger of poisoning and suffocation
The heater should never be operated in confined spaces such as garages or workshops
without exhaust gas discharge, including the programming function !!
Warning !
Fire hazard due to flammable materials or liquids in the hot air stream (Air heater).
Do not block hot air flow !!
Warning !

1Back and off button
2Enter and confirm button
3Left selection button
4Right selection button
5Status display screen
6Control and selection screen
3. Overview
3.1 Control panel
Important !
When you first open your control panel, set the day and time in the "Time Setting" menu.
see. p. 18
Menu items in the main menu: Program, Heating, Ventilation, Settings.
5
3.2 Buttons
Screen off and functional back
button
Right selection
button
In the menu and functions
right arrow button
In the menu and functions
left arrow button
1
3
2
4
5
6

Standart termostat is active Room termostat is active
Heating menu Settings menu
Quick start setting menu Time setting menu
Language setting menu System settings menu
Unit setting menu Altitude setting menu
Screen off setting menu Setting reset menu
Info
Ventilation is active Main menu is active
6
Program menu Ventilation menu
Heating menu Settings menu
Attention Fan speed 1-2-3
Add a timer program Delete a timer program
Edit a timer program Heating is active
Timer is active Altitude mode is active
3.3 Symbols
Heating level maximum, provides powerful heating.
3.4 Heating level selection
Heating level normal, provides comfortable heating.
Heating level economic, it saves energy when the heating need is not high.
The heating levels differ from each other in terms of energy consumption and the time
required to reach the set temperature. The eco heating stage requires the least energy but
a longer time to reach the set temperature.

1
3 4 5 6 7
2
Control of ventilation level
1
Control of ventilation duration
2
Operating mode indicator
3
Operating from timer indicator
4
Operating from altitude adaptation indicator
5
Termostat mode indicator
6
Internal temperature value display
7
1
3
4 5 6 7 8
2
Control of heating level
1
Control of set tempature
2
Control of heating duration
3
Operating mode indicator
4
Operating from timer indicator
5
Operating from altitude adaptation indicator
6
Termostat mode indicator
7
Internal temperature value display
8
The operating screen is divided into 1,2, with the control panel 3,4,5,6,7 operating indicators.
Ventilating operation screen
3.6 Info screen
The software version information related to the
connected control panel is displayed on the start screen.
The demonstration switches to the main menu after 3
seconds.
7
3.5 Operation screens
The operating screen is divided into 1,2,3, the control panel 4,5,6,7,8, and the operating indicators.
Heating operation screen

4. Heating operation
Heating start and stop
Heating is started by pressing the confirmation button
in the main menu.
Heating starts at the factory settings. Set: 25 °C Power: Maximum Duration: 1 hour
To change it in the settings menu, see. p. 16
The screen looks like this in case of heating.
If the confirmation button is pressed, the change is
saved and the selection switches to the power
setting.
You can choose max, normal and eco power with the
arrow buttons. See. p. 16
Heating settings
The set, power and duration setting can be easily changed while in heating. Follow the instructions.
Attention! The function of the back button while in heating is to turn off the heating.
If the confirmation button is pressed, the selection
moves to the set temperature.
You can change the set temperature with the arrow
buttons.
If the confirmation button is pressed, the change is
saved and it switches to the selection time setting.
You can set the time with the arrow buttons.
If the back button is pressed, the heating process
stops and the main menu is returned.
8
If the confirmation button is pressed, the changes are
saved and the device continues to heat with its new
settings.

5. Ventilation operation
Fan start and stop
The fan is started by pressing the confirmation button
in the main menu.
The fan starts at factory settings. Power: 2nd Stage Duration: 1 hour
To change it in the settings menu, see. p. 16
The screen looks like a fan in this way.
If the confirmation button is pressed, the change is
saved and it switches to the selection time setting.
You can set the time with the arrow buttons.
Fan settings
Power and duration setting can be easily changed while on the fan. Follow the instructions.
Attention! The function of the back button while the fan is on is to turn off the fan.
If the confirmation button is pressed, the selection
switches to the fan power setting.
You can change the fan stage with the arrow buttons.
If the confirmation button is pressed, the changes are
saved and the device continues to the fan with its
new settings.
If the back button is pressed, the fan operation stops
and return to the main menu.
9

6. Timer program
6.1. Set a heating timer
Time and current day are set. The heater is off. Main menu "Timer" menu element is selected.
The timer setting menu is entered by pressing the
confirm button in the main menu.
The menu item "Add" appears on the screen (If a timer
has not been registered yet). If there is a registered
timer; "Add" menu is accessed with the left arrow button.
If the confirmation button is pressed, the change is
saved and the selection switches to the "Mode"
setting.
You can set the mode with the arrow buttons.
If the confirm button is pressed, the selection
switches to the "Day" setting.
You can change the day with the arrow buttons.
If the back button is pressed in this menu, it returns to
the previous setting and finally returns to the main
menu.
If the confirmation button is pressed, the change is
saved and the selection switches to the "Power"
setting.
You can adjust the power with the arrow buttons.
See p. 6
If the confirmation button is pressed, the change is
saved and the selection switches to the "Start Time"
setting.
You can set the start time in hours and minutes with
the arrow buttons.
10

If the confirmation button is pressed, the change is
saved and the selection switches to the "Stop Time"
setting.
You can set the stop time in hours and minutes with
the arrow buttons.
If the confirmation button is pressed, the change is
saved and the selection switches to the "Stop Time"
setting.
You can set the stop time in hours and minutes with
the arrow buttons.
If the confirmation button is pressed, the change is
saved and the selection moves to the "Set
Temperature" setting.
You can set the set temperature with the arrow buttons.
If the confirmation button is pressed, the change is
saved and the selection switches to the "State"
setting.
You can set the start status with the arrow buttons.
If the confirmation button is pressed, the change is
saved and the selection returns to the "Timer" menu.
You can see the timers installed with the arrow
buttons.
11
If you set the status to "Active", the program will heat at the values set at the set time. If
you do "Deactive", the program data is saved but does not start the heater until it is
changed and changed to "Active".
*
In the established timers, the day means "Active" in the white
background.
*
If the day is not in the white background in the established timers, it
means "Deactive".
*
Attention! You cannot set the stop time earlier than the start time. In this case, the warning
sign appears in the upper right and if you press "OK", it returns to the "Stop time" setting.
For other program errors see. p .15
*

6.2. Set a ventilation timer
Time and current day are set. The heater is off. Main menu "Timer" menu element is selected.
12
The timer setting menu is entered by pressing the
confirm button in the main menu.
The menu item "Add" appears on the screen (If a timer
has not been registered yet). If there is a registered
timer; "Add" menu is accessed with the left arrow button.
If the confirmation button is pressed, the change is
saved and the selection switches to the "Mode"
setting.
You can set the mode with the arrow buttons.
If the confirm button is pressed, the selection
switches to the "Day" setting.
You can change the day with the arrow buttons.
If the back button is pressed in this menu, it returns to
the previous setting and finally returns to the main
menu.
If the confirmation button is pressed, the change is
saved and the selection switches to the "Power"
setting.
You can adjust the power with the arrow buttons.
If the confirmation button is pressed, the change is
saved and the selection switches to the "Start Time"
setting.
You can set the start time in hours and minutes with
the arrow buttons.

13
If the confirmation button is pressed, the change is
saved and the selection switches to the "Stop Time"
setting.
You can set the stop time in hours and minutes with
the arrow buttons.
If the confirmation button is pressed, the change is
saved and the selection switches to the "Stop Time"
setting.
You can set the stop time in hours and minutes with
the arrow buttons.
If the confirmation button is pressed, the change is
saved and the selection switches to the "State"
setting.
You can set the start status with the arrow buttons.
If the confirmation button is pressed, the change is
saved and the selection returns to the "Timer" menu.
You can see the timers installed with the arrow
buttons.
If you set the status to "Active", the program will fan at the values set at the set time. If you
do "Deactive", the program data is saved but does not start the fan until it is changed and
changed to "Active".
*
In the established timers, the day means "Active" in the white
background.
*
If the day is not in the white background in the established timers, it
means "Deactive".
*
Attention! You cannot set the stop time earlier than the start time. In this case, the warning
sign appears in the upper right and if you press "OK", it returns to the "Stop time" setting.
For other program errors see. p .15
*

6.3. Timer editing
By pressing the confirm button in the timer menu, the
timer setting menu is entered.
Time and current day are set. The heater is off. The timer you want to change is selected in the
timer menu.
If the back button is pressed in this menu, it returns to
the previous setting and finally returns to the main
menu.
If the confirm button is pressed, the timer day remains
the same and the selection switches to the "Power"
setting.
You can adjust the power with the arrow buttons.
See. p. 6
Subsequent operations are performed by following the steps as in adding timers.
See. p. 10
6.4. Timer deleting
By pressing the confirm button in the timer menu, the
timer setting menu is entered.
Time and current day are set. The heater is off. The timer you want to delete is selected in the timer
menu.
If the back button is pressed in this menu, it returns to
the previous setting and finally returns to the main
menu.
The "Delete" menu item is selected with the arrow
buttons and the timer is deleted by pressing the "OK"
button.
14
The "Edit" menu item appears on the screen.

2. Minimum time limit.
Attention! When installing the timer, the program cannot be created for less than
15 minutes.
1. The time interval conflict
Attention! When installing the timer, more than one program cannot be set to the
same time period in the same day.
3. Maximum time limit or incorrect time interval
6.5. Timer installation errors
Attention! When installing timer, a maximum of 3
programs can be set on the same day.
The activity does not change the situation.
If a fourth wishes to be added, the third program is
automatically deleted and the fourth program replaces
the third.
15
Daily maximum timer limit
*
1
2
Attention! When
installing the timer,
the start time cannot
be after the end time.
3
Attention! When
installing the timer, the
program cannot be
created for more than 8
hours.
3
It can be set up to 3 timers per day and a total of 21 timers per week.

7. Settings
7.1 General information
Press the confirm button in the main menu and enter
the settings menu.
If the back button is pressed in this menu, it returns to
the previous setting and finally returns to the main
menu.
You can change the selection in the menu with the
arrow buttons.
Main menu "Settings" menu element is selected.
7.2 Quick start setting
The "Quick start" menu item is selected in the
settings menu.
If the confirm button is pressed, the selection
switches to the "Mode" setting to be adjusted.
You can select the mode with the arrow buttons.
There are 4 setting elements in the settings menu. These;
Quick start setting
Time and day setting
Language setting
System settings (Unit, Altitude, Screen time, Setting reset, Information)
16
Here, the initial settings of "heating" and "ventilation" operations in
the main menu are made.

If the confirmation button is pressed, the change is
saved and the selection switches to the "Time"
setting.
You can select the time with the arrow buttons.
If the confirmation button is pressed, the change is
saved and the selection switches to the "Temperature
Set" setting.
You can set the temperature with the arrow buttons.
If the confirmation button is pressed, the change is
saved and the selection switches to the "mode"
setting again.
You can select the mode with the arrow buttons.
If the confirm button is pressed, the selection
switches to the "Power" setting.
You can adjust the power with the arrow buttons.
If the confirmation button is pressed, the change is
saved and the selection switches to the "Time"
setting.
You can select the time with the arrow buttons.
If the confirm button is pressed, the selection
switches to the "Power" setting.
You can adjust the power with the arrow buttons.
17

7.3 Time and day setting
If the confirmation button is pressed, the selection
changes to the "Hour" setting.
You can select the hour with the arrow buttons.
If the confirmation button is pressed, the selection
changes to the "Minute" setting.
You can select the minute with the arrow buttons.
If the confirmation button is pressed, the selection
changes to the "Day" setting.
You can select the day with the arrow buttons.
The "Time Setting" menu item is selected in the
settings menu.
7.4 Language setting
If the confirmation button is pressed, the selection
changes to the "Language" setting.
You can select the language with the arrow buttons.
The "Language" menu element is selected in the
settings menu.
18
The 24-hour slice is applied as the time zone.

7.5 System settings
7.5.1 Unit Setting
System settings menu is entered by pressing the
confirmation button in the main menu.
Main menu "System Settings" menu element is selected.
If the confirmation button is pressed, the selection
changes to the "Unit" setting.
You can select the unit with the arrow buttons.
The "Unit" menu element is selected in the settings
menu.
7.5.2 Altitude Setting
If the confirmation button is pressed, the selection
changes to the "Altitude" setting.
Select altitude active or passive with the arrow
buttons.
The "Altitude" menu element is selected in the
settings menu.
19
If altitude is activated, the device adaptive altitude control algorithms are activated above
1500m altitude and regulates.
Heating performance decreases 5% with every 500m height increase.
*

7.5.3 Screen time setting
If the confirmation button is pressed, the selection
changes to the "Screen time" setting.
You can select the time with the arrow buttons.
The "Screen time" menu element is selected in the
settings menu.
7.5.4 Setting reset
The "Setting reset" menu element is selected in the
settings menu.
7.5.5 Info
If the confirmation button is pressed, the selection
switches to the "Information" screen.
The connected heater name and version number are
displayed here.
The "Info" menu item is selected in the settings
menu.
20
If the confirmation button is pressed, the selection
changes to the "Setting reset" confirmation.
You can choose between "reset" and "cancel" with
the arrow keys.
Table of contents
Other YILKAR Control Panel manuals