Yoak Composite Yoak User manual

User Guide
The YoakTM Training System
The world’s most versatile, portable, and robust training
tool. It will challenge your core stability and strength
symmetry while providing you with movement awareness in
a fun and novel way. As you embark on your journey we
encourage the following:
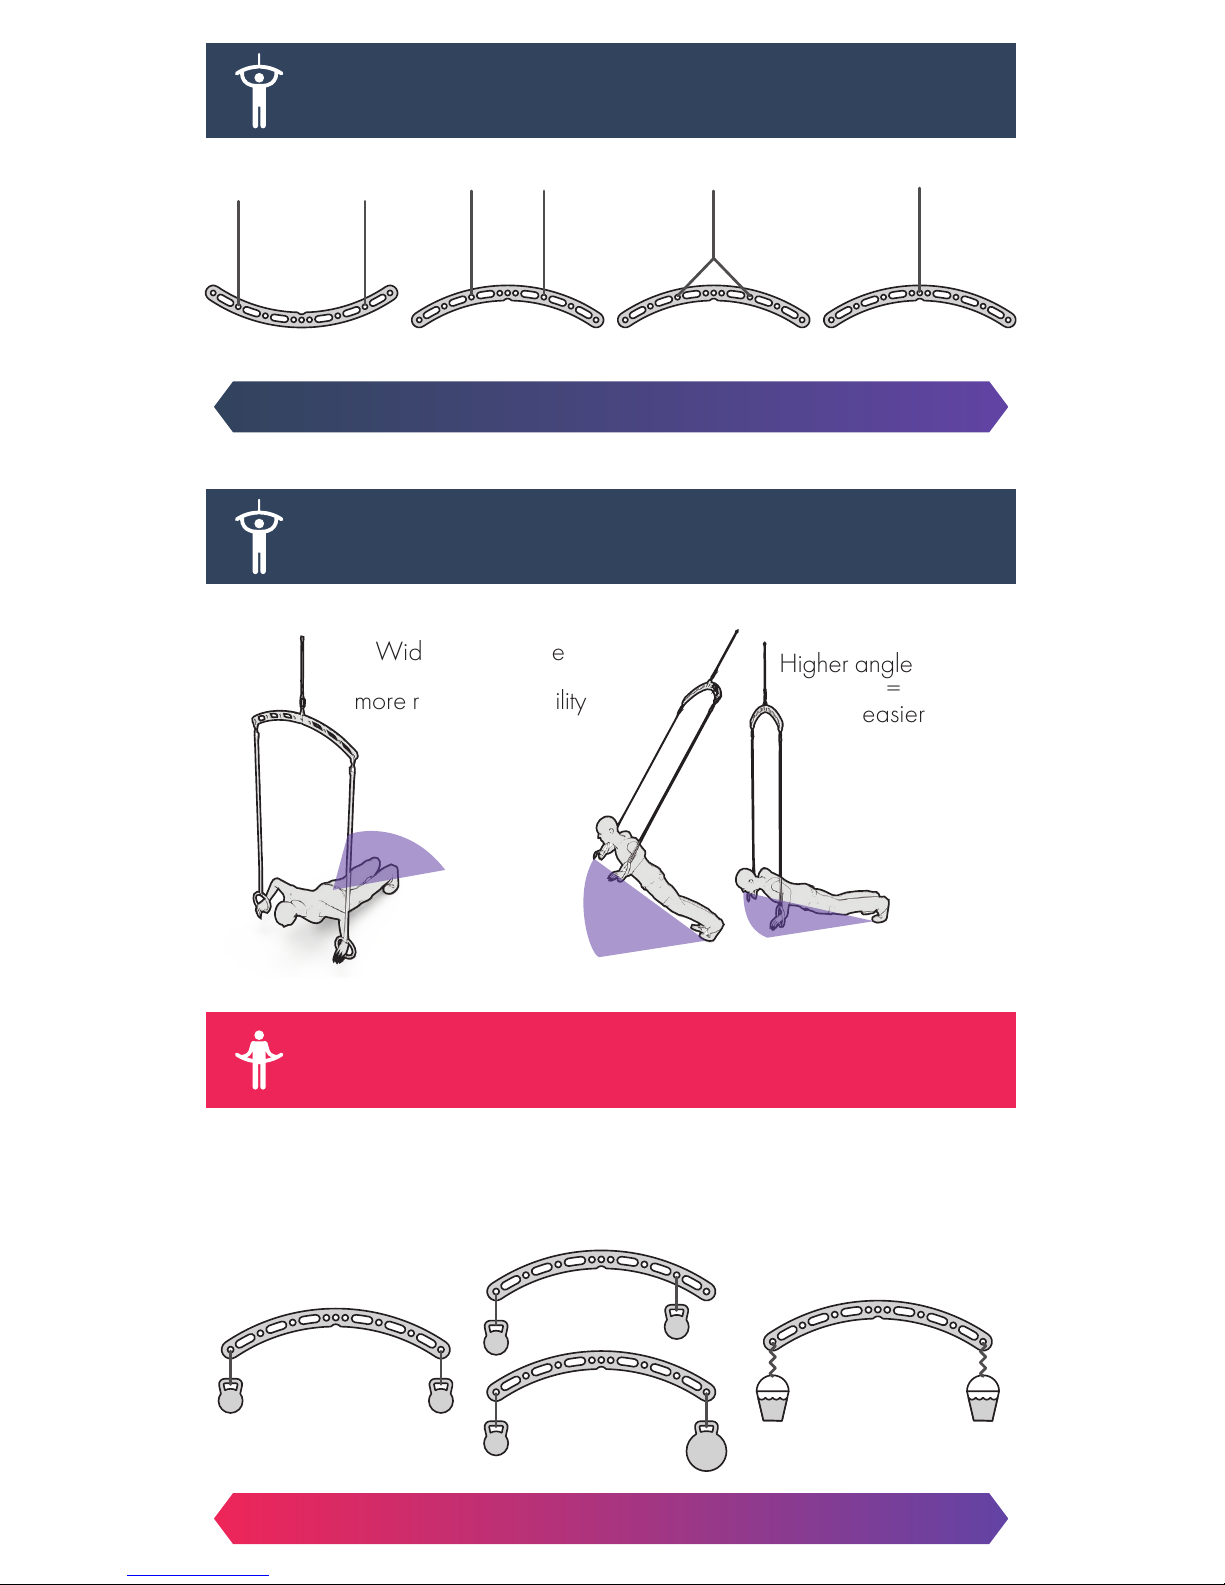
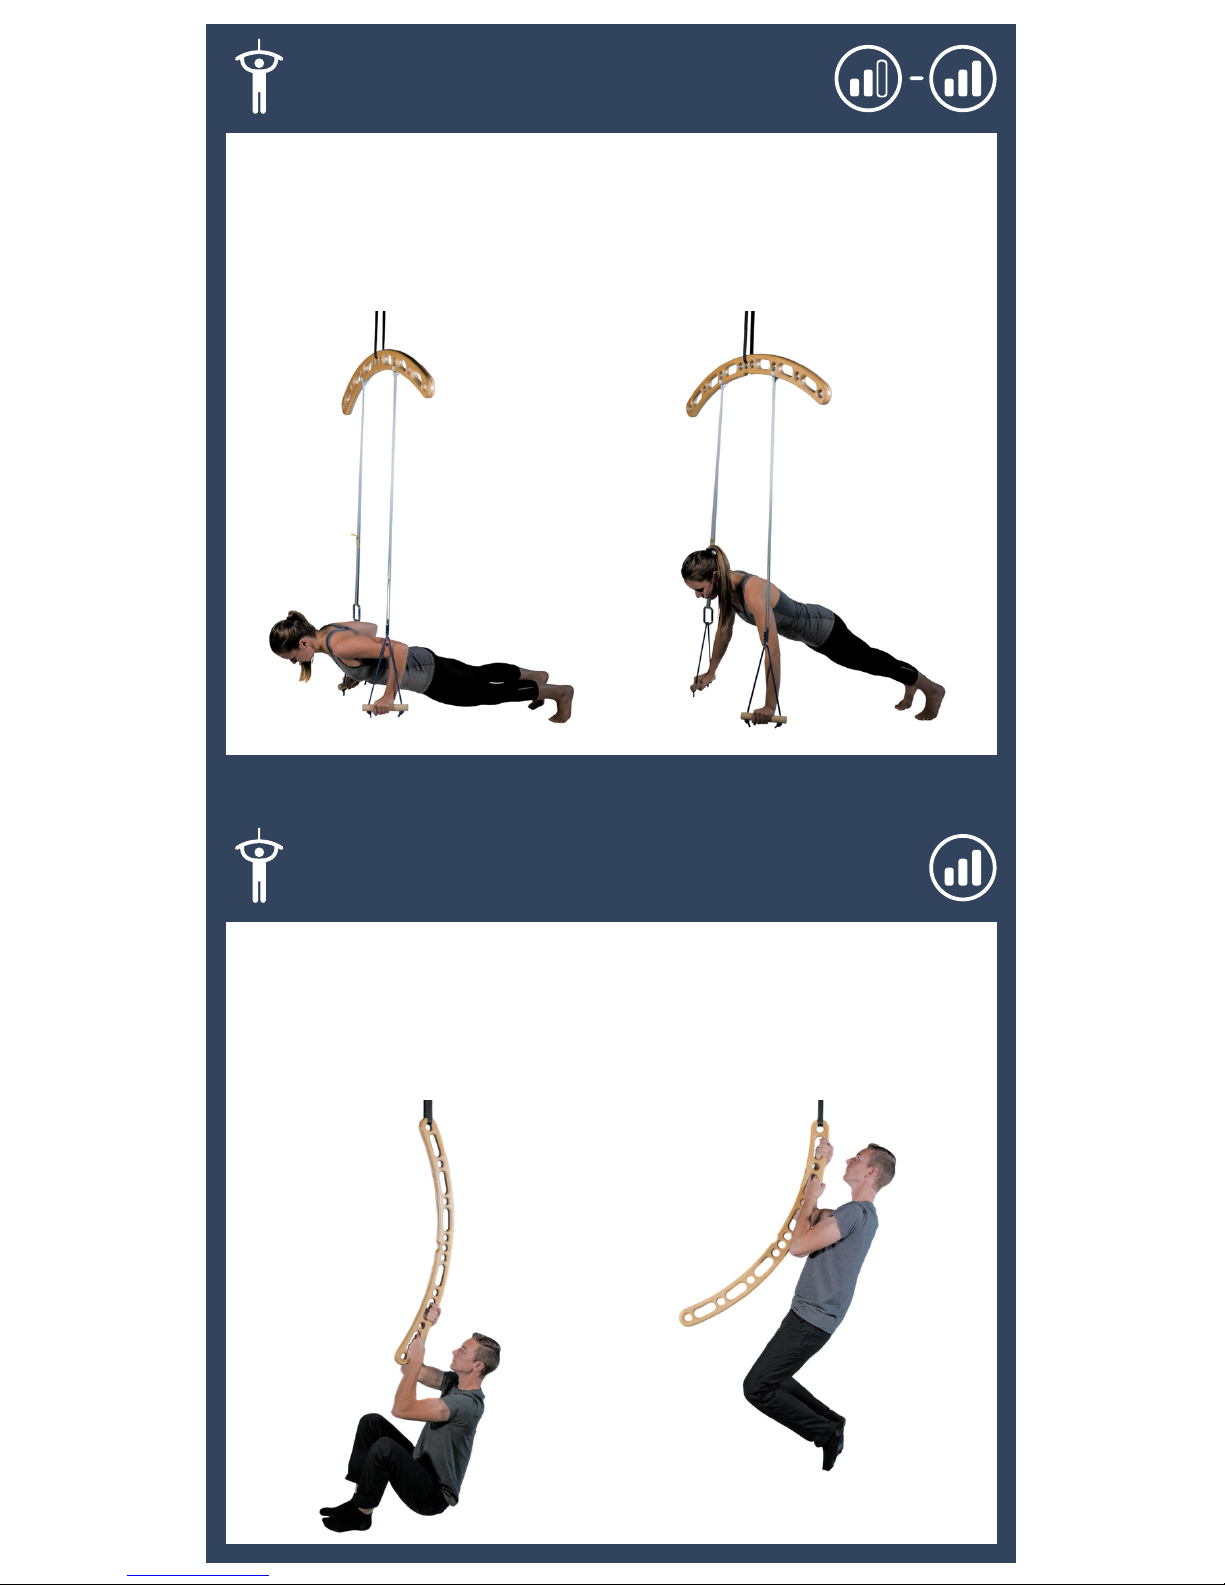
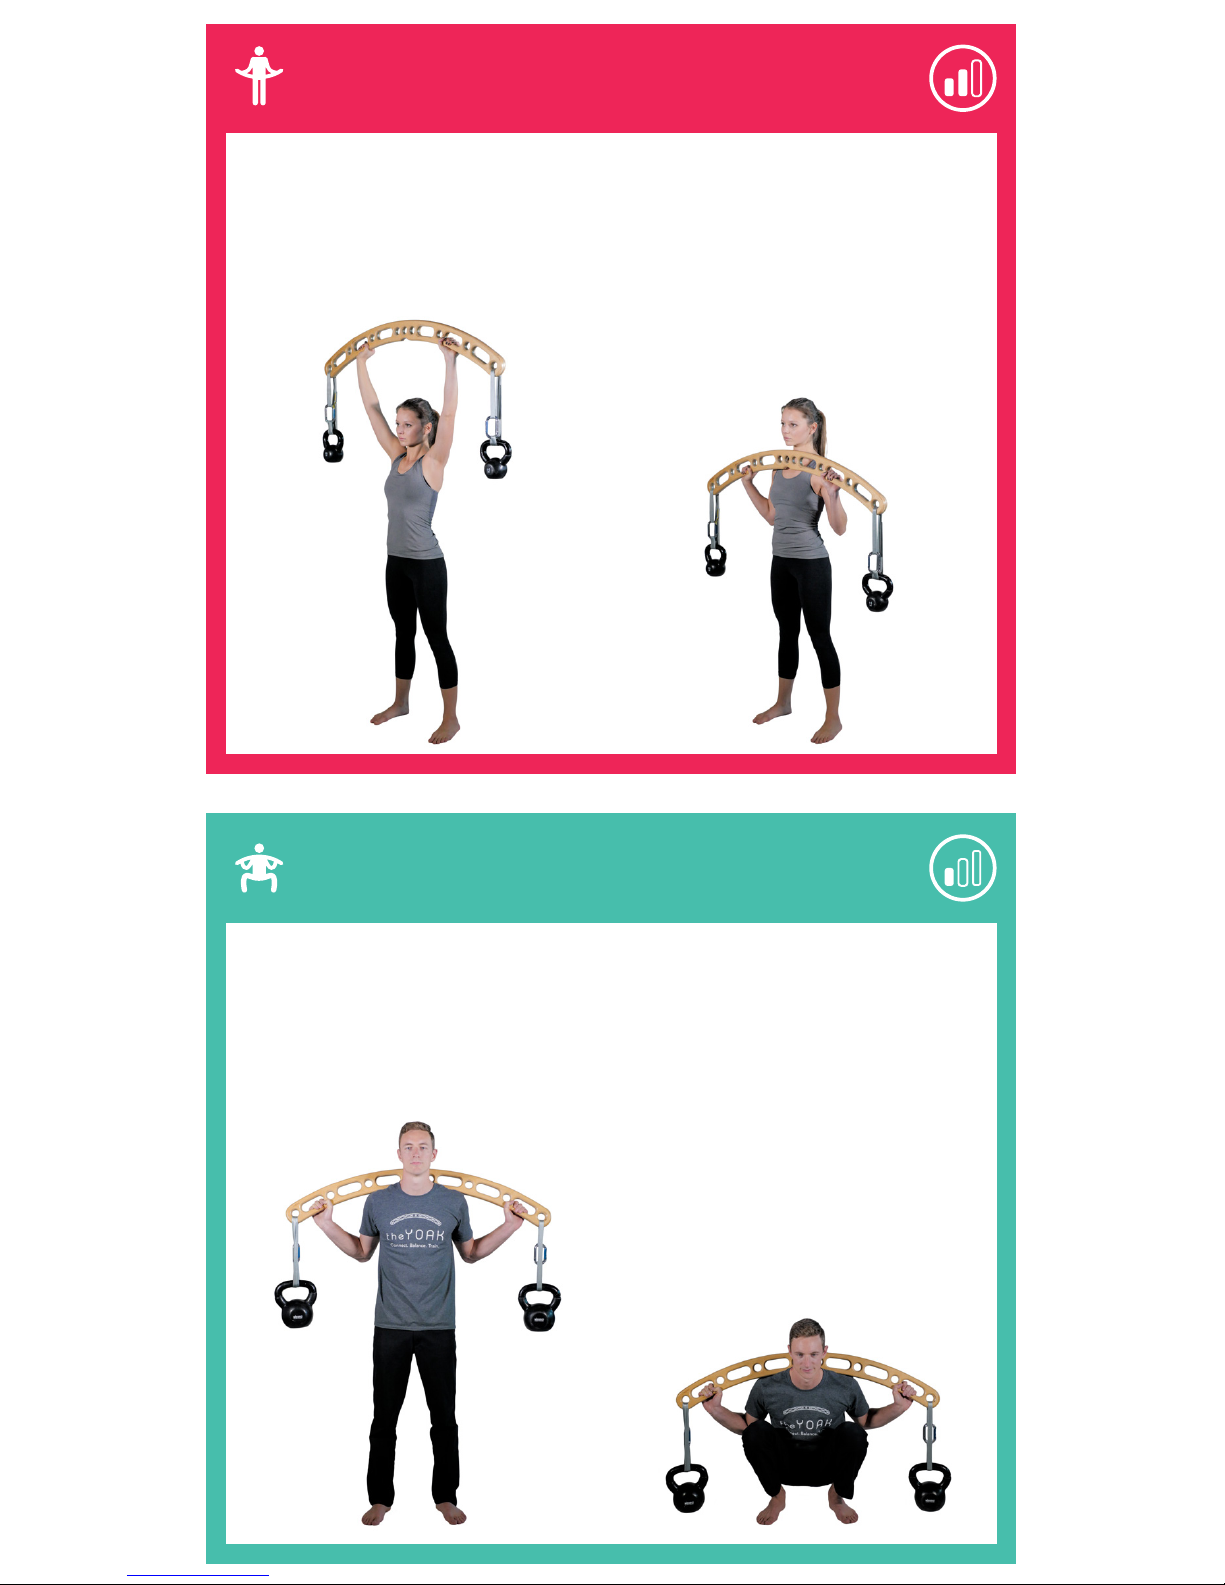
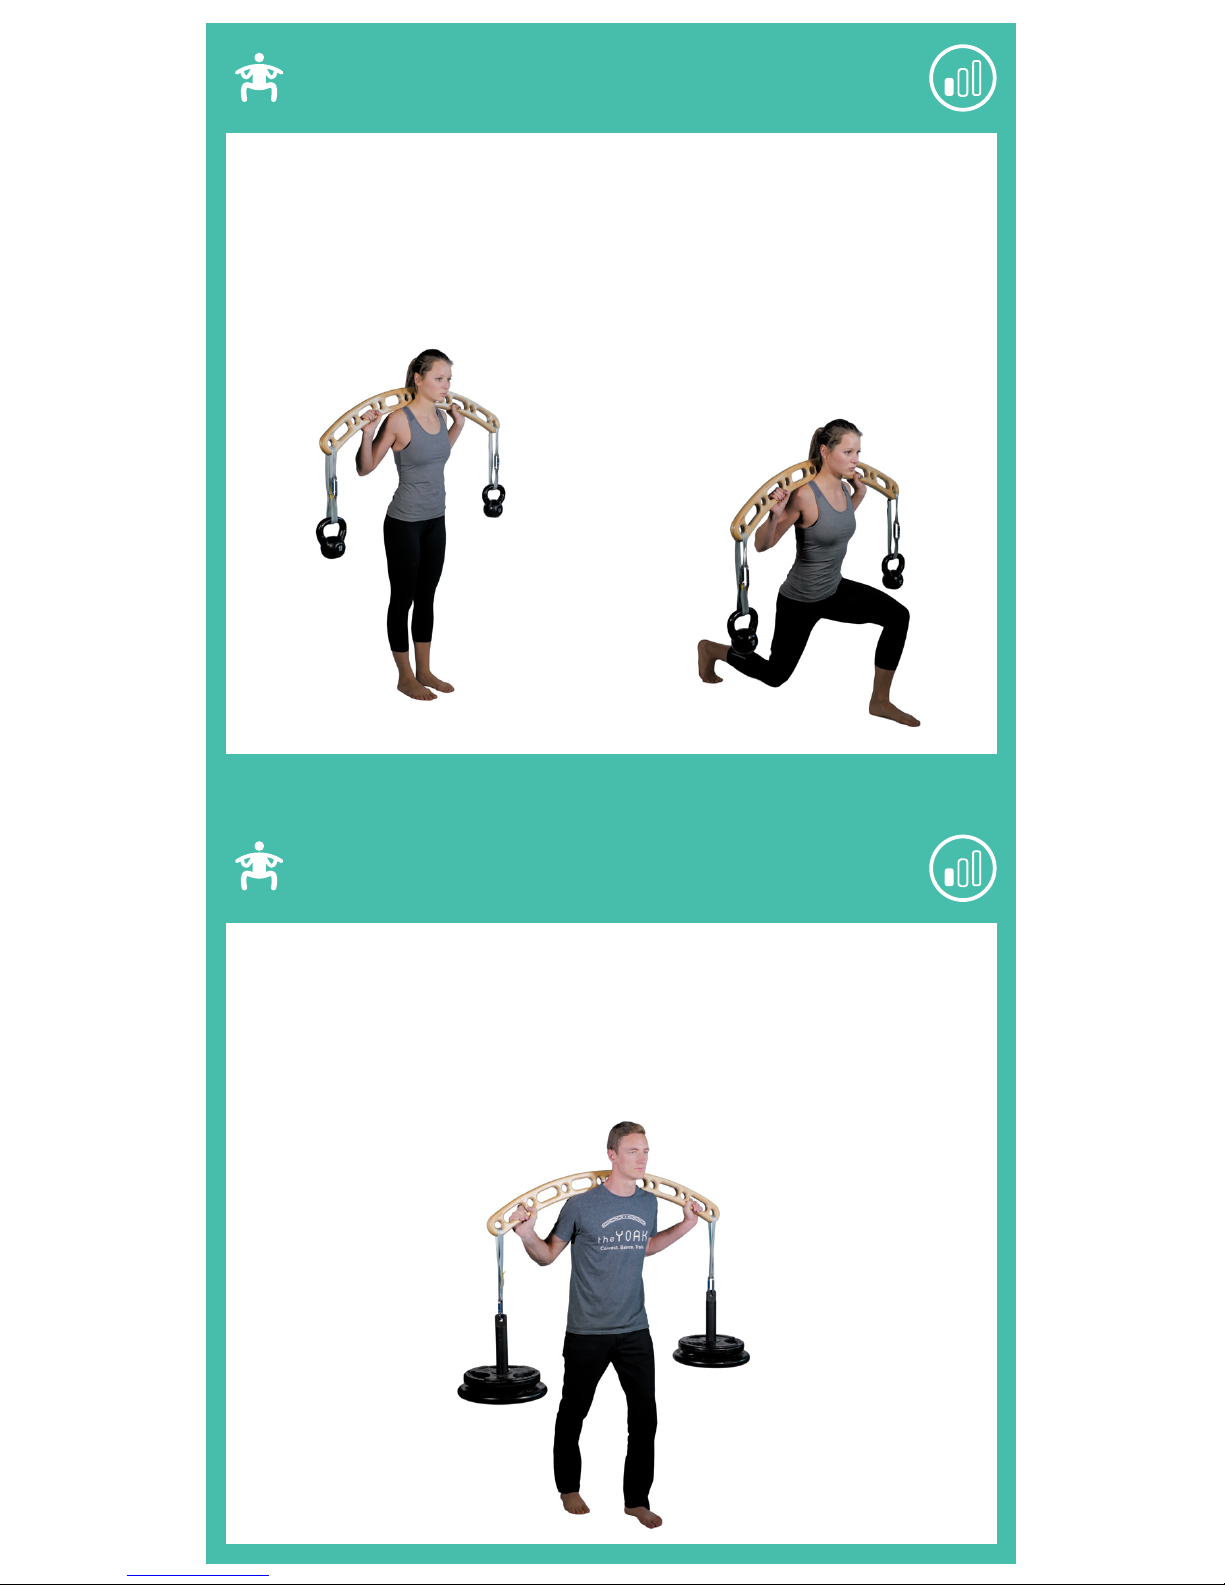
Start Small
In the spirit of research on stability training, optimal
results can be achieved with minimal weight. Get
use to the pendular movement of loads before
increasing the weight.
Be Mindful
When loading the device in suspension mode,
use the angles of inclination shown in the poster
to ease into more challenging variations.
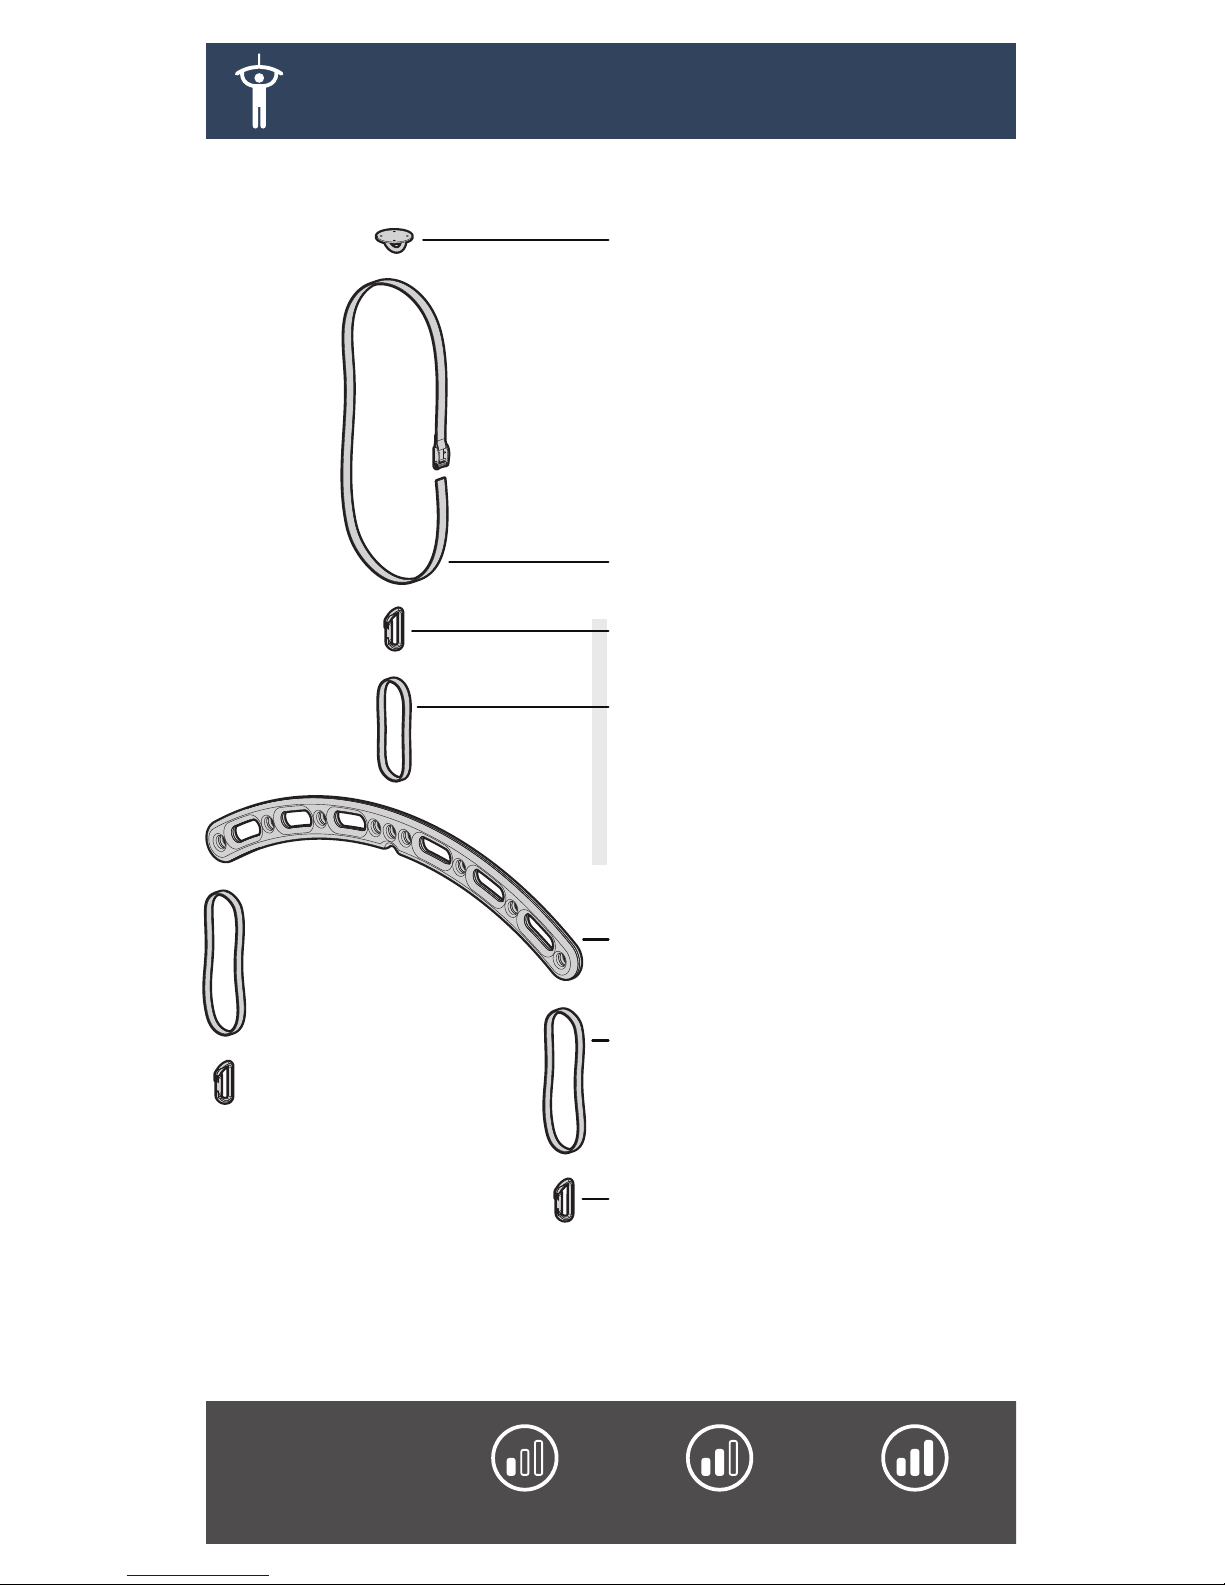
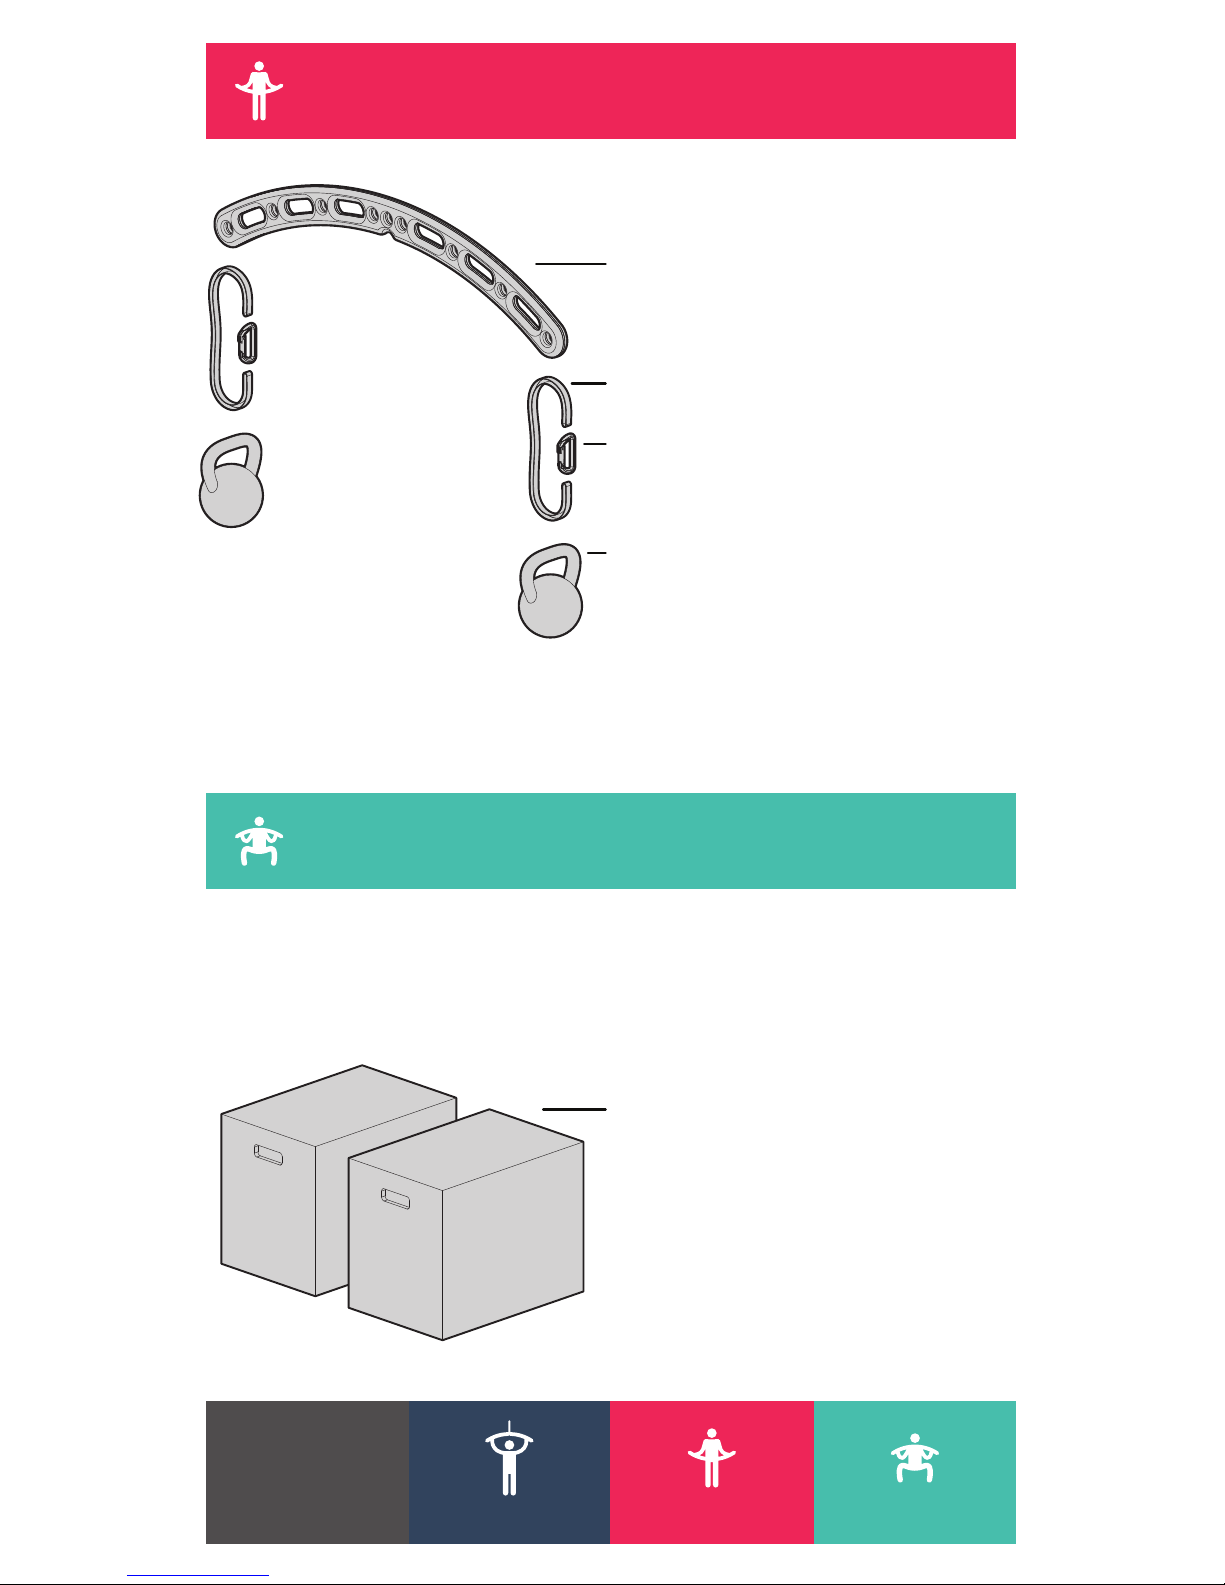
Explore hand placement and grip options.
Have Fun!
The YoakTM offers a novel range of motion. Play
with the rotational component when pushing and
pulling in suspension mode. Get creative with your
exercises and loading options.
#getyoaked
Connect and Share with us at:
TheYoak.com
The Yoak The Yoak@getYoakedtheYoak

Anchor Point
Cam Strap
Carabiner
Sling (short)
Hang the Yoak from a point that can
support the weight safely. Suitable
anchor points may include:
• Ceiling Mount Hardware (shown)
• Wooden or steel beam
• Tree Branch
• Squat/Pull-up Rig
• Mounted Pull-Up Bar
• Playground structure, soccer net, etc.
*Note, the sling and carabiner are
optional. The Cam Strap can be used to
hang the Yoak, but using the Carabiner
and the Sling allow for quicker transitions
between modes.
Attach handles or rings either directly to
the carabiners, or by looping both ends
of the slings through the carabiners.
*Note, ensure the full length of the slings
is used when doing Push style exercises
to avoid potential injury.
Carabiner
Sling (48”)
The Yoak
Suspension Mode Setup
AdvancedIntermediateBeginner
Exercise Level
of Difficulty:

In the Squat Mode the Yoak is setup the same as shown above for the Bar Mode.
Additionally, you’ll need two identical supports to rest the loads on and to allow
you to get under the Yoak.
Load
Hang pretty much whatever you want
from the Yoak. May we suggest:
• Kettlebells (shown)
• Buckets, Bags or Bladders
• Loading Pins
• Olympic Plates
Experiment with altering the sling length
and see what works for your movements.
Sling
Carabiner
The Yoak
Load Supports
Space your supports so that both loads
are centered on them and so you can
comfortably stand between. Potential
supports include:
• Plyoboxes (shown)
• Stools
• Chairs
Bar Mode Setup
Squat Mode Setup
Suspension Mode Bar Mode Squat Mode
Mode Colors
and Icons:

Asymmetric
and/or
un-balanced weight
Static
equal weight
equal sling length
symmetric
Different sling length,
Dynamic slings (ie: bands)
and/or
Dynamic load (ie: water)
Wider foot stance
=
more rotational stability
=
easier
Higher angle of incline
=
easier
Suspension Stability Progression
Suspension Degree of Difficulty Variation
Bar Stability Progression
Stability
more less
Stability
more less

1. Set the handles at your desired height to manage difficulty
2. Load the handles with your body weight evenly via your hands
while engaging your core muscles to a reverse plank position
3. Pull your body towards the handles
4. Lower your body back to the reverse plank position
Sling Row
1. Suspend the Yoak to your desired height
2. Suspend your body weight by holding on to the Yoak at your
desired hand position
3. Flexing your arms, pull your body towards the Yoak
4. Lower yourself to the starting position in a controlled manner
Pull-up (wide grip)

1. Set the handles at your desired height to manage difficulty
2. Load the handles with your body weight evenly via your hands
while engaging your core muscles to a reverse plank position
3. Pull your body towards the handles
4. Lower your body back to the reverse plank position
1. Suspend the Yoak with the sling approximately 12-18" off the ground
2. Load the slings with your feet evenly while engaging your core
muscles to a plank position
3. Maintain this position and repeat as desired
Sling Plank (feet)
1. Suspend the Yoak with the handles at your hip height
2. Load the handles with your body weight evenly via your hands while
engaging your core muscles with your legs hanging towards the ground
3. Slowly lower your body towards the ground keeping your elbows in
4. Straightening your arms press your body back to the starting position
Sling Dip

1. Suspend the Yoak with the handles at your desired height
2. Grip the handles and evenly load them with your body weight
while engaging your core muscles to a plank position
3. Lower your body the desired depth
4. Push your body back to the plank position
Sling Push-up
1. Suspend the Yoak from one end so that it hangs vertically
2. Starting at the bottom of the Yoak, reach up and suspend your
weight off the ground
3. Reach up and pull your body towards the top of the Yoak,
alternating your hands as you go
Banana Climb

1. Load the Yoak and lift it while engaging your core muscles
2. Walk your desired distance and back
3. Repeat on opposite side
Farmer’s Walk
Bent Over Row
1. Load the Yoak
2. Bend your legs, engage your core and pickup the Yoak
3. Maintaining a straight back, bend forward
4. Maintaining this position lower the Yoak towards the grounds
5. Lift the weight back to the starting position by drawing your elbows
back past your ribs

1. Load the Yoak and step under it and line up the Cervical Notch
over your spine
2. Engaging your core, straighten your legs
3. Step forward and squat until thighs are at your desired height
4. Repeat as desired and step back to unload the Yoak
Squat
1. Load the ends of the Yoak with a weight that enables you to safely
bring the device to your chest
2. Press the Yoak slowly overhead minimizing any jerking or dynamic
movements
3. Lower the Yoak to your chest and repeat as desired
Standing Overhead Press

1. Load the Yoak and step under it and line up the Cervical Notch
over your spine
2. Engaging your core, straighten your legs
3. Step forward and lunge to your desired gait and depth
4. Repeat as desired and step back to unload the Yoak
Lunge
1. Load the Yoak and step under it and line up the Cervical Notch
over your spine
2. Engaging your core, straighten your legs
3. Take small steps forward as desired
Yoke Walk

Disclaimer of Liability: e Yoak must be used in accordance with the manufacturer’s User Guide and only for
the purpose for which it was designed. e manufacturers, retailers, inventors and distributors of this product shall
not be liable for any consequential damages, injury, paralysis or death arising from any use or misuse of the product.
In using this product, you, the purchaser, user or customer of the Yoak, assume the responsibilities of ownership,
use and operation, and you agree to hold harmless the Yoak’s manufacturers, retailers, inventors and distributors, as
well as their owners, partners and employees for any incident or action involving the use of the product.
Setup in Suspension Mode with
handles or rings attached.
Perform all the exercises in
sequence and repeat for 3 sets.
Sample Workouts
Push-Pull Workout Leg & Back Workout
EXERCISE REPS
Pull-Up 6-8
Push-Up 6-8
Sling Row 6-8
Dip 6-8
Squat (bodyweight) 12-15
..........................
..........................
..........................
..........................
..........................
Setup in Bar Mode. If need be use
Squat Mode w/ Load Supports.
Perform all the exercises in
sequence and repeat for 3 sets.
EXERCISE REPS
Squat (Yoak only) 12-15
Squat (weighted Yoak) 8-12
Lunge (alternating) 8-12
Bent Over Row 8-12
Overhead Press 8-12
Yoak Walk 50m
..........................
..........................
..........................
..........................
..........................
..........................
Warning: Exercise can be dangerous and the use of the Yoak is inherently risky. Responsibility lies with
you, the purchaser, user or customer of the Yoak, to get proper instruction and to act safely and in
accordance with the uses and specications outlined by the Yoak product literature. It is your
responsibility to learn and practice safe and proper use of the product. e Yoak User Guide is available
online at www.eYoak.com. If you have any questions about the specic function of the Yoak, contact
the retailer from which you purchased it before using.
Inspection: Inspect your Yoak before each use. If you notice what might be a problem, seek a
professional opinion before continuing use of the product. Check hardware for cracks, dents, loose parts
and general safe operation. Ensure the carabiners are used in accordance with their user guide and
inspection protocol. Check ropes, webbing, and any other soft materials used for loading the Yoak for
frays, wear, and tears. If you have any questions concerning the inspection of the Yoak, contact the
retailer from which you purchased this product before use.
Safety Warnings

Do not use the Yoak directly on the ground (except in Parallette Mode). It
is very unstable when balanced on the apex of the curve or balanced on
both ends of the curve. Using the Yoak like this can result in serious injury.
Not Safe for Ground Use
Ensure Proper Clearances
24”
(60cm)
24”
(60cm)
44”
(110cm)
Ceiling Clearance: When the Yoak is suspended ensure there is sufficient
clearance (min. 24” / 60cm) above and around the Yoak so it doesn’t hit
the ceiling or surrounding objects.
Head Clearance: When the Yoak is suspended ensure there is sufficient
clearance between your head and the Yoak; 44” / 110cm when doing
Push and 24“ / 60cm when doing Pull exercises.
Be aware that if one end of the Yoak is pulled or released quickly, the
other end can cause serious injury.
Table of contents
Popular Fitness Equipment manuals by other brands

New Image
New Image FITT GYM Assembly and user's guide

HMS Premium
HMS Premium H6319 Manual instruction

ICON Health & Fitness
ICON Health & Fitness NTRW15121-INT.0 user manual

BLUEFIN Fitness
BLUEFIN Fitness CURV MiNI instruction manual

Hoist Fitness
Hoist Fitness ROC-IT RPL-5356 owner's manual

Ironmaster
Ironmaster Spotting Stand operating instructions

ICON
ICON WESLO MOMENTUM G 3.2 user manual

FREE MOTION
FREE MOTION EPIC STRENGTH CHEST owner's manual

SPRI
SPRI AQUA FITNESS BAG Exercise guide

Rogers
Rogers Zone Reactor manual

CYBEX
CYBEX Total Body 770AT Assembly Instructions after Remanufactured

Bowflex
Bowflex SelectTech BD1090i Owner's manual and workout guide