YouLess LS110 User manual

User Manual
YouLess energy monitor
Model LS110
Version: 1.3-EN (Concept)
Date: 10/08/2013

Copyright and Trademark Information
YouLess is a trade name and registered trademar of PostFossil B.V.
© 2012-2013 PostFossil B.V.
All rights to this document are reserved.
All mentioned trademar s and registered trademar s are the intellectual property of their
respective owners.
Version History
Version Date Description
1.0 05/12/2011 Initial release
1.1 01/03/2012 myEnersave->Bidgely rebranding change
1.2 07/03/2013 Added flash procedure and small changes
1.3 (concept) 10/08/2013 Minor changes and improvements
Used Sym ols
This text is relevant for computer users running the Microsoft Windows operating system.
This text is relevant for computer users running the Apple OS X operating system.
This text is relevant for computer users running the Linux operating system.
Warning of a potential pitfall that can occur in a specific case.
General information or tip.
2 YouLess User Manual

Contents
YouLess description.......................................................................................................................................... 5
Device usage................................................................................................................................................................... 5
Type indication................................................................................................................................................................. 5
Pac age contents............................................................................................................................................................ 5
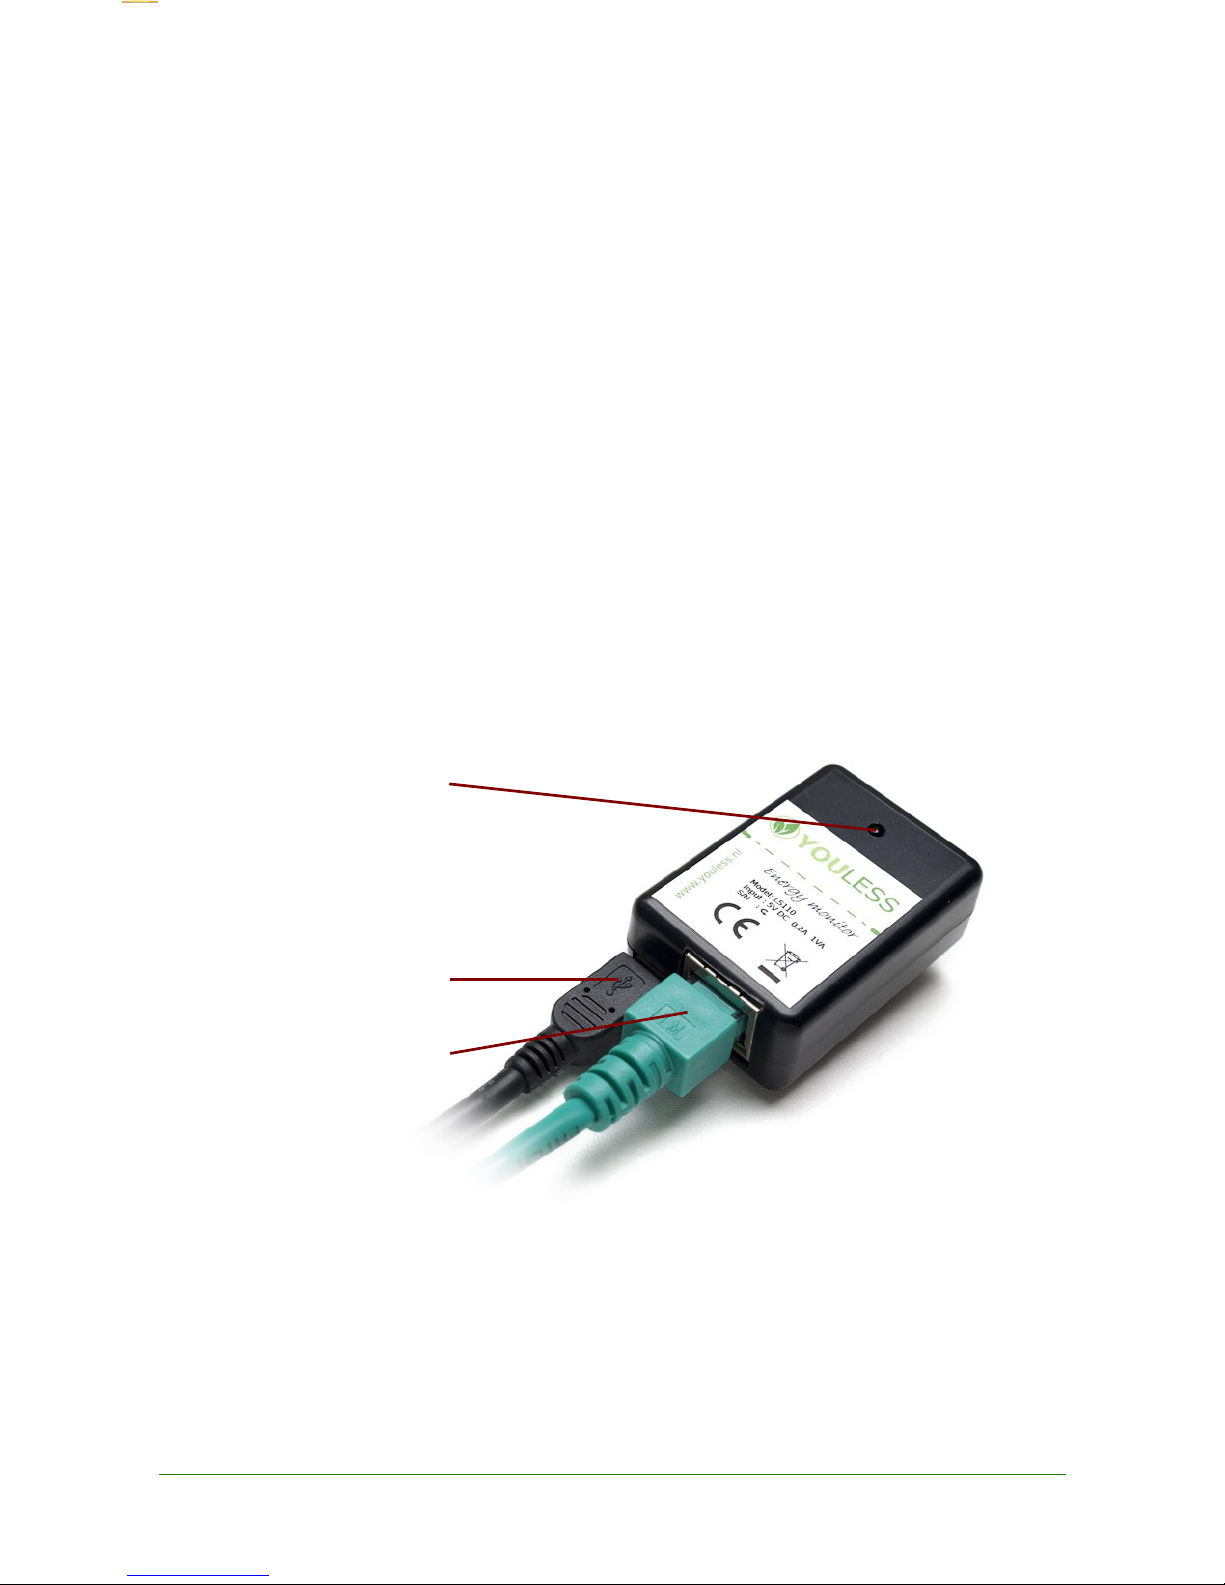
Physical interface............................................................................................................................................................ 6
Preconditions................................................................................................................................................................... 7
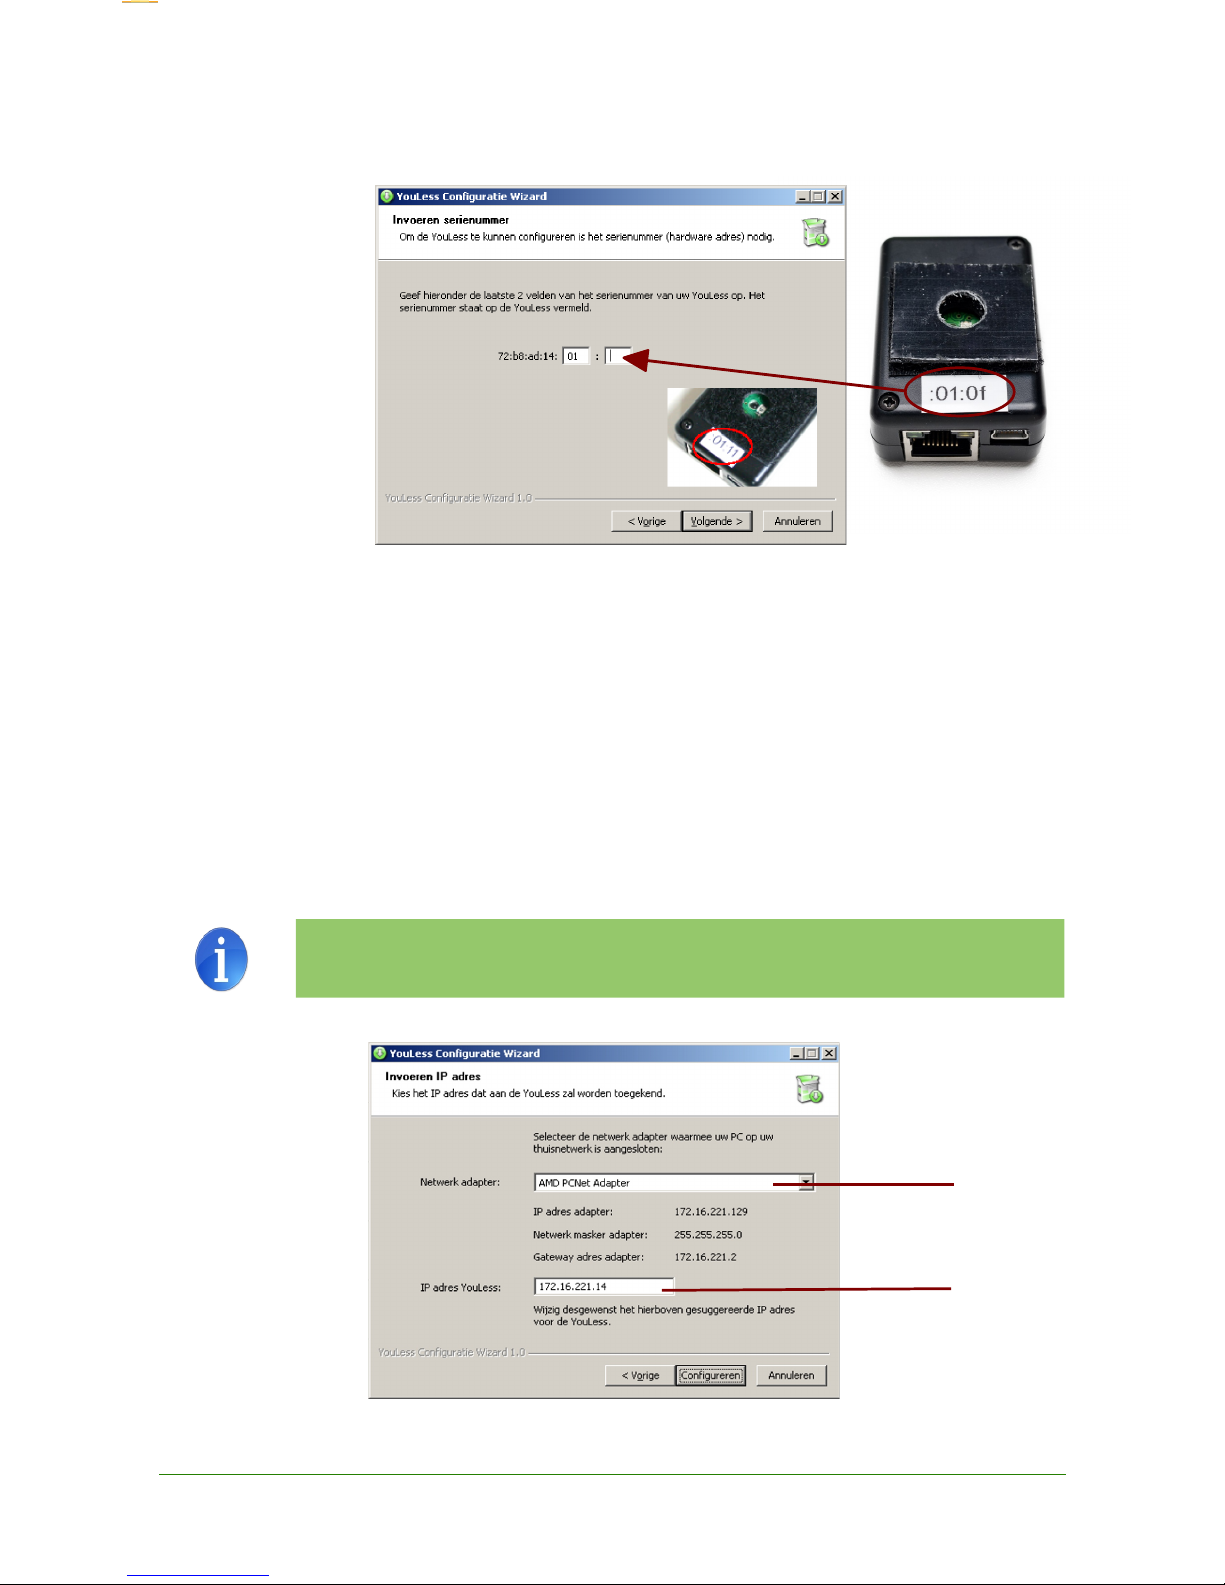
Networ configuration....................................................................................................................................... 8
Configuration with Windows configuration wizard........................................................................................................... 9
Requirements............................................................................................................................................................. 9
Configuration wizard.................................................................................................................................................. 9
Manual networ configuration........................................................................................................................................ 11
Manual networ configuration on Mac OS X............................................................................................................11
Networ configuration on Linux.....................................................................................................................................13
Meter settings................................................................................................................................................................ 13
Physical installation on the electricity meter.................................................................................................... 14
Positioning..................................................................................................................................................................... 14
Analog meter............................................................................................................................................................ 14
Digital meter.............................................................................................................................................................15
Verification..................................................................................................................................................................... 15
Analog meter............................................................................................................................................................ 16
Digital meter.............................................................................................................................................................16
Web browser interface.................................................................................................................................... 17
Overview........................................................................................................................................................................ 17
Home............................................................................................................................................................................. 17
Configuration................................................................................................................................................................. 18
Networ .................................................................................................................................................................... 18
Electricity meter....................................................................................................................................................... 19
Upload...................................................................................................................................................................... 21
System..................................................................................................................................................................... 22
Logging.......................................................................................................................................................................... 23
Measurements......................................................................................................................................................... 23
Special functions............................................................................................................................................. 25
Reset to factory defaults................................................................................................................................................ 25
Generic procedure................................................................................................................................................... 25
Specific procedure................................................................................................................................................... 26
Flashing firmware updates............................................................................................................................................ 26
Requirements........................................................................................................................................................... 26
Flash procedure....................................................................................................................................................... 27
Blind flashing............................................................................................................................................................ 28
Flashing with a direct ethernet cable connection.....................................................................................................28
Troubleshooting....................................................................................................................................................... 28
Information sources........................................................................................................................................ 30
YouLess website............................................................................................................................................................ 30
Bidgely........................................................................................................................................................................... 30
PVOutput....................................................................................................................................................................... 30
YouLess User Manual 3

Solar-Yield..................................................................................................................................................................... 30
Technical Specifications.................................................................................................................................. 31
Safety and warranty........................................................................................................................................ 32
Safety information.......................................................................................................................................................... 32
Maintenance.................................................................................................................................................................. 32
Warranty........................................................................................................................................................................ 32
Conformity..................................................................................................................................................................... 32
Contact.......................................................................................................................................................................... 33
Appendix......................................................................................................................................................... 34
4 YouLess User Manual

YouLess description
The YouLess is a networ ed digital device that reads and stores the electricity consumption
from the main electricity meter. Current and historical meter readings are made available
digitally on the local networ (LAN) and / or on the internet, via the device ethernet networ
connector.
These data readings can be displayed on various devices, such as des top computers,
smartphones and tablets. This way, electricity consumption information is made visible in the
users everyday digital environment.
Various software applications that can connect with the YouLess are made available for
download freely.
Because of the open data interface of YouLess, it is also possible for third parties to read the
measurement data from the networ , and to integrate them in custom software or systems.
Device usage
The YouLess is designed to inform about how much electricity is consumed and when pea s
occur, which creates awareness. Through this awareness, it is made easier to identify
unnecessary energy consumption and thus save on energy costs.
Type indication
This manual applies to the YouLess model LS110.
Package contents
The YouLess comes as a set with the following components:
•YouLess LS110
•USB wall mount power supply
•USB power cable
•Ethernet networ cable
YouLess User Manual 5

Physical interface
The YouLess is equipped with two connectors:
1. USB mini B connector for power supply
2. RJ-45 LAN connector for connection to a wired ethernet networ .
The LAN connector features two built-in LEDs:
green: An ethernet lin with a networ device (switch, router or modem) is
established
yellow: Networ activity indicator (reception of data)
NB: when no networ lin is established, the yellow LED will function as an
alignment help for positioning the YouLess on an analog meter.
The bottom side photo-sensor is used to read the electricity meter.
The top side green status LED gives information about the device state. The following LED
status signals are possible:
Status LED signal Signal meaning
2 seconds on, followed by 2 short
consecutive pulses
The device has been restarted after a (power) reset
Off Default state: device is waiting for a measurement pulse
Single pulse The device detected a measurement pulse.
Blin ing slowly
(1 second on, 1 second off)
The device networ adapter has not yet been configured and
is in factory default mode; no IP address has been assigned
Blin ing
(½ second on, ½ second off)
The device is in de firmware update mode and waits for the
firmware flash utility to start flashing
Blin ing fast The firmware flash utility is updating the device firmware by
programming the device flash memory
Blin ing very fast The factory settings reset procedure has been performed and
the device is busy wiping the internal non-volatile memory.
Continuously on The web interface password reset procedure has been
performed and the device is now accessible without a
password
6 YouLess User Manual
LAN
Power
Status LED
Sensor

Preconditions
To ma e full use of all YouLess benefits, the following preconditions must exist:
1. A wall soc et for the YouLess USB AC power adapter must be present. Alternatively,
the YouLess can be powered from a device with a USB port, for instance a
modemrouter. The provided USB cable can be used for this purpose.
2. The electricity meter on which the YouLess will be deployed, must provide one of the
following options for reading the meter:
•a rotating metal disc with a blac or red mar ing (analog meter)
•a LED pulse indicator (digital meter)
Generally, all electricity meters feature either of these readout capabilities, thus
ma ing the YouLess universally usable.
3. In order for the YouLess measured values to be available on the local networ
and/or the internet, the YouLess must be connected with the local networ using the
provided ethernet cable. Therefore, it is convenient if the internet modemrouter or
another type of networ connection soc et is located near the meter.
The latter precondition is not strictly required since the YouLess features an internal logging
memory in which up to 1 year of readings can be recorded. This log data, for example, can
be read out at certain times with a laptop and a direct cable connection. However, in such a
scenario not all capabilities of the YouLess are exploited. It is therefore recommended to use
the YouLess as a connected device in order to fully benefit from all capabilities.
YouLess User Manual 7
If a wired networ access near the electricity meter is not available or practical, a
wireless ethernet adapter (not provided) can be used to wirelessly connect with an
available WiFi networ . A WiFi signal near the electricity meter is necessary for this
alternative connection method.
Alternatively, if no WiFi signal is available near the meter, a homeplug powerline adapter
(not provided) set can be used to connect the YouLess with the wired networ . In this case,
the networ signal is transmitted over the mains power cables using wall mount powerline
adapters.

Network configuration
The YouLess is a networ device, li e for example a Networ Attached Storage (NAS) or a
media player. Such devices must have a networ IP address assigned to them in order to be
accessible on the networ . The YouLess utilizes a fixed (static) IP address which is to be
configured when installing the device.
Since it can be useful to be able to access the YouLess web interface during the physical
installation on the electricity meter, the topic of networ configuration is covered in this
manual before the physical installation on the electricity meter. Thus, the YouLess does not
need to be placed on the meter yet in order to perform the networ configuration. It is
sufficient for the YouLess to be connected somewhere on the local networ and to be
powered.
Connect the YouLess to the local networ as follows:
1. Plug the USB AC adapter into a wall soc et and connect the YouLess to the USB
adapter with the provided USB mini cable.
2. Verify that the status LED on the YouLess blin s slowly to indicate that the networ
settings are not yet configured. If the LED is not blin ing slowly, please refer to
paragraph Reset to factory defaults on page 25.
3. Connect the LAN connector to the internet modem or other networ appliance using
the provided networ cable. The networ connector rectangular green lin LED lights
continuously to indicate that there is a networ lin . The networ connector
rectangular yellow LED blin s occasionally to indicate networ activity.
8 YouLess User Manual
2
1
3

Configuration with the Windows configuration wizard
In order to ease the networ configuration, a networ configuration wizard tool for Windows
is provided. This wizard automatically assigns an IP address to the YouLess after stepping
through a few wizard screens.
Requirements
The following elements are required:
•The wizard executable file YouLess-config.exe. This utility can be downloaded from
the YouLess site http://www.youless.net
•A Windows XP/Vista/7/8 PC with a networ connection (wired or wireless).
•The configuration wizard must run with Administrator privileges. Windows will
automatically as for permission for elevated execution privileges.
•Any firewall software should preferably be disabled while running the configuration
wizard.
Configuration wizard
De YouLess networ settings can be configured using the configuration wizard:
1. On the Windows PC, run YouLess-config exe. Clic “Next” after the welcome
screen.
2. Ma e sure that the YouLess is powered and connect the YouLess to the local
networ . Clic “Next” to proceed.
YouLess User Manual 9
Firewall software might obstruct the configuration wizard. Therefore, it is recommended
to temporarily disable firewall software while running the configuration wizard.
The configuration wizard requires Administrator privilages only to access certain
networ functions needed to configure the YouLess.
The configuration wizard does not install any software on your PC and does not apply
any changes to your PC. The wizard is run only once and therefore does not need to
be installed. The sole purpose of this utility is to ma e the networ configuration easier.

3. In the first screen, enter the last two combinations of the YouLess serial number.
These two combinations can be found on the bac of the YouLess device. Clic
"Next" to continue.
4. On the next screen, select the networ adapter from the drop down list which
connects the PC to the home networ . Most computers will have one (fixed) or two
(fixed + wireless) networ adapters. The wireless adapter can usually be recognized
by the name (WiFi or Wireless). If the wireless networ has the same IP numbering
as the wired networ , then both types of adapters can be selected for the purpose of
configuration. If however these networ s are different, then the wired networ
adapter must be selected.
5. After the networ adapter is selected, the associated networ numbering topology of
the networ is automatically detected and an appropriate IP address for the YouLess
will be suggested. Optionally, an alternative IP address may be entered. Clic
“Configure” to start the configuration process.
6. The wizard will now show the progress of the YouLess configuration process. Finally,
on the last screen a hyperlin to the YouLess will be shown. Clic on this hyperlin
to browse the YouLess web interface.
10 YouLess User Manual
4
5
It is recommended to ma e note of the assigned IP address and / or create a boo mar
in the browser. This IP address is needed to access the YouLess with browsers,
apps and widgets.

Manual network configuration
It is preferable to use the configuration wizard as this will quic ly and easily ta e care of the
networ configuration. However, the networ configuration can be also be done manually
without using the configuration wizard.
For this purpose, the networ settings of the (Windows, Mac, Linux, ...) computer, with which
the YouLess networ setting is to be configured, will have to be temporarily altered according
to the following generic steps:
1. Connect the YouLess to the local networ as described on page 8. Ma e sure that
the computer with which the YouLess is to be configured is also connected with this
local networ , preferably with a fixed networ cable.
2. Change the networ settings of the computer so that the IP address of that computer
is set up with a netmas of 255.255.255.0 and an IP address of 10.10.10.11. If you
are using Mac OS X, refer to the next paragraph for a more specific guide.
3. Use a browser to navigate to http://10.10.10.10. This is the YouLess factory default
IP address.
4. Select the “Networ ” menu in the YouLess web interface and enter an IP address for
the YouLess that matches the networ numbering topology (refer to paragraph
Network, page 18). For example, 192.168.1.14 could be used in the situation where
addresses on the local networ begin with the three numbers 192, 168 and 1.
5. Enter the gateway IP address (the LAN IP address of the modemrouter) in the
Gateway field. This could for example be 192.168.1.1 or 192.168.1.254.
6. Restore the computer networ settings to the original settings and then navigate
with a browser to the IP address that was set in step 3 to verify that the IP
configuration wor s correctly.
Manual network configuration on Mac OS X
Since the configuration wizard does not run on OS X, step 2 and step 5 of the generic
manual configuration guidelines are made more specific for this particular operating system
in this paragraph. With regard to the other steps, the generic steps described in the previous
paragraph can be followed.
YouLess User Manual 11
It is recommended to ma e note of the assigned IP address and / or create a boo mar
in the browser. This IP address is needed to access the YouLess with browsers,
apps and widgets.
In rare cases it is possible that the modemrouter bloc s communications
with these altered networ settings. In such a situation, the YouLess
can be connected directly with the computer using the provided networ
cable. The computer networ adapter should support Auto MDI / MDI-X for
this to wor . For modern computers, this is usually the case.

•Step 2a: Open the System preferences window and select Network.
•Step 2b: In the list to the left, select the networ adapter with which the computer is
connected tot the local networ . If this connection is established with a fixed networ
cable, then this will be the Ethernet adapter. Ma e note of the Router IP address
(encircled in red in the figure below), as this will be needed in step 5 of the generic
guide.
•Step 2c: From the Configure IPv4 drop-down, choose Manually. Enter the IP
address 10.10.10.11 in the IP address field. The subnet mas can remain set to the
default value 255.255.0.0
12 YouLess User Manual

•Continue with the generic guide steps 3 to 6 from the previous paragraph. In step 4
of the generic guide, the router IP address listed in step 2b is needed. In order to
obtain a suitable IP address for the YouLess device, replace the last digit of this
router address with 14 (or an other available address) and enter this as the device
IP address. In step 5 of the generic guide, the router address from step 2b can be
entered as gateway address. Restore the computer networ settings in step 6 by
selecting Using DHCP in the Configure IPv4 drop-down.
Network configuration on Linux
Linux users can configure the YouLess networ interface by entering the following
commands in a shell:
sudo arp -s <ip> 72:b8:ad:14:yy:zz
ping <ip>
Where <ip> is the IP address that is to be assigned, and :yy:zz matches the last 2
combinations of the device serial number. These 2 number combinations can be found on
the bac of the YouLess.
On success, the ping command will return without and error return value (in other words, the
ping succeeds). Also, the YouLess status LED will stop blin ing.
The newly set IP address can now be navigated to with a browser. Select the “Networ ”
menu in the web interface, and enter the gateway IP address as described in paragraph
Network on page 18.
Meter settings
For a proper configuration of the YouLess, the electricity meter type and meter constant
need to be configured as well. Configure these parameters before starting the physical
installation of the YouLess on the electricity meter, according to the instructions given in
paragraph Electricity meter on page 19.
YouLess User Manual 13

Physical installation on the electricity meter
The YouLess is fitted with an adhesive strip on the bac of the device. An identical separate
adhesive strip is included, which has to be put on the electricity meter. The YouLess can
then be attached by simply "clic ing" it on the electricity meter. If needed, the YouLess can
just as easily be detached from the meter as well.
Positioning
Clean the surface of the electricity meter to ensure optimal adhesion to the meter.
Remove the cover film of the separate adhesive strip, and put the strip on the meter
according to the directions provided below.
Analog meter
On analog meters (rotating disc) the YouLess detects the movement of the blac or red
mar ing on the metal disc. Every time the mar ing comes into view, a measurement pulse is
registered.
Put the adhesive strip on the meter in such a way, that the middle of the hole in the strip is
aligned with the middle of the rotating disc.
Subsequently, attach the YouLess on the meter by aligning the strip on the meter with the
strip on the YouLess. Preferably, the connectors of the YouLess will be pointing downwards.
A method of achieving correct alignment, is to eep the red light beam focused on the disc
center. Keep an eye on the red light dot, while loo ing at it sideways. Now move the Youless
ever closer to the meter while eeping the red light dot on the disc center, until finally the
YouLess is in position.
On the front of the YouLess, a dotted horizontal line is visible. This line should align with the
rotating disc horizontal plane.
The alignment should be done quite precisely. The YouLess has a built-in alignment help
function to aid in fine-tuning the alignment.
When the YouLess is powered, but not yet connected to the local networ , the yellow LED in
the ethernet connector functions as an alignment indicator. The faster the LED is blin ing,
the higher the sensor input level of reflected light is. When fine-tuning to the last millimeter, a
higher input level is indicative for a better alignment with the metal disc.
14 YouLess User Manual
In order to use the alignment aid, the YouLess meter configuration setting must be set
to the Analog meter type. Refer to paragraph Meter for this configuration setting

Digital meter
On digital meters, the YouLess detects measurement pulses coming from a visible or
invisible (infrared) LED on the electricity meter. Whenever this LED flashes, a measurement
pulse is recorded.
Locate the pulse LED position on the meter. Digital meter often have multiple LEDs. The
pulse LED can be recognized by the meter constant which is usually printed near to it, e.g.
“1000 Imp/ Wh” or “500 Imp/ Wh”. Put the adhesive strip on the meter in such a way that
the pulse LED can be seen through the hole in the strip.
Subsequently, attach the YouLess on the meter by aligning the strip on the meter with the
strip on the YouLess. Preferably, the connectors of the YouLess will be pointing downwards.
Verification
After the YouLess has been attached on the meter, the correct positioning can be verified
and perhaps adjusted if necessary. The latter is especially of importance with analog meters.
YouLess User Manual 15
The meter type and the meter constant have to be already configured in the YouLess,
according to the instructions in paragraph Meter in order to verify the positioning.

Whenever the blac or red mar ing on the rotating disc (analog meter) comes into view, or
the pulse LED (digital meter) gives a measurement pulse, the YouLess status LED will briefly
flash to indicate the pulse detection. With analog meters, it can ta e a minute or two before
the YouLess has adjusted the detection algorithm to the lighting conditions.
The detection of a measuring pulse can also be seen on the Home page of the YouLess web
interface.
Each time a pulse is detected, this is briefly indicated by a dot behind the Sensor signal
value. The Wh counter is then increased. The YouLess Wh value does not necessarily
have to be the same value as the Wh of the meter itself, but it should increase in value
synchronously with the Wh value on the meter.
Analog meter
On analog meters, the YouLess shines light on the rotating disc. The Sensor signal value
gives the average level of reflected light that falls on the detector. For optimal detection this
value should preferably lie between 6% and 80%.
Each time a pulse is detected, this is briefly indicated by a dot behind the Sensor signal
value. The Sensor signal value shown during that time, gives the level of reflected light
during the pulse detection, as opposed to the average level which is normally given.
Because the blac /red mar ing on the disc attenuates the light reflection, this value will be
lower than the average value. For a reliable detection the Sensor signal level during a pulse
detection should be at least about 40% lower than the average level normally given. When
the Sensor signal level becomes too high (far in excess of 80%) it is possible that the 40%
drop cannot be achieved because of signal saturation. It is recommended to alter the
positioning in such cases in order to establish a lower average signal level.
In case of doubt regarding the positioning of the YouLess, one can also monitor the Sensor
signal level while moving the YouLess until a correct Sensor signal level is found. Since the
Sensor signal value is averaged over a longer period of time, this should be done slowly.
Alternatively, the alignment aid can be used as described in paragraph Analog meter, page
14.
Digital meter
Each time a pulse is detected, the Sensor signal value gives the light intensity level of the
measured pulse. This level should preferably be around 100% and in any case should be at
least 70% for a reliable detection.
16 YouLess User Manual
It is recommended that the power consumption level is not too low during the verification,
so that pulse detections occur frequently enough to quic ly verify the correct positioning.
Meter Wh value is increased
Pulse detection is indicated with a dot

We rowser interface
The YouLess web interface can be accessed with any web browser such as Internet
Explorer, Firefox, Safari, Chrome, etc. Enter the YouLess IP address in the browser address
field (See page 8) while being connected to the local networ .
Besides the standard web interface HTTP port 80, the YouLess is also accessible on port
32848, 16464 and 49232. These alternative ports are usefull in port forwarding setups when
the modemrouter is unable to translate port X to port Y, limiting the number of devices that
can be accessed on port 80 to one.
In this chapter the functionality of the various web pages are documented.
Overview
The YouLess web pages consist of a menu part to the left and the selected menu screen on
the right.
On the Home page, current version and status information is shown.
The menu group configuration groups the pages with which various YouLess settings can be
configured.
In the menu group Logging, reports can be generated based on historical measurements
that have been logged in the internal memory of the YouLess.
In the next paragraphs, these pages are further detailed with regard to their functionality.
Home
On the Home pagine, the following fixed identification information is presented:
•Model: YouLess device type specification
•Firmware: Version of the firmware loaded in the YouLess
YouLess User Manual 17

Also, the following dynamic information is presented on this page:
•Meter reading: The current YouLess internal Wh meter counter. This counter value
does not necessarily have to be the equal to the reading of the
electricity meter itself (see also paragraph Electricity meter, page
19).
On each pulse detection, the reading value is incremented.
•Power: Current power consumption in Watt.
On each pulse detection, this power value is calculated again and
automatically updated on this page.
•Sensor signal: The average light intensity level measured by the YouLess sensor
eye. For a digital meter, this value will be 0% most of the time.
On each measurement pulse detected, this value will briefly
be near 100%.
For analog meters, the average light intensity level of the light being
reflected by the rotating disc's edge is measured.
Whenever a measurement pulse is detected, a dot will be visible
briefly after the intensity level value (see also paragraph
Verification, page 15) in both analog and digital mode.
•Upload: In case the YouLess is configured to send measurement data to an
online energy manager service, the upload status is shown here.
If the most recent upload was successful, then the status will be OK.
Between parentheses, a countdown in seconds till the next upload
is shown. If there was no successful update during a longer period
of time, or if no upload is configured, an asteris (*) is shown. If an
explicit error is returned by the online service, then the (HTTP) error
code is shown between parenthesis.
Configuration
Network
The networ settings of the YouLess can be configured on the Network page.
The ethernet hardware address (MAC address) of the YouLess can be found on this page.
This is a unique identification number, which is also the device serial number of the YouLess.
This number cannot be altered. The first 4 MAC address number combinations for YouLess
model LS110 are fixed to 72:b8:ad:14. The last 2 number combinations are variable; these
numbers are also printed on the bac of the device.
18 YouLess User Manual
If the configuration wizard was used during the YouLess installation, then the networ
setting have already been configured correctly by the configuration wizard.
After a power outage, the YouLess meter reading will be preserved with a resolution of
one tenth of a Wh. If for example the meter reading were to be 3629,123 Wh prior to
the outage, the meter reading after the outage would be 3629,100 Wh.

On this page, the following settings can be configured:
•IP Address: The YouLess local networ IP address. This address must
be unique on the local networ .
•Gateway Address: The IP address of the internet modem (router) on the local
networ . This modem (router) provides YouLess with access
to the internet. Over the internet, the YouLess can
synchronize time and optionally upload measurement data
to a cloud based energy management service.
Clic on the Save button to save the settings in the YouLess non-volatile memory. On
incorrect input, the input is rejected and the old settings remain active.
If the configured gateway address was not found on the local networ , an asteris (*) will
appear behind the gateway field. If the address was found on the networ , but the YouLess
could not access the internet (DNS), a cross (X) wil appear behind the gateway field. If
needed, refresh the displayed status by pressing the F5 ey to reload the page.
Electricity meter
On the Electricity Meter page, the properties of the electricity meter can be configured.
The following meter properties must be configured correctly for the YouLess to operate
properly:
YouLess User Manual 19

•Meter type: In chapter Physical installation on the electricity meter (page 14) a
description is given of how the meter type (analog or digital) can be
determined. In this setting, the correct meter type can be configured.
On an analog meter, the YouLess will use a LED on the bottom of
the device, with which the rotating disc is illuminated.
•Meter reading: The YouLess eeps trac of the Wh total with an internal Wh
counter. This value can, but does not need to be the same as the
counter of the electricity meter. Both counters will however
increment synchronously, with the difference remaining constant.
For single rate meters it is possible to let both counters run fully
synchronized with the values being equal. For this purpose, the Wh
counter value of the meter can be read of the meter and then
entered in this field. The chec -box must be chec ed first in order to
enable setting the Wh counter value.
For double rate meters, the two counter values could be added and
this sum could be entered in this field. The YouLess then runs
synchronously with sum of the two counter values.
•Pulses/kWh: The number of measurement pulses (the number of times a pulse
LED will flash on a digital meter or the number of times the mar ing
on the rotating disc passes by on an analog meter) that the
electricity meter gives per Wh of electric energy, is an important
configuration setting for the YouLess. This meter constant varies
depending on the electricity meter model and is printed on the front
of the electricity meter.
The presentation format of this meter constant may differ per model.
Some common presentation formats are:
•C=, a=, A=
•Imp/ Wh, omw/ Wh, p/ Wh, r/ Wh, tr/ Wh, U/ Wh,
In rare cases, the “reverse” value may be presented on the meter,
i.e. Wh/imp. In such case, the parameter value will be a low number
(less or slightly above 1). Divide 1000 by this value in order to obtain
the Pulses/kWh parameter value.
If the meter constant is named A or a (instead of C), then the
constant is expressed in ilowattminutes. This value must be
multiplied with 60 in order to obtain the Pulses/kWh value.
Common values for the meter constant are 375, 600 and 1000, but
there are many other possibilities. The YouLess will accept all
values ranging from 1 till 10000.
Clic on the Save button to save the settings in the YouLess non-volatile memory. On
incorrect input, the input is rejected and the old settings remain active.
On analog electricity meters, the rotating disc is illuminated with a regular or high illumination
level. This illumination level is determined automatically. When the illumination level is high,
a plus (+) sign is made visible behind the pulses/kWh configuration field.
20 YouLess User Manual
If the YouLess has been binded with a cloud energy management service, a manual
change in the meter reading will influence the analysis of the energy management
service on the uploaded data; the manual change will appear as a real change.
Table of contents
Popular Cash Counter manuals by other brands

Olympia
Olympia NC 520 Plus operating manual

Lighthouse
Lighthouse SOLAIR 1001 + operating manual

Royal Sovereign
Royal Sovereign FS-550D owner's manual

Magnetic Autocontrol
Magnetic Autocontrol VEK CN1 operating instructions

SRS Labs
SRS Labs SR400 manual

MZ electronic
MZ electronic EV-011 Instructions for use