Yuwell YE680B User manual

User's Manual
JIANGSU YUYUE MEDICAL EQUIPMENT & SUPPLY CO.,LTD.
Sales Center Address: Huanyuan East Road No.1,Xuzhuang
Software Park, Nanjing, Jiangsu Province, P.R. China, 210000
Manufacturing Address: YunYang Industrial Park
DanYang, Jiangsu Province, P.R. China, 212300
http://www.yuwell.com
Please read the user's manual closely before using!
YE680B
Electronic Blood Pressure Monitor
1530173-0A
Shanghai International Holding Corp.GmbH(Europe)
Eiffestrasse 80,20537 Hamburg Germany

Before using
Product features....................................................
Operation guide......................................................
Parts..........................................................................
Important notes......................................................
Maintenance............................................................
Battery installation................................................
Time and date setting...........................................
Voice/Unit setting..................................................
Measuring method
Using method of cuff............................................
Measuring posture.................................................
Start measuring......................................................
Blood pressure range indicator...........................
Memory function....................................................
Auxiliary measuring function..............................
Static mode.............................................................
Common problems
Common questions of blood ..Pressure measurement...... ..
Common fault and trouble shooting..................
Technical parameters............................................
Health diary.............................................................
Electromagnetic compatibility information..........
01
Contents Product Features
01
02
05
08
13
14
15
17
18
20
21
25
26
29
30
32
36
38
40
44
Body Movement
Detection
IHB (Irregular
Heartbeat)
Prompt
Cuff
Detection
Wrapping
OK
Voice broadcast
function
Data storage Backlit display
M
D
AM
PM
m
MEMBER
A/B

0302
Operation guide
This device uses the oscillometric method of
blood pressure measurement。
Please follow the steps as shown below
Or install four AA batteries
Connect the power source
(Please turn to page 14 for details)
Open the
battery cover
Install the batteries
properly
Close the
battery cover
Power-on
Operation guide
1. Using method of cuff
Wearing the cuff and make the lower edge
2~3cm above the elbow, keep the air tube
inside of the arm.
(Please turn to page 19 for details)
2-3cm
Measurement
2 Measuring posture
Sit straightly, keep the center of cuff and heart
at the same level.
(
.
Please turn to page 20 for details)
3 Start measuring
Sit still for 5 minutes and then Press the
" " Button to measure.
.
(Please turn to page 21 for details)
1.5V LR6(AA)
1.5V LR6(AA)
1.5V LR6(AA)
1.5V LR6(AA)

0504
Check the records
Operation guide Parts
MEMBER
m
SYS
mmHg
DIA
mmHg
P/m in
A/B
Plug port
Press the button of " " check the measuring
records.
This monitor can display the average
measurement and store 99 records.
(Please turn to page 24 for details)
1. Main part
Display
Member
button
Memory
button
Start/Pulse
button
m
MEMBER
SYS
mmHg
DIA
mmHg
P/min
M
D
AM
PM
A/B
Power adapter
socket
Battery cover

0706
2. Cuff:
Parts Parts
The suitable upper-arm circumference:
22cm~45cm
22~45cm
Air plug
Rubber air
tube
Cuff
2~3cm
3. Adapter
AC adapter
INPUT:100~240Vac,50/60Hz,0.15A
OUTPUT:6Vdc 600mA
MFR:JIANGSU CHENYANG ELECTRON CO LTD
US Model:CYSM06-060060-UL-C
EU Model:CYSM06-060060-CE-C
4. User's manual,Warranty card,
4xAA batteries
SYS(systolic)
Pulse rate
Low voltage
Blood pressure
level display
Cuff
Detection
Wrapping
Deflation/Inflation
Time and date
Movement
Indication
Error
Memory
Records
number
HeartbeatIHB Prompt,
Pressure unit
DIA(diastolic)
Member
M
D
AM
PM
Display

0908
Pay attention with the symbols shown here to
prevent harm or damage to the user.
Important notes
signs and symbols
Caution
Note on important information
Type BF application part
Follow instructions for use
Temperature range
Humidity range
Manufacture
Date of manufacture
EC-Representative
Atmospheric pressure range
Symbol for the marking of electrical and electronics
devices according to Directive 2002/96/EC
Safety and environmental protection use period
for 10 years
Important notes
IP Classification
IP 21
Class II Device
DC Current
AC Current
1. Range of application
2. Warning
This product is intended to measure the blood
pressure and pulse rate of adult at household or
medical center(not suitable for neonate,
pregnancy or pre-eclampsia.
Pay attention to the following points when
measuring or it may cause the incorrect
results.Sit still for 5 minutes before measuring
to ensure quiet and stable mode.
Do not take the measurement within 1 hour of
eating ,smoking, drinking wine or coffee (black tea).
Do not measure while standing, walking or
having body pressed.
Do not take the measurement after sport or bath.
Do not speak, move, shake arm or bend fingers
while measuring.
Do not take the measurement at extreme
temperature condition or the varied severely
environment.
Do not take the measurement in a moving
vehicle.
Shelf Life
Shelf Life (Limited by Battery): 1 Year.
The shelf life of the device depend on the life
expectance of AA battery, the AA battery could
be replaced by user at home.

Important notes Important notes
1110
Do not measure continuously. (5 minutes or
more should be spared between two
measurements).
Please reinstall the batteries and start again if
cannot measure.
For patient of arrhythmia, measuring results
may not be accurate.
Do not keep the cuff in the inflated state for a
long time.
The patient is an intended operator,this
monitor is used for adult whom more than 12
years old.
The AC adapter cable may cause accidental
strangulation in infants.
Do not swallowed small parts that may cause
choking hazard.
The device must not be used with high
frequency surgical equipments.
It will affect the measurement accuracy if the
arm circumference is out of the given value.
Do not use the CUFF over a wound arm or
being on an intravenous drip.
Consult your doctor if using the device on the
arm with an arterio-venous (A-V) shunt.
Do not use the cuff on the arm where the side
of a mastectomy.
Note that It will lose function on the same limb
while cuff inflating.
Do not allowed frequent measurements the
resulting restriction of the blood flow may
cause injury.
Avoid compression or bending of the cuff
connection tubing while using the device.
Please use the alkaline battery,do not use the
rechargeable battery.
According to the local laws and regulations to
deal with device and battery.
The patient operator could not touch the
battery and DC socket. Or the operator could
not touch the patient and the battery and DC
socket at the same time.
The different type battery might result in
measurement error. Please follow the battery
requirement of manufacturer.
To report unexpected operation or events.

1312
Important notes Maintenance
Please store the monitor and accessories
properly after use.
Do not place the monitor and accessories in
high temperature, moisture, dust, or exposure
to sunshine.
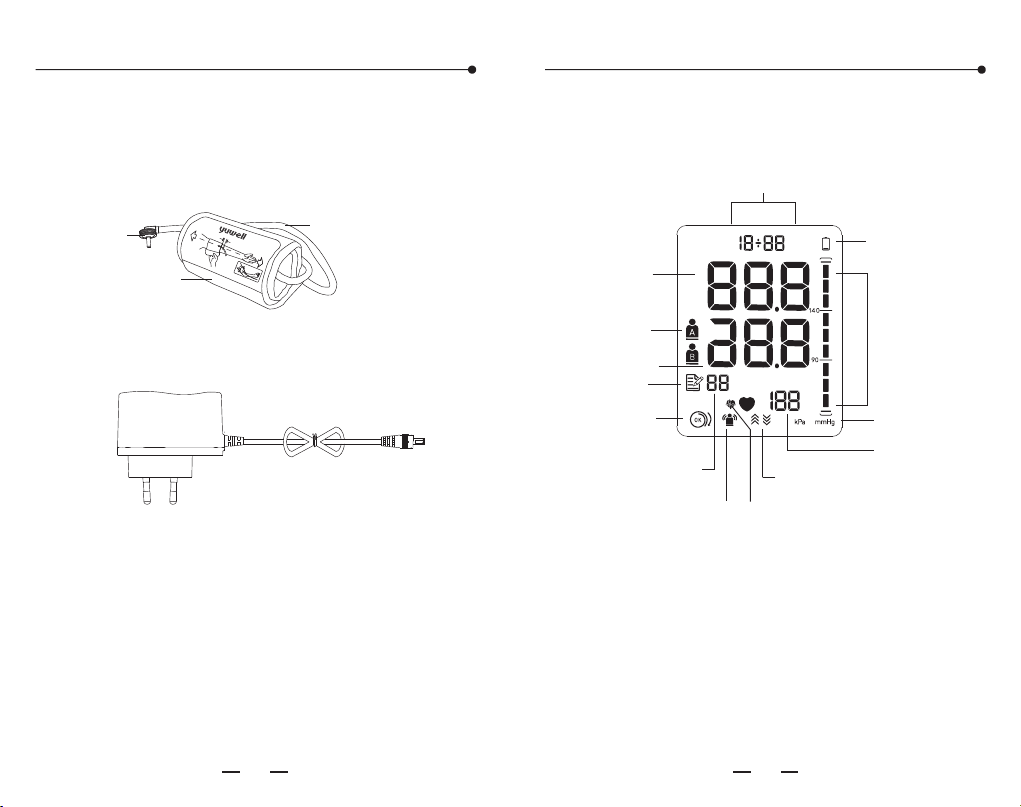
The cuff contains an airbag inside, please care in
applications, do not fold, pull or twist it.
Do not modify the device without authorization.
Do not replace the parts without authorization.
Please clean the monitor with soft dry cloth. If
it's necessary, please use wiped soft cloth with
water or before cleaning by soft
dry cloth.
Using absorbent cotton to wipe gently with rubbing
alcohol, disinfection of the machine when it
necessary. Do not use detergent to clean.
Do not let water seep into the device.
75% alcohol
Please observe the following items to protect
the device and ensure the accuracy of
measurement.
We suggest to calibrate the monitor (at least
once a year) according to local laws and
regulations. Please contact the manufacturer
or agent if need.
Tips!
Please disconnect the plug of adapter with
mains when you need to safely terminate
operation of ME EQUIPMENT.
When it is dirty in single patient daily use,
clean the monitor with soft dry cloth. If it is
necessary, please use wiped soft cloth with
water before cleaning by soft cloth. Then clean
the device with 75% alcohol.
When multiple patients use between uses on
different patients, cleaning with 75% alcohol
must be conducted after each use.
Do not let the alcohol flow into the monitor
and arm cuff.
Note: Do not diagnose with the measurement,
Please follow doctor's instruction.
Statement: If the monitor has not been stored
in the required temperature and humidity
range, it may not conformance to specification.

The" "icon displayed means the battery is low.
The" "icon twinkled means the battery is
running out. Please replace all the batteries.
Please take out the batteries if the monitor
will not be used for a long time (over three
months).
Note: 6V/600mA DC external power can be
connected to the monitor. (Please use the
power adapter supplied by us.)
Please take out the batteries if use the DC
external power for a long time(more than one
month).
Time and date setting
1514
Battery installation
Open the
battery cover
Install the batteries
properly
Close the
battery cover
1. Year setting: Press the " " button and
“ ”for more than 3 seconds till the number
starts flashing.
2. The year increase once press the " "
button.
3. Press the " " button to switch to the
month setting.
4. Using the same way for other settings.
The monitor will store the measuring results
automatically by the management system.
It is necessary to reset time and date after
installing new batteries or connecting to DC
power. Please operate as following steps. (For
example: setting the date as 2018-1-15 and
time as 08:28)
1.5V LR6(AA)
1.5V LR6(AA)
1.5V LR6(AA)
1.5V LR6(AA)
Open the battery cover and install four AA
batteries properly. Then close the cover with a
click sound.
Aligning the +ve and poles of each battery
with the +ve and -ve signs imprinted on the
battery housing of the device.

16 17
Time and date setting Voice/Unit setting
Year character blink Month character blink
Date character Hour character blink
Minute character blink
M
D
M
D
the " " button to enter the mmHg/kPa
unit setting. Press the " " button to
switch between these two pressure units.
Finish by pressing the " " button.
After finishing the volume setting, pressing
After unit setting, press the " "button
to shut down.
Pressing the " " button to enter the voice
setting. The size of the sound ranges from 01
to 05 and OFF. Press " "choose the volume.
Attention:
In the condition of kPa unit, measurement
without voice prompt.

Using method of cuff
Tips!
Either of arms can be measured.
Cuff connecting
Connect the air connector of the cuff to the
socket which on the left side of the monitor.
18 19
Using method of cuff
Sit straight and flat
the arm on table with
palm up, also keep
the center of cuff and
heart at the same
level. Also please
ensure the air tube
not twisted.
Using method of cuff
Wind the cuff around the upper arm. ( as shown
Stick the cuff tightly.
Note: The cuff
should be wearing
comfortably, avoiding
too tight or loose.
In the picture) Keep
the lower edge of the
cuff at the position
above 2-3cm to the
elbow joint and keep
the air inlet which
insert to the cuff at
the inner side of arm.
2~3 m
c
MEMB ER
m
SYS
mmHg
DIA
mmH g
P/min
A/B

Measuring posture
Sit straight
Keep the upper
arm bareness or
wearing thin clothes
Keep the center
of cuff and heart
at the same level
Wrong measurement postures
Do not bend down or body
bend forward.
Do not sit with legs crossed.
Do not sit on a sofa.(Belly
pressure may increase the
blood pressure)
Do not put the arm on the
low table.(May increase the
blood pressure)
20 21
The ideally height
difference between
table and chair is
25-30cm,back and
arm being supported.
Sit on a chair with your
feet flat on the floor
Don't eat, smoke, drink, take bath or do any
high impact sport within half an hour before
measuring. Measurements shall be taken at the
same time every day.
Start measuring
Sit still for 5 minutes before the
measurement
All icons on screen appear for 1 sec after
pressing the" "button, then disappear.
After that the deflation icon flickers which
means the system is in zero testing. Several
seconds later the inflation icon flashes which
means the zero testing is finished. Then
inflation starts.
1. Measurement

Start measuring
22 23
Start measuring
The monitor starts measuring automatically
after inflation finished, and the measuring
icon " " starts to flicker, pressure release
value starts to decrease gradually.
2. Measurement finished
After measurement, the monitor will show the
SYS, DIA and pulse rate, then inflate the air
automatically.
m
MEMBER
SYS
mmHg
DIA
mmHg
P/min
M
D
AM
PM
A/B
Full screen display state
The zeroing state Inflate state
Cuff wear state
measurement state
mmHg display kPa display
AM AM

24 25
If the SYS is higher than 139mmHg or DIA
higher than 89mmHg means having high blood
pressure. Please contact with doctor for advice.
Also the Blood pressure range indicator can
show the blood pressure intuitively.
Tips!
The time interval between two measurements
should be at least 5 minutes or longer.
Estimate the blood pressure condition
according to the BP classification table, and
consult the doctor.
Blood pressure range indicator
Start measuring
4. Shut down
Press the" "button to shut down. Also it
will power off automatically in 3 mins without
any operation.
3. Take off the cuff
Higher than 139mmHg
Higher than 89mmHg
m
MEMBER
SYS
mmHg
DIA
mmHg
P/min
M
D
AM
A/B

Tips!
The monitor will store the measurement data
automatically (including time, date, blood
pressure and pulse), and the upper limit of
records is 99. Press the " "button to check
the records.
Warning: Upper limit pressure of air inflation
is 300mmHg/40.0kPa. Don't keep the
inflated state for a long time to avoid
damage.
Memory function
26 27
Memory function
Emergency stop during measurement
If the measurement need stoping for
uncomfortableness or other reasons,
please press the " " button, the
measurement will stop immediately and
air releases fast. Take off the cuff
manually if the " " button is not
working.
1. Press the " "button for the records.
A. Press the" "button to show the average
value of the latest 3 times measurement.
B. Repress the" "button to display the 1st
group of memory, the serial number is displayed
as "1~99".
The average value The 1st group of memory
The th data may be replaced by the th
when the memory capacity is full.The 1st data
may be replaced by the new data.
99 98
Tips!
AM

Memory function
28 29
Auxiliary measuring function
Press the both " " and " " button until
the display shown as the following picture,
which means the recorded data is cleared.
Press the " " button
to turn off the monitor
after deleting.
Note: This operation will delete all the
recorded data.
C. Read the recorded data by pressing the
" "button as the sequence: "1", "2"
......"99"(max).
D. Press the " " button to shut off the
monitor.
2. Delete the recorded data
If the cuff winded properly, it will show the
" "icon. Otherwise it will show the" "
icon, then press the " " button to stop
and wind properly to measure again. (Please
refer to page 18 to 19 for how to properly
wrap the cuff.)
It will show the " " icon, if body moves
when measuring. Please measure again or it
will show inaccurate results.
Cuff Wrapping Detection
Body Movement Detection

30 31
Static mode
This function is mainly for professional
personnel to enter the static mode to test the
monitor through standard pressure gauge.
Warning: Normal users don't need to know
this function and also do not operate. The
company will not take any responsibility for
damage caused by this operation.
Press the" "button after battery
installation, then the screen will show the " "
icon, which means the system is in restore
testing. Several seconds later, the " " icon
disappears and the air pump starts inflating at
the same time, which indicates the test ended.
Then press the " "button to stop
inflating and take out the batteries to enter
the next step.
System restores
Static mode
Press the " "button and hold, meanwhile
install the batteries. Hold on for about 3
seconds then release the" " button. Then
screen will show the pressure value " " , the
date and time. Now the system has restored
and entered the static mode. Now can take
the static test.
Entering the static mode
After entering the static mode, if the screen
still doesn't show " ", please operate again as
the System restore. Please contact with the
local distributor if it still does not work.
The monitor will
automatically power
off if there is no
operation in 4
minutes.
Tips!
Note: It must restore the system before
entering the static mode, otherwise it may
cause inaccurate results.

32 33
kPa/mmHg k a/mmHgP
12.0~18.5kPa
90~139mmHg
18.7~21.2kPa
140~159mmHf
12.0~13.2kPa
90~99mmHg
21.3~23.9kPa
160~179mmHg
13.3~14.5kPa
100~109mmHg
≥24.0kPa
≥180mmHg
≥14.7kPa
≥110mmHg
8.0~11.9kPa
60~89mmHg

34 35
Note: There is no definition about hypopiesia,
and generally SYS(systolic pressure) less than
90mmHg or DIA (diastolic pressure) less than
60mmHg is called hypotension.
5. Blood pressure variations?
An individual's blood pressure varies greatly on
a daily and seasonal basis. It may vary by 30 to
50 mmHg due to various conditions during the
day. In hypertensive individuals variations are
even more pronounced. Normally, the blood
pressure rises while at work or play and falls to
its lowest levels during sleep. So do not be
overly concerned by the results of one
measurement.
Take measurements at the same time every
day using the procedure described in this
manual to get to know your normal blood
pressure. Regular readings give a more
comprehensive blood pressure history. Be sure
to note date and time when recording your
blood pressure. Consult doctor to interpret the
blood pressure data.

The " "icon
twinkle
36 37
(300mmHg)
Table of contents
Other Yuwell Blood Pressure Monitor manuals