Z SPARS Z400 User guide

GENINS05 Page 1 28/08/2014
Z SPARS UK
GENOA FURLING SYSTEM
SYSTEM MANUAL
Documents in this manual:
Title Document/File Name
Genoa Furling System –Instructions GENINS05.doc
Z400F, Z500F, Z600F Dimensions Form FS-1/456
Z700F, Z800F, Dimensions Form FS-1/780
Z1000F, Z1200F Dimensions Form FS-1/1012
Halyard Diverter –Method 1 FS-3/gendiv01.skd
Halyard Diverter –Method 2 FS-3a/gendiv02.skd
Halyard Diverter –Method 3 FS-3b/gendiv03.skd
System Forestay
No. Size (mm)
Z400F 4mm
Z500F 5mm
Z600F 6mm
Z700F 7mm
Z800F 8mm
Z1000F 10mm
Z1200F 12mm

GENINS05 Page 2 28/08/2014
Z SPARS UK
Unit 2, Pond Hall Road, HADLEIGH, Suffolk IP7 5PW, U.K..
Tel +44 (0)1473 822130. Fax +44 (0)1473 827354
Genoa Furling System.
Models Z400 to Z1200.
List of Components
1 Halyard Diverter (type may vary)
NB a diverter MUST be fitted: See drawing ref FS-3.
2 PVC Sleeving
3 Swivel
4 Head Shackle
6 Aluminium Luff Foil
7 Drum Screws
8 Tack Eye
9 Guard
10 Drum
11 Guard Attachment
12 Locking Joint
13 Locking Screw
14 Bushing for Lower Drum Bolt
15 Lower Drum Bolt
Z400F-Z600F = M10 x 60
Z700F-Z800F = M12 x 75
Z1000F-Z1200F = M16 x 100
16 Foil Connecting Screws
17 Foil Connector
18 Bottom Plastic Stopper
19 Bottom Foil with sail entry
20 Top Foil
21 Foil End Cap
22 Inner Half Bearings for 21
23 Double Hole Toggle
24 Lower Drum Tube
25 Upper Drum Tube
3ml tube Loctite 638
NB Observe maker's handling & usage instructions
2 Alloy Rivets for Foil End Cap

GENINS05 Page 3 28/08/2014
COMPONENT DRAWINGS

GENINS05 Page 4 28/08/2014

GENINS05 Page 5 28/08/2014
Assembly Instructions: Z SPARS Genoa Furling System
ALL SYSTEMS ARE SUPPLIED WITH A NEW FORESTAY. TYPICALLY
THIS WILL HAVE A RIGGING SCREW AT THE BASE.
Establish the length of the forestay before determining the foil length. This can be
done by calculation or by trial installation of the forestay on the mast etc.. Do not
swage the lower terminal on the Forestay until assembly of the Furling System is
complete.
NB In all cases the Forestay Rigging Screw MUST be compatible with the Furling
Drum and must have the special double hole toggle fitted to the lower end. (see
drawing FS-1).
Assembly of the Luff Foil
The length of the foil required can be determined by reference to our technical sheet. The
foil length must be trimmed from the top as the bottom end has a machined sail entry slot
and it is essential that its position relative to the lower end of the foil be maintained.
If the luff foil (6) is not supplied in one complete section, connect the aluminium sections
that make up the foil using the Foil Connector Sleeves (17) and socket set screws m6x8
(16). Use Loctite 638 on the threads. These screws are best inserted from inside the foil,
not from the outside.
Forestay top terminals vary from boat to boat. If the Foil End Cap (21) will not fit over the
forestay top terminal, feed the Foil End Cap onto the forestay from the bottom of the
forestay at this stage.
Feed the pvc sleeving onto the wire from the end and then feed the forestay into the foil
before fitting the lower terminal. If this operation is difficult, reduce friction by applying
washing up liquid to wre before inserting into the sleeve.
The Swivel & Foil End Cap
Slide the swivel (4) onto the foil making sure the outer casting of the swivel is at the top
and the inner casting is at the bottom.
The Foil End Cap (21) consists of 3 parts: an outer plastic end cap and two inner half
bearings (22). Before fitting the end cap, check that the hole in the plastic inner half
bearings is the correct size for the forestay. Drill out if necessary to forestay diameter +
1mm.
Fit end cap to foil as follows: slide plastic end cap over forestay eye terminal* and over
the two profiled plastic half bearings while holding the latter together around the forestay.
Fit bearings into top of foil and rivet the cap to the foil using the two alloy rivets supplied.

GENINS05 Page 6 28/08/2014
* If the top fitting on your forestay is too large to pass through the end cap aperture you
will need to run the forestay through the end cap from the lower end before installing the
forestay into the foil.
The Furling Drum
The drum assembly consists of an upper (torque) tube, two flanges and a lower tube.
The rigging screw will pass through these tubes. Connection of the foil to the upper tube
is made by 2 x M6 x 12mm socket capscrews. These engage both the foil and double
hole threaded stainless steel plate which has been glued into the foil.
Tap bottom plastic stopper (18) into the bottom of the foil. This prevents the pvc sleeving
from falling down inside the foil.
Assembly on the mast
When all the above assembly operations are completed, hook up the forestay to the
mast. Be careful to ensure that the assembly passes on the correct side of all halyards at
the front of the mast and the drum is inside the guard rails. Fit a diverter (see below).
Halyard diverter
Please note that it is essential to fit a diverter to the foresail halyard above the top swivel
of the furling system (see drawings FS3, FS3a, FS3b). The purpose of the diverter is to
stop any tendancy of the halyard to wrap around the furling mechanism. If this happens,
the system can jam on the forestay and cause rotation of the latter, with potentially
disastrous results - the forestay can break.
If the diverter is fitted to the mast, it should be located so that the halyard makes an
angle of 15° to 20° with the forestay. This angle should be verified with the mast in the
boat and the foresail fully hoisted. This is not necessary if a clamp-on type of diverter is
fitted on the forestay.
It is essential to maintain tension in the forestay and halyard when furling/unfurling - a
diverter will be ineffective if the rig is slack.
NOTE on dimensions of sail luff tabling.
Your sailmaker needs to be aware of the following:
All sizes of Z Spars luff foil have an 5.5mm internal diameter sail slot, with a minimum
slot width of 2.5mm.

GENINS05 Page 7 28/08/2014
OPERATION
The sail is furled (partially or completely) by slackening the foresail sheets and pulling on
the drum rope. This causes the sail to be wound round the luff foil. Cleat the rope when
the desired amount of sail is set.
We recommend that the first turn of the sail is across the aft face of the foil, e.g. if the sail
is in the port luff groove, the drum should rotate clockwise (when viewed from above) to
furl.
To unfurl the sail, release the drum rope and pull on the foresail sheet. Cleat the drum
rope when the desired amount of sail is set.
MAINTENANCE
Flush with fresh water all parts exposed to salt water.
Adjustment of Forestay Tension (or Length) with Z Spars Genoa
Furling Systems.
1. Remove the sail from the foil completely.
2. Connect the halyard to the Drum Tack Eye (8) and take up a slight tension.
3. For safety reasons bring the spinnaker halyard (or alternative) onto the pulpit
and tension up.
4. Disconnect the foil from the drum assembly: while holding the foil, remove the two
socket-headed Drum Screws (7) from the upper drum tube, then allow the foil to gently
lower into the upper drum tube. (This operation is not necessary if there is sufficient
length of forestay above the top of the foil to raise the foil and drum and thus expose the
rigging screw).
5. Remove the Lower Drum Bolt (15) which passes through the lower drum tube and
prevents the lower part of the drum from rotating when in use. Note: If our recommended
set-up is adhered to this does not disconnect the forestay.
It is then possible to hoist the drum assembly up the foil by hand or by using the genoa
halyard. (See Step 2).
6. With the drum now lifted clear, adjustment to the forestay rigging screw or chainplates
is possible.
7. After refitting the drum by reversing the above procedure, it is advisable to tape over
the socket headed Drum Screws (7) to prevent any possibilty of these coming undone
and being lost.
If you have any queries contact Z Spars UK on +44 (0)1473 822130.

GENINS05 Page 8 28/08/2014
Troubleshooting
1. The foresail will not unfurl
NB. DO NOT USE FORCE TO UNFURL SAIL, otherwise damage to forestay may result.
Causes:
a. The jib halyard has wrapped round the luff foil.
Action: ease the jib halyard and re-furl. Free the halyard. Fit a diverter to the halyard if one is not already
installed.
b. The furling line is fouled.
Action: Free the furling line. Possibly adjust position of lead blocks, especially the one nearest the drum.
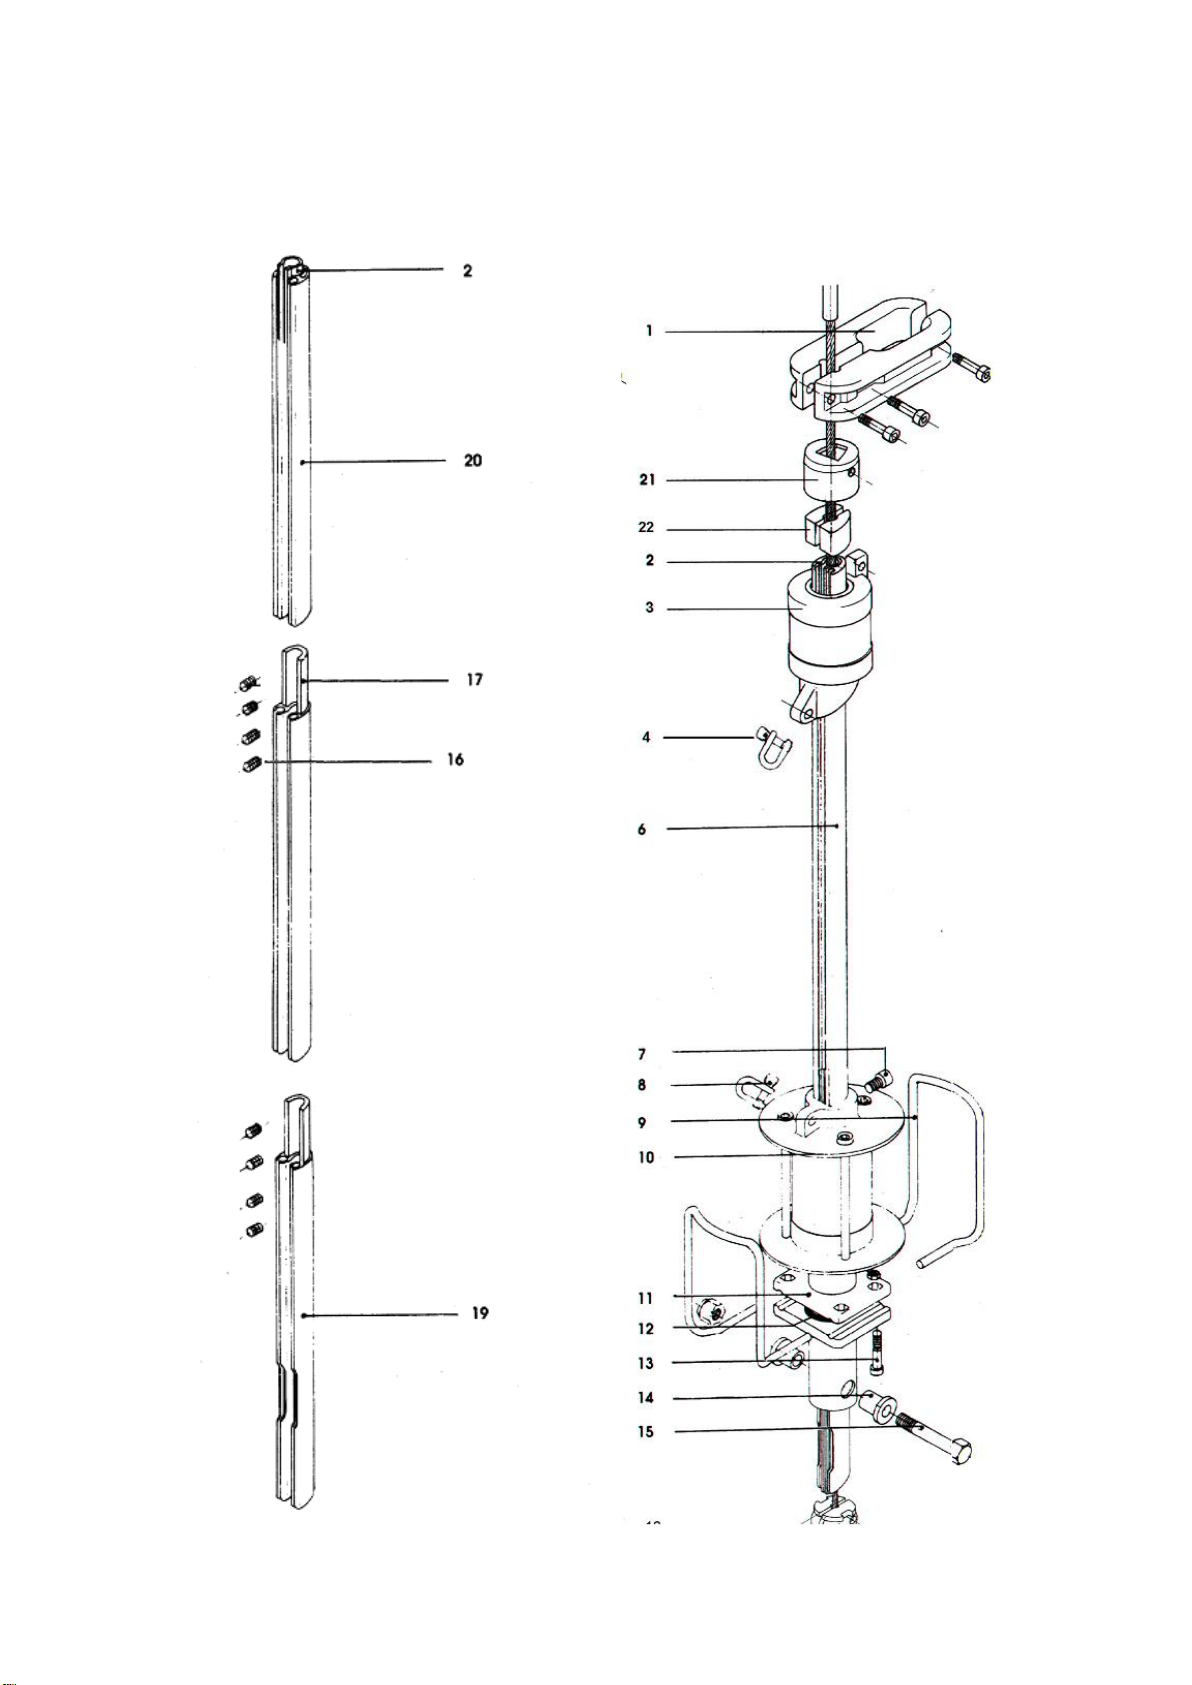
Ensure that the furling line passes through the stainless steel drum guard (9) without touching it (possible
chafe point).
c. The forestay is too slack.
Action: Tension the forestay.
d. The halyard is too tight.
Action: Ease off the halyard a small amount.
2. The foresail will not furl
Causes:
a. The jib halyard has wrapped round the luff foil.
Action: ease the jib halyard and try to unfurl. Free the halyard. Fit a Diverter to the halyard.
b. No line remaining on the drum.
Action: Unfurl the sail and undo the sheets. Gather the sail round the luff foil, then wind more line on the
drum.
c. The forestay is too slack.
Action: Tension the forestay.
d. The jib sheet is not released.
Action: release the sheet.
e. The halyard is too tight.
Action: Ease off the halyard.
f. Furling line fouled on the drum.
Action: Unfurl & remove the sail. Rewind the furling line. Unfurl with slight tension on the line. Do not have
excessive number of turns on the drum.
g. Furling line leads have too much friction and/or are showing signs of chafe.
Action: Use low friction blocks for furling line instead of fairleads. Ensure that the furling line is not fouling
the drum guard (9).
3. The sail is difficult to hoist
Causes:
a. The sail luff rope is too thick - maximum 5mm finished size allowed (see page 5).
Action: refer to sailmaker.
b. Luff groove is obstructed
Action: clean groove.
c. The sail is wrongly positioned for entry.
Action: re-position the sail on the deck so that luff rope is more in line with direction of feed.
4. The luff cannot be tensioned sufficiently.
Causes:
a. The sail luff is too long for the foil.
Action: Shorten luff (refer to sailmaker).
b. The halyard is not sufficiently in line with the forestay.
Action: re-locate halyard diverter.
5. The sail cannot be lowered
Causes:
a. Halyard wrapped round top of foil.
Action: Slacken the halyard and try to untwist via the drum. Fit a diverter.
b. The halyard is stuck.
Action: check halyard routing (sheaves etc).
If you have any queries, contact Z Spars UK on +44 (0)1473 822130.
This manual suits for next models
11
Table of contents