13
12
How to Use the Air Fryer
This section of the manual will instruct you on how to use the air fryer and the
preset functions. For rotisserie instructions, see the ROTISSERIE section of the
manual on page 18.
1. Place the air fryer on a flat, steady surface away from all sources of heat and
water and plug it in.
2. Ensure the drip tray is in place on the bottom of the air fryer.
NOTE: The door of the air fryer will not close if the drip tray is not placed in the
unit properly.
3. Place seasoned food on cooking trays and place cooking trays on the
appropriate rack position. Close the door, making sure it clicks into place.
NOTE: If the door is opened at any point while the air fryer is running, it will
pause the cooking time.
4. Press the TEMP button and turn the Time & Temp dial on top of the air fryer
until the display reads your desired temperature.
5. Once the desired temperature is displayed on the screen, press the TIME
button to program your cooking time. Turn the Time & Temp dial on the top of
the air fryer until the display reads your desired cooking time.
6. Press the START/STOP button located on the top of the air fryer to begin the
cooking process.
NOTE: For the best and most even results, rotate the trays from the top
positions to the bottom positions, and vice versa, halfway through cooking.
7. While the air fryer is running, the display will toggle between the set
temperature and the remaining time. The Fahrenheit Indicator and Minutes
Indicator will confirm whether the screen is showing the cooking temperature
or cooking time.
NOTE: Press START/STOP at any time to stop the cooking process. The time
and temperature will disappear from the screen and only the running lights will
remain. The fan will stay on for about 20 seconds before the unit completely
shuts off.
8. Once the cooking time is done, the unit will beep 3 times and will automatically
shut off.
9. Use oven mitts to remove hot trays from air fryer and tongs to handle hot
food.
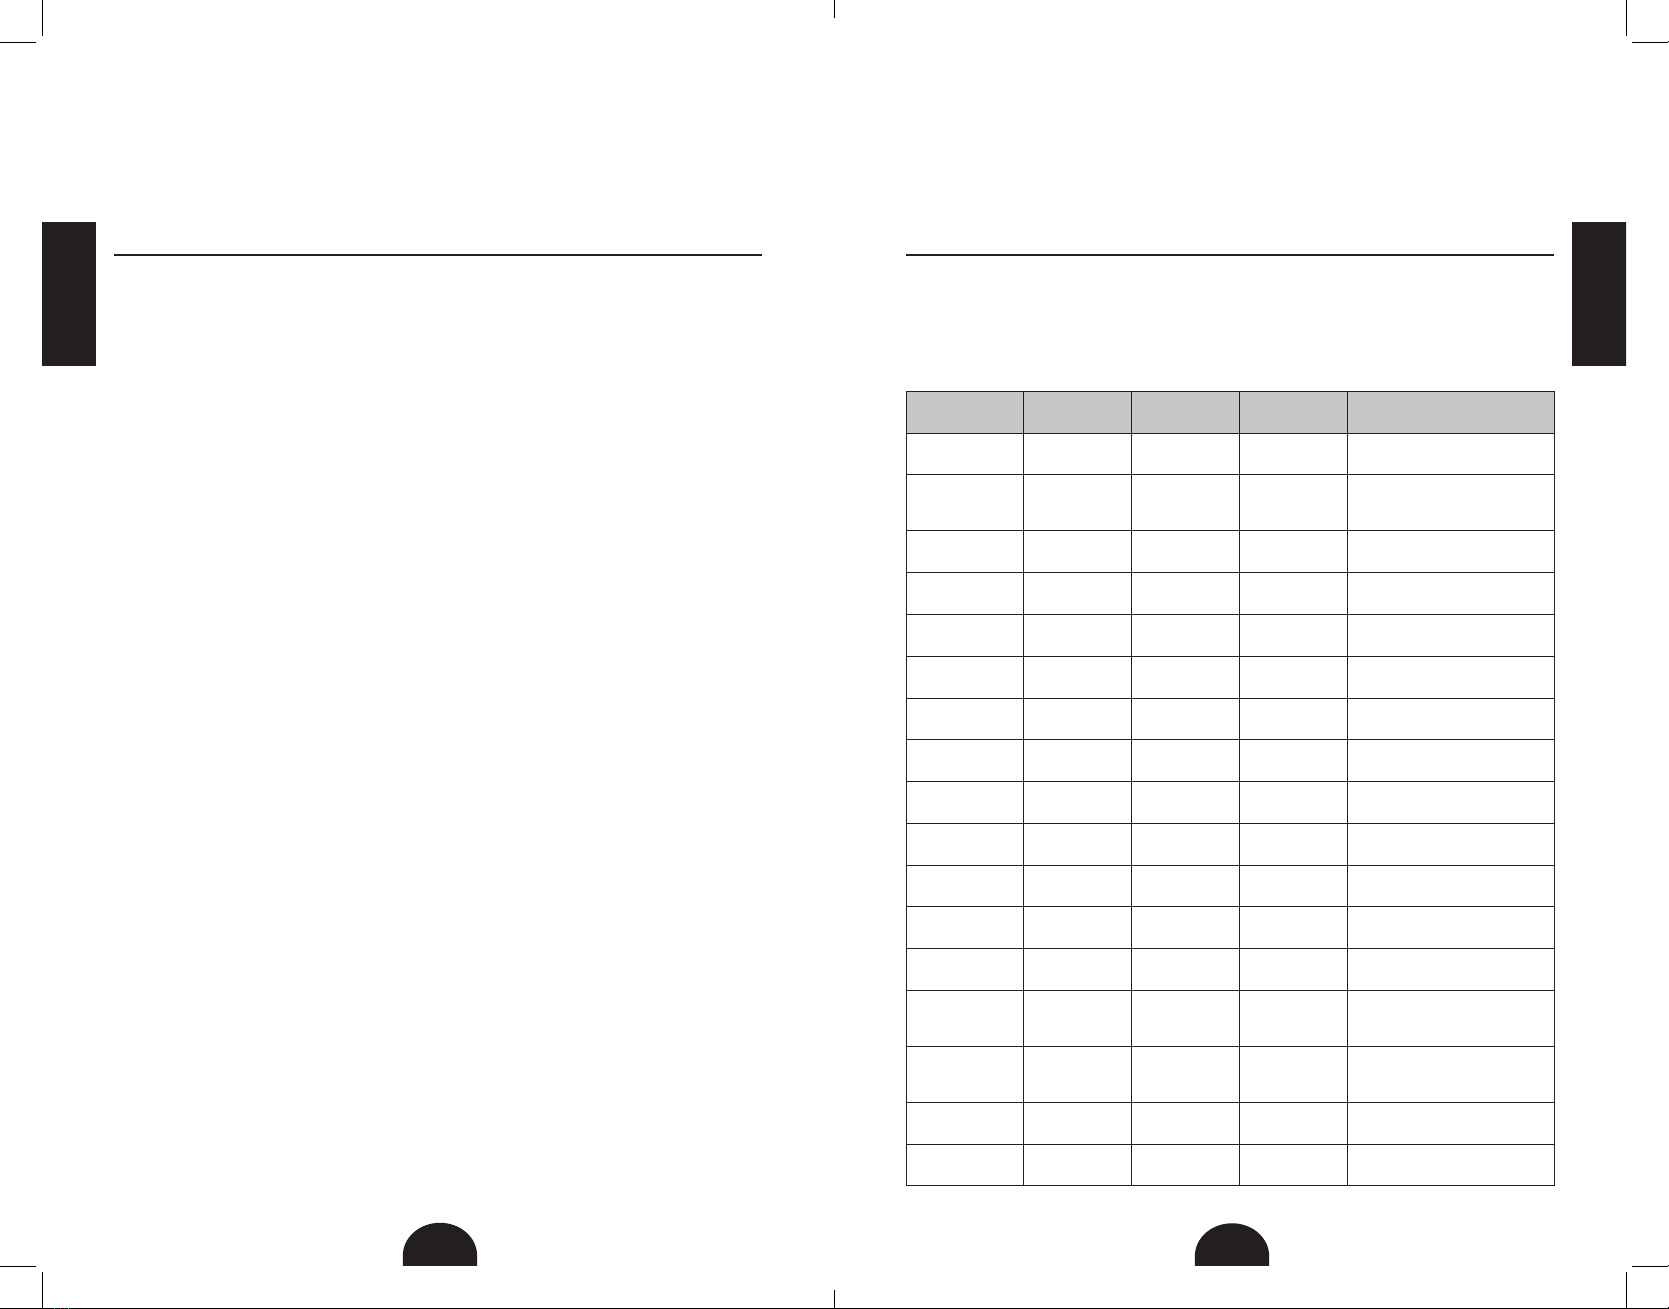
Air Fryer Cooking Charts
Air fryer cooking times are approximate times. Use these cooking times as a
general guideline. Size and variety of food will most likely alter cooking times.
Fresh Food Air Fryer Cooking Chart
Fresh Food Item Amount Temperature Time Extra Info
Thin Fries 16 oz 400°F 36 minutes On two trays, switch tray
positions at halfway mark
Baby Potatoes 16 oz 375°F 16-20 minutes
Potatoes should be quartered,
on one tray on the second rack
position from the top
Onion Rings 4 oz 400°F 14 minutes On two trays, switch tray
positions at halfway mark
Chicken Breasts 2 pcs- 4 oz each 375°F 30 minutes On one tray on the second rack
position from the top
Meatballs 4 pcs- 2 oz each 360°F 15 minutes On one tray on the second rack
position from the top
Chicken Wings/
Drumsticks 4-5 pcs 375°F 28-30 minutes On one tray on the second rack
position from the top
Fish Fillet 4 oz 390°F 12 minutes On one tray on the second rack
position from the top
Jumbo Shrimp 13-14 oz 390°F 14 minutes On two trays, switch tray
positions at halfway mark
Broccoli 8 oz 350°F 15 minutes On one tray on the second rack
position from the top
Mushrooms 8 oz 400°F 18 minutes Sliced, on one tray on the second
rack position from the top
Corn on the Cob 2 ears 400°F 12-14 minutes On one tray on the second rack
position from the top
Zucchini 1 pc 400°F 22 minutes Sliced, on one tray on the second
rack position from the top
Mini Fruit Hand
Pies 3 pcs- 3 oz each 350°F 15 minutes On one tray on the second rack
position from the top
White Toast 2 pcs 400°F 4-6 minutes
Flip the slices halfway through
the time, adjust time for desired
darkness
Whole Wheat
Toast 2 pcs 400°F 3-5 minutes
Flip the slices halfway through
the time, adjust time for desired
darkness
Bagel 1, sliced 400°F 5 minutes Adjust time for desired darkness.
Personal Pizza 7 oz 325°F 24-26 minutes On one tray on the second rack
position from the top