Zeegma Ironee User manual

Ironee
EN | DE | PL | IT | FR | ES | NL | UA | LT | HR
Instrukcja obsługi | User Manual | Bedienungsanleitung | Manuale
d’uso | Manuel de l’UlisateurManual de usuario | Handleiding |
Посібник користувача | Vartotojo vadovas | Korisnički priručnik

A
I
H
F
G
J
A
B
C
D
EK

1
2

3
4

EN
Introducon
Dear customer!
Thank you for placing trust in us and choosing Zeegma.
We provide you with a product perfect for everyday use thanks to the use
of high-quality materials and modern soluons.
We are convinced that the product will sasfy your requirements as it has
been manufactured with utmost care.
Before you use the product, please read this operang manual carefully.
Should you have any remarks or quesons concerning the product, please
do not hesitate to contact us:
IMPORTANT INFORMATION
1. Read the instrucon manual before using the device.
2. This device may be used by children of 8 years of age and
older and persons with limited physical, sensory or mental
abilies or without experience and knowledge, if they have
been supervised or instructed in the use of the device in a
safe manner and understand the risks involved.
3.
Cleaning and maintenance of the device must not be
performed by children without supervision.
4. Children must not play with the device.
5.
Keep the plugged-in or cooling iron and cord out of the reach
of children under the age of 8.
6. The iron must not be le unaended while it is connected
to the mains power supply.
7.
The iron must be used only with the base included in the set.
8.
The risk of burns: the device generates very high temperatures.
Avoid contact with the heated surface of the iron.
9. Always wait for its temperature to drop before touching the
device aer use.
10.
To protect yourself from burns and injuries, do not iron fabrics
while wearing them on your body and do not direct the steam
toward your body while ironing.
11. Take special care when using the device. Heated parts of the
device or leaking water can cause burns.
12.
Never use the device for anything other than its intended
purpose. The iron is designed for ironing fabrics only.
13. The device is for home use only. Do not use it for industrial
purposes.
14.
Do not use the device outdoors or in rooms with high humidity.

EN 15. Use the device only on a at and stable surface.
16.
If ironing is interrupted, place the iron on the base. Make sure
the base is placed on a at and stable surface.
17.
Do not immerse the device and cable in water or other liquids.
18.
Before connecng or disconnecng the device from the power
source, set the steam control knob to the “0” posion.
19. Never pull on the cord when unplugging from an outlet. To
disconnect the device from the power source, grab the plug
and pull.
20.
Do not allow the cable to come into contact with sharp edges
and hot surfaces.
21. Always disconnect the device from the power source when
lling or pouring water, and when it is not in use.
22. Do not use the iron with a damaged cord or plug, or if the
device malfuncons, has been dropped or damaged in any
way, and if there are traces of leakage.
23.
Do not aempt to repair or modify the iron yourself. This
could cause a risk of electric shock or damage to the device.
In the event of problems, contact an authorized service center.
NOTE! Hot surface - surfaces can get hot during use.
PRODUCT DESCRIPTION (FIG. A)
A.
Steam control knob / Self-
cleaning
B. Steam ejecon buon
C. Spray buon
D. Light indicator
E. Cable cover
F. Temperature control knob
G. Water tank
H. Ceramic-coated plate
I. Sprinkler
J. Water inlet cover
K. Wireless base buon
DEVICE OPERATION
NOTE
Before using it for the rst me, it is necessary to remove any protecve
lm that may have been stuck to the case or sole plate of the iron.
The rst me the device is used, there may be a slight emission of smoke
and a specic odor. This is a normal phenomenon that does not adver-
sely aect the funconality of the device. This does not pose a risk to the
safety of use.
FILLING THE WATER TANK
1. Before lling the water tank, unplug the iron from the power supply and

EN
set the steam control knob (A, g. A) to the “0” posion (g. 1).
2. Place the device in a horizontal posion.
3. Open the water inlet cover (J, g. A), and slowly pour water through the
inlet into the water tank (G, g. A). Do not exceed the level marked MAX
(g. 2). While pouring water into the tank, take breaks to check the level
in the vercal posion.
4. Close the water inlet cover.
5. If the water level is low, perform steps 1 to 4 again.
6. When you have nished using the device, pour out the remaining water
in the tank.
NOTE! In most instances, tap water is suitable for use in this device. Do
not use any kind of water addives or substutes, such as laundry deter-
gent or perfumed water. They can lead to staining of materials and damage
to the device itself. The water tank should not be lled above the level
marked “MAX”.
DRY IRONING
1. If necessary, empty the iron by pouring out the water from the tank.
2. Place the device in an upright posion.
3.
Connect the device to the power source. The light indicator (D, g. A)
will light up.
4. Set the temperature control knob to the MIN posion (g. 3).
5. Wait unl the iron plate heats up and the light indicator turns blue. The
iron is ready for use.
SPRAY FUNCTION
To use this funcon, place the device in a horizontal posion. Fill the water
tank (see: Filling the water tank), then press the spray buon (C, g. A).
NOTE! Before using the spray funcon, check the fabric label for ironing
instrucons, as some fabrics may be stained or discolored by moisture.
The spray funcon is parcularly helpful for removing stubborn creases
and where extra weng is needed. It can be used for both steam and dry
ironing.
STEAM IRONING
1. Place the device in a horizontal posion. Fill the water tank (see: Filling
the water tank). Place the device in a vercal posion.
2.
Connect the device to the power source. The light indicator (D, g. A)
will light up.
3. Set the temperature control knob to the steam posion (g. 4), selecng
a range suitable for the type of fabric.
4. Wait unl the iron plate heats up and the light indicator turns blue.

EN 5. Set the steam control knob to the desired posion, adjusng the amount
of steam according to the type of fabric.
Note! Steam ironing is only possible at higher temperature sengs. Other-
wise, water may leak from the machine.
STEAM EJECTION FUNCTION
1. Place the device in a horizontal posion. Fill the water tank (see: Filling
the water tank). Place the device in a vercal posion.
2. Set the temperature control knob to the “MAX” posion.
3. Wait unl the iron plate heats up and the light indicator turns blue.
4.
Press the steam ejecon buon (B, g. A). Pressing the buon several
mes beforehand may be necessary to prepare the machine for operaon.
5.
Wait a few seconds for the steam to penetrate the fabric before pressing
the buon again. For maximum eciency, it is recommended not to use this
funcon more than three mes in a row aer the light indicator turns blue.
The steam ejecon funcon is parcularly helpful in removing stubborn
creases. It can be used for both steam and dry ironing.
ANTI CALC SYSTEM
An Calc is a system located inside the water tank that eliminates im-
puries from the water and reduces the problems of scale accumulaon.
To prolong the eecveness of this system, perform the following steps
periodically:
1. Unplug the iron from the power supply and let it cool down.
2. Fill the water rell container to about ¾ of its capacity. Add 1 teaspoon
of salt to the water and ll the water tank with the prepared soluon.
3.
Leave the soluon in the water tank for 15 minutes, shaking it gently from
me to me, and then pour out the soluon.
4. Fill the water tank a second me with the salt water soluon, shaking it
occasionally, and empty it again aer 15 minutes.
5. Fill the tank with fresh water to rinse it, and then pour out the water.
ANTI DRIP SYSTEM
An Drip is a system that constantly controls the ow of water to the iron
plate. Below a certain temperature, the an drip funcon interrupts the
water ow and prevents water from dripping onto the fabric.
CORDLESS IRONING
To use the device in the cordless version, press the wireless base buon (L,
Figure A), and then remove the device from the base.

EN
STEPS TO FOLLOW AFTER EACH USE
1. Turn o the iron and unplug it from the power source.
2. Wait for the iron to cool down before storing it. Empty the iron. Do not
store the iron with water inside.
3. Always store the iron vercally to protect the iron plate from scratches,
corrosion or stains.
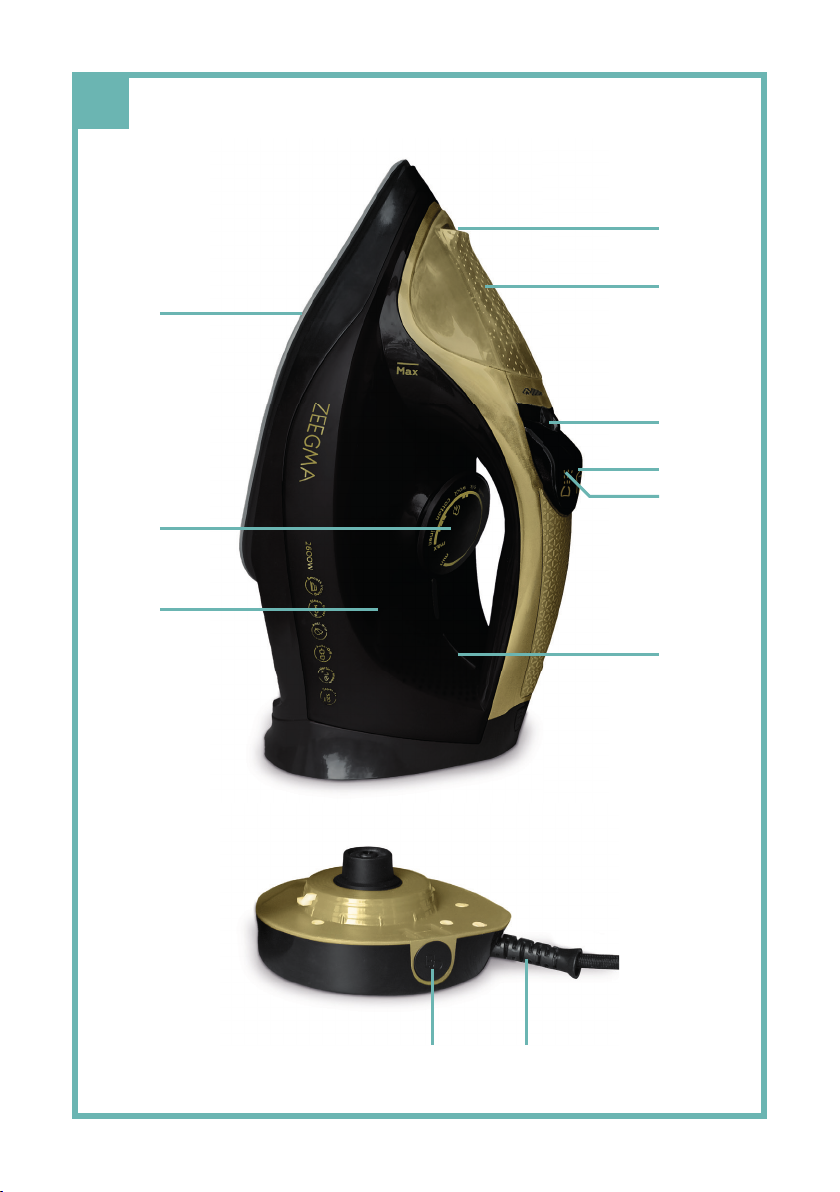
4. For cordless use: always place the iron on the stand to protect the iron
plate from scratches, corrosion or stains. Proper placement of the iron
on the stand will signal a click.
SELF-CLEANING FUNCTION
It is recommended to use the self-cleaning funcon on average once a
month or more oen, depending on the frequency of use. To use the func-
on:
1. Fill the water tank halfway.
2. Set the iron on the base.
3. Set the temperature control knob to MAX.
4. Connect the iron to a power source.
5. Allow the iron to heat up unl the indicator light turns blue.
6. Disconnect the iron from the power source.
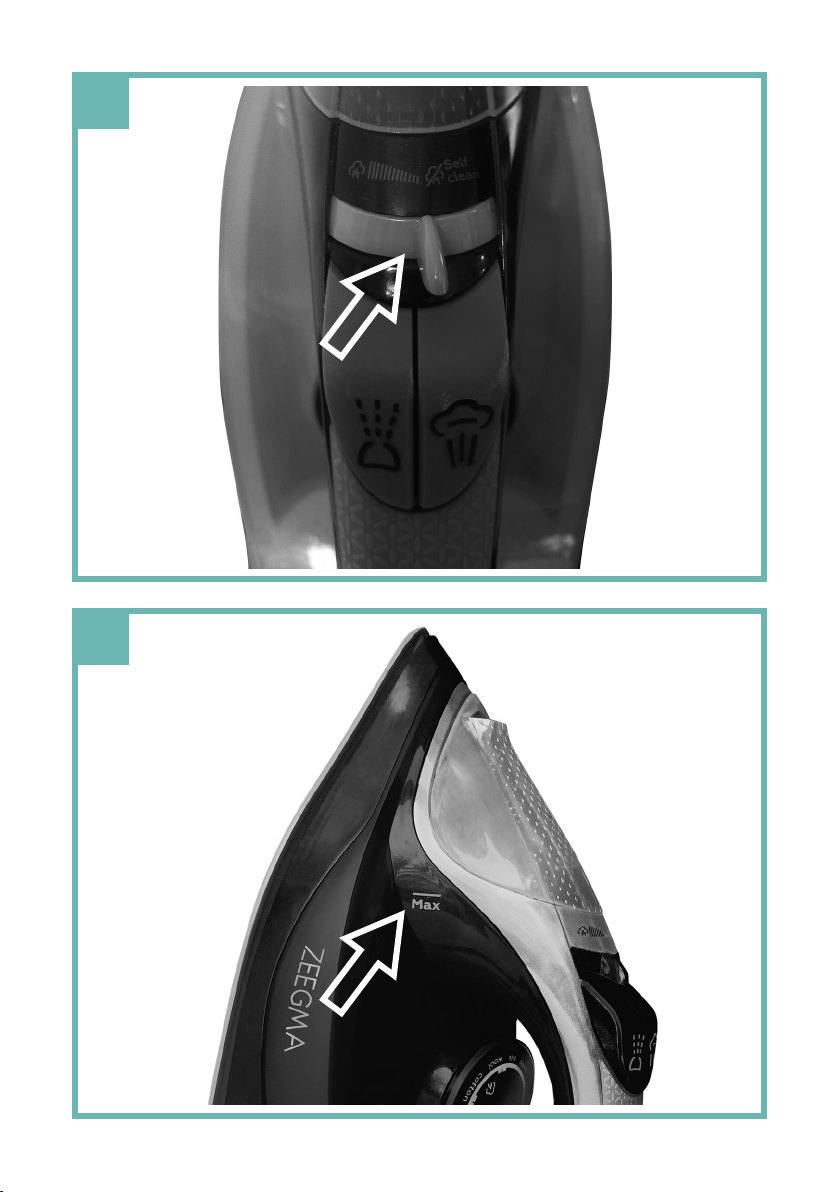
7. Hold the iron horizontally over the sink.
8. Set the steam control knob to the “Self clean” posion. Boiling water and
steam will now begin to come out of the holes in the iron plate.
Note! Hold down the knob unl the self-cleaning funcon is complete.
9. Move the iron back and forth while steam and water are coming out of
it. Connue unl the water tank is basically empty.
10. Turn the steam control knob to the “0” posion (g. 1).
11. Connect the iron to a power source.
12.
Set the temperature knob to the MAX posion. Let the iron heat up again.
The remaining water in the steam chamber will now evaporate and leave
the iron through the plate.
13. To clean the iron plate, it is recommended to iron a piece of old fabric.
CLEANING AND MAINTENANCE
• Aer the iron is unplugged and cooled down, simply wipe it with a damp
cloth, and if necessary, use a mild detergent.
• Never use harsh cleaning agents.
• Starch and other deposits can be easily removed from the iron plate by
wiping it with a damp cloth.
•
To avoid scratching the nish, never use a metal sponge to clean the plate
and never place the iron on a rough surface.
•
If you iron synthec fabrics at too high a temperature, there is a risk

EN
of damaging the fabric and also covering the iron plate with synthec
material residue. To remove the residue of the synthec material, turn
on the device and then iron a piece of coon cloth.
Photos are for reference only, the actual appearance of the products may dier from that
shown in the photos.

DE
Einführung
Sehr geehrter Kunde!
Wir möchten uns bei Ihnen bedanken, dass Sie uns vertraut und die Ze-
egma-Marke gewählt haben.
Wir übergeben Ihnen das Produkt, dass sich dank hochqualitaver Mate-
rialien und moderner technologischer Lösungen in dem täglichen Bedarf
perfekt bewährt.
Wir sind sicher, dass die sehr sorgfälge Ausführung Ihre Anforderungen
erfüllt.
Vor der Verwendung des Produkts machen Sie sich mit der vorliegenden
Bedienungsanleitung vertraut.
Falls Sie Anmerkungen oder Fragen haben, setzen Sie sich mit uns in Ver-
bindung: [email protected]
WICHTIGE INFORMATIONEN
1.
Lesen Sie die Bedienungsanleitung, bevor Sie das Gerät
benutzen.
2.
Dieses Gerät kann von Kindern ab 8 Jahren und Personen mit
eingeschränkten körperlichen, sensorischen oder geisgen
Fähigkeiten oder ohne Erfahrung und Kenntnisse benutzt
werden, wenn sie beaufsichgt oder in die sichere Benutzung
des Geräts eingewiesen wurden und die damit verbundenen
Risiken verstehen.
3.
Die Reinigung und Wartung des Geräts darf nicht von Kindern
ohne Aufsicht durchgeführt werden.
4. Kinder dürfen nicht mit dem Gerät spielen.
5.
Bewahren Sie das angeschlossene oder abkühlende Bügeleisen
und das Kabel außerhalb der Reichweite von Kindern unter
8 Jahren auf.
6. Das Bügeleisen darf nicht unbeaufsichgt gelassen werden,
wenn es an das Stromnetz angeschlossen ist.
7.
Das Bügeleisen darf nur mit der mitgelieferten Basis verwendet
werden.
8.
Verbrennungsgefahr: Das Gerät erzeugt sehr hohe
Temperaturen. Vermeiden Sie den Kontakt mit der erhitzten
Oberäche des Bügeleisens.
9. Warten Sie immer, bis die Temperatur des Geräts gesunken
ist, bevor Sie es nach dem Gebrauch berühren.
10. Um sich vor Verbrennungen und Verletzungen zu schützen,
bügeln Sie keine Stoe, während Sie diese am Körper tragen
und richten Sie den Dampf beim Bügeln nicht auf Ihren Körper.

DE 11.
Seien Sie bei der Verwendung des Geräts besonders vorsichg.
Heiße Geräteteile oder auslaufendes Wasser können
Verbrennungen verursachen.
12. Verwenden Sie das Gerät niemals für etwas anderes als den
vorgesehenen Zweck. Das Bügeleisen ist nur zum Bügeln
von Stoen besmmt.
13. Das Gerät ist nur für den Hausgebrauch besmmt. Es sollte
nicht für gewerbliche Zwecke verwendet werden.
14.
Verwenden Sie das Gerät nicht im Freien oder in Räumen mit
hoher Lufeuchgkeit.
15. Verwenden Sie das Gerät nur auf einer ebenen und stabilen
Oberäche.
16.
Wenn das Bügeln unterbrochen wird, stellen Sie das Bügeleisen
auf die Basis. Achten Sie darauf, dass die Basis auf einer
ebenen und stabilen Fläche steht.
17. Tauchen Sie das Gerät und das Kabel nicht in Wasser oder
andere Flüssigkeiten.
18.
Bevor Sie das Gerät an die Stromquelle anschließen oder von
ihr trennen, müssen Sie den Dampfregler auf die Posion „0”
stellen.
19. Ziehen Sie niemals am Kabel, wenn Sie den Stecker aus der
Steckdose ziehen. Um das Gerät von der Stromquelle zu
trennen, fassen Sie den Stecker an und ziehen Sie.
20. Achten Sie darauf, dass das Kabel nicht mit scharfen Kanten
oder heißen Oberächen in Berührung kommt.
21.
Trennen Sie das Gerät immer von der Stromquelle, wenn
Sie Wasser einfüllen oder ausgießen und wenn es nicht in
Gebrauch ist.
22.
Verwenden Sie das Bügeleisen nicht mit einem beschädigten
Kabel oder Stecker oder wenn das Gerät nicht richtig
funktioniert, fallen gelassen oder in irgendeiner Weise
beschädigt wurde und Anzeichen von Undichtigkeiten
aufweist.
23.
Versuchen Sie nicht, das Bügeleisen selbst zu reparieren oder
zu modizieren. Dies könnte zu einem elektrischen Schlag
oder einer Beschädigung des Geräts führen. Wenden Sie sich
bei Problemen an ein autorisiertes Servicezentrum.
WARNUNG: Heiße Oberächen - Oberächen können
während des Gebrauchs heiß werden.

DE
PRODUKTBESCHREIBUNG (ABB. A)
A. Drehknopf Dampf /
Selbstreinigung
B. Knopf für den Dampfausstoß
C. Sprühknopf
D. Lichtanzeige
E. Kabelummantelung
F. Drehknopf für die
Temperaturregelung
G. Wassertank
H. Feld mit Keramikbeschichtung
I. Sprühdüse
J. Abdeckung des Wassereinlasses
K. Knopf für kabellose Basis
BEDIENUNG DES GERÄTS
ACHTUNG
Vor dem ersten Gebrauch müssen Sie alle Schutzfolien enernen, die mö-
glicherweise auf dem Gehäuse oder der Sohle des Bügeleisens kleben.
Wenn Sie das Gerät zum ersten Mal benutzen, kann es zu einer leichten
Rauchentwicklung und einem spezischen Geruch kommen. Dies ist nor-
mal und beeinträchgt die Funkonalität des Geräts nicht. Das stellt kein
Sicherheitsrisiko dar.
FÜLLEN DES WASSERTANKS
1.
Bevor Sie den Wassertank füllen, müssen Sie das Bügeleisen vom Stromnetz
trennen und den Dampfregler (A, Abb. A) auf Posion „0” stellen (Abb. 1).
2. Stellen Sie das Gerät in eine horizontale Posion.
3.
Önen Sie die Abdeckung des Wassereinlaufs (J, Abb. A) und gießen
Sie dann langsam Wasser durch den Einlauf in den Wassertank (G, Abb.
A). Überschreiten Sie nicht den mit MAX markierten Füllstand (Abb. 2).
Machen Sie Pausen, während Sie Wasser in den Tank gießen, um den
Füllstand in der senkrechten Posion zu überprüfen.
4. Schließen Sie die Abdeckung des Wassereinlaufs.
5. Wenn der Wasserstand niedrig ist, führen Sie die Schrie 1 bis 4 erneut
durch.
6.
Wenn Sie das Gerät nicht mehr benutzen, gießen Sie das restliche Wasser
aus dem Tank.
ACHTUNG! In den meisten Fällen ist Leitungswasser für die Verwen-
dung in diesem Gerät geeignet. Verwenden Sie keine Wasserzusätze oder
Ersatzstoe wie Waschmiel oder parfümiertes Wasser. Diese können zu
Flecken auf den Materialien führen und das Gerät selbst beschädigen. Der
Wassertank sollte nicht über den mit „MAX” markierten Füllstand hinaus
gefüllt werden.
TROCKENES BÜGELN
1. Entleeren Sie das Bügeleisen bei Bedarf, indem Sie das Wasser aus dem
Tank gießen.
2. Stellen Sie das Gerät in eine aufrechte Posion.

DE 3.
Schließen Sie das Gerät an das Stromnetz an. Die Kontrollleuchte (D,
Abb. A) leuchtet auf.
4. Stellen Sie den Temperaturregler auf die Posion MIN (Abb. 3).
5. Warten Sie, bis sich die Bügelsohle aueizt und die Leuchtanzeige blau
wird. Das Bügeleisen ist einsatzbereit.
SPRÜHFUNKTION
Um diese Funkon zu nutzen, stellen Sie das Gerät in eine horizontale
Posion. Füllen Sie den Wassertank (siehe Füllen des Wassertanks) und
drücken Sie dann die Sprühtaste (C, Abb. A).
ACHTUNG! Prüfen Sie vor der Verwendung der Sprühfunkon die Büge-
lanleitung auf dem Stoeke, da einige Stoe aufgrund von Feuchgkeit
Flecken oder Verfärbungen aufweisen können.
Die Sprühfunkon ist besonders hilfreich bei der Beseigung hartnäckiger
Falten und wenn eine zusätzliche Befeuchtung erforderlich ist. Es kann
sowohl zum Dampf- als auch zum Trockenbügeln verwendet werden.
DAMPFBÜGELN
1.
Stellen Sie das Gerät in eine horizontale Posion. Füllen Sie den Wassertank
(siehe Füllen des Wassertanks). Stellen Sie das Gerät in eine aufrechte
Posion.
2.
Schließen Sie das Gerät an das Stromnetz an. Die Kontrollleuchte (D,
Abb. A) leuchtet auf.
3.
Stellen Sie den Temperaturregler auf die Posion Dampf (Abb. 4) und
wählen Sie einen für die Art des Stoes geeigneten Bereich.
4.
Warten Sie, bis sich die Bügelsohle erhitzt hat und die Leuchtanzeige
blau leuchtet.
5. Stellen Sie den Dampfregler auf die gewünschte Posion und passen Sie
die Dampfmenge an den Stoyp an.
Achtung! Dampügeln ist nur bei höheren Temperatureinstellungen mö-
glich. Andernfalls kann Wasser aus dem Gerät austreten.
DAMPFAUSSTOSSFUNKTION
1.
Stellen Sie das Gerät in eine horizontale Posion. Füllen Sie den Wassertank
(siehe Füllen des Wassertanks). Stellen Sie das Gerät in eine aufrechte
Posion.
2. Stellen Sie den Temperaturregler auf die Posion „MAX”.
3.
Warten Sie, bis sich die Bügelsohle erhitzt hat und die Leuchtanzeige
blau leuchtet.
4. Drücken Sie die Dampfausstoßtaste (B, Abb. A). Es kann notwendig sein,
die Taste vorher mehrmals zu drücken, um das Gerät für den Betrieb
vorzubereiten.

DE
5.
Warten Sie ein paar Sekunden, bis der Dampf in den Sto eingedrungen ist,
bevor Sie die Taste erneut drücken. Für maximale Ezienz wird empfohlen,
diese Funkon nicht öer als dreimal hintereinander zu verwenden,
nachdem die Leuchtanzeige blau geworden ist.
Die Dampfausstoßfunkon ist besonders hilfreich, um hartnäckige Falten
zu enernen. Sie kann sowohl zum Dampf- als auch zum Trockenbügeln
verwendet werden.
SCHUTZ GEGEN KALKABLAGERUNGEN (ANTI CALC)
An Calc ist ein System, das sich im Wassertank bendet und Verunreini-
gungen aus dem Wasser enernt und die mit Kalkablagerungen verbunde-
nen Probleme reduziert. Um die Wirksamkeit dieses Systems zu verlängern,
führen Sie von Zeit zu Zeit die folgenden Schrie durch:
1.
Ziehen Sie den Stecker des Bügeleisens aus der Steckdose und lassen
Sie es abkühlen.
2.
Füllen Sie den Wassernachfüllbehälter zu etwa ¾ seines Fassungsvermögens.
Geben Sie 1 Teelöel Salz in das Wasser und füllen Sie den Wassertank
mit der vorbereiteten Lösung.
3.
Lassen Sie die Lösung 15 Minuten lang im Wassertank stehen und
schüeln Sie sie von Zeit zu Zeit leicht, dann gießen Sie sie aus.
4. Füllen Sie den Wassertank ein zweites Mal mit einer Lösung aus Wasser
und Salz, wobei Sie ihn gelegentlich schüeln, und leeren Sie ihn nach
15 Minuten wieder.
5.
Füllen Sie den Tank mit frischem Wasser, um ihn auszuspülen, und gießen
Sie das Wasser dann aus.
TROPFSCHUTZSYSTEM (ANTI DRIP)
An Drip ist ein System, das ständig das den Wasseruss in die Bügelsohle
konstant kontrolliert. Unterhalb einer besmmten Temperatur unterbricht
die An-Tropf-Funkon den Wasseruss undvverhindert, dass Wasser auf
den Sto trop.
KABELLOSES BÜGELN
Um die kabellose Version des Geräts zu verwenden, drücken Sie die Taste
für die kabellose Basis (L, Abb. A) und nehmen Sie dann das Gerät aus der
Basis.
SCHRITTE, DIE NACH JEDEM GEBRAUCH EINZUHAL-
TEN SIND
1. Schalten Sie das Bügeleisen aus und trennen Sie es von der Stromquelle.

DE 2.
Lassen Sie das Bügeleisen abkühlen, bevor Sie es auewahren. Entleeren
Sie das Bügeleisen. Bewahren Sie das Bügeleisen nicht mit Wasser darin
auf.
3.
Bewahren Sie das Bügeleisen immer senkrecht auf, um die Bügelsohle
vor Kratzern, Korrosion oder Flecken zu schützen.
4. Für den kabellosen Gebrauch: Stellen Sie das Bügeleisen immer auf den
Ständer, um die Sohle vor Kratzern, Korrosion oder Flecken zu schützen.
Wenn Sie das Bügeleisen richg auf den Ständer stellen, ertönt ein Klick.
SELBSTREINIGUNGSFUNKTION
Es wird empfohlen, die Selbstreinigungsfunkon im Durchschni einmal
im Monat oder öer zu verwenden, je nach Häugkeit der Nutzung. So
verwenden Sie die Funkon:
1. Füllen Sie den Wassertank bis zur Häle.
2. Stellen Sie das Bügeleisen auf die Basis.
3. Drehen Sie den Temperaturregler auf MAX.
4. Schließen Sie das Bügeleisen an eine Stromquelle an.
5.
Lassen Sie das Bügeleisen aueizen, bis die Kontrollleuchte blau leuchtet.
6. Trennen Sie das Bügeleisen von der Stromquelle.
7. Halten Sie das Bügeleisen waagerecht über das Waschbecken.
8.
Stellen Sie den Dampfregler auf die Posion „Selbstreinigung” (Self Clean).
Aus den Löchern in der Bügelsohle treten nun kochendes Wasser und
Dampf aus.
Achtung! Halten Sie den Drehknopf gedrückt, bis die Selbstreinigungsfunk-
on abgeschlossen ist.
9.
Bewegen Sie das Bügeleisen hin und her, während Dampf und Wasser aus
dem Gerät kommen. Fahren Sie fort, bis der Wassertank praksch leer ist.
10. Drehen Sie den Dampfregler auf Posion „0” (Abb. 1).
11. Schließen Sie das Bügeleisen an eine Stromquelle an.
12.
Stellen Sie den Temperaturregler auf die Posion MAX. Lassen Sie das
Bügeleisen erneut aueizen. Das restliche Wasser in der Dampammer
verdamp nun und verlässt das Bügeleisen über die Sohle.
13.
Um die Bügelsohle zu reinigen, empehlt es sich, ein Stück alten Sto
zu bügeln.
REINIGUNG UND WARTUNG
•
Sobald das Bügeleisen vom Stromnetz getrennt und abgekühlt ist, wischen
Sie es einfach mit einem feuchten Tuch ab und verwenden bei Bedarf
ein mildes Reinigungsmiel.
• Verwenden Sie niemals scharfe Reinigungsmiel.
•
Stärke und andere Ablagerungen lassen sich leicht von der Bügelsohle
enernen, indem Sie sie mit einem feuchten Tuch abwischen.

DE
•
Um Kratzer auf der Oberäche zu vermeiden, verwenden Sie zum Reinigen
der Sohle niemals einen Metallschwamm und stellen Sie das Bügeleisen
niemals auf eine raue Oberäche.
•
Wenn synthesche Stoe bei einer zu hohen Temperatur gebügelt werden,
besteht die Gefahr, dass der Sto beschädigt wird und die Bügelsohle mit
Rückständen von syntheschem Material bedeckt wird. Um Rückstände
von syntheschen Stoen zu enernen, schalten Sie das Gerät ein und
bügeln Sie dann ein Stück Baumwollsto.
Die Fotos dienen nur zur Veranschaulichung. Das tatsächliche Aussehen der Produkte kann
von den Abbildungen abweichen.

PL Wprowadzenie
Drogi Kliencie!
Dziękujemy za obdarzenie nas zaufaniem i wybranie marki Zeegma.
Oddajemy w Twoje ręce produkt idealny do codziennego użytkowania dzię-
ki wykorzystaniu wysokiej jakości materiałów i nowoczesnych rozwiązań
technicznych. Jesteśmy pewni, że ogromna staranność wykonania sprawi,
że spełni on Twoje wymagania.
Przed użyciem produktu zapoznaj się dokładnie z poniższą instrukcją obsługi.
Jeśli masz jakiekolwiek uwagi lub pytania do zakupionego produktu, skon-
taktuj się z nami: [email protected]
WAŻNE INFORMACJE
1.
Zapoznaj się z instrukcją obsługi przed rozpoczęciem
użytkowania urządzenia.
2.
To urządzenie może być używane przez dzieci w wieku od 8 lat
i starsze oraz osoby o ograniczonych zdolnościach zycznych,
sensorycznych lub umysłowych lub bez doświadczenia i
wiedzy, jeśli zostały one poddane nadzorowi lub instruktażowi
dotyczącemu użytkowania urządzenia w bezpieczny sposób
oraz rozumieją związane z tym zagrożenia.
3.
Czyszczenie i konserwacja urządzenia nie mogą być
wykonywane przez dzieci bez nadzoru.
4. Dzieci nie mogą bawić się urządzeniem.
5. Przechowuj podłączone do prądu lub stygnące żelazko oraz
przewód w miejscu niedostępnym dla dzieci poniżej 8 roku
życia.
6.
Żelazko nie może być pozostawione bez nadzoru, gdy jest
podłączone do zasilania sieciowego.
7. Żelazko musi być używane wyłącznie z podstawą dołączoną
do zestawu.
8.
Ryzyko poparzenia: urządzenie generuje bardzo wysokie
temperatury. Unikaj kontaktu z nagrzaną powierzchnią żelazka.
9. Przed dotknięciem urządzenia po użyciu zawsze odczekaj aż
jego temperatura spadnie.
10.
Aby uchronić się przed poparzeniami i urazami, nie prasuj
tkanin podczas noszenia ich na ciele i nie kieruj pary w kierunku
ciała w trakcie prasowania.
11.
Zachowaj szczególną ostrożność w trakcie korzystania z
urządzenia. Rozgrzane części urządzenia lub wyciekająca woda
mogą spowodować poparzenia.
12.
Nigdy nie używaj urządzenia do celów innych niż przeznaczone.

PL
Żelazko jest przeznaczone tylko do prasowania tkanin.
13.
Urządzenie służy tylko do użytku domowego. Nie należy
używać go do celów przemysłowych.
14.
Nie należy używać urządzenia na zewnątrz lub w
pomieszczeniach o wysokiej wilgotności powietrza.
15.
Należy korzystać z urządzenia wyłącznie na płaskiej i stabilnej
powierzchni.
16. Jeśli prasowanie jest przerwane, należy postawić żelazko na
podstawie. Upewnij się, że podstawa jest umieszczona na
płaskiej i stabilnej powierzchni.
17.
Nie należy zanurzać urządzenia i przewodu w wodzie lub
innych płynach.
18.
Przed podłączeniem lub odłączeniem urządzenia od źródła
zasilania pokrętło regulacji pary należy ustawić na pozycję „0”.
19. Nigdy nie należy ciągnąć za przewód podczas odłączania od
gniazdka. Aby odłączyć urządzenie od źródła zasilania, należy
chwycić za wtyczkę i pociągnąć.
20.
Nie należy dopuszczać, aby przewód stykał się z ostrymi
krawędziami i gorącymi powierzchniami.
21.
Zawsze odłączaj urządzenie od źródła zasilania podczas
napełniania lub wylewania wody, oraz gdy nie jest ono
używane.
22.
Nie należy używać żelazka z uszkodzonym przewodem lub
wtyczką, lub gdy urządzenie działa nieprawidłowo, zostało
upuszczone lub w jakikolwiek sposób uszkodzone oraz gdy
widoczne są ślady wycieku.
23.
Nie próbuj samodzielnie naprawiać lub modykować żelazka.
Mogłoby to spowodować ryzyko porażenia prądem lub
uszkodzenie urządzenia. W przypadku problemów skontaktuj
się z autoryzowanym serwisem.
UWAGA! Gorąca powierzchnia - powierzchnie mogą się nagrze-
wać podczas użytkowania.
OPIS PRODUKTU (RYS. A)
A. Pokrętło regulacji pary /
Samooczyszczanie
B. Przycisk wyrzutu pary
C. Przycisk spryskiwania
D. Wskaźnik świetlny
E. Osłona na przewód
F. Pokrętło regulacji temperatury
G. Zbiornik na wodę
H. Płyta z powłoką ceramiczną
I. Spryskiwacz
J. Pokrywa wlotu wody
K. Przycisk podstawy
bezprzewodowej

PL OBSŁUGA URZĄDZENIA
UWAGA
Przed pierwszym użyciem konieczne jest usunięcie wszelkich folii ochron-
nych, które mogły zostać przyklejone do obudowy bądź podeszwy żelazka.
Przy pierwszym użyciu urządzenia, może dojść do nieznacznej emisji dymu
oraz wydzielenia specycznego zapachu. Jest to zjawisko normalne, nie
mające negatywnego wpływu na funkcjonalność urządzenia. Nie stanowi to
zagrożenia dla bezpieczeństwa użytkowania.
NAPEŁNIANIE ZBIORNIKA NA WODĘ
1.
Przed napełnieniem zbiornika na wodę należy odłączyć żelazko od zasilania
oraz ustawić pokrętło regulacji pary (A, rys. A) na pozycji „0” (rys. 1 ).
2. Umieść urządzenie w pozycji poziomej.
3.
Otwórz pokrywę wlotu wody (J, rys. A), a następnie powoli wlej wodę
przez wlot do zbiornika na wodę (G, rys. A). Nie przekraczaj poziomu
oznaczonego jako MAX (rys. 2). W trakcie wlewania wody do zbiornika
rób przerwy, aby skontrolować jej poziom w ustawieniu pionowym.
4. Zamknij pokrywę wlotu wody.
5.
W przypadku niskiego poziomu wody, wykonaj ponownie kroki od 1 do 4.
6.
Po zakończeniu korzystania z urządzenia, wylej pozostałą w zbiorniku wodę.
UWAGA! W większości przypadków woda z kranu jest odpowiednia do
stosowania w tym urządzeniu. Nie używaj wszelkiego rodzaju dodatków do
wody, bądź substytutów, takich jak płyny do prania bielizny czy perfumo-
wane wody. Mogą one prowadzić do plamienia materiałów oraz uszko-
dzenia samego urządzenia. Zbiornik wodny nie powinien być napełniany
powyżej poziomu oznaczonego jako ‚MAX’.
PRASOWANIE NA SUCHO
1. W razie konieczności, opróżnij żelazko wylewając wodę ze zbiornika.
2. Umieść urządzenie w pozycji pionowej.
3.
Podłącz urządzenie do źródła zasilania. Wskaźnik świetlny (D, rys. A)
zaświeci się.
4. Ustaw pokrętło regulacji temperatury na pozycji MIN (rys. 3 ).
5. Poczekaj, aż płyta żelazka rozgrzeje się, a wskaźnik świetlny zmieni kolor
na niebiski. Żelazko jest gotowe do pracy.
FUNKCJA SPRYSKIWANIA
Aby skorzystać z tej funkcji, umieść urządzenie w pozycji poziomej. Napeł-
nij zbiornik na wodę (patrz: Napełnianie zbiornika na wodę), a następnie
wciśnij przycisk spryskiwania (C, rys. A).
UWAGA! Przed użyciem funkcji spryskiwania, sprawdź etykietę materiału
pod kątem instrukcji prasowania, ponieważ niektóre tkaniny mogą ulec
Table of contents
Languages: