manuals.online logo
Brands
  1. Home
  2. •
  3. Brands
  4. •
  5. ZENEC
  6. •
  7. Dashcam
  8. •
  9. ZENEC ZE-RCE4606 User manual

ZENEC ZE-RCE4606 User manual

MOUNTING
INSTRUCTIONS
ZE-RCE4606
REAR VIEW CAMERA FOR MERCEDES SPRINTER
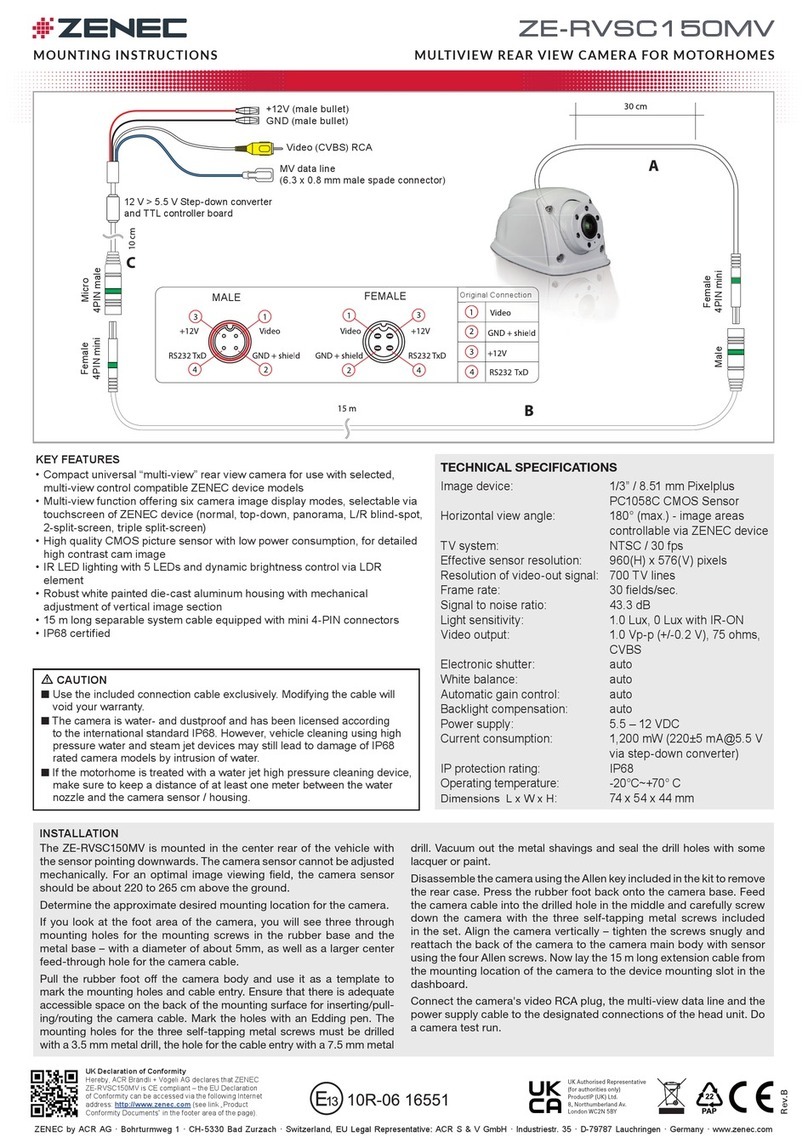
KEY FEATURES
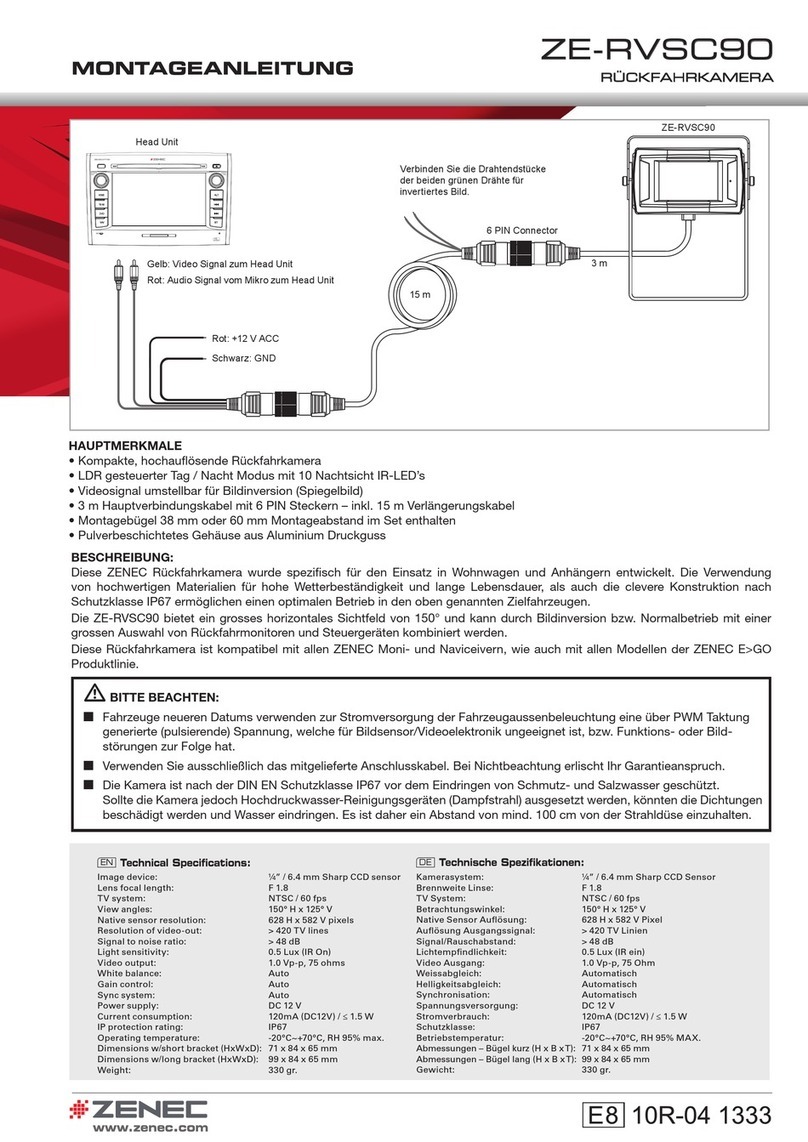
• Compact, high-resolution rear view camera for MERCEDES Sprinter and VW Crafter vehicles
• Easy “Plug & Play installation
• Integrated microphone
• LDR controlled day / night mode with 6 night vision IR-LED’s
• Manual adjustment of vertical image section in 3 steps
• Separable 3-part system cable, with cable lengths of 0.7m + 15m + 0.7m
DESCRIPTION:
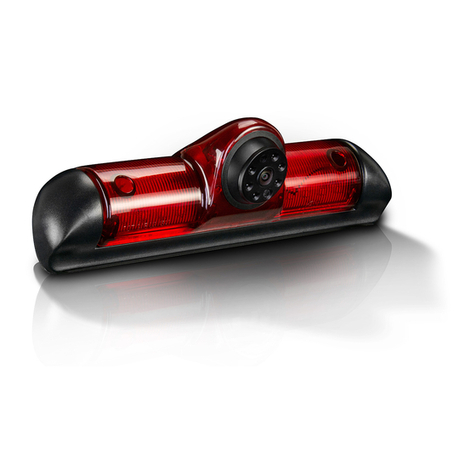
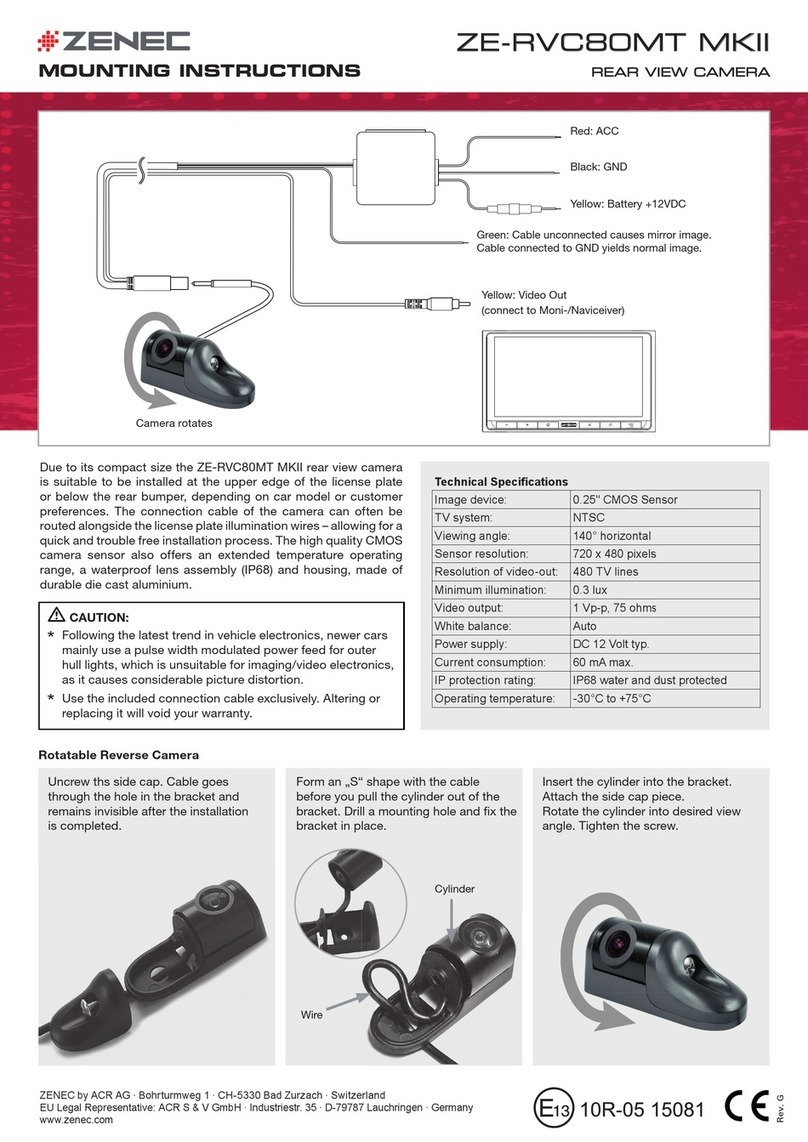
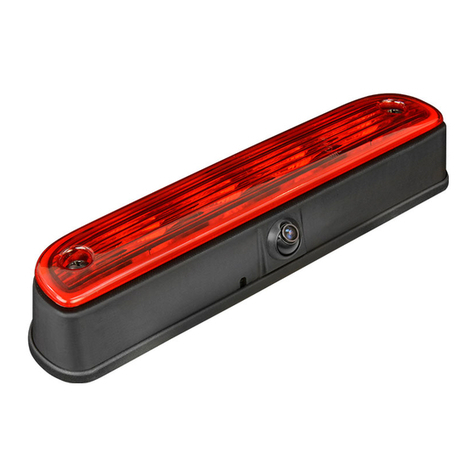
ZENEC‘s vehicle-specic rear view camera ZE-RCE4606 replaces the original third brake light of your MERCEDES Sprinter or
VW Crafter.
Of course, you don´t have to do without the third brake light. The ZENEC camera module takes over the original brake light, for
simple „Plug & Play“ retrot connecting to the vehicle-mounted cable.
An integrated microphone and an IR-LED night illumination system are part of the ZE-RCE4606 cam as well.
This product is compatible with a wide variety of 2-DIN A/V receivers of the aftermarket and the ZENEC E>GO product line up,
including ZENEC 2-DIN Infotainers and Naviceivers.
ZENEC ∙ Bohrturmweg 1 ∙ CH-5330 Bad Zurzach ∙ Switzerland
CAUTION:
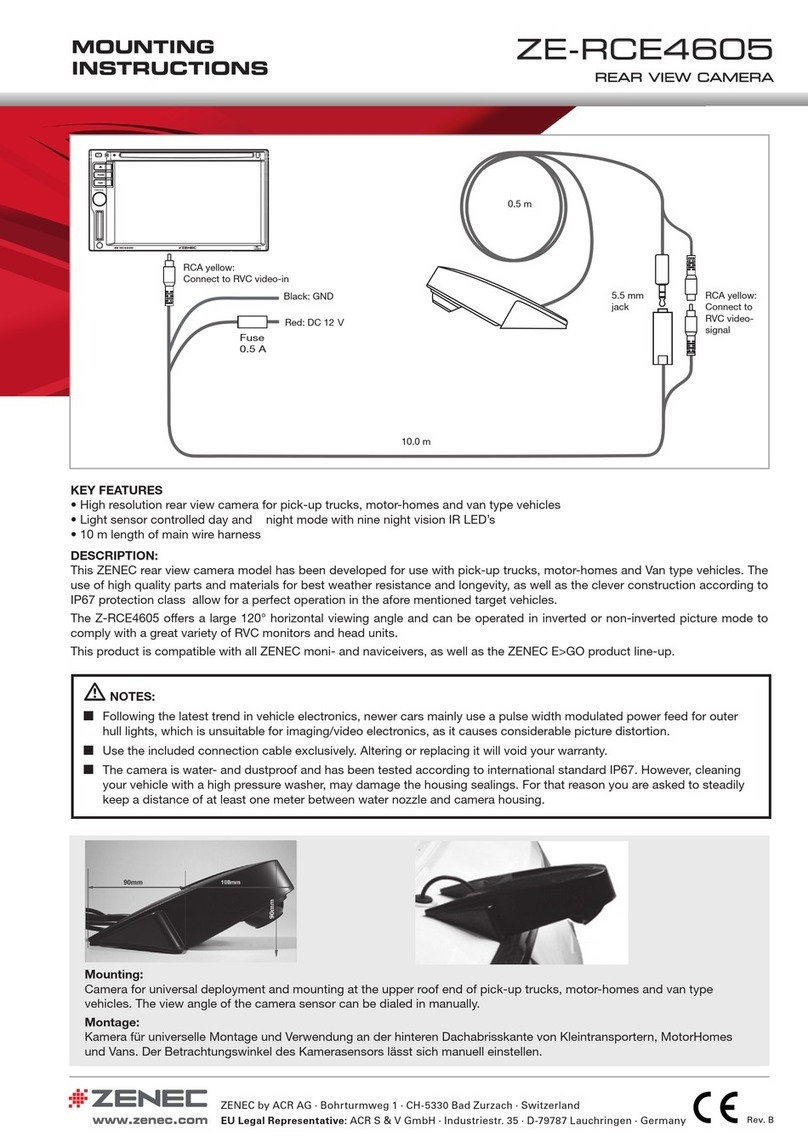
■Use the included connection cable exclusively. Altering or replacing it will void your warranty.
■The camera is water- and dustproof and has been licensed according to the international standard IP68. However,
vehicle cleaning using high pressure water and steam jet devices may still lead to damage of IP68 rated camera models
by water intrusion. Keep a distance of at least one meter between the water nozzle and the camera housing.
Rev. A
EU Legal Representative:
ACR S & V GmbH ∙ Industriestraße 35 ∙ D-79787 Lauchringen ∙ Germany
EN
Technical Specifications:
Image device: ¹/³” / 8.5mm Sony CCD sensor
Lens focal length: f2.6
TV system: NTSC / 60 Hz
View angle: 130°(D) x 102°(H) x 77°(V)
Native sensor resolution: 752 (H) x 494 (V) pixels
Resolution of video-out: > 600 TV lines
Frame rate: 60 fields/sec.
Signal to noise ratio: > 48 dB
Light sensitivity: 0.1 Lux, 0 Lux if IR on
Video output: 1.0 Vp-p, 75 ohms CVBS
White balance: Auto
Backlight compensation: Auto
Gamma correction: 0.45
Gain control: Auto
Sync system: Auto
Power supply: DC 12V
Current consumption: 150mA (DC12V) / ≤ 1800mW
IP protection rating: IP68
Operating temperature: -20°C~+70°C
DE
Technische Spezifikationen
Kamerasystem: ¹/³” / 8.5mm Sony CCD Sensor
Brennweite Linse: f2.6
TV System: NTSC / 60 Hz
Betrachtungswinkel: 130°(D) x 102°(H) x 77°(V)
Native Sensor Auflösung: 752 (H) x 494 (V) Pixel
Auflösung Ausgangssignal: > 600 TV Linien
Bildwiederholrate: 60 Felder/Sek.
Signal/Rauschabstand: > 48 dB
Lichtempfindlichkeit: 0.1 Lux, 0 Lux wenn IR an
Video Ausgang: 1,0 Vp-p, 75 Ohm CVBS
Weißabgleich: Automatisch
Belichtungskompensation: Automatisch
Gamma Korrektur: 0.45
Helligkeitsabgleich: Automatisch
Synchronisation: Automatisch
Spannungsversorgung: DC 12V
Stromverbrauch: 150mA (DC12V) / ≤ 1800mW
Schutzklasse: IP68
Betriebstemperatur: -20°C~+70°C
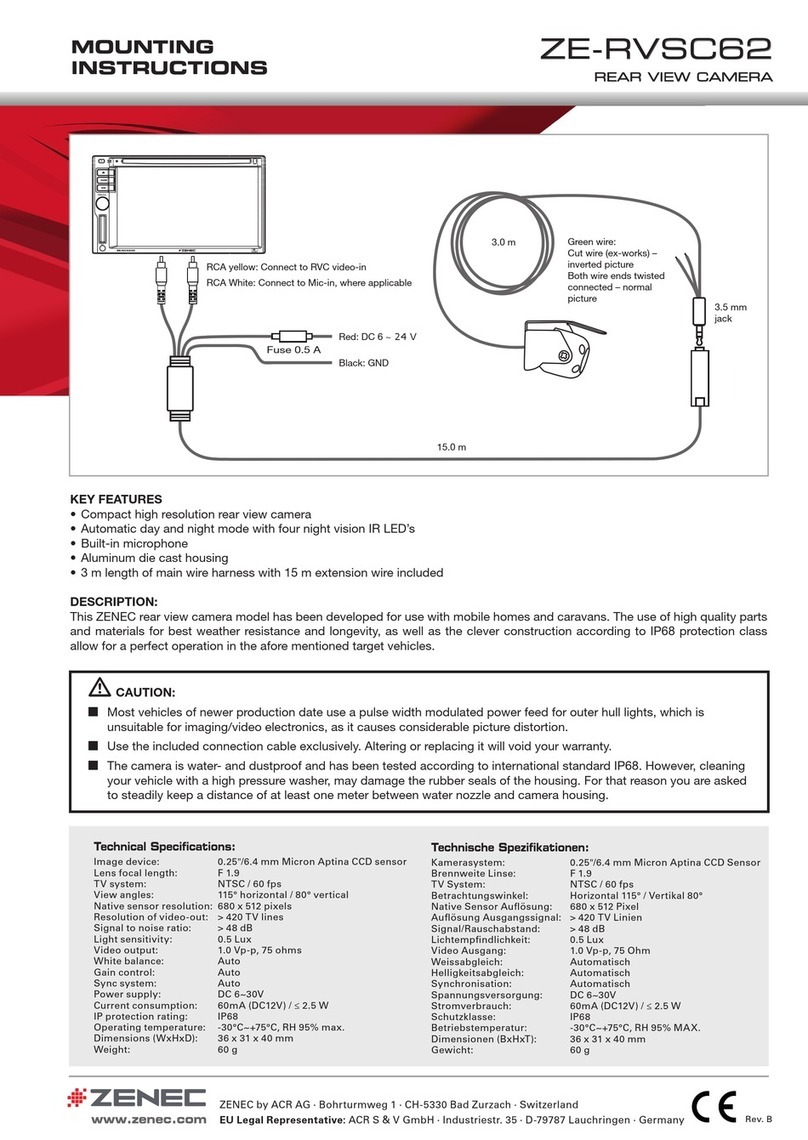
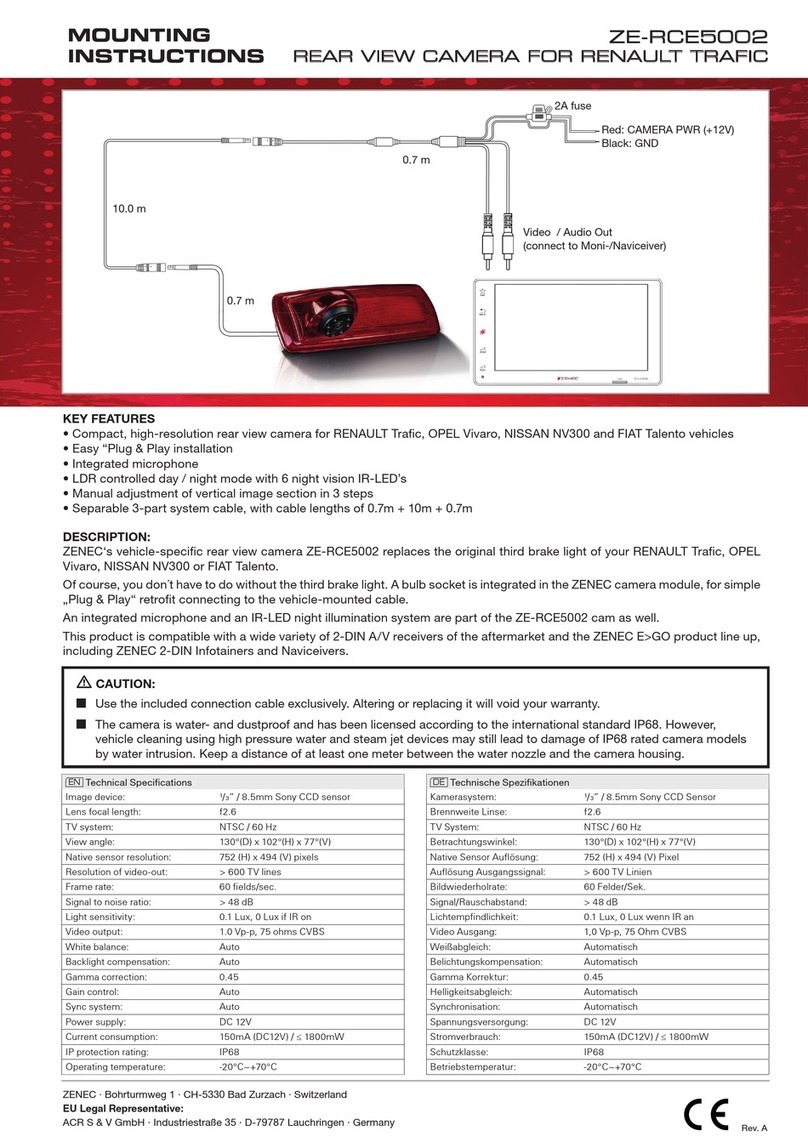
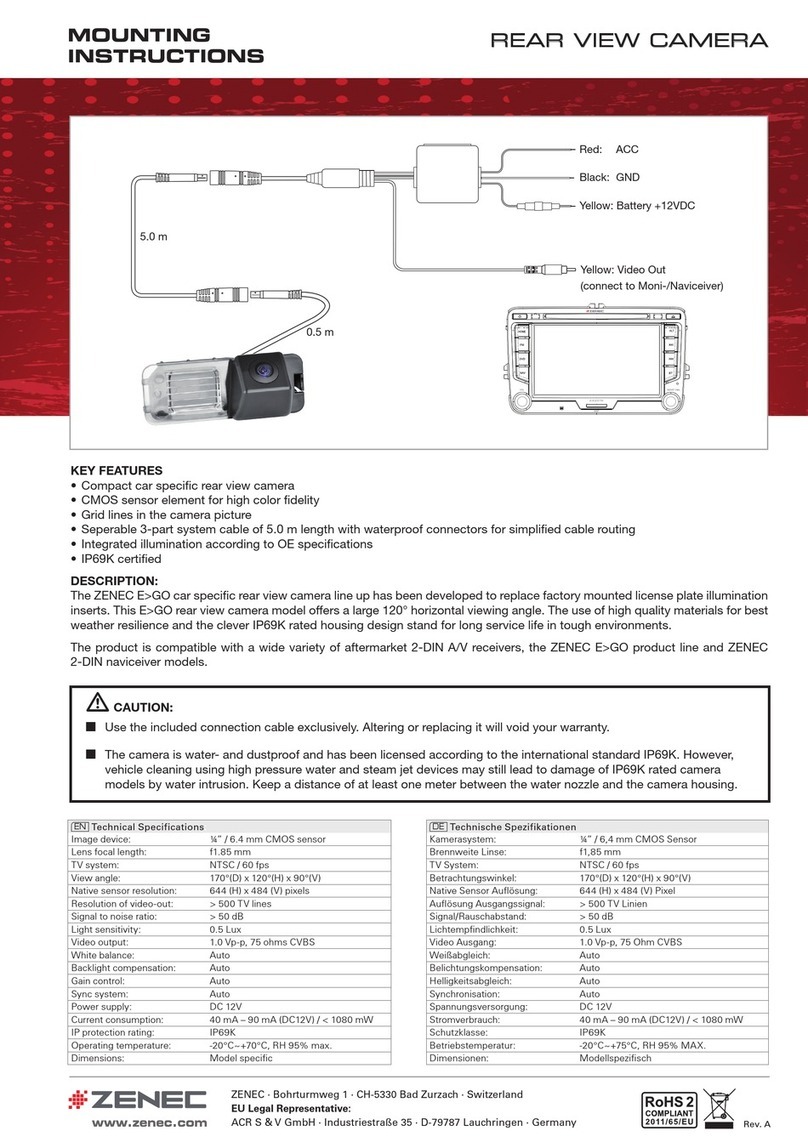
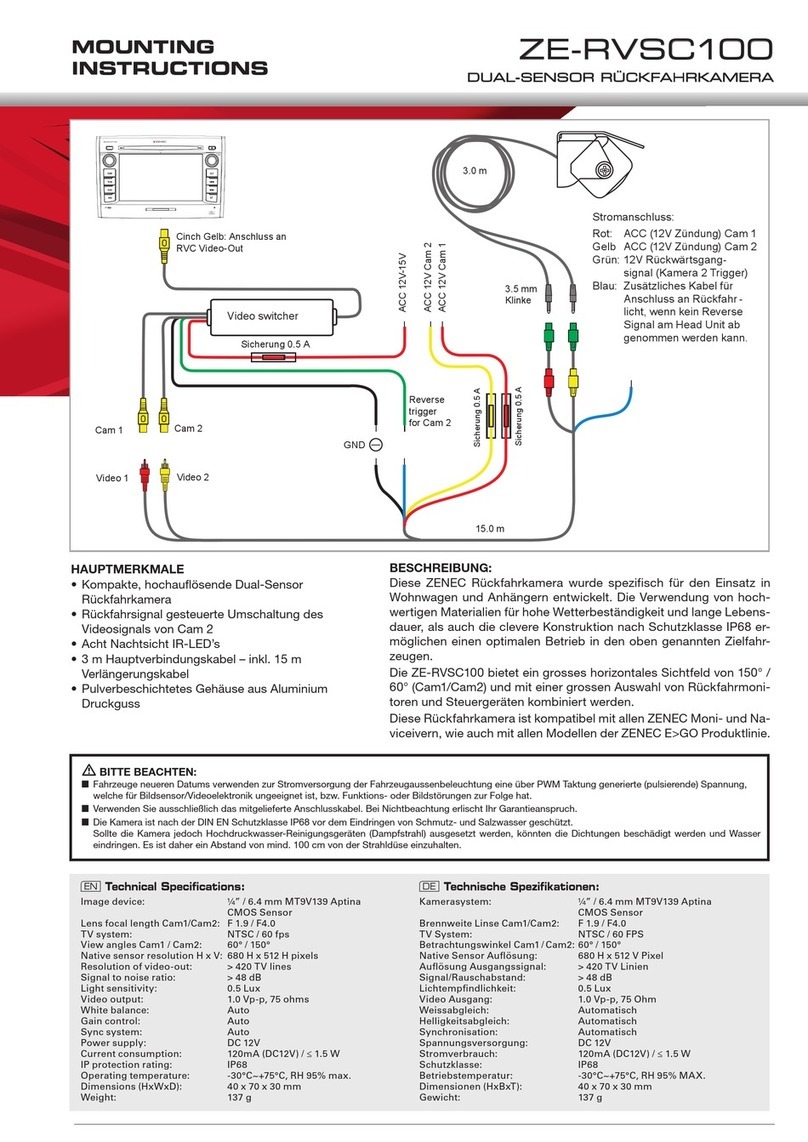
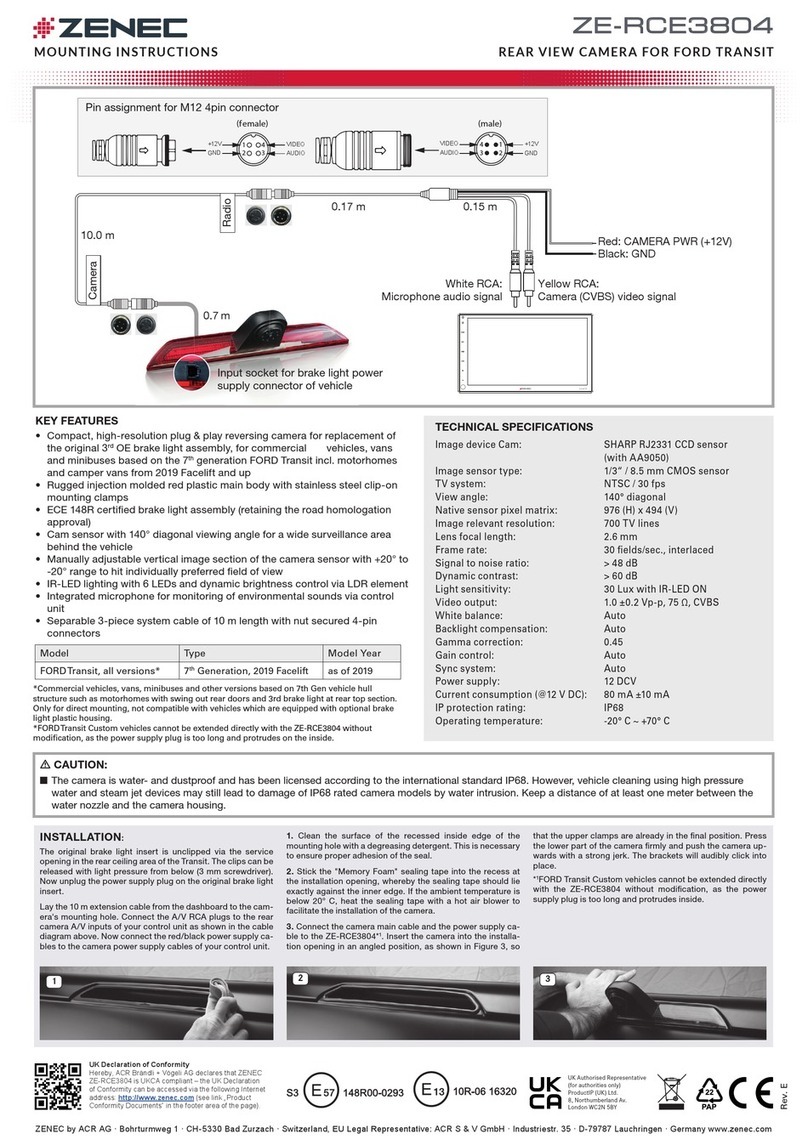
Red: CAMERA PWR (+12V)
Video / Audio Out
(connect to Moni-/Naviceiver)
15.0 m
Black: GND
2A fuse
0.7 m
0.7 m
0.7 m
MONTAGE-
ANLEITUNG
HAUPTMERKMALE
• Kompakte, hochauösende Kamera für MERCEDES Sprinter und VW Crafter Fahrzeuge
• Einfache „Plug & Play“ Installation
• Integriertes Mikrofon
• LDR gesteuerter Tag / Nacht Modus mit 6 Nachtsicht IR-LED’s
• Vertikaler Bildausschnitt ist am Kameragehäuse manuell in 3 Stufen einstellbar
• 3-teiliges auftrennbares Systemkabel mit 0.7m + 15m + 0.7m Längen
BITTE BEACHTEN:
■Verwenden Sie ausschließlich das mitgelieferte Anschlusskabel. Bei Nichtbeachtung erlischt Ihr Garantieanspruch.
■Die Kamera ist nach der DIN EN Schutzklasse IP68 vor dem Eindringen von Schmutz- und Salzwasser geschützt.
Sollte die Kamera jedoch Hochdruckwasser-Reinigungsgeräten (Dampfstrahl) ausgesetzt werden, können selbst IP68
spezifizierte Modelle durch eindringendes Wasser beschädigt werden. Es ist daher ein Abstand von mind. 100 cm von
der Strahldüse zur Kamera einzuhalten.
BESCHREIBUNG
ZENECs Fahrzeug-spezifische Rückfahrkamera ZE-RCE4606 ersetzt die originale dritte Bremsleuchte Ihres MERCEDES
Sprinter oder VW Crafter.
Auf die dritte Bremsleuchte müssen Sie natürlich nicht verzichten. Das ZENEC Kameramodul übernimmt das originale
Bremslicht, welche ganz einfach per „Plug & Play“ mit dem fahrzeugseitigen Kabel verbunden wird.
Unterstützt wird die ZE-RCE4606 sowohl durch das integrierte Mikrofon als auch durch das IR-LED Nachtbeleuch-
tungs-System.
Dieses Produkt ist kompatibel mit einer großen Auswahl an 2-DIN A/V Gerätemodellen des Nachrüstmarkts und der
ZENEC E>GO Produktlinie mitsamt den ZENEC 2-DIN Infotainern und Naviceivern.
ZE-RCE4606
REAR VIEW CAMERA FOR MERCEDES SPRINTER
EN
Installation:
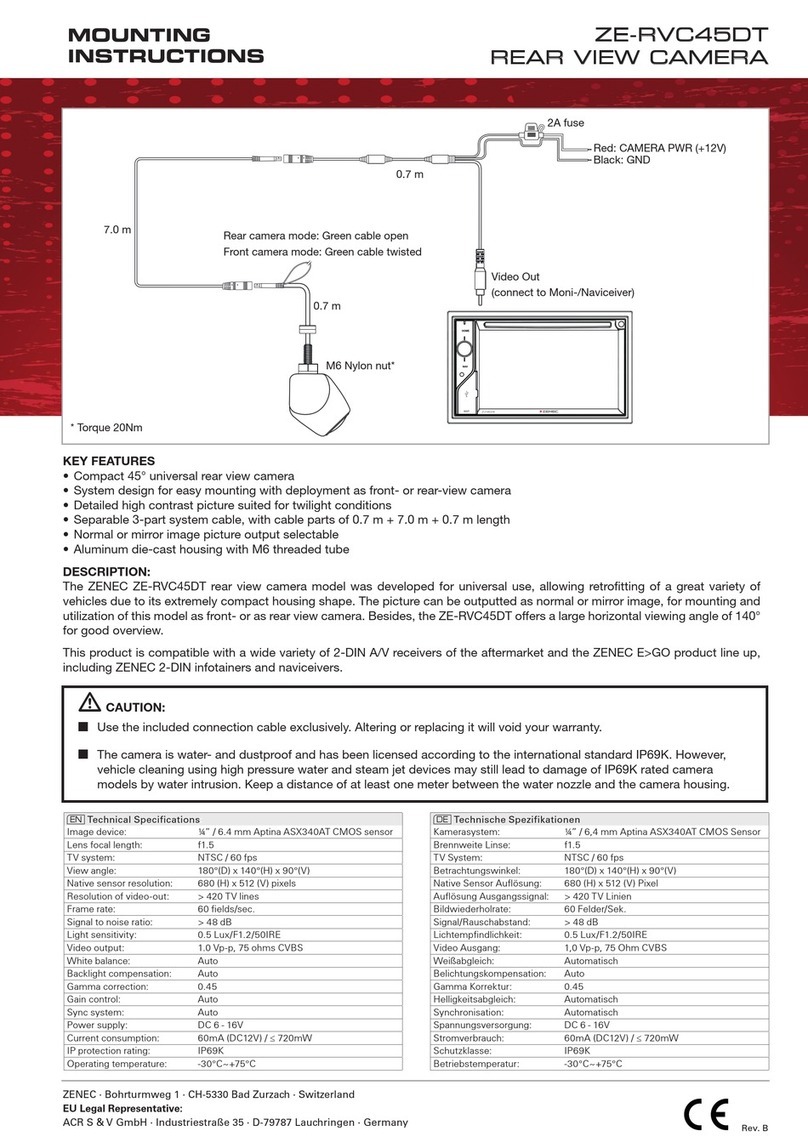
Use a Phillips screwdriver to remove the two screws on
the left and right of the third brake light. Carefully pull out
the brake light and disconnect the plug on the rear. Now
you have to loosen the original bulb from the third brake
light and insert it into the ZENEC module. The enclosed
sealing tape must also be glued to the ZENEC module so
that it later seals between the vehicle and the brake light.
If necessary, clean the area around the brake light recess.
Connect the ZE-RCE4606 module to the plug (power
supply) you previously unplugged. Insert the module and
screw it with the original screws.
Route the connecting cable through the vehicle forward,
connect it to your device and perform a functional test.
DE
Installation:
Nutzen Sie einen Phillips Schraubendreher um die beiden
Schrauben links und rechts in der dritten Bremsleuchte zu
entfernen. Ziehen Sie die Bremsleuchte vorsichtig heraus und
lösen Sie den Stecker auf der Rückseite. Nun müssen Sie das
originale Leuchtmittel aus der dritten Bremsleuchte lösen und in
das ZENEC Modul einsetzen. Das beiliegende Dichtband muss
ebenfalls auf das ZENEC Modul geklebt werden, damit es spä-
ter zwischen Fahrzeug und Bremsleuchte abdichtet. Reinigen
Sie gegebenenfalls den Bereich um die Bremsleuchtenausspa-
rung. Verbinden Sie das ZE-RCE4606 Modul mit dem Stecker
(Stromversorgung), welchen Sie zuvor ausgesteckt hatten. Setz-
ten Sie das Modul ein und verschrauben Sie es mit den origina-
len Schrauben.
Verlegen Sie das Anschlusskabel durch das Fahrzeug nach
vorn, verbinden Sie es mit Ihrem Wiedergabegerät und führen
Sie eine Funktionsprüfung durch.
Rot: KAMERA PWR (+12V)
Video / Audio Out
(mit Moni-/Naviceiver verbinden)
15.0 m
Schwarz: GND
2A Sicherung
0.7 m
0.7 m
0.7 m

Other ZENEC Dashcam manuals

ZENEC E GO - User manual

ZENEC

ZENEC E GO - User manual

ZENEC ZE-RVC90MT User manual

ZENEC

ZENEC ZE-RVC90MT User manual

ZENEC ZE-RVC80MT MKII User manual

ZENEC

ZENEC ZE-RVC80MT MKII User manual

ZENEC ZE-RCE4605 User manual

ZENEC

ZENEC ZE-RCE4605 User manual

ZENEC ZE-RVSC62 User manual

ZENEC

ZENEC ZE-RVSC62 User manual

ZENEC ZE-RVC45DT User manual

ZENEC

ZENEC ZE-RVC45DT User manual

ZENEC ZE-RVSC90 User manual

ZENEC

ZENEC ZE-RVSC90 User manual

ZENEC ZE-RCE3701 User manual

ZENEC

ZENEC ZE-RCE3701 User manual

ZENEC ZE-RCE5002 User manual

ZENEC

ZENEC ZE-RCE5002 User manual

ZENEC ZE-RCE3702 User manual

ZENEC

ZENEC ZE-RCE3702 User manual

ZENEC ZE-RVSC150MV User manual

ZENEC

ZENEC ZE-RVSC150MV User manual

ZENEC ZE-RVC30MT User manual

ZENEC

ZENEC ZE-RVC30MT User manual

ZENEC ZE-RCE3804 User manual

ZENEC

ZENEC ZE-RCE3804 User manual

ZENEC ZE-RVSC100 User manual

ZENEC

ZENEC ZE-RVSC100 User manual

ZENEC ZE-RVSC90 User manual

ZENEC

ZENEC ZE-RVSC90 User manual

Popular Dashcam manuals by other brands

MP-Man MPCS1 manual

MP-Man

MP-Man MPCS1 manual

Smarti Duo user manual

Smarti

Smarti Duo user manual

Z-EDGE Z3G quick guide

Z-EDGE

Z-EDGE Z3G quick guide

SMARTPOINT SPMINIDASH manual

SMARTPOINT

SMARTPOINT SPMINIDASH manual

Lukas LK-350-12/24VT manual

Lukas

Lukas LK-350-12/24VT manual

Connects2 CAM-VW8 user manual

Connects2

Connects2 CAM-VW8 user manual

Aim SmartyCam HD user guide

Aim

Aim SmartyCam HD user guide

Gator GHDVR82W Product user manual

Gator

Gator GHDVR82W Product user manual

Cobra CDR835 user manual

Cobra

Cobra CDR835 user manual

Aukey DR02 J user manual

Aukey

Aukey DR02 J user manual

Crux RVCVW-738 installation guide

Crux

Crux RVCVW-738 installation guide

ring RBGDC50 instructions

ring

ring RBGDC50 instructions

Thinkware X500 user manual

Thinkware

Thinkware X500 user manual

Fleet Complete Vision 2.0 installation guide

Fleet Complete

Fleet Complete Vision 2.0 installation guide

Provision ISR PR-DVR-C10 Quick installation guide

Provision ISR

Provision ISR PR-DVR-C10 Quick installation guide

Gembird DCAM-002 user manual

Gembird

Gembird DCAM-002 user manual

Axis JS5001+C20 instruction manual

Axis

Axis JS5001+C20 instruction manual

Denver CCT-1301 MK2 user manual

Denver

Denver CCT-1301 MK2 user manual

manuals.online logo
manuals.online logoBrands
  • About & Mission
  • Contact us
  • Privacy Policy
  • Terms and Conditions

Copyright 2025 Manuals.Online. All Rights Reserved.