ZENIQ ROBIO DAB+ 100 User manual

ZENIQ DAB+ 100
Designed in Denmark. Assembled in PRC. Zeniq is a registered brand of Nomenta Industries
(HK) Ltd. . All rights reserved. Copyright 2013. Trademarks are the property of Nomenta
Industries (HK) Ltd. or their respective owners unless indicated otherwise.

EN
Disclaimer
The information in this document is subject to change without notice. No
liability shall be assumed for technical or editorial errors or omissions
contained herein; nor for incidental or consequential damages resulting
from the performance or use of this material. This document contains
information protected by copyright.
Copyright
Copyright ©2012 Nomenta Industries (HK) Ltd. All rights reserved.
Trademarks
Zeniq, Robio, the Zeniq logo, and the Nomenta Industries (HK) Ltd. are
trademarks or registered trademarks of Nomenta Industries (HK) Ltd. All
other product names are trademarks of their respective companies.
1st Edition, September 2012
1

EN
Table of Content
1. Introduction ............................................................................
2. In the package .......................................................................
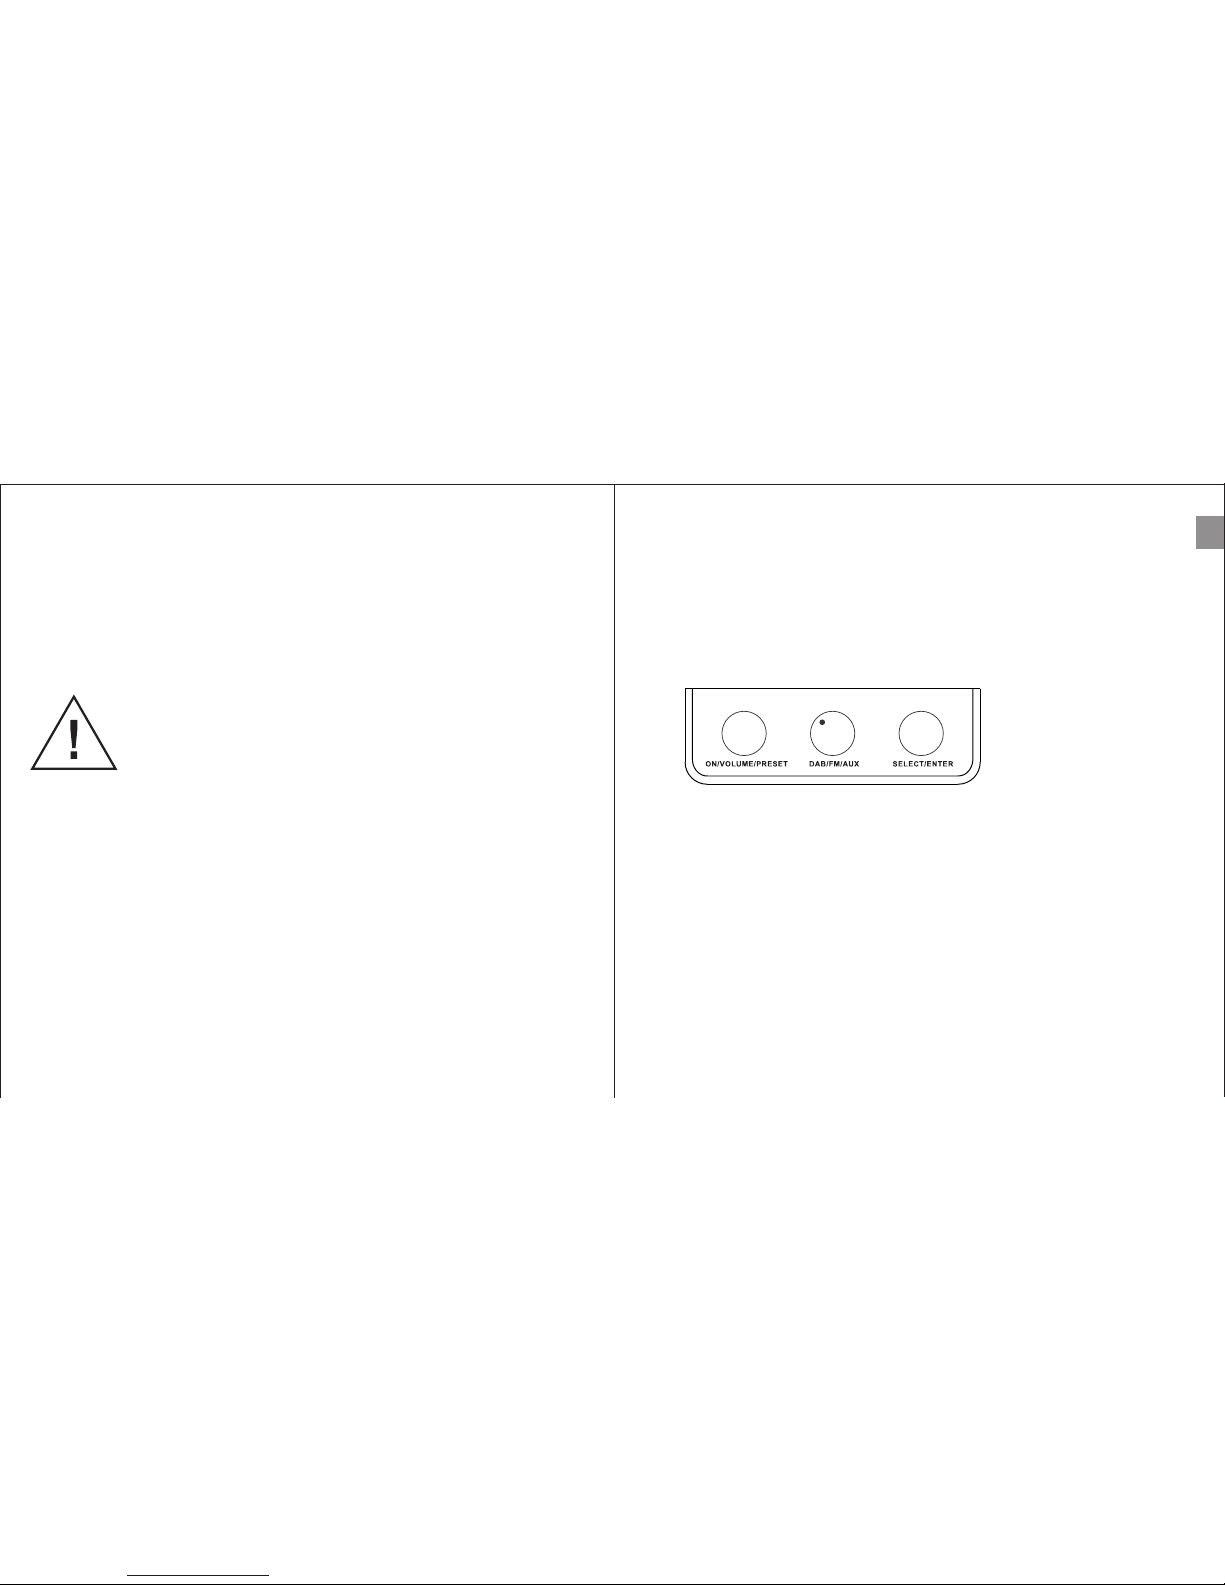
3. The 3 knobs ..........................................................................
4. The back ...............................................................................
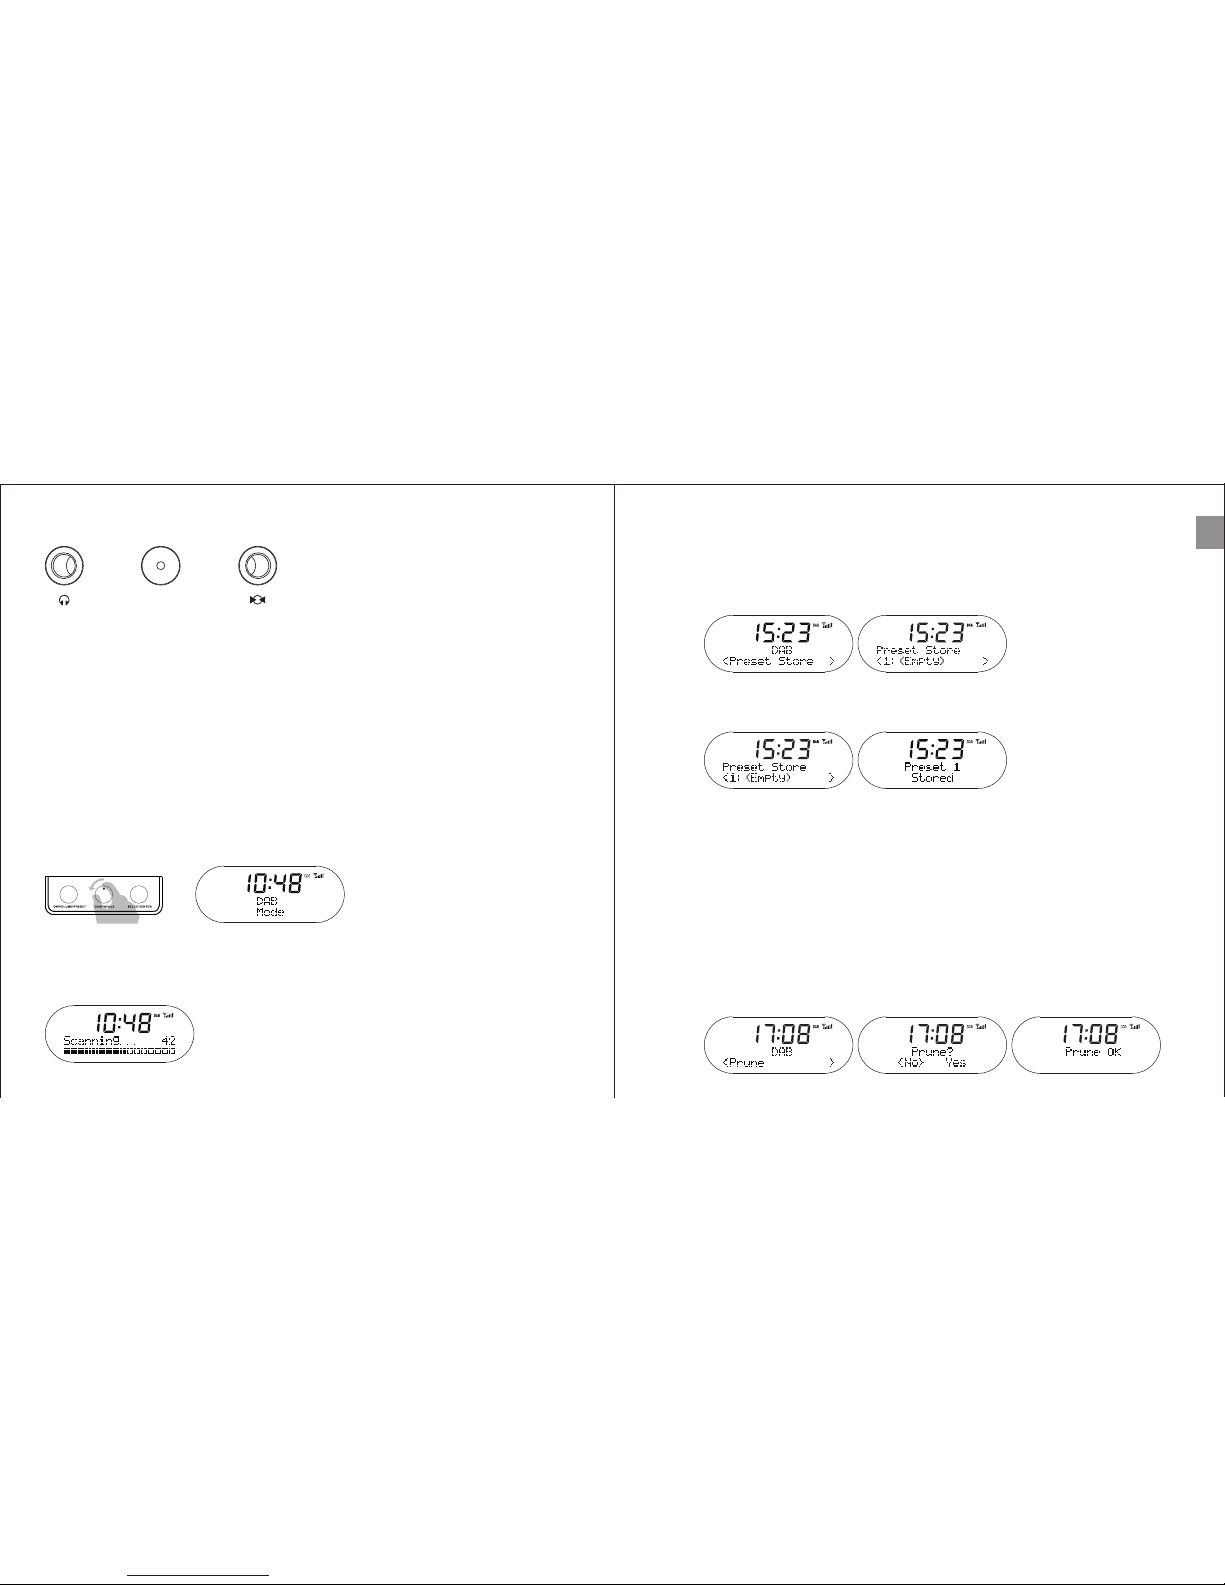
5. DAB mode ............................................................................
5-1 Store station ...................................................................
5-2 Prune .............................................................................
5-3 DRC ...............................................................................
5-4 Manual tuning .................................................................
5-5 Full Scan ........................................................................
5-6 Recall station ..................................................................
5-7 Switch stations ...............................................................
6. FM mode ..............................................................................
6-1 Quick tune ......................................................................
6-2 Manual tune ....................................................................
6-3 Store station ...................................................................
6-4 Recall station ..................................................................
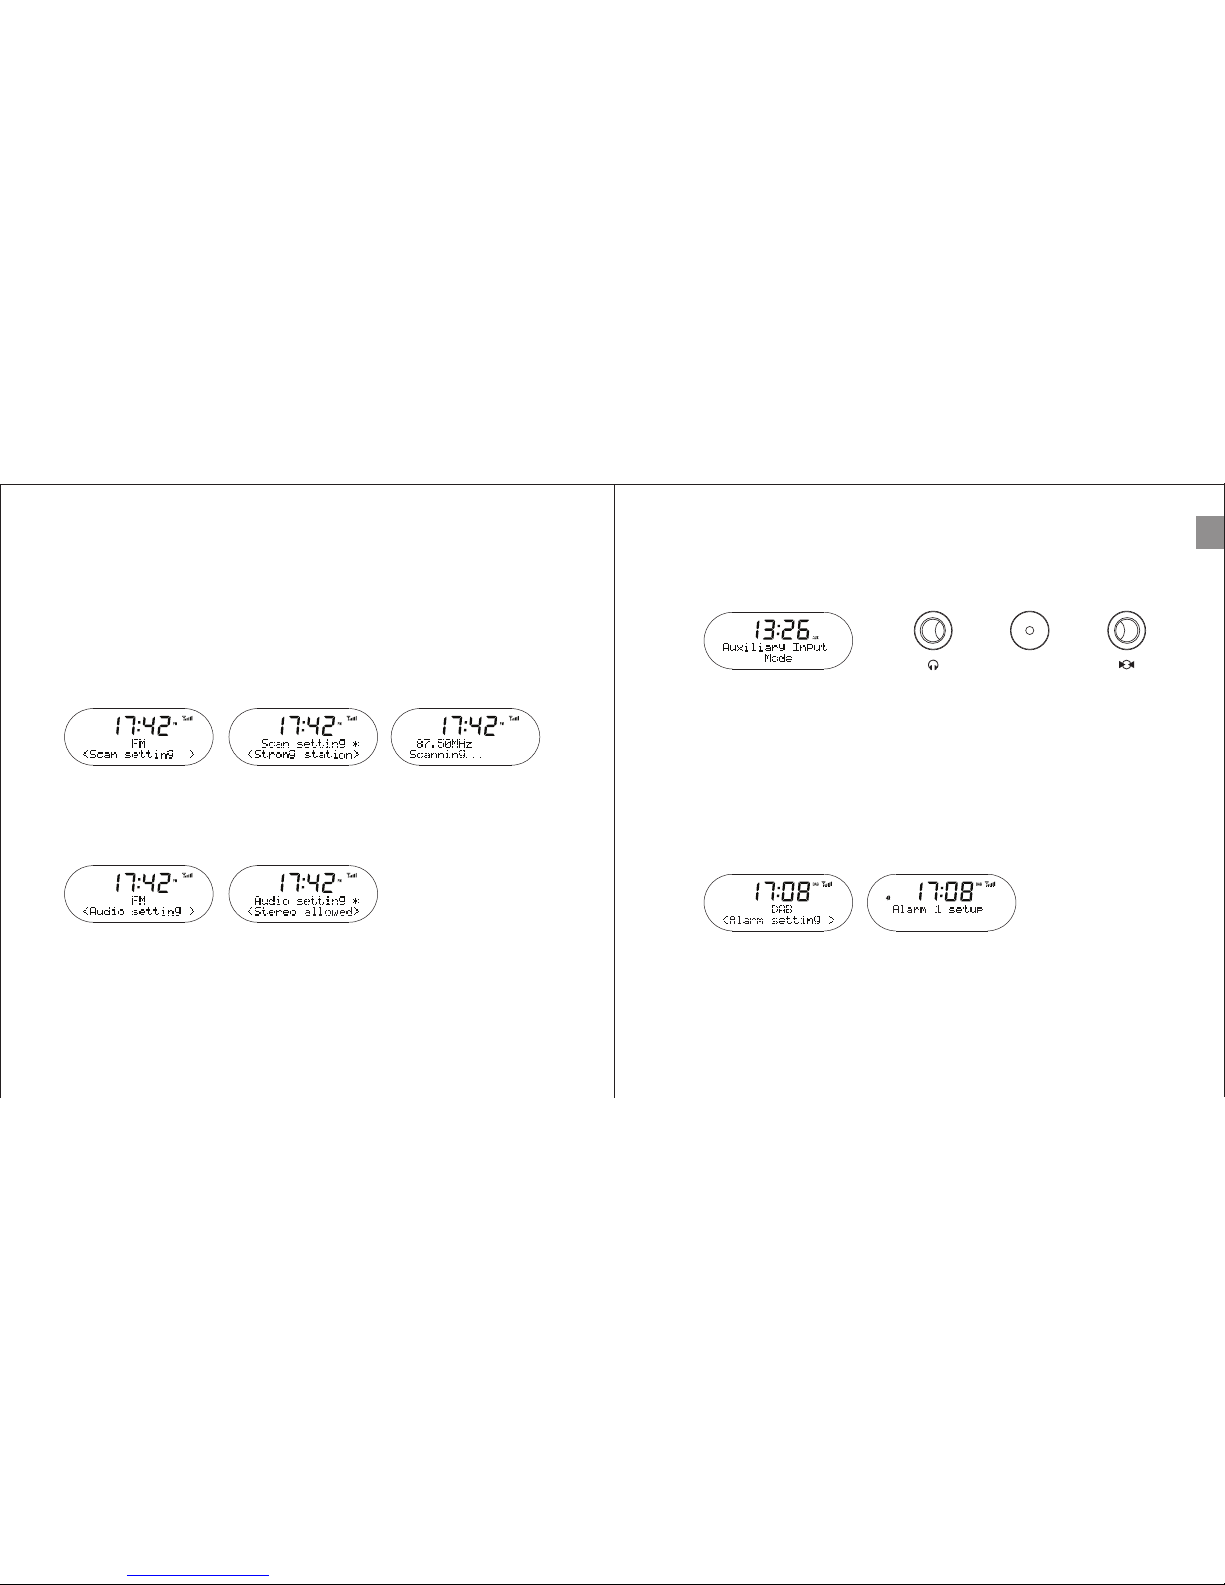
6-5 Scan Setting ...................................................................
6-6 Audio Setting ..................................................................
7. AUX mode .............................................................................
8. Alarm setting...........................................................................
9-1 Sleep function ...............................................................
9-2 Timer ............................................................................
9-3 Equalizer .......................................................................
9-4 Time settings ................................................................
9-5 Backlight settings ..........................................................
9-6 Language settings .........................................................
9-7 Factory reset .................................................................
10. Support / FAQs .................................................................
11. How to upgrade .................................................................
12. Warranty ............................................................................
13. Technical specification .......................................................
9. System setting .....................................................................
4
5
5
6
6
7
7
8
8
9
9
9
10
10
10
11
11
12
12
13
13
14
14
14
15
15
16
16
17
17
18
18
18
2 3

Do not expose the radio to any heat sources or direct sunlight.
Ensure proper ventilation around the unit at all times.
Do not open or remove screws from the radio casing as this will
void the limited warranty. If required, only qualified technicians
are authorized to carry out repairs.
Do not use the radio near water.
Avoid objects or liquids getting into the radio.
Unplug the product from any external power source before
cleaning. Do not clean the radio with strong cleaning agents.
Only clean the product with a dry cloth.
Only use accessories or attachments specified by the
manufacturer.
Ensure that the voltage indicated on the AC adapter
corresponds to the voltage the unit is connected to.
Unplug the unit if the radio will not be used for a long period.
EN
4
1. Introduction
Congratulations with the purchase of your Zeniq Robio DAB+ radio!
This user manual offers information and instructions on setting up and using
your product. It will provide you with technical specifications and information
on where to get support.
Please take some time to study this manual. It contains important safety and
regulatory information.
Safety instructions
2. In the package
• 1 Main unit
• 1 Power adaptor
• 1 User Manual
• 1 Leaflet
3. The 3 knobs
(1) Left knob functions
- Press 2 seconds for Power ON/OFF
- Press for Preset/Recall
- Turn for Volume +/-
(2) Middle knob functions
- Turn for DAB/FM/AUX mode
(3) Right knob functions
- Press 2 seconds for Menu /Return
- Press for Enter/OK or for switching between info
- Turn to shuffle between options or Change FM frequency or stations
5

EN
4. The back
(1) Left Jack
- Headphones Output
(2) Middle Jack
- DC (Power in)
(3) Right Jack
- AUX in or Wireless receiver
DC
5. DAB mode
If this is the first time you turn on Robio, the unit will automatically perform a
full scan of all DAB stations.
You can perform a full scan at any time.
5-1 Store station
Robio can store up to 10 of your favorite stations.
Press the right knob for 2 seconds in order to store desired station. Unit
shows “Preset Store” and short press the right knob.
You can now choose preset location from 1-10. Confirm location with a
short press on the right knob.
Note: You can listen to the newly added stations by pressing the right
knob for 2 seconds, then turn the right knob, select the desired station
and press to confirm.
5-2 Prune
Robio’s prune function will remove any stations that are not used or
outdated from the broadcaster.
You can prune your station list by pressing the right knob for 2 seconds.
Turn the knob to “Prune” position and short press the right knob to enter
menu. You can now choose Prune YES/NO. Choose YES or NO by
again turning the right knob and confirm selection with a short press.
6 7
Turn the middle knob to its left position

EN
5-3 DRC
Dynamic Range Compression reduces the volume of loud sounds or
amplifies quiet sounds by narrowing or compressing an audio signal's
dynamic range. This can be used in noisy environments.
Robio has 3 settings:
DRC off (DRC is off)
DRC low (DRC will compress 50%)
DRC high (DRC will compress 100%)
To set the DRC press the right knob for 2 seconds. Turn the knob to
“DRC” position and short press the right knob to enter menu. You can
now choose DRC high/low/off. Do this by again turning the right knob and
confirming with a short press.
5-4 Manual tuning
A manual tuning can be performed by pressing the right knob for 2
seconds. Turn the knob to the “manual tune” position and short press the
right knob.
5-5 Full Scan
When in DAB mode, press the right knob for 2 seconds. Turn the knob
to “Full Scan” position and short press the right knob.
Robio will now perform a full scan.
5-6 Recall station
To recall the station you have stored, short press the left knob and
choose the station by turning the right knob, then confirm with a
short press.
5-7 Switch stations
To switch between the available stations, turn the right knob and choose
the desired station with a short press.
8 9
You can now tune between all possible DAB stations from 5A to 13F. Short press
to see signal strength. Press the right knob for 2 seconds to listen to the 1st station.
Stations will be added on the playing list if the signal is strong enough.

EN
6. FM mode
Turn the middle knob to its center position. Robio is now in FM mode.
6-1 Quick tune
To quick tune, simply short press the right knob. It will now find the
nearest station with good signal (see “scan setting” for further
instructions).
By turning the right knob either clock or counter-clock wise and then
pressing the right knob, the quick tune will scan the FM band in either
increasing or decreasing values.
6-2 Manual tune
To manual tune, simply turn the right knob either clock or
counter-clock wise.
6-3 Store station
Robio can store up to 10 of your favorite stations.
Press the right knob for 2 seconds in order to store desired station. Unit
now shows “Preset Store”. Short press the right knob to confirm.
You can now choose preset location from 1-10. Confirm location with a
short press on the right knob.
6-4 Recall station
To recall the station you have stored, short press the left knob and choose
the station by turning the right knob, then confirm with a short press.
10 11

EN
6-5 Scan Setting
Under scan settings you can set the quick scan’s mode to “All stations”
or “Strong stations”.
All stations = Quick scan will stop at all stations even with a weak signal.
Strong station = Quick scan will only stop at stations with a strong signal
strength.
Press the right knob for 2 seconds. Turn the knob to “Scan setting” and
short press the right knob. Choose either “All stations” or “Strong stations”.
6-6 Audio setting
Press the right knob for 2 seconds. Turn the knob to “Audio setting” and
short press the right knob.
In “Audio setting” you can choose “Forced mono” or “Stereo allowed”.
Forced mono = may improve sound quality in areas where a weak areal
signal results in background noise.
Stereo allowed = will play all stations according to the original
broadcasting signal.
7. AUX mode
Turn the middle knob to its right position. Robio is now in AUX mode.
In AUX mode you can connect any audio device to Robio and use it as
an external speaker.
DC
In the right jack insert a 3.5” audio jack and connect the other end of the
cable with your music device, such as a Smartphone, MP3, laptop, CD
player etc.
You can also connect a wireless receiver or Bluetooth receiver to stream
your music.
8. Alarm setting
Press the right knob for 2 seconds. Turn the knob to “Alarm setting” and
short press to confirm.
Follow the guide on the display.
You can maximum set two alarms.
You can stop the alarm by pressing the left or right knob.
12 13

EN
9. System settings
9-1 Sleep function
This function will automatically turn off Robio after the selected time.
Press the right knob for 2 seconds. Turn the knob to “System” and short
press to confirm.
Now turn the right knob to choose your time by confirming with a
short press.
9-2 Timer
This function is a kitchen timer.
Press the right knob for 2 seconds. Turn the knob to “Timer” and short
press to confirm.
Now turn the right knob to choose your time and confirm with a short
press. Timer will start countdown.
Now turn the right knob to choose your time and confirm with a short
press. Timer will start countdown.
9-3 Equalizer
Press the right knob for 2 seconds. Turn the knob to “Equalizer” and
short press to confirm.
Now turn the right knob to choose your EQ and confirm selection with a
short press.
You can choose from Normal, Classic, Jazz, Pop, Rock, Speech
and “My EQ…”
“My EQ…” allows you to personally set Treble and Bass.
9-4 Time settings
If there is no DAB signal on hand to automatically update the
time/date, you can manually set the time/date here.
Press the right knob for 2 seconds. Turn the knob to “Time” and
short press to confirm.
14 15

EN
Values are set by turning the right knob and confirming each step with a
short press.
9-5 Backlight settings
Here you can set the backlight levels to “Timeout”, “On level” or “Dim level”.
Press the right knob for 2 seconds. Turn the knob to any one of the above
and short press the right knob.
Timeout = Can be set to always on or from 10sec to 180sec
On level = Can be set to HIGH/MEDIUM/LOW.
Dim level = Can be set to HIGH/MEDIUM/LOW.
9-6 Language settings
Robio supports 5 languages - English, French, German, Danish and
Swedish.
Press the right knob for 2 seconds. Turn the knob to “Language setting”
and short press to confirm.
Select your language and confirm with a short press.
9-7 Factory reset
Here you can reset the settings to default.
Press the right knob for 2 seconds. Turn the knob to “Factory reset” and
short press to confirm.
Select “Yes” or “No” and confirm with a short press.
10. Support / FAQs
For more support please log on to www.zeniq.com
16 17

11. How to upgrade
Find out about product upgrades and accessories on www.zeniq.com
12. Warranty, Service and Repair
If the product is damaged and needs repair, please contact us by phone
or email, state the products serial number and describe your problem.
See terms on the web at www.zeniq.com or consult your dealer.
13. Technical specification
Audio power 15W
Audio frequency response 80Hz~20kHz
Speaker 3”
Power input AC input: 100~240V,
DC input: 12V ± 5% @ 1.5A
Audio input port (Aux) Stereo/ 3.5mm Jack
Audio output port Stereo/ 3.5mm Jack
Dimensions (mm) 120W X 210H X 156D
18
Table of contents
Other ZENIQ Radio manuals