manuals.online logo
Brands
  1. Home
  2. •
  3. Brands
  4. •
  5. Zenoah
  6. •
  7. Garden Machinery Accessories
  8. •
  9. Zenoah SHTZ-A User manual

Zenoah SHTZ-A User manual

Popular Garden Machinery Accessories manuals by other brands

Makita EM409MP Original instruction manual

Makita

Makita EM409MP Original instruction manual

Stihl PolyCut 48-2 manual

Stihl

Stihl PolyCut 48-2 manual

Ryobi Expand-It RY15523A Operator's manual

Ryobi

Ryobi Expand-It RY15523A Operator's manual

Echo 99944100026 instruction sheet

Echo

Echo 99944100026 instruction sheet

Stihl AS 2 Safety precautions

Stihl

Stihl AS 2 Safety precautions

MacDon HC10 Original instruction

MacDon

MacDon HC10 Original instruction

Makita EN410MP instruction manual

Makita

Makita EN410MP instruction manual

Westfalia HSA 710/510 Original instructions

Westfalia

Westfalia HSA 710/510 Original instructions

Exmark Z-Plug 142-1850 Operator's manual

Exmark

Exmark Z-Plug 142-1850 Operator's manual

Stihl EHC 605.0 instruction manual

Stihl

Stihl EHC 605.0 instruction manual

Stihl PolyCut 7-3 manual

Stihl

Stihl PolyCut 7-3 manual

Echo Pro Attachment Series Service data

Echo

Echo Pro Attachment Series Service data

Stihl SuperCut 20-2 manual

Stihl

Stihl SuperCut 20-2 manual

Husqvarna Zenoah LHTZ-A owner's manual

Husqvarna

Husqvarna Zenoah LHTZ-A owner's manual

HART HTAXA22VNM Operator's manual

HART

HART HTAXA22VNM Operator's manual

Stihl PolyCut 7-3 manual

Stihl

Stihl PolyCut 7-3 manual

Ryobi EXPAND-IT ALT05 Original instructions

Ryobi

Ryobi EXPAND-IT ALT05 Original instructions

Toro Mini 8 Series user guide

Toro

Toro Mini 8 Series user guide

manuals.online logo
manuals.online logoBrands
  • About & Mission
  • Contact us
  • Privacy Policy
  • Terms and Conditions

Copyright 2025 Manuals.Online. All Rights Reserved.

Compatible Models
PHT750/PHT1200/PHT1500
DANGER
Keep blades away from power lines. Accidental cutting of power lines could result in inju-
ry and even death due to electrical shock.
WARNING
The blades used in this product are very sharp. Failure to handle the product correctly
could result in serious injury. Observe all precautions to ensure correct operation of the
product.
●Do not direct the blades toward people.
●Turn off the engine before changing the blade angle or removing debris caught in
the blades.
●Wear thick, durable leather gloves when using the product and when performing in-
spections and maintenance.
●Cover the blades with the included cover when the product is not in use.
●Falling branches and chips could cause injury to the face and eyes. Wear a helmet
and face protector when using the product.
●Refer to the instruction manual of the main device for information on using the main
device.
IMPORTANT
●When using this attachment with cutters having engines of 25cc or more displacement, open the
throttle only partially as such engines produce too much power for suitable operation of this attach-
ment.
●This product contains an overload protection mechanism to prevent damage to blades and drive
gears due to excessive force.
Note the following precautions if branches frequently get caught in the blades.
※Branch thickness: Try not to cut branches more than 5mm or so in thickness.
※Blade condition: Using worn blades results in a loss of cutting ability and increases likeliness of
caught branches.
●Do not allow blades to remain wet. Do not allow the drive unit to become wet. Doing so may result in
rust or failure.
■Attachment Installation
(1) Loosen the setting screw and gear case
mounting bolt in the weed cutter gear case.
Then remove the gear case.
(2) Remove the partially tightened setting screw
in the attachment mount.
(3) Place the attachment mount over the main
pipe of the cutter. Fig. 1
(4) Align the setting screw hole with the hole in
the main pipe and then fully tighten the set-
ting screw.
(5) Use a 4-mm Allen wrench to fully tighten the
attachment mounting bolt.
Zenoah Hedge Trimmer Attachment
OWNER’S MANUAL
115869226 (1610)
Fig. 1
Main pipe
Setting screw
Hole
Attachment
Mount
Attachment
mounting bolt
*SHTZ�A 取説_CS5_二.indd 1 16/10/21 16:25
■Blade Angle Adjustment
(1) Turn the attachment mount clamp lever toward
the engine to loosen. Refer to Fig. 2.
(2) After adjusting the blade angle as appropriate,
turn the clamp lever toward the blades to tighten.
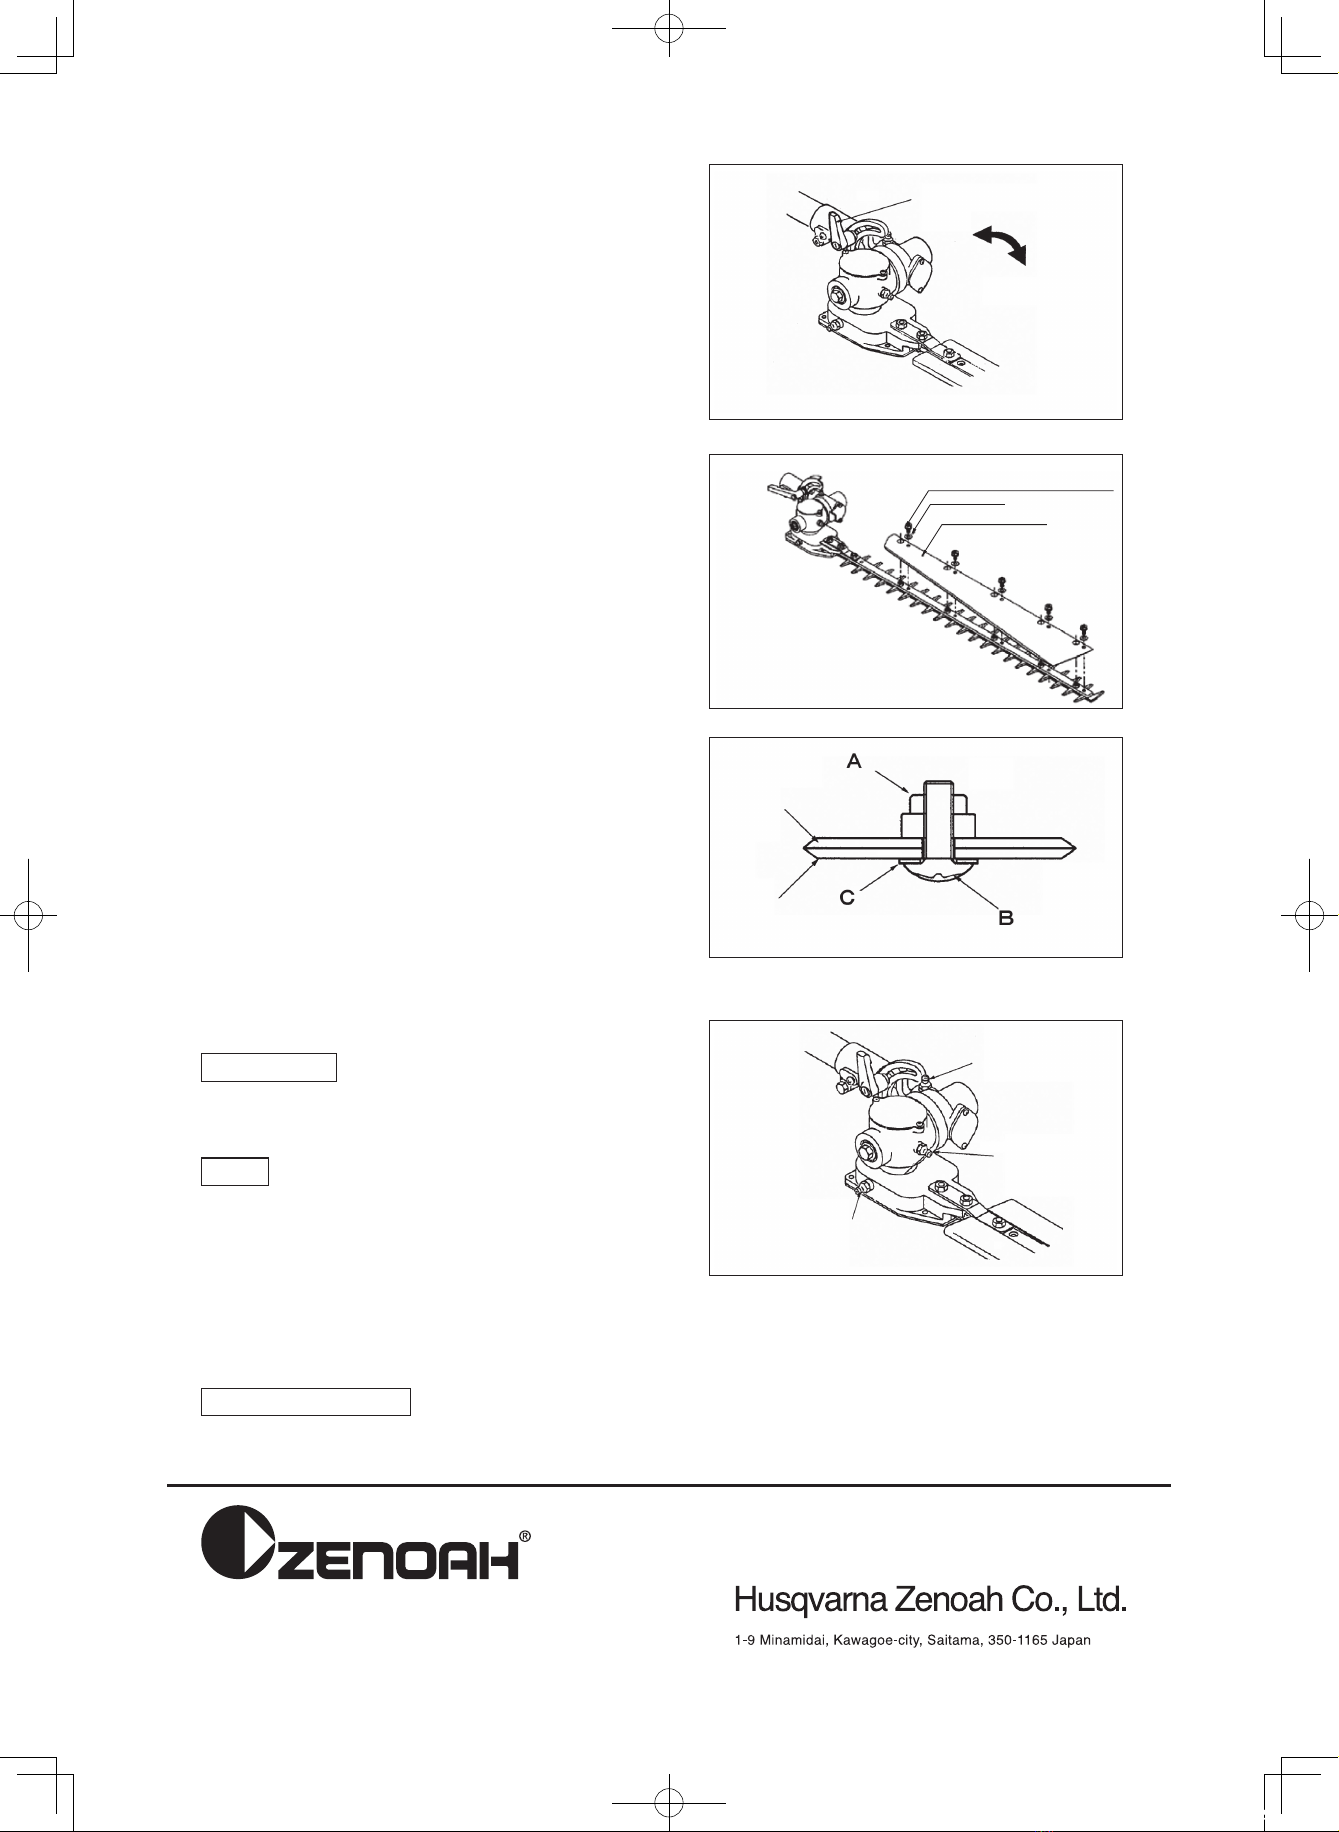
■Leaf Backing Plate Installation
(1) Install and use the leaf backing plate as neces-
sary.
(2) Securely tighten the leaf backing plate to the
weed cutter machine using the 5 leaf backing
plate mounting bolts and 5 flat washers.
■Slide Plate Installation
(1) Install and use the slide plate as necessary.
(2) Remove the 4 screws used to mount the lower
gear case cap.
(3) Mount the slide plate with the screw included
with the slide plate together with the lower cap.
※
Retain the original 4 screws used to mount
the lower cap as these will be needed again
when using the product without the slide plate.
■Blade Maintenance
(1) Lubricate the blade when taking breaks or add-
ing fuel.
(2) Use the following procedure to readjust the
clamp if there is a gap between the upper and
lower blades.
1. Loosen the lock nut as indicated by "A" in
Fig. 4.
2. Completely loosen the screw as indicated by
"B" and then tighten by a 1/3 or 1/2 rotation.
3. Tighten the lock nut while securing the
screw.
4. Check that the flat washer as indicated by
"C" turns freely with your finger.
IMPORTANT Overtightening the screw may pre-
vent blade movement. However, if the screw is too
loose, blades will not cut cleanly and branch catch-
ing is more likely to occur.
NOTE If gap adjustments cannot be made due to
excessive wear, have the blades replaced by your
dealer.
■Lubricating the Gear Case
Fill the gear case with the specified grease every
20 or so hours of use.
Use a grease gun and fill the gear case using all 3
grease nipples. Fig. 5
SPECIFIED GREASE
Zenoah Genuine Power Grease (Product No.:
3180-96250) or Heat-resistant Lithium Grease (#2)
■Main Product Specifications
Length × Width × Height── 830×125×110(mm)
Weight  ─────────────── 2.0kg
Effective cutting width ──────── 615mm
Blade pitch──────────────30mm
Fig. 2 Clamp lever
Loosen
Tighten
Fig. 3
Leaf backing plate mounting bolt
Flat washer
Leaf backing plate
Fig. 4
Upper blade
Lower blade
Fig. 5 Grease
nipple
Grease
nipple
Grease
nipple
*SHTZ�A 取説_CS5_二.indd 2 16/10/21 16:25