ZERO-X TREXER ZX-RCP User manual


1

2
CONTENTS
1.0 WELCOME................................................................................................... 4
2.0 IN THE BOX:................................................................................................ 4
3.0 BATTERY SAFETY ........................................................................................ 5
4.0 RECHARGEABLE BATTERY CHARGING....................................................... 9
5.0 POWERING ON......................................................................................... 10
6.0 R30 RECEIVER........................................................................................... 10
7.0 E45A BRUSHLESS ESC .............................................................................. 11
8.0 REMOTE CONTROL .................................................................................. 12
9.0 HEAD WHEEL INSTALLATION (OPTIONAL)............................................... 13
10.0 REAR WING INSTALLATION ..................................................................... 14
11.0 REMOTE CONTROL BATTERY INSTALLATION .......................................... 14
12.0 CAR SHELL ASSEMBLY.............................................................................. 14

3

4
1.0 WELCOME
Thank You for purchasing a Zero-X Remote Control Car. The Zero-X range has
been specifically designed to provide the intermediate to advanced user with
a great driving experience. Please take the time to read the following safety
warnings and operating instructions carefully.
2.0 IN THE BOX:
• RC Car Trexer x1
• Remote Control x1
• Battery (Standard Package) x2
• Rear Wing (with 2 screws) x1
• User Manual x1
• USB Charging Cable x1
• Hexagon Wrench x1
• Head Wheel (with 3 screws) x1
• Screwdriver x1
• 3M Action Camera Mounting Plate x1

5
3.0 BATTERY SAFETY
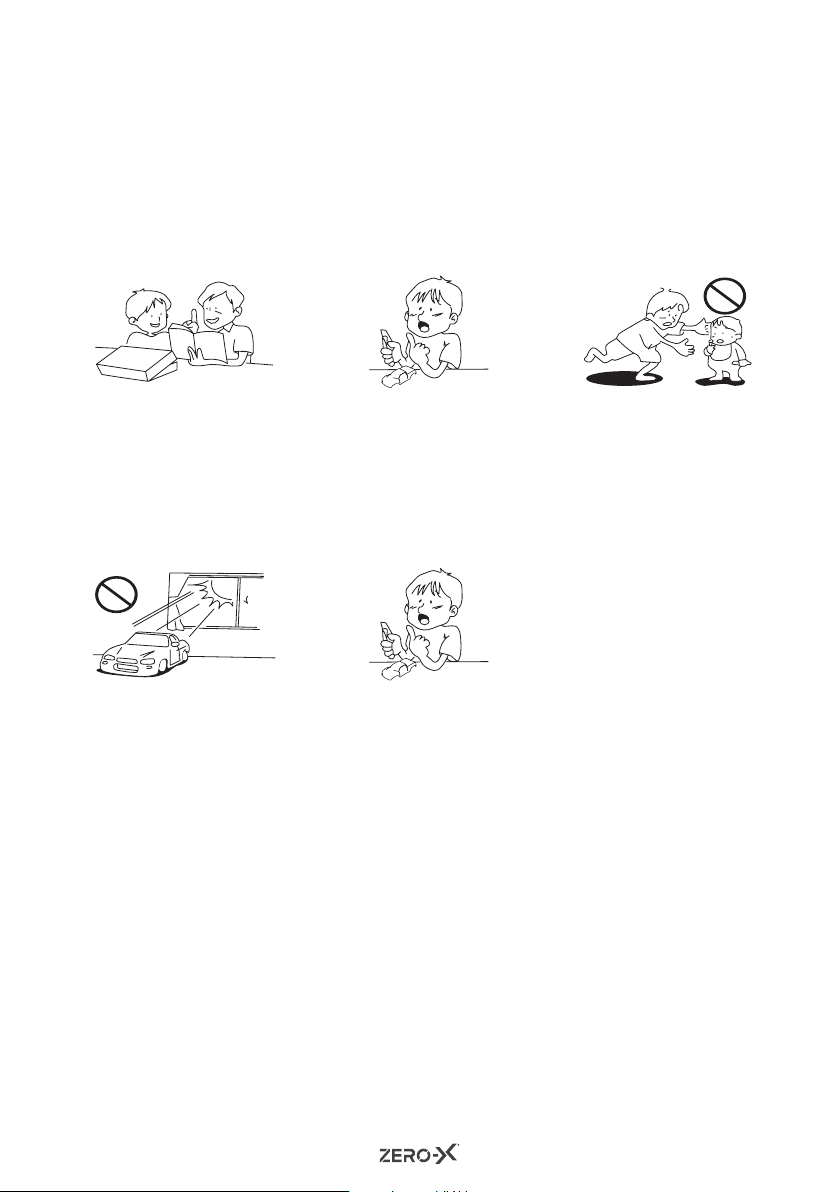
IMPORTANT INFORMATION - PLEASE READ BEFORE USE
When handled incorrectly, Lithium polymer batteries can be dangerous
and can potentially harm persons and / or property. Zero-X does not
accept any liability for damage to persons and/ or property, if the
battery is not correctly charged, stored or protected.
These are our suggestions to keep safe:
• Always unwind all cables before charging.
• DO NOT over charge the battery. Once the charging process is
completed, remove the battery from the charger.
• Only use the included or replacement Zero-X chargers and batteries.
• You must charge the Lithium polymer battery in a safe area away
from flammable materials.
• The battery is only to be charged under adult supervision. Do not
leave charging batteries unattended. Remain aware of the charging
process so you can react immediately to any problems that may
occur.
• DO NOT charge the battery in temperatures higher than 40°C or
lower than 0°C.
• DO NOT cover the batteries when charging. DO NOT leave
batteries in direct sunlight.
• After each flight and / or crash, please check battery for any damage
or swelling.
• If the battery is damaged, leaking, making noises, punctured or
malformed in any way DO NOT attempt to use it. Please dispose of
the battery immediately and safely in the correct manner.
• DO NOT bend, puncture, crush or scratch the battery.
• DO NOT store batteries in your pockets, on you or in extreme
temperatures.
• After flying/discharging the battery you must allow it to cool to
ambient/room temperature before recharging.
• If at any time during the charge or discharge process the battery
begins to balloon or swell, discontinue charging or discharging
immediately. Quickly and safely disconnect the battery, then place it
in a safe, open area away from flammable materials to observe it for
at least 15 minutes. Continuing to charge or discharge a battery
that has begun to balloon or swell can result in a fire. A battery
that has ballooned or swollen even in a small amount must be
removed from service completely.
• Never plug in a battery and leave it to charge unattended overnight.
• Non-compliance with the above warnings may result in the failure
of the battery and become dangerous. The instruction sheet for
this product is just for your reference. We reserve the right to make
changes or adjustments on the product without prior notification.
Please refer to the official information.
WARNING:
Choking hazard! This product contains small parts. NOT suitable for children
under 3 years. Contains electrical components and should be kept dry at all
times. Regularly check the battery charger wires, plugs and shell and other
components for damage. DO NOT use if any part is damaged.

6
WARNING AND CAUTIONS
1. Detachable small parts should be stored safely and out of reach of children.
2. If interference is experienced, turn off the car and try it again at a different
area.
3. The remote control will not function correctly if battery power is low. Please
replace the batteries.
4. Please discard old/used batteries in a safe manner.
5. Please store the remote control car in cool, dry place.
6. DO NOT expose the car to fire or high temperatures or store in a moist
location.
7.If the battery is wet, wipe immediately with a soft dry cloth. Stop using the car
immediately if the battery is damaged or deformed.
8.If the car is not used for prolonged periods, please hang up the car with the
chassis raised.
PRECAUTION FOR BATTERY USE
1. The remote control uses two 1.5V AA-size batteries (batteries not included).
2. Please ensure the correct polarity when replacing batteries.
3. Rechargeable batteries should be charged under adult supervision.
4. Donot mix old and new batteries.Do not mix alkaline, standard (carbon-zinc),
or rechargeable batteries.
5. After the batteries are exhausted, it should be removed from the remote
control.
6. Please dispose of exhausted batteries safely and responsibly.
7. DO NOT short circuit any terminals.
8. DO NOT attempt to recharge non rechargeable batteries.
9. Please remove the rechargeable battery from the car for charging.
10. DO NOT place batteries into a fire or water.
11. The rated input voltage battery charger MUST be suitable for your mains
power voltage.
12. During charging, it is quite normal for the charger and battery to heat up.
13. Do not swallow the batteries.
14. Store the batteries in a cool and dry location and out of reach of children.
15. If the battery leaks and the liquid enters into your eyes, please rinse your
eyes immediately and seek medical attention.

7
SAFETY PRECAUTIONS
• The remote control car is not a toy. Please handle it appropriately.
• The car requires a simple assembly before use.
• Improper usage with alkaline cells or rechargeable batteries may damage
the electronics of the car or the remote control.
In order to operate the car safely, please observe the following points:
• Pleas read the user
manual carefully
and thoroughly
before using the
car. Seek advice if
you need help to
assemble the car.
• Please handle all
tools carefully. • The car contains
small and sharp
parts. Please
assemble and store
the car away from
the presence of
young children.
• Do not expose
the car to direct
sunlight, excessive
humidity or high
temperatures.
• Never reverse
the polarity or
disassemble the
battery as it may
cause damage
and leakage of the
battery.
• When not in use, always turn off the remote control. In addition,disconnect the
batteries and remove them from the car and the remote control. This is to avoid
overheating and leakage.

8
OPERATING THE CAR SAFELY
Do NOT operate the car in the following places and situations.
1. On public roads or areas of high traffic.
2. In places that are crowded and where infants and children gather.
3. In residential areas and public parks.
4. Indoors and where space is limited.
• Please stop using the car if it is operating abnormally. Check for the
problem and if it is not rectified, stop using the car immediately to prevent
any further problems or issues from occurring.
• Always check that the remote control batteries are working properly with
ample power level. With weak dry batteries, the remote control may fail
with transmission and reception. You may also lose control of the car and
cause potential accidents.
• Keep in mind that people around you may also be operating a radio control
car. NEVER share the same frequency with somebody else at the same time!
Otherwise, radio signals will be mixed up and you will lose control to your
car. This may lead to accidents.
• Do not place fingers or any object inside the rotating and moving parts of
the car.
• Do not touch the motor right after the use of the car as you may suffer
burns.
!

9
4.0 RECHARGEABLE BATTERY CHARGING
Install the battery:
1. Turn the knob and open the battery holder as shown in Step 1.
2. Remove the rechargeable battery (11.1V 1050mAh 25C) and charge it using
the supplied USB charging cable or the power adaptor as shown in Step 2 and
Step 3.
3. When charging, the indicator light on the USB charging cable will turn green
and blink and will stay a constant green when the battery is fully charged. A full
charge will take approximately 4 hours.
4. After the rechargeable battery is fully charged, re-install it to the car as
shown in Step 4.
5. Replace the battery holder and turn the knob to secure it as shown in Step 5.
Step 1
Step 4
Step 2
Step 5
Step 3
Adaptor 5V2A

10
5.0 POWERING ON
1. Please turn on the remote control first.
2. Next, turn on the car. The LED indicator will blink in red. Please DO NOT
touch the throttle knob and steering on the remote control.
3. The LED indicator on the car will change to a constant red.
4. Please assemble the top shell to the car.
5. Only pair one car with one remote control at the same time to prevent any
failed connection.
• Please DO NOT touch the throttle and steering. After turning on the remote
control, use it only after the LED light has become a constant red.
• Please ensure that the remote control is always turned on first before
turning on the car.
• When pairing the frequencies of the car and remote control, please ensure
that it is only between these two items. Otherwise, the frequencies pairing
will be unsuccessful.

11
6.0 R30 RECEIVER
Warning: Please make sure the connection is correct.
!
6 TH (Throttle)
⑥CH2: TH (Throttle)
Forward
Brake: When the car is going forward, pull the transmitter trigger back,
and the car enters into the braking state. After the trigger is in the
middle, push back again, and the car can move backward.
*When the car is in reverse situation, it does not the brake function.
Backward
Middle
Push
forward
Pull
Pull
back
back
Pull
back Brake: To brake, squeeze the remote control trigger to its middle
position to stop the car. Squeeze the trigger further back to reverse
the car.
Middle Turn left Turn right
5 ST (Steering)
Forward Reverse
VCC/FAN
VCC/FAN
CH3
CH2
CH1
VCC/FAN
VCC/FAN
CH3
CH2
CH1
VCC/FAN: Power Interface (VCC=5-6V)
ESC
(CH2)
Steering
servo
(CH1)
Fan
(VCC/FAN)
R30
R30 Indicator
Constant red
Blinking red
Meaning
Matched with the remote
control.
Searching for the remote control.
Please turn on the remote control
and ensure it is within range.
Antena
Please make sure that
is in a vertical position.

12
7.0 E45A BRUSHLESS ESC
Please Do Not force or reverse insert all sockets.
8.0 REMOTE CONTROL
!
Indicator
VCC/BVD
Yellow wire A
Blue wire C
White wire B
Power switch
Power switch
Heat sink
Constant red Matched with the
remote control.
Meaning
Blinking red rapidly Low Voltage
Blinking red slowly Overheating
Protection
Blinking red twice The motor is stuck
and stuck protection
is activated.
Off Off
E45A Indicator
1 ST TRIM
(Steering servo strimmer)
2 TH TRIM
(Throttle trimmer)
3 Power switch
(Power Switch/Throttle Sensitivity)
4 Indicator Light
5 ST (Steering)
6 TH (Throttle)

13
3 Power Switch/Throttle Sensitivity
70%
(70% Throttle)
OFF 100%
(100% Throttle)
Stays constant: Working normally
Blinks rapidly: Pairing with remote
control
Blinks slowly: Remote control battery
level low
4 Indicator Light
Forward
1 ST TRIM (Steering servo trimmer)
If the car is not heading straight, it can be
corrected via the ST TRIM.
2 TH TRIM (Throttle trimmer)
If the car cannot be stopped when the TH
is at the middle position, use TH TRIM to
adjust the stopping action.


15
10.0 REAR WING INSTALLATION
Install the rear wing with the two screws supplied.
11.0 REMOTE CONTROL BATTERY INSTALLATION
Open the battery cover by removing the two screws with the supplied
screwdriver. Then insert two AA-size batteries (not included) into the battery
compartment and ensure that the polarity is correct. Close the cover after
installation.

16
12.0 CAR SHELL ASSEMBLY
1. To assemble the car shell, align the holes on the car shell with the
corresponding struts on the car chassis. There is one strut in front and two
struts behind.
2. Insert the 3 pins into the struts to secure the assembly. To disassemble,
repeat the steps in reverse order.

17
WARRANTY TERMS AND CONDITIONS
Our goods come with guarantees that cannot be excluded under the
Australian Consumer Law. You are entitled to a replacement or refund for a
major failure and for compensation for any other reasonably foreseeable loss
or damage. You are also entitled to have the goods repaired or replaced if the
goods fail to be of acceptable quality and the failure does not amount to a
major failure.
This warranty is provided in addition to your rights under the Australian
Consumer Law. Directed Electronics Australia Pty Ltd (Directed Electronics)
warrants that this product is free from defects in material and workmanship for
a period of 12 months from the date of purchase or for the period stated on
the packaging. This warranty is only valid where you have used the product in
accordance with any recommendations or instructions provided by Directed
Electronics.
This warranty excludes defects resulting from alterations of the product,
accident, misuse, abuse or neglect. In order to claim the warranty, you must
return the product to the retailer from which it was purchased or if that retailer
is part of a National network, a store within that chain, along with satisfactory
proof of purchase. The retailer will then return the goods to Directed
Electronics.
Directed Electronics will repair, replace or refurbish the product at its
discretion. The retailer will contact you when the product is ready for
collection. All costs involved in claiming this warranty, including the cost of the
retailer sending the product to Directed Electronics, will be borne by you.
Email: [email protected]
INDEMNITY
You agree to defend, indemnify and hold harmless Zero-X and its subsidiaries
and affiliates from and against any and all claims, proceedings, injuries,
liabilities, losses, costs and expenses (including reasonable legal fees),
including but not limited to, claims alleging negligence, invasion of privacy,
copyright infringement and/or trademark infringement against Zero-X and
its subsidiaries and affiliates, relating to or arising out of your breach of any
provision of these terms, your misuse of Zero-X products or its services, or your
unauthorized modification or alteration of products or software.
WARRANTY AND WARRANTY DISCLAIMER
Zero-X has a limited warranty, whereby Zero-X warrants to you and only to you
that this Zero-X product will be free from defects in materials and workmanship
for one (1) year from the date of your purchase (unless a longer warranty period
is required by law). The specifics of this Zero-X limited warranty are covered in
this manual.
To the extent possible under governing law, other than the above product
warranty for the Zero-X product you understand and agree that the Zero-X

18
services are provided on an “as is” and “as available” basis.
Zero-X makes no warranty that the Zero-X product and services will meet your
requirements or that use of the Zero-X services will be uninterrupted, timely,
secure or error-free. Nor does Zero-X make any warranty as to the accuracy or
reliability of any information obtained through Zero-X (including third party
content), that any defects in the Zero-X products or services be corrected or
that the Zero-X products or Zero-X services will be compatible with any other
specific hardware or service.
Further, Zero-X does not warrant that Zero-X products or services or Zero-X
servers that provide you with data and content are free of viruses or other
harmful components.
Zero-X also assumes no responsibility for and shall not be liable, for any
damages caused by viruses that may infect your Zero-X. In the event of
any loss, damage or injury, you will not look to Zero-X to compensate you
or anyone else. You release and waive for yourself and your insurer all
subrogation and other rights to recover against Zero-X arising as a result of the
payment of any claim for loss, damage or injury.
Zero-X equipment and services do not cause and cannot eliminate occurrences
of certain events, including, and Zero-X makes no guarantee or warranty,
including any implied warranty of merchantability or fitness for a particular
purpose, that the Zero-X equipment and services provided will detect or avert
such incidents or their consequences.
Zero-X does not undertake any risk that you or property, or the person or
property of others, may be subject to injury or loss if such an event occurs. The
allocation of such risk remains with you, not Zero-X.
Other than the above product warranty for the Zero-X products, its suppliers
disclaim all warranties of any kind, whether express, implied, or statutory,
regarding the Zero-X services, including any implied warranty of title,
merchantability, fitness for a particular purpose, or non-infringement of third
party rights.
Because some jurisdictions do not permit the exclusion of implied warranties,
the last sentence of this section may not apply to you.
Zero-X hereby further expressly disclaims all liability for any claims for service
failures that are due to normal product wear, product misuse, abuse, product
modification, improper product selection or your non-compliance with all
applicable federal, state or local laws.
This warranty and warranty disclaimer give you specific legal rights, and you
may have other rights that vary by state, province, or country. Other than
as permitted by law, Zero-X does not exclude, limit or suspend other rights
you have, including those that may arise from the nonconformity of a sales
contract.
For a full understanding of your rights, you should consult the laws of your
state, province, or country. For our Australian customers: Please note that this
warranty is in addition to any statutory rights in Australia in relation to your
goods which, pursuant to the Australian Consumer Law, cannot be excluded.
Table of contents
Other ZERO-X Motorized Toy Car manuals
Popular Motorized Toy Car manuals by other brands

AE
AE SC8 quick start guide

Redcat Racing
Redcat Racing rampage tt off-road buggy instruction manual

Mattel
Mattel HotWheels R/C Speed Racer M0661 instructions

Agora
Agora FDNY FIRE TRUCK TOWER LADDER 9 Pack 12 Build instructions

BeeWi
BeeWi BBZ201 user guide

Jamara
Jamara Jeep Wrangler Rubicon 2,4 GHz Instruction