Zetec MIZ-21C User manual

ZEC-DOC-USER-MANUAL-MIZ-21C (180 - 1030496 - 1 - A) - 1 Page 1
User Manual
MIZ-21C

ZEC-DOC-USER-MANUAL-MIZ-21C (180 - 1030496 - 1 - A) - 1 Page 2
TABLE OF CONTENTS
1. SAFETY PRECAUTIONS AND SYMBOLS___________________________________ 3
2. FEATURES AND LAYOUT_________________________________________________ 6
3. NAVIGATION AND CONTROLS __________________________________________ 9
4. GENERAL DATA DISPLAY LAYOUTS _____________________________________ 12
5. GETTING STARTED______________________________________________________ 17
6. TOOLS MENU __________________________________________________________ 21
7. SPECIAL FEATURES _____________________________________________________24
8. ADDITIONAL LEARNING ________________________________________________25
9. BATTERY REPLACEMENT________________________________________________ 26
10. SPECIFICATIONS________________________________________________________ 27
11. WARRANTY ____________________________________________________________28
LEGAL NOTICE: Copyright © 2018 Zetec, Inc. All Rights Reserved. Contents of this publication may not be reproduced in any form without permission of Zetec, Inc. MIZ®, Air
LockTM, Zetec®, THE INSPECTION ADVANTAGE®, and WAVE design, are trademarks or registered trademarks of Zetec, Inc. in the United States and/or other countries. The
names of actual companies and products mentioned herein may be the trademarks of their respective owners. The material in this manual is for informational purposes only.
INFORMATION IN THIS MANUAL AND ALL PRODUCT, PRODUCT SPECIFICATIONS AND DATA ARE SUBJECT TO CHANGE WITHOUT NOTICE DUE TO ZETEC’s CONTINUOUS
DEVELOPMENT PROGRAM. ZETEC INC., ITS AFFILIATES, AGENTS, AND EMPLOYEES, AND ALL PERSONS ACTING ON ITS OR THEIR BEHALF (COLLECTIVELY, “ZETEC”), MAKES
NO REPRESENTATIONS OR WARRANTIES WITH RESPECT TO THIS MANUAL AND SPECIFICALLY DISCLAIMS ANY EXPRESS OR IMPLIED WARRANTIES OF MERCHANTABILITY
OR FITNESS FOR ANY PARTICULAR PURPOSE AND DISCLAIMS ANY AND ALL LIABILITY FOR ANY ERRORS, INACCURACIES OR INCOMPLETENESS CONTAINED WITHIN THIS
DOCUMENT. ZETEC SHALL NOT BE LIABLE FOR ANY DAMAGES, LOSSES, COSTS OR EXPENSES, WHETHER DIRECT, INDIRECT, INCIDENTAL, CONSEQUENTIAL, OR SPECIAL,
ARISING OUT OF, OR RELATED TO THE USE OF THIS MATERIAL.

ZEC-DOC-USER-MANUAL-MIZ-21C (180 - 1030496 - 1 - A) - 1 Page 3
1. Safety Precautions and Symbols
This section contains the most important precautions to follow, and identifies and explains the
various safety symbols found on the instrument. Before turning on the instrument, make sure that
these safety precautions are taken, as described below.
Safety Indications
The purpose of the various safety indications is to ensure operator safety and instrument integrity.
WARNING!
The Warning sign denotes a hazard. It calls attention to a procedure, practice,
or the like, which, if not correctly performed or adhered to, could result in
severe personal injury or death.
Do not proceed beyond a Warning sign until the indicated conditions are fully
understood and met.
CAUTION!
The Caution sign denotes a hazard. It calls attention to a procedure, practice, or
the like, which, if not correctly performed or adhered to, could result in material
damage or loss of data.
Do not proceed beyond a Caution sign until the indicated conditions are fully
understood and met.
Intended Use
The MIZ-21C is designed to perform nondestructive inspections on industrial and commercial
materials.
CAUTION!
Do not use the MIZ-21C for any purpose other than the intended use.
Use of equipment and accessories
Zetec provides a series of eddy current probes and accessories that allow the MIZ-21C to perform a
wide range of eddy current inspections. Contact Zetec with questions on compatibility of third party
products to ensure safe operation of the MIZ-21C.
WARNING!
Always use equipment and accessories that meet Zetec’s specifications. Using
incompatible equipment could cause malfunction and/or equipment damage,
or injury.

ZEC-DOC-USER-MANUAL-MIZ-21C (180 - 1030496 - 1 - A) - 1 Page 4
Repair and modification
The MIZ-21C does not contain user-serviceable parts. Opening the instrument might void the
warranty. Contact Zetec to arrange for service should your MIZ-21 need maintenance or repair.
CAUTION!
To prevent human injury and/or equipment damage, do not disassemble,
modify, or attempt to repair the instrument.
Safe Workplace Operation
The MIZ-21C instrument is a handheld instrument that requires user interaction for operation. Before
performing an inspection with the MIZ-21C, secure the workplace and ensure proper personal
protection equipment appropriate for the work activity is in place.
WARNING!
Use of the MIZ-21C may require user attention and interaction. Always use the
proper safety precautions and personal protection equipment appropriate for
the jobsite to avoid personal injury or death while operating the equipment.

ZEC-DOC-USER-MANUAL-MIZ-21C (180 - 1030496 - 1 - A) - 1 Page 5
General Precautions
•Before turning on the instrument, carefully read the instructions in this user manual.
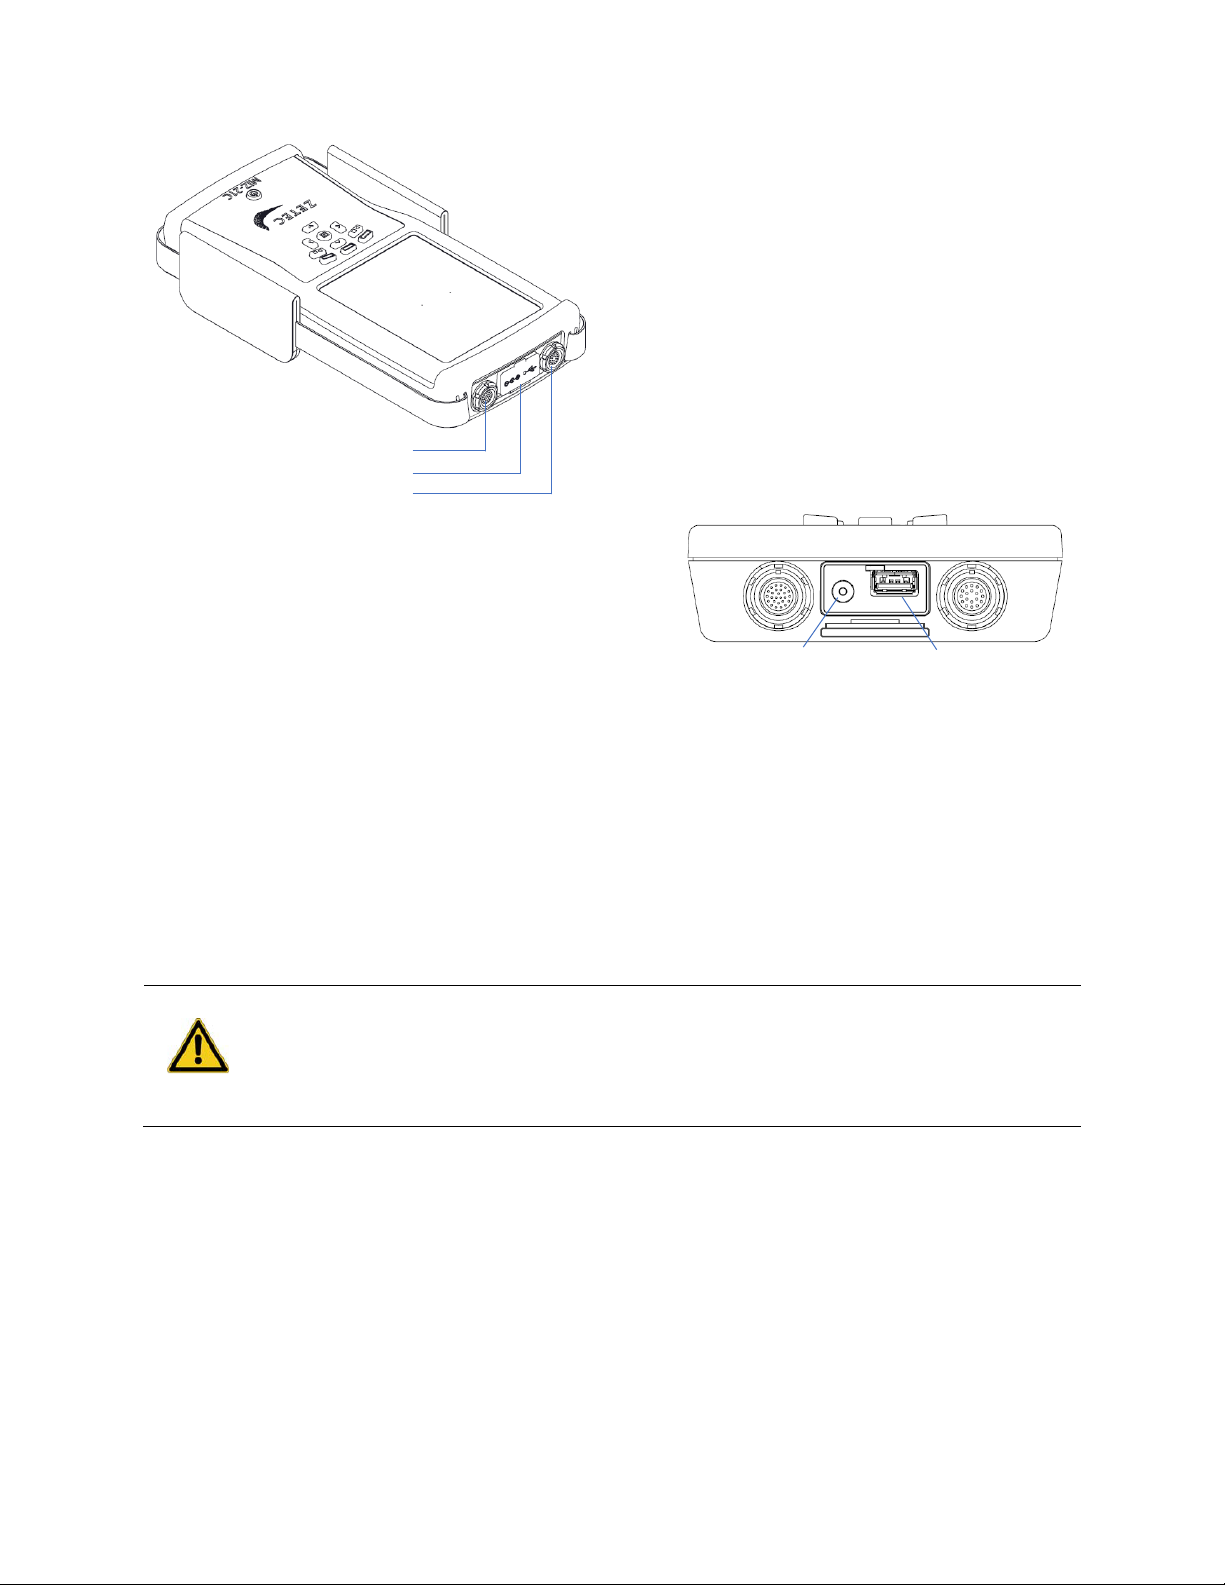
•Never touch connector pins, whether the instrument is turned on or not, a shock potential
may be present.
•Be familiar with this user manual and keep it available for future reference.
•Follow operation procedures carefully.
•Heed the safety warnings found on the instrument and in this manual.
•The MIZ-21C has been designed for non-destructive evaluations of industrial and commercial
materials. Do not use the MIZ-21C for any other purpose than the stated intended use.
•Only use cables and accessories approved by ZETEC for this instrument.
•MIZ-21C shall only be connected to the supplied power adapter and cables for charging
and/or operating from mains power. The mains plug shall only be inserted in a socket outlet
provided with a protective earth contact and of the type indicated on the rating plate of the
supplied power adapter.
•If the equipment is used in a manner not specified by ZETEC, Inc., the protection provided on
the equipment may be impaired.
•Do not install substitute parts or perform unauthorized modifications to the instrument.
•The MIZ-21C instrument must be serviced by the manufacturer only. For any problem or
question regarding this instrument, contact ZETEC, Inc., or an authorized ZETEC, Inc.
representative.

ZEC-DOC-USER-MANUAL-MIZ-21C (180 - 1030496 - 1 - A) - 1 Page 6
2. Features and Layout
Features
❶Power Button
❷Control Buttons
❸System Display
❹Connector Panel
❺Product Information and Serial Number
❻Instrument Stand
❼
Protection Cover
❽Hand Strap
❶
❷
❸
❹
❼
❻
❺
❽

ZEC-DOC-USER-MANUAL-MIZ-21C (180 - 1030496 - 1 - A) - 1 Page 7
Connector Panel
The connectors accept a broad line of probes
supplied by Zetec. The connector is designed for
easy connection and retention of the probe
connector during operation. Gently insert the
probe connector into the MIZ-21C by aligning the
red dots and inserting until seated. To remove the
connector, grasp the probe connector housing by
the no-slip surface and gently pull to release the
latch and allow the connector to be removed
The charging port is to attach the power
adapter supplied with the MIZ-21C. The
charging port can be used to recharge the
internal batteries as well as powering the
instrument for longer term operation or when
the battery level is lower than is required for
the inspection.
The USB connector can be used to attach
peripherals such a mouse, keyboard,
headphones, or storage device. The USB
connector also supports the connection of a
USB hub so several peripherals can be
connected at once.
CAUTION!
Charging Port
MIZ-21C shall only be connected to the supplied power adapter and cables for
charging and/or operating. Use of an improper power adapter may result in loss
of data or damage to the instrument.
Eddy Current Array Connector
USB & Charging Ports
Eddy Current Connector
Charging
Port
USB 2.0

ZEC-DOC-USER-MANUAL-MIZ-21C (180 - 1030496 - 1 - A) - 1 Page 8
MIZ-21C Models
The MIZ-21C is offered in three different models with varying features suited for multiple
applications. Throughout this manual, references may be provided on features not included on your
specific model. Compare the model information tag on the back of the MIZ-21C with the following
table to understand your exact features. Contact Zetec with any questions that may arise about
models and features.
Feature
MIZ-21C-SF
MIZ-21C
MIZ-21C-ARRAY
Conductivity
Single Frequency
Dual Frequency
Rotating Scanner
Eddy Current Array

ZEC-DOC-USER-MANUAL-MIZ-21C (180 - 1030496 - 1 - A) - 1 Page 9
3. Navigation and Controls
Touch Control
The MIZ-21C display includes Touch UI that allows the user to interact with the software application
in some very useful ways. Throughout the software applications various gestures of Touch UI are
enabled depending on the current screen and action. Below are the gestures used with the MIZ21C.
Single Tap on most screens allows you to select a menu item or move features on
the data screen.
Double Tap is used on select screens to provide deeper functionality. For
example, double tapping on the C-Scan display from an array technique will
launch a menu with display options for the C-Scan.
Pinch and Zoom provides additional features for interacting directly with the
screen image. For example, pinch and zoom on the 2D calibration Lissajous
screen can be used to adjust the display scale.
Touch control can be disabled by selecting the Tools menu and navigating to
the Touch Screen preference menu.

ZEC-DOC-USER-MANUAL-MIZ-21C (180 - 1030496 - 1 - A) - 1 Page 10
Control Buttons
Incorporated into the front panel of MIZ-21C are several user control buttons which provide an
alternative to on screen software buttons for many functions. This can be useful when the job
requires the use of gloves that may not be compatible with the touch enabled display screen. The
table below provides information on the use of the Control Buttons.
Cursor Movement provides up, down, left,
right movement of the active screen item
along with select button in center.
Holding the select button is also used to
capture a screenshot.
Function Buttons corresponding to the
three software buttons on the lower
extent of the screen. Either the touch
screen or function button can be selected
with the same effect. The functions vary
based on the current screen.
Start and Stop Acquire associated with
record and stop while acquiring data or
play and stop when reviewing recorded
data. The two start and stop buttons have
the same function and are positioned for
ease of left or right hand operation.

ZEC-DOC-USER-MANUAL-MIZ-21C (180 - 1030496 - 1 - A) - 1 Page 11
Display Navigation
The system can be navigated by directly touching the
appropriate item on the screen or by the control keys. The
initial screen presents the application options for the MIZ-
21C. The right arrow screen symbol indicates there is
further navigation from this menu choice. Selecting a menu
choice can be performed by the touch screen method or
through the control buttons.
Touch Screen
Control Button
Directly select the
menu item on the
screen
Move the highlight up
or down by using the
up/down cursor
buttons . Chose
the menu item by
either the select or right
arrow button .
Control Hints
The MIZ-21C is disigned to be intiutive and simple to
operate. Throughout the application, Control Hints are
provided on the status bar so the user can see how to use
the current feature.

ZEC-DOC-USER-MANUAL-MIZ-21C (180 - 1030496 - 1 - A) - 1 Page 12
4. General Data Display Layouts
Display modes are set according to the Application Type in use. The MIZ-21C produces both
2-Dimensional and 3-Dimensional data screens. The content of the screen is automatically adjusted
depending on the current mode to provide the user with the most relevant controls for operation.
During acquisition, some menu items are automatically hidden to maximize the viewable area for
live data. Once data acquisition has halted, menus and components reappear to assist the user in
the review of data. Depending on the application type in use, the MIZ-21C will either display a 2D or
3D type of screen.
Application Type
2D
3D
Bolt Holes
✓
Conductivity and Coating Thickness
✓
Sub-Surface
✓
Surface Array
✓
Surface Cracks
✓
Common Data Display Features
Across the different data display types, the
MIZ-21C presents some common interface
components. The interface components
noted to the left are visible an 2D and 3D
data screens when not actively acquiring
data. While acquiring data, the data display
area is maximized for the best visibility and
these features are hidden.
The sections below will provide general
information on these common interface
components.
.
Screen Mode Menu
Screen Controls
Status Bar
Context Menu

ZEC-DOC-USER-MANUAL-MIZ-21C (180 - 1030496 - 1 - A) - 1 Page 13
Status bar
The Status Bar displays general system status
including date, time, battery status. Wi-Fi and
Bluetooth status are also present for units where this
feature is available.
The main title area displays the current technique
name in use. When edits have been applied to the
saved technique, an asterisk appears next to the
name to indicate it has been modified.
This area is also used to show operational hints,
when available.

ZEC-DOC-USER-MANUAL-MIZ-21C (180 - 1030496 - 1 - A) - 1 Page 14
Screen Mode Menu
This feature is a menu across the top of many screens for
quick access to the various screen modes. The active
screen mode will be highlighted to indicate the current
screen mode.
Main Menu Navigation
Touch Screen
Control Button
Directly select the
menu item on the
screen
Navigate by using the
left or right cursor
button
Home recalls the current technique page
Calibrate displays the calibration contextual menu
Underlay Tool in 2D mode, displays menu to capture and display a reference
Lissajous signal under the active data in Sub-Surface Techniques
Filter displays the contextual menu to adjust mixes, cursor position, and filters.
Alarm displays a contextual menu and screen options to define an alarm box
based on signal response
Display displays the contextual menu to adjust modes of display, cursor position,
and position of displayed data on screen.
Tools displays contextual menus to save the data file, make measurements of
signals, and access the tools menu. See page 21 for more information on the
Tools Menu.

ZEC-DOC-USER-MANUAL-MIZ-21C (180 - 1030496 - 1 - A) - 1 Page 15
The Screen Controls Menu
On the acquisition screen when acquisition is not active, the
Screen Controls Menu is active to allow for direct
adjustment of signals. Moving from left to right, the control
options are channel, phase, scale, gain, and drive. How
adjustments are made varies depending on the selection.
The table below explains how to adjust the signal for the
various modes.
Phase and Data Scale settings are a function of the
calibration to display the data appropriately for the
inspection.
Gain and Drive are a function of the technique and
changing these values will modify the current technique. To
keep Gain and Drive changes, the technique must also be
saved.
Control
Adjustment
Channel
Select the on-screen menu to toggle through channels or use the up and down
arrow keys .
Phase
Select the on-screen menu to enable phase adjustment mode. Adjustment of the
phase angle is through direct rotation of the signal on the screen with your finger or
using the buttons for coarse adjustment or buttons for fine adjustment. The
context menu at the bottom of the screen will be active during phase adjustment
and clicking the “Done” button will save the changes. Phase is a function of the
calibration.
Data
Scale
Select the on-screen menu to enable scale adjustment mode. The scale of a signal
can be adjusted directly on the screen through a “Pinch and Zoom” gesture or using
the or control buttons. The context menu at the bottom of the screen will be
active during scale adjustments. Clicking the “Done” button will save changes.
In addition to using the manual scale features, Auto Scale Defect will automatically
set the defect within the parameters of the technique. Data Scale is a function of the
calibration.
Gain
Select the on-screen menu to enable the settings menu for the eddy current drive
gain. Changes to the gain value will be applied the next time the acquisition is
started with the start/stop acquire button . Gain is a function of the technique.
Drive
Select the on-screen menu to enable the settings menu for the eddy current drive
voltage. Changes to the drive voltage value will be applied the next time the
acquisition is started with the start/stop acquire button . Drive is a function of the
technique.

ZEC-DOC-USER-MANUAL-MIZ-21C (180 - 1030496 - 1 - A) - 1 Page 16
Context Menu
This feature is a three-option menu across the
bottom of many screens that changes based on the
current screen mode. The context menu is a screen
soft key that correlates to the three keypad buttons
directly below the screen.
Navigation between the different screen modes can
be performed by either the touch screen or control
buttons.
Context Menu Navigation
Touch Screen
Control Button
Directly select the
menu item on the
screen
Select by function button
directly below the
screen option
Data Display Area
2D Data Display
3D Data Display
The data display areas appear differently for the general 2D and 3D data types however the layout
is similar. The display areas represent the portion of the data that is within the Lissajous Data
Window. The Lissajous Data Window is represented by the blue shaded area of the 2D display or
the white dotted boundary lines of the 3D display.
Data Display
Data Buffer

ZEC-DOC-USER-MANUAL-MIZ-21C (180 - 1030496 - 1 - A) - 1 Page 17
5. Getting Started
Before first use, read the safety precautions on page 3 to ensure safe operation.
The following information provides general steps to quickly start operating the MIZ-21C.
Powering Up the Instrument
With batteries fully charged, momentarily press the
power button on the front panel to power up the MIZ-
21C. It will take several seconds to boot as the system
starts.
Powering Down the Instrument
Press and hold the power button for 2 seconds to power
down the MIZ-21C.
Selecting an Application
Once the MIZ-21C is fully powered up, the initial display
will show the various application types supported by the
MIZ-21C. The MIZ-21C organizes techniques under
application categories to quickly identify the best
technique for inspection requirements. Select the
category to view avilable techniques currently loaded.
Touch Screen
Control Button
Directly select the
menu item on the
screen
Move the highlight up
or down by using the
up/down cursor
buttons . Chose
the menu item by
either the select or right
arrow button .

ZEC-DOC-USER-MANUAL-MIZ-21C (180 - 1030496 - 1 - A) - 1 Page 18
Selecting a Technique
The technique screen will display a list of techniques
currently avaliable on the MIZ-21C. When the technique is
highlighted and the technique parameters are set
correctly for the application, start acqusition using the
start/stop acquire button .
To view and edit the technique, select the technique on
the screen or use the right arrow on the keypad.
Default techniques are locked; however, a copy can be
made from any technique and modified for use. The
Copy button in the Context Menu allows for copying and
naming a new technique based on the current selection.
To return to the Application Screen, select Application….
In the Context Menu.
Viewing a Technique
When viewing a techique, you can scroll up or down on the
screen or use the up/down cursor buttons to view all
the current settings.
To Return to the list of techniques, select List… from the
Context Menu.
To modify a technique, select Edit from the Context Menu.

ZEC-DOC-USER-MANUAL-MIZ-21C (180 - 1030496 - 1 - A) - 1 Page 19
Editing a Technique
The technique editing screen will present all of the user
configurable features in a menu driven list. Select any
feature to enter changes to values.
Modified techniques can be run in acqusition mode
without saving by pressing Start/Stop Acquire button .
Edited techniques that have not been saved will append
an asterisk to the technique name at the top of the screen
to note the technique is not saved.
A modified technique can be saved at any time by
selecting Save from the context menu in the editing
screen. If the technique is currently locked, a prompt will
display a choice to save a copy of the technique or
cancel. Locked techniques cannot be changed.
Acquiring Data
With an active technique selected and an appropriate probe
attached, press the Start/Stop Acquire button to initiate
acquisition and start scanning the specimen.
While acquiring, use the Context Menu buttons to perform
Display Null, Instrument Null, and Clear the data buffer.

ZEC-DOC-USER-MANUAL-MIZ-21C (180 - 1030496 - 1 - A) - 1 Page 20
Calibrating Data
Press the Start and Stop Acquire button to halt
acquisition. The data review page will immediately be
displayed in the Calibrate menu mode. The Calibrate mode
provides tools to adjust settings such as scale and rotation.
The lower portion of the display shows the Data Buffer (see
page 16) for selecting a data segment for calibration.
In addition, the Screen Controls Menu (see page 15)
provides additional tools.
The Context Menu (see page 16) on the bottom of the
screen provides the tools for calibrating the data.
Table of contents
Other Zetec Test Equipment manuals