zewa UAM-901 User manual

User Manual
Version:1.0
Blood Pressure Monitor UAM-901
Arm Type
Thank you very much for selecting ZEWA Blood Pressure Monitor UAM-901
Please read the user manual carefully and thoroughly to ensure the safe usage of this
product. Keep the manual well for further reference in case you have problems.
2020-08-18
技术要求:
1、黏合不可露胶
2、保持印刷面板上的清洁
3、注意套印的准确性
4、表面处理不可爆开
5、结构工艺以结构受控图为准
6、颜色参考:
产品型号 材质
尺寸
70g书写纸
125*90 mm
单黑
产品名称 血压计
-
TMB-1872-T-014
李秋燕 2020-08-18
罗佳钰 2020-08-18
谭文昊 2020-08-18
TMB-1872-T-014-GB-01
PO#2F6474B-TMB-1872-T-014-GB-01-说明书-A2
共 32 张 第 1 张
A/2
对应结构图纸 印色
1:1 -表面处理
SET
START
STOP
MEM
Manufactured for Zewa, Inc.
12960 Commerce Lakes Drive#29
Fort Myers, FL 33913 USA
www.zewa.com
Toll Free Customer Service:
1-888-993-3592

1 2
CATALOGUE CATALOGUE
Table of Contents
INTRODUCTION...................................................................................................................3
General Description
Indications for Use
Contraindications
Measurement Principle
Safety Information
LCD Display Signal
Monitor Components
List
BEFORE YOU START.........................................................................................................18
The Choice of Power Supply
Installing and Replacing the Batteries
Setting Date, Time
MEASUREMENT..................................................................................................................27
Tie the Cuff
Start the Measurement
DATA MANAGEMENT..........................................................................................................31
Recall the Records
Delete the Records
INFORMATION FOR USER................................................................................................38
Tips for measurement
Maintenances
ABOUT BLOOD PRESSURE..............................................................................................40
What are systolic pressure and diastolic pressure?
What is the standard blood pressure classification?
Irregular heartbeat detector
Why does my blood pressure fluctuate throughout the day?
Why do I get a different blood pressure at home compared to the hospital?
Is the result the same if measuring on the right arm?
TROUBLESHOOTING........................................................................................................44
SPECIFICATIONS...............................................................................................................46
AUTHORIZED COMPONENTS ..........................................................................................48
CONTACT INFORMATION..................................................................................................49
FCC STATEMENT................................................................................................................49
COMPLIED STANDARDS LIST...........................................................................................50
EMC GUIDANCE.................................................................................................................52
WARRANTY.........................................................................................................................58
Select the User
Turn on or turn off the voice

3 4
INTRODUCTION INTRODUCTION
Thank you for selecting ZEWA arm type blood pressure monitor
(UAM-901). The monitor features blood pressure measurement, pulse
rate measurement and the result storage. The design provides you with
two years of reliable service.
Readings taken by the UAM-901 are equivalent to those obtained by a
trained observer using the cuff and stethoscope auscultation method.
This manual contains important safety and care information, and
provides step by step instructions for using the product.
Read the manual thoroughly before using the product.
Features:
60*74mm Digital LCD display
Maximum 120 records per each user
Measuring during inflation technology
General Description
The ZEWA Blood Pressure Monitor is a digital monitor intended for use in
measuring blood pressure and heartbeat rate with arm circumference ranging
from 22cm to 42cm(about 8¾˝-16½˝).
It is intended for adult indoor use only.
Indications for Use
Measurement Principle
Contraindications
1.The device should not be used by any person who may be suspected of,or is pregnant .
2.The device is not suitable for use on patients with implanted,electrical devices,
such as cardiac pacemakers, defibrillators.
This product uses the Oscillometric Measuring method to detect blood pressure.
Before every measurement, the unit establishes a “zero pressure” equivalent to the
atmospheric pressure. Then it starts inflating the arm cuff, meanwhile, the unit detects
pressure oscillations generated by beat-to-beat pulsatile, which is used to determine
the systolic and diastolic pressure, and also pulse rate.

5 6
INTRODUCTION INTRODUCTION
The signs below might be in the user manual, labeling or other component.
They are the requirement of standard and using.
Safety Information
Symbol for “RECYCLE”
Symbol for “THE OPERATION
GUIDE MUST BE READ”
Symbol for “SERIAL NUMBER”
Symbol for “TYPE BF APPLIED
PARTS”
Symbol for “DIRECT CURRENT”
Symbol for “ENVIRONMENT
PROTECTION - Electrical waste
products should not be disposed of
with household waste. Please recycle
where facilities exist. Check with your
local authority or retailer for recycling
advice”
Caution: These notes must
be observed to prevent any
damage to the device.
SN
Symbol for “MANUFACTURE
DATE”
CAUTION
* This device is intended for adult use in homes only.
* The device is not suitable for use on neonatal patients, pregnant women,patients with
implanted, electronical devices, patients with pre-eclampsia, premature ventricular beats,
atrial fibrillation, peripheral, arterial disease and patients undergoing intravascular therapy or
arterio-venous shunt or people who received a mastectomy. Please consult your doctor prior
to using the unit if you suffer from illnesses.
* The device is not suitable for measuring the blood pressure of children. Ask your doctor
before using it on older children.
* The device is not intended for patient transport outside a healthcare facility.
* The device is not intended for public use.
* This device is intended for no-invasive measuring and monitoring of arterial blood
pressure.It is not intended for use on extremities other than the arm or for functions other
than obtaining a blood pressure measurement.
* Do not confuse self-monitoring with self-diagnosis. This unit allows you to monitor your
blood pressure.Do not begin or end medical treatment without asking a physician for
treatment advice.
* If you are taking medication,consult your physician to determine the most appropriate time
to measure your blood pressure. Never change a prescribed medication without consulting
your physician.
* Do not take any therapeutic measures on the basis of a self measurement. Never alter the

7 8
INTRODUCTION INTRODUCTION
CAUTION CAUTION
dose of a medicine prescribed by a doctor. Consult your doctor if you have any question
about your blood pressure.
* When the device is used to measure patients who have common arrhythmias such as
atrial or ventricular premature beats or atrial fibrillation, the best result may occur with
deviation. Please consult your physician about the result.
* Don't kink the connection tube during use, otherwise, the cuff pressure may continuously
increase which can prevent blood flow and result in harmful injury to the PATIENT.
* When using this device, please pay attention to the following situation which may interrupt
blood flow and influence blood circulation of the patient, thus cause harmful injury to the
patient: connection tubing kinking too frequent and consecutive multiple measurements; the
application of the cuff and its pressurization on any arm where intravascular access or
therapy, or an arterio-venous (A-V) shunt, is present; inflating the cuff on the side of a
mastectomy.
* Warning: Do not apply the cuff over a wound;otherwise it can cause further injury.
*Do not inflate the cuff on the same limb which other monitoring ME equipment is applied
around simultaneously, because this could cause temporary loss of function of those
simultaneously-used monitoring ME equipment.
*On the rare occasion of a fault causing the cuff to remain fully inflated during measurement,
open the cuff immediately. Prolonged high pressure (cuff pressure >300mmHg or constant
pressure >15mmHg for more than 3 minutes) applied to the arm may lead to an ecchymosis.
*Please check that operation of the device does not result in prolonged impairment of
patient blood circulation.
* When measurement, please avoid compression or restriction of the connection tubing.
* The device cannot be used with HF surgical equipment at the same time.
* The ACCOMPANYING DOCUMENT shall disclose that the SPHYGMOMANOMETER
was clinically investigated according to the requirements of ISO 81060-2:2013.
* To verify the calibration of the AUTOMATED SPHYGMOMANOMETER, please contact
the manufacturer.
* This device is contraindicated for any female who may be suspected of, or is pregnant.
Besides providing inaccurate readings, the effects of this device on the fetus are unknown.
* Too frequent and consecutive measurements could cause disturbances in blood
circulation and injuries.
* This unit is not suitable for continuous monitoring during medical emergencies or
operations.Otherwise, the patient’s arm and fingers will become anaesthetic, swollen and
even purple due to a lack of blood.
* When not in use, store the device in a dry room and protect it against extreme moisture,
heat, lint, dust and direct sunlight. Never place any heavy objects on the storage case.
* This device may be used only for the purpose described in this booklet. The manufacturer
cannot be held liable for damage caused by incorrect application.
*This device comprises sensitive components and must be treated with caution. Observe

9 10
INTRODUCTION INTRODUCTION
CAUTION CAUTION
* The service life of the cuff may vary by the frequency of washing, skin condition, and
storage state. The typical service life is 10000 times.
* It is recommended that the performance should be checked every 2 years and after
maintenance and repair, by retesting at least the requirements in limits of the error of the
cuff pressure indication and air leakage (testing at least at 50mmHg and 200mmHg).
* Please dispose of ACCESSORIES, detachable parts, and the ME EQUIPMENT according
to the local guidelines.
* Manufacturer will make available on request circuit diagrams, component part lists,
descriptions, calibration instructions,etc., to assist to service personnel in parts repair.
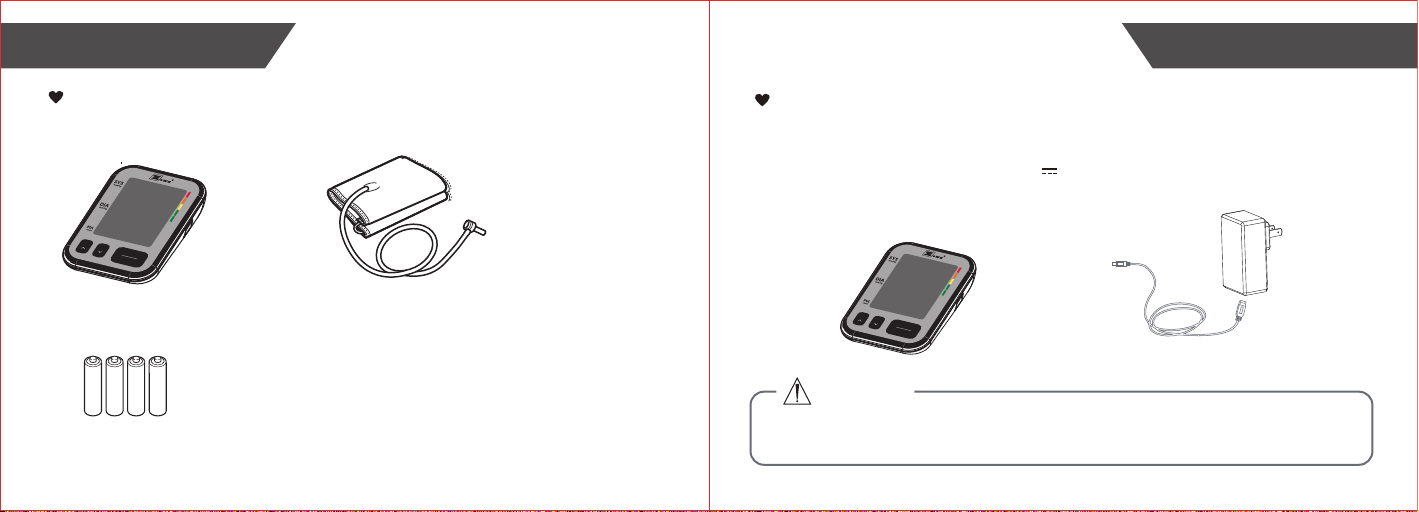
* The plug/adapter plug pins insulate the device from the main supply. Do not position the
device in a position where it is difficult to disconnect from the supply mains to safely
terminate operation of ME equipment.
* The operator shall not touch output of batteries/adapter and the patient simultaneously.
* Cleaning :Dust environment may affect the performance of the unit. Please use the soft
cloth to clean the whole unit before and after use. Don’t use any abrasive or volatile
the storage and operating conditions described in this booklet.
* The equipment is not AP/APG equipment and not suitable for use in the presence of a
flammable anesthetic mixture with air of with oxygen or nitrous oxide.
* Warning: No servicing/maintenance while the ME equipment is in use.
* The patient is an intended operator.
* The patient can measure data and change batteries under normal circumstances and
maintain the device and its accessories according to the user manual.
* To avoid measurement errors, please avoid the condition of strong electromagnetic field
radiated interference signal or electrical fast transient/burst signal.
* The blood pressure monitor and the cuff are suitable for use within the patient
environment. If you are allergic to polyester, nylon or plastic, please don't use this device.
* During use, the patient will be in contact with the cuff. The materials of the cuff have been
tested and found to comply with requirements of ISO 10993-5:2009 and ISO
10993-10:2010. It will not cause any potential sensation or irritation reaction.
* Adaptor is specified as a part of ME EQUIPMENT.
* If you experience discomfort during a measurement, such as pain in the arm or other
complaints, press the START/STOP button to release the air immediately from the cuff.
Loosen the cuff and remove it from your arm.
* If the cuff pressure reaches 40 kPa (300 mmHg), the unit will automatically deflate.
Should the cuff not deflate when pressure reaches 40 kPa (300 mmHg), detach the cuff
from the arm and press the START/STOP button to stop inflation.
* Before use, make sure the device functions safely and is in proper working condition.
Check the device, do not use the device if it is damaged in any way. The continuous use of
a damaged unit may cause injury, improper results, or serious danger.
* Do not wash the cuff in a washing machine or dishwasher!

11 12
INTRODUCTION INTRODUCTION
CAUTION CAUTION
Table 9 of IEC 60601-1-2:2014, as appropriate.
* Please use ACCESSORIES and detachable parts specified/ authorised by MANUFAC-
TURE. Otherwise, it may cause damage to the unit or danger to the user/patients.
* There is no luer lock connectors are used in the construction of tubing, there is a
possibility that they might be inadvertently connected to intravascular fluid systems,
allowing air to be pumped into a blood vessel.
* Please use the device under the environment which is provided in the user manual.
Otherwise, the performance and lifetime of the device will be impacted and reduced.
cleaners.
* The device doesn’t need to be calibrated within two years of reliable service.
* If you have any problems with this device, such as setting up, maintaining or using, please
contact the SERVICE PERSONNEL of ZEWA. Don’t open or repair the device by
yourself in the event of malfunctions. The device must only be serviced, repaired and
opened by individuals at authorized sales/service centers.
* Please report to ZEWA. if any unexpected operation or events occur.
* Keep the unit out of reach of infants, young children or pets to avoid inhalation or
swallowing of small parts. It is dangerous or even fatal.
* Be careful to strangulation due to cables and hoses, particularly due to excessive length.
* At least 30 min required for ME equipment to warm from the minimum storage
temperature between uses until it is ready for intended use. At least 30 min required for ME
equipment to cool from the maximum storage temperature between uses until it is ready for
intended use.
* This equipment needs to be installed and put into service in accordance with the
information provided in the ACCOMPANYING DOCUMENTS;
* Wireless communications equipment such as wireless home network devices, mobile
phones, cordless telephones and their base stations, walkie-talkies can affect this
equipment and should be kept at least a distance d away from the equipment. The distance
d is calculated by the MANUFACTURER from the 80MHz to 5.8 GHz column of Table 4 and

13 14
INTRODUCTION INTRODUCTION
LCD Display Signal
SYMBOL DESCRIPTION
Systolic blood pressure High blood pressure
Diastolic blood pressure Low blood pressure
EXPLANATION
Memory
mmHg Measurement Unit of the blood pressure
Low battery Batteries are low and need to be replaced
mmHg
Pulse in beats per minute
Pulse display
Blood pressure monitor is detecting an
irregular heartbeat during measurement.
Irregular heartbeat
(1mmHg=0.133kPa)
Indicate it is in the memory mode and
which group of memory it is.
Motion indicator Motion may result in an inaccurate
measurement
Average value The average value of blood pressure

15 16
INTRODUCTION INTRODUCTION
User 1
Start measurement for User 1
User 2 Start measurement for User 2
SYMBOL DESCRIPTION EXPLANATION
Current Time Month/Day/Year, Hour/Minute
Blood pressure
level indicator Indicate the blood pressure level
Heartbeat Blood pressure monitor is detecting a
heartbeat during measurement.
The voice switch Indicating voice switch
Monitor Components Component list of
pressure measuring system
1 Cuff
2 Air pipe
3 PCBA
4 Pump
5 Valve
BATTERY COMPARTMENT
MEM BUTTON
START/STOP BUTTON
SET BUTTON
CUFF
AIR HOSE
LCD DISPLAY
USB INTERFACE
SET
START
STOP
MEM
AIR CONNECTOR
PLUG

17 18
INTRODUCTION BEFORE YOU START
The Choice of Power Supply
In order to get the best effect and protect your monitor,please use the right
battery and special power adaptor which complies with local safety standard.
1.Battery powered mode:
6VDC 4*AAA batteries
2.
CAUTION
Please use the AC adaptor and USB
cable just like the following picture(not included):
AC adaptor powered mode:
5V 1A
AC adaptor
SET
START
STOP
MEM
List
1.Blood Pressure Monitor
(UAM-901)
4.User manual
3. 4*AAA batteries
2.Cuff (Type BF applied part)
( 22~42cm)
SET
STA
RT
ST
O
P
MEM

19 20
BEFORE YOU STARTBEFORE YOU START
•Slide off the battery cover.
•Install the batteries by matching
the correct polarity, as shown.
•Replace the battery cover.
Installing and Replacing the Batteries CAUTION
Replace the batteries whenever the below happens
The shows
The display is dim
The display does not light up
Do not use new and used batteries together.
Do not use different types of batteries together.
Do not dispose the batteries in fire. Batteries may explode or leak.
Remove batteries if the device is not likely to be used for some time.
Worn batteries are harmful to the environment. Do not dispose with daily garbage.
Remove the old batteries from the device following your local recycling guidelines.
Setting Date, Time
It is important to set the clock before using your blood pressure monitor,
so that a time stamp can be assigned to each record that is stored in the
memory. (The setting range of the year :2018—2058 time:12 H)
1.When the monitor is off,
presse “SET” button shortly
it will display the time.Then
press “SET” button for 3
seconds to enter the mode
for year setting.

21 22
BEFORE YOU STARTBEFORE YOU START
3.When you get the right
year, press “SET” button
to set down and turn to next
step.
4.Repeat steps 2 and 3 to
set the [MONTH] and [DAY].
5
2.Press “MEM” button to
change the [YEAR].
Each press will increase
the numeral by one in a
cycling manner.
.Repeat steps 2 and 3 to
set the [HOUR] and [MINUTE].

23 24
BEFORE YOU STARTBEFORE YOU START
6.After the [MINUTE] is set,
the LCD will display “donE”
first,then display all the
settings you have done
and then it will turn off.
Select the User
1.
2.
3.
When the monitor is off, press and hold “MEM ”button to
enter user setting mode. The user ID will blink.
Then press “ MEM ” button again, select the user
ID between user 1 and user 2 .
After selecting the suitable user ID, press “SET”
button to confirm. It will display “User ID+ donE”
and then turn off.

25 26
BEFORE YOU STARTBEFORE YOU START
Turn on or turn off the voice
1. When the monitor is off, press and hold “MEM ” button and “SET ” button to
enter the mode for turn on or turn off the voice. The trumpet will blink.
2. Press “MEM ” button again to select turn on or turn off the voice.
It will speak
“ Voice on”
or “Voice off ” at the same time.
Turn off the voice Turn on the voice
3. Then press “ SET ” button to confirm. It will display
“ donE” to save the setting you have done and then
turn off.

27 28
MEASUREMENT MEASUREMENT
Tie the Cuff
2~3cm
tie the cuff
1.
4.
Hold your arm with your palm facing up and
on your upper arm, then position the tube off-center toward
the inner side of arm in line with the little finger. Or position
the artery mark over the main artery (on the inside of your arm).
Note: Locate the main artery by pressing with 2 fingers
approximately 2 cm above the bend of your elbow on the inside
of your left arm. Identify where the pulse can be felt the strongest.
This is your main artery.
The cuff should be snug but not too tight. You should
be able to insert one finger between the cuff and your arm.
Remove all jewelry, such as watches and bracelets
from your left arm.Note: If your doctor has diagnosed
you with poor circulation in your left arm, use your right arm.
Roll or push up your sleeve to expose the skin.
Make sure your sleeve is not too tight.
2.
3.
Sit comfortably with your tested arm resting on
a flat surface. Place your elbow on a table
so that the cuff is at the same level as your heart.
Turn your palm upwards. Sit upright in a chair,
and take 5-6 deep breaths.
5.
Rest for 5 minutes before first measurement.
Wait at least 3 minutes between measurements.
This allows your blood circulation to recover.
The patient must relax as much as possible and do not move and talk
during the measurement procedure.
For a meaningful comparison, try to measure under
similar conditions. For example, take daily measurements
at approximately the same time, on the same arm,
or as directed by a physician.
6.
Take the measurement in a silent room.
The cuff should maintain at the same level as the right atrium
of the heart.
Please sit comfortably. Do not cross your legs and
keep your feet flat on the ground.
Keep your back against the backrest of the chair.
Helpful tips for Patients, especially for Patients
with Hypertension:

29 30
MEASUREMENT MEASUREMENT
START
STOP
1.When the monitor is off, press “Start/Stop” button to turn on
the monitor, and it will finish the whole measurement .
Adjust the zero.LCD display
Inflating and measuring. Display and save the
results.(When the volume is on,
It will broadcast your measuring result.)
Start the Measurement
2.Press “Start/Stop” button to power
off, otherwise it will turn off
within 1 minute.
(When the volume is on,it will speak “ Starting measurement,
please remain still and quiet” first, and then complete the
measurement process.)
START
STOP
START
STOP

31 32
DATA MANAGEMENT DATA MANAGEMENT
Recall the Records
1. When the monitor is off,
please press “MEM” button
to show the recent record.
If the records are less than
3 groups, it will display the
latest record instead. Take
user 1 for example.
(When the volume is on,
it will read the number for you)
2. Press “MEM” button
or “SET” button to get
the record you want.
(When the volume is on,
it will read the number for you)
The corresponding
time is 10:38.
The date and time
of the record
will be shown
alternately.
The current No. is No. 1.
The corresponding
date is 2019 year
July 1st.

33 34
DATA MANAGEMENT DATA MANAGEMENT
START
STOP
The most recent record (1) is shown first. Each new measurement is
assigned to the first (1) record. All other records are pushed back one
digit (e.g., 2 becomes 3, and so on), and the last record (120) is dropped
from the list.
CAUTION
Delete the Records
If you did not get the correct measurement, you
can delete results by following steps below.
A: Delete one record
1.Hold pressing “set” button
(except the AVG ) for 3
seconds when the monitor
is in the memory recall
mode, the flash display
“dEL one+User ID” will
show.
2.Press and hold “Start/stop”
button to confirm deleting
and the monitor will display
“dEL donE+User ID” and then
the device will show the latest
record. (When the volume is on,
it will read the number for you)
Note: To exit out the delete mode
press “Start/Stop” button shortly
before you press and hold
“Start/stop” button.

35 36
DATA MANAGEMENT DATA MANAGEMENT
START
STOP
1.Hold pressing “MEM” button
for 3 seconds when the
monitor is in the memory
recall mode, the flash
display “dEL ALL+User
ID” will show.
2.Press and hold “Start/stop”
button to confirm deleting
and the monitor will display
“dEL donE+USER ID” and then
turn off.
B: Delete all records
Note: To exit out the delete mode
press “Start/Stop” button shortly
before you press and hold
“Start/stop” button.

37 38
DATA MANAGEMENT INFORMATION FOR USER
Tips for Measurement
Measurements may be inaccurate if taken in the following
circumstances.
Within 1 hour
after dinner or drinking
Within 20 minutes
after taking a bath
In a very cold
environment
Immediate measurement
after tea, coffee, smoking
When talking or
moving your fingers
When you want to
discharge urine
3. If there is no record,
the right display will
show.
Table of contents
Other zewa Blood Pressure Monitor manuals