manuals.online logo
Brands
  1. Home
  2. •
  3. Brands
  4. •
  5. Zhejiang Dongma Baby Carrier
  6. •
  7. Stroller
  8. •
  9. Zhejiang Dongma Baby Carrier ADL1588 Parts list manual

Zhejiang Dongma Baby Carrier ADL1588 Parts list manual

Age range:37~96months
Load limit:25kg
The assembling and recharging process should be performed by adults.
For the first use,suggested charging time is 4-6hours
Assembly and Operation Instruction
Electric baby stroller
ITEM NO:ADL1588
Please read this directions carefully before assembling and using. After reading,
please keep it carefully for possible future use.
Content:
1. Profiles and specification
2. Breakdown drawing
3. Assembling step
4.Instructions
5.Charging
6.Repairs
7.Maintenance
Profiles and specification
Age:37~96 months Battery:2*6V4AH
Max weight: ≤25kg Size of car:1050*550*490cm
Speed:3~5km/h Power
way:
Charger way
Charger:220V Doubledrive:Output:
DC12V0.5A
Average
battery life:
Approximately280times
Recharger
times:
8~12 hours Fuze: Self-resetting fuse
Exploded view
-
No. Name No. Name No. Name No. Name
1 Car body 5 Rearview mirror 9 Front wheel 13 rear prop
2 Windscreen 6 seat 10 Wear ring
3 Dashboardl 7 Rear wheel 11 Shim
4 Steering wheel 8 Gearbox 12 steering yoke
Assembling steps
The assembling process before using has to be operated by adults.The whole
process takes approximately 30 minutes.
Minute parts has potential danger of choking.Children should be forbidden
touching and playing!
Tools needed in assembling:screwdriver (self-provided),vice(self-provided)
Before assembling,please check the number of all the parts .The plastic package
should be kept away from children since there’s danger of choking
Installing rear axle and rear wheel:
Rear wheel:
Put the driving gear box into the back-shaft from the left of
the car(make sure the motor cable connector is through the
hole on the car and reach the battery cartridge from the left
of the car)The use of light-emitting wheel will be shining
round power line on the motor through the hole, non
luminous wheel is not required.
Loaded wheel, which coincided with the connector
matching.
Slightly forced by the boss wheels, and the wheels under
pressure, the wheel assembly in place. (remark: pull the
wheel to the outer pull to confirm the wheel assembly in
place)
On the other side of the assembly.
According to the picture,put the spring and spring support into
hole.
Put rear axle through the side hole
Make spring support down,put rear axle through the spring
support’s hole.
The same operation with another spring support.
Loaded wheel, which coincided with the connector matching.
Slightly forced by the boss wheels, and the wheels under
pressure, the wheel assembly in place. (remark: pull the wheel
to the outer pull to confirm the wheel assembly in place)
On the other side of the assembly.
Note: single drive only one drive motor
Assembling steps
Installing front wheel:
Installing rear support:
Installing windscreen:
Installing wing mirror:
Put the bayonet the corresponding net.When
hearing the click sound.It means the buckle has
been installed in place
Put the screw hole on the rear support right to the
screw post on the noumenon
Use screw driver to screw in the 4x12tapping screw
Put 12gasket*1 on one side of the front wheel
Load wheel*1
Slightly forced by the boss wheels, and the wheels under
pressure, the wheel assembly in place. (remark: pull the wheel
to the outer pull to confirm the wheel assembly in place)
On the other side of the assembly.
Put up the windscreen,then according to the
picture,put wing mirror’s hole into the screw
post on the windscreen(pay attention to the left
and right )
Using the same method to install on the other
side of the mirror.
Assembling steps
Installing steering wheel:
Connect the power:
Installing plug:
Installing the seat:
Connect the electricity wire on the car to that
of the motor
Connect the red wire to the electricity jar and
the black wire to the black end.
Screw off the 4x12 tapping screw of the
car
Snap the buckle on the back of the
cushion into the neck.
Use two 4x12tapping screws to make it
set
Use the screw driver to unload the M5x35
inorganic screws.
Connect the lead plug-in on the steering wheel to
that of the open holes,and plug the steering wheel
in to the end of the steering tube(pay attention that
the plug-in is along the hole).Make sure the hole
on the steering wheel is lined with the steering
tube,then screw in the M5x35 inorganic screw.
Screw in the M5nut

Push the plug into the hole in the body.
The hole and push on the hole on the body
aligned, penetrating M5 screws with nut.
Note: if you do not push, the installation
is not.
How to use it(please make sure the switch is on)
Manual:
Forward:
1. Press the “Forward/backward”switch to forward;
2. Slightly step on “foot switch”,the car will moving forward
Stop:
Lifting the foot to loosen the “foot switch”,the car will stop
Backward:
1. Press Switch the “forward/backward switch ”to “backward”;
2. Slightly step on the “foot switch”the car will moving backward.
Remote control :(remarks :in this mode there’s no remote control/manual
switch)
Warning!
When change the
gear,please make sure
the car is completely
stopped.Or it will
damage the gear case
and motor
Note: remote control should be used by the
guardian, the child can not touch.
How to use it(please make sure the switch is on)
2.4GWireless stroller controller instructions
For the first time using the code, the following steps:
Step one:Installed on two AAA1.5V batteries, the remote control battery cover down
to push the battery cover to open the battery (note the positive and negative polarity of
the battery chamber), and finally close the battery cover, the indicator flashes three
instructions battery is installed correctly;
Step two:Press the button for 2 seconds, frequency of flicker light;
Step three:Immediately turn on the power, the frequency will go out immediately,
while the frequency of success;
Step four:If the frequency of the frequency is not successful (the frequency is not out),
turn off the power, repeat step two and step three;
一、Normal use
1. Speed choose: 3 light flashes slowly at low speed, medium speed medium speed is
3 light flashing, flashing lamp is 3 high speed high speed, each gear speed with
variable speed slow start;The forward and backward button has a slow stop, press the
left and right keys can be left and right, press the emergency stop button in any case to
stop;
2.Press the emergency stop button on the remote control or manual, the vehicle can
stop moving;
3.15 seconds after the remote control is not used automatically cut off the power, again
use no re - frequency;
How to use it(please make sure the switch is on)
Battery warning:
1. The distance of the remote control car when baby and child adult ride
shall not exceed the range of 15M.
2. The remote control only allows the guardian to use, and can not let
the children touch.
3. Before the remote operation to read the instructions carefully, and
empty experiment, master, can make children ride and use.
4. remote control with energy saving, when a period of time (about 10
seconds), the automatic power failure, all the lights are off, and then
re work when the key;
5. The frequency keys are required to be re operated for the first time
using and replacing the battery;
6. The remote control car may not travel on the road and the water source,
the obstacle, etc.
7. Remote control shall not be allowed to rain or other ways to avoid damage
caused by immersion line.
8. Old batteries and different brands of batteries not mixed use.
9. For a long time no application for remote control, it is recommended
to remove the battery, so as to avoid battery leakage, corrosion circuit
board, so that the damage to remote control.
10. In the remote control process should avoid the remote control fell.
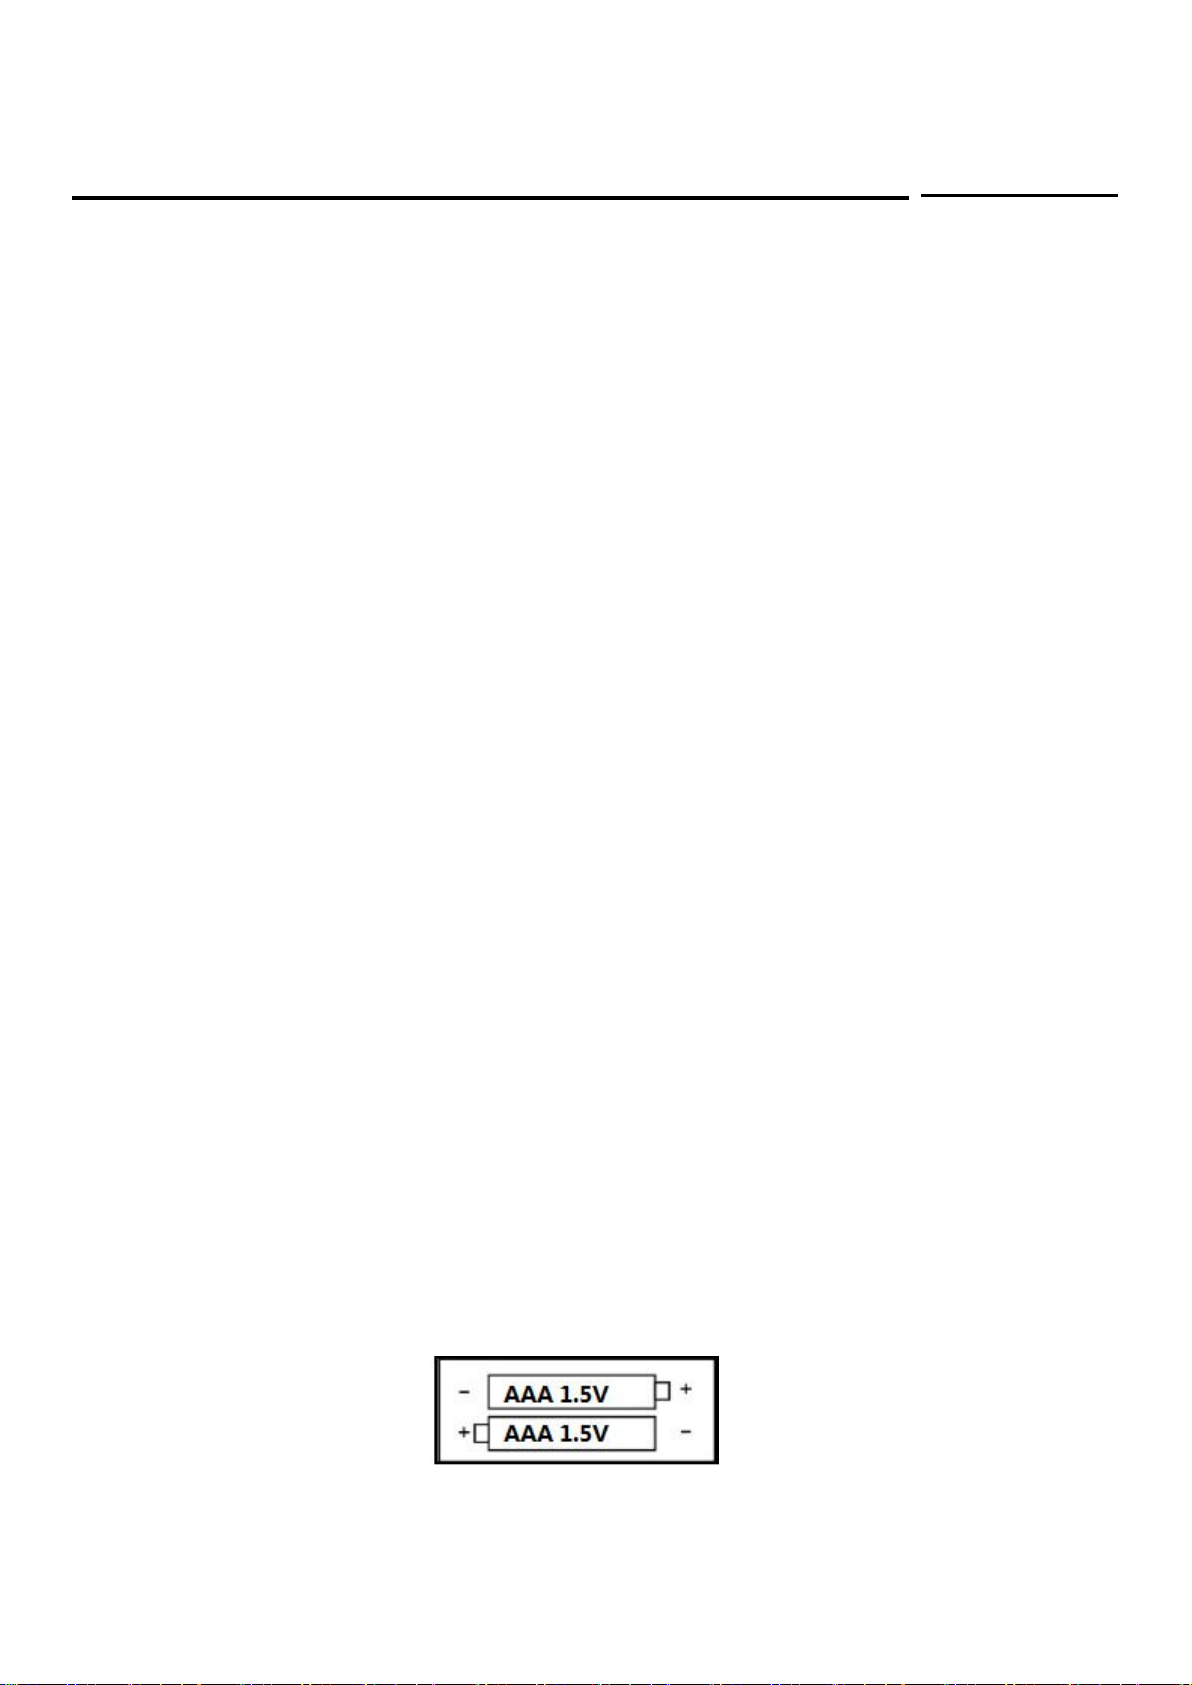
11. The battery with the correct polarity, the battery is strictly
forbidden to short-circuit.
12. Rechargeable batteries can only charge under the adult guardianship.
Non rechargeable battery can not charge.
13. The exhausted battery should take out the battery from the toy,
properly handle, prevent the children to play.
14. When long time no toys, we should take out the battery from the toy,
properly handle and prevent children to play..
15. Such as remote control range less than 3 meters, remote control
battery power shortage, to replace the two No. 5 (1.5V) battery.
Music:
Push the button on the steering wheel,there will be trumpet or music
Usage
Using the method of auxiliary wheel, handle and matters
needing attention:
1.When the car is insufficient, turn off the power.
2.The front bumper on the pulling out, after the bumper on the auxiliary
wheel spins.
3.Then hold the handle, the car will be brought into 45 degrees, drag the
car.
4.No children ride in the car using the handle auxiliary wheel.
5.This operation must be adult operation.
Charging:
Power switch must be turned in off when charging
Charging seat is located in the rear right.
Plug the charger into a local mains power wall outlet
Plug in the charging seat on the electricity power
Matters need attention when charging:
The charging process has to be operated by adults.
Before the firsts use of the car,make sure the battery has been
charged more than 4-6hours.Or the battery would be damaged
permanently and cannot be repaired.
When charging,please turn of the battery.Put the charger plug into
the charging hole before plug it on the socket.The car cannot be
operated when charging.
When the battery is low,please charge it in time.Normally the
charging hour is 8-12hours,but do not charge it more than
20hours.
It is normal that the battery jar emits heat,but when the
temperature is too high,you should examine whether the
recharging process is over-current or short-current.
When there is water in socket aperture,the battery jar cannot be
charged since it will cause short-current.
Only chargers and battery equipped by this car can be
used.Chargers and battery jars of other brand are strictly
prohibited .Or the charger and battery might be damaged.
When the product is packed away or will not be used for a long
time,you have to fully charge the battery and charge it once every
month to guarantee the life of the battery.
The charger and the battery are not toy.Children should not be
allowed to play with them.
Warning:
The assembling and charging process could only be operated by
adults.
Before use,please check whether all the part are installed well to
position and connected tightly
When playing this car,the distance between the car and an adult
cannot be more than 10 meters
This car should only be rode under adult’s supervision
This car cannot be used on dangerous places like
streets,roads,slopes and raceways.When there is barrier ,please
change directions to avoid it.
Do not use it on smooth surfaces like marbles,floor tiles and
glasses .
Do not use this car on rainy or snowy days.
Do not switch the forward/backward switch when
advancing.Make sure kids are not standing on the seat.
Do not change the structure,line and additional electrical devices
without permission.
The car is outfit with seat belt,Make sure the Child has fastened
it.
When the car is not used,please switch off the electric power
source;When not used for a long time,pluck off the attaching
plug.
Examine the product and charger regularly to see whether the
parts are becoming old or dropped off.When damage is found,the
product should be stopped using until fixed.
Simple Maintenance:
Fault type
Reason analysis
Exclusion methods
Car’s not moving
1.Battery has low voltage
2.Fuse protection
3.The nut of the wheel is dropped
off
4.Socked connector of the battery
has fallen off
5.Battery is flat
6.Electrical damage
7.Motor is broken
1.Recharging the battery
2.Stop for several minutes before
using again
3.Screw the nut on
4.Link it up again
5.Change a new battery
6.Go to the maintenance area
7.Go to the maintenance area
Battery cannot be recharged
1.Socket connector of the battery
has fallen off
2.There’s no power
1.Link it up again
2.Plug it in
Short flight mileage
1.Battery off
2.Battery is old
1.Recharging the battery
2.Change a new battery
There’s slight sound and heat
when recharging
1.This belongs to normal
chemical reaction
1.It’s normal
Low speed
1.Battery is old
2.Dead battery
3.Overload
4.Pavement irregularity
1.Change a new battery
2.Recharging the battery
3.Reduce weight bearing to below
30kg
4.Ride on smooth-riding surface
Gearbox has noise
1.Gear is broken
1.Repair it in maintenance point
Car is shaking when progressing
1.Connector cable for lens motor
contact poorly
2.There’s dead spot on the motor
1.Reconnect it
2.Repair it in maintenance point
Battery indicating light is not
working
1.Body power is not on
2.Battery is dead
1.Turn it on
2.Recharging the battery
Car cannot be stopped 1.Electrical damage 1.Repair it in maintenance point
Maintenance:
After the regular service of the product, adults should regularly (suggest once
two weeks) check the main items, including storage battery, charging device,
wires, outer skin, circuit changer and switching valve. Clamp devices should be
checked to see whether is loose. When there ’s hidden danger, the product
should be stopped being used until restored.
The vehicle should be cleaned by slightly wet (no water drop) soft cotton. Also
can be polished by non-wax furniture in order to make the surface bright and
clean. Do not use chemical dissolvent to wipe the plastic part of the toy to avoid
being dissolved. The car cannot be cleaned by soap and water since water will
damage the motor and storage battery, causing short pass of the electro-circuit
system.
After using for a period of time,please use lubricating oil to lubricate the iron
part in order not to get rusty.
The car should be kept away from high temperature and moistness ,since the
plastic parts might melt.When charging,please keep it away from inflammable
materials so that fire will not occur.
After using,please recharge it in time.Recharging should be operated by
adults.If the car will not be used for a long time or be stored up,it has to be
fully-recharged before storage.Then recharge it once every month to lengthen
its life.
When stop or not using for a long time ,please cut off the power .All the circuit
changers should be switched to “STOP”or “OFF” .The structure and wire
system cannot be altered without authorization.Maintenance and replacement
of crucial parts should be supervised by professionals.
In areas where power supply is unstable,installing power regulator is highly
recommended to protect the storage battery when recharging.
Do not use safety wires not accord with the product.
Do not use this vehicle indoors. Using this
Play
Active
outdoor toys for kids
Thank you for choosing a PlayActive product.
We hope your child will endure many years of fun
with this item. If you require any trouble shooting
assistance or help on assembly please view our
tutorial videos available on our website.
www.playactive.net
If you require any further assistance please contact the outlet you
purchased this item from.
vehicle in confined areas may cause the
WARNING!
vehicle's motors to over load.

Popular Stroller manuals by other brands

Joyello JL-932 user manual

Joyello

Joyello JL-932 user manual

Kolcraft Jeep Wrangler All-Weather UmbrellaStroller instruction sheet

Kolcraft

Kolcraft Jeep Wrangler All-Weather UmbrellaStroller instruction sheet

UPPAbaby G-LiTE manual

UPPAbaby

UPPAbaby G-LiTE manual

Cosatto uwu mix instructions

Cosatto

Cosatto uwu mix instructions

Nuna ivvi savi manual

Nuna

Nuna ivvi savi manual

Cybex Platinum MIOS manual

Cybex Platinum

Cybex Platinum MIOS manual

Safety 1st NOOK manual

Safety 1st

Safety 1st NOOK manual

Kolcraft Jeep Wrangler Sport S088-R3 instructions

Kolcraft

Kolcraft Jeep Wrangler Sport S088-R3 instructions

Peg-Perego Pliko P3 Instructions for use

Peg-Perego

Peg-Perego Pliko P3 Instructions for use

Bumbleride Era owner's manual

Bumbleride

Bumbleride Era owner's manual

Coccolle primo user manual

Coccolle

Coccolle primo user manual

Peg-Perego aria on track Instructions for use

Peg-Perego

Peg-Perego aria on track Instructions for use

CASUALPLAY S6 User instructions

CASUALPLAY

CASUALPLAY S6 User instructions

Emmaljunga Edge Duo Combi / 3-in-1 instruction manual

Emmaljunga

Emmaljunga Edge Duo Combi / 3-in-1 instruction manual

Verdi Babies MAX user manual

Verdi Babies

Verdi Babies MAX user manual

Chipolino MISTY instruction manual

Chipolino

Chipolino MISTY instruction manual

KIDDY Evostar 1 instruction manual

KIDDY

KIDDY Evostar 1 instruction manual

Joie krome instruction manual

Joie

Joie krome instruction manual

manuals.online logo
manuals.online logoBrands
  • About & Mission
  • Contact us
  • Privacy Policy
  • Terms and Conditions

Copyright 2025 Manuals.Online. All Rights Reserved.