ZHONGSHAN ETECH H-Series User manual

H-SERIES OWNER’S MANUAL
ELECTRIC POWERED
NEV & LSV VEHICLES
STARTING MODEL YEAR 2019
ISSUED FEBRUARY 2019
ETECH DIVISION OF ZHONGSHAN ETECH ELECTRIC VEHICLE CO., LTD.. RESERVES THE RIGHT TO
INCORPORATE ENGINEERING AND DESIGN CHANGES TO PRODUCTS IN THIS MANUAL WITHOUT
OBLIGATION TO INCLUDE THESE CHANGES ON UNITS LEASED/SOLD PREVIOUSLY
THE INFORMATION CONTAINED IN THIS MANUAL MAY BE REVISED PERIODICALLY BY THE ETECH
DIVISION, AND THEREFORE IS SUBJECT TO CHANGE WITHOUT NOTICE.
#23,GUINAN INDUSTRY ZONE, WUGUISHAN TOWN, ZHONGSHAN, GUANGDONG, CHINA
all rights reserved !OWNER’S MANUAL 2019-O-M-0011
SALES & TECHNICAL ASSISTANCE & WARRANTY
TO CONTACT US:

FORWARD
Thank you for the purchase of your ETECH H-Series Electric Vehicle. Your
satisfaction with your new vehicle is important to all of us at ETECH.
Please take the time to review this OWNER’S MANUAL and abide by all safety
and operation warnings before allowing anyone to operate your new H-Series
Electric Vehicle. Familiarizing yourself with the OWNER’S MANUAL and
warnings will help avoid possible injury and property loss.
We hope that you will consider this manual an indispensable part of the vehicle.
The information contained in this manual is subject to change without notice.
ETECH reserves the right to update vehicle designs without obligation to make
these changes on units previously sold.
IMPORTANT OPERATING NOTES
Always operate your H-Series Electric Vehicle in compliance with your state and
local vehicle regulations including registration, titling, insurance, seat belt usage,
and operator’s licensing.
Switch vehicle to off position and remove key prior to exiting driver’s seat.
Obey all traffic laws.
Always fasten your seat belts!
To extend the life of your batteries:
●Keep batteries fully charged whenever possible;
●Avoid deep discharging of batteries whenever possible;
●Always wear safety goggles or eye protection, rubber gloves, and a mask
before handling batteries;
all rights reserved !OWNER’S MANUAL 2019-O-M-0012

TABLE OF CONTENTS
The table of contents is empty because you aren’t using the paragraph styles set to appear in it.
all rights reserved !OWNER’S MANUAL 2019-O-M-0013

1. INTRODUCTION AND SAFETY INFORMATION
This manual contains information for the proper operation and care of your vehicle. This vehicle has been
designed and constructed with safety in mind, but improper operation can be hazardous. It is necessary to
thoroughly review and understand the information contained in this manual in order to maximize your safety and
enjoyment in the use of this vehicle.
NOTES CAUTIONS and WARNINGS pertaining to the proper and safe use of the vehicle are included
throughout this manual. These items are categorized as follows.
NOTE∆... Highlights a condition that should be observed.
CAUTION∆…Highlights a condition that may result in damage to the vehicle.
WARNING∆…Highlights a condition that could result in damage to the vehicle as well as serious
injury or death."
all rights reserved !OWNER’S MANUAL 2019-O-M-0014

2. DESCRIPTION AND USE OF CONTROLS, INDICATORS & ACCESSORIES
The H-SERIES vehicle includes the following controls, indicators and accessories:
▪Off/On(POWER) switch
▪Forward/reverse direction switch
▪Charge status indicator
▪Accelerator pedal
▪Steering wheel
▪Service brake pedal
▪Electronic Parking Brake
▪Turn signal and horn lever and headlight switch
▪5V USB car charger (USB for mobile phone or tablet computer)
▪Locking glove box
▪Run/Tow switch
!
2.1 OFF/ON/(POWER) SWITCH
all rights reserved !OWNER’S MANUAL 2019-O-M-0015
2.9
2.1
2.2
2.3
2.10
2.4
2.5
2.8
2.6
2.7
2.11

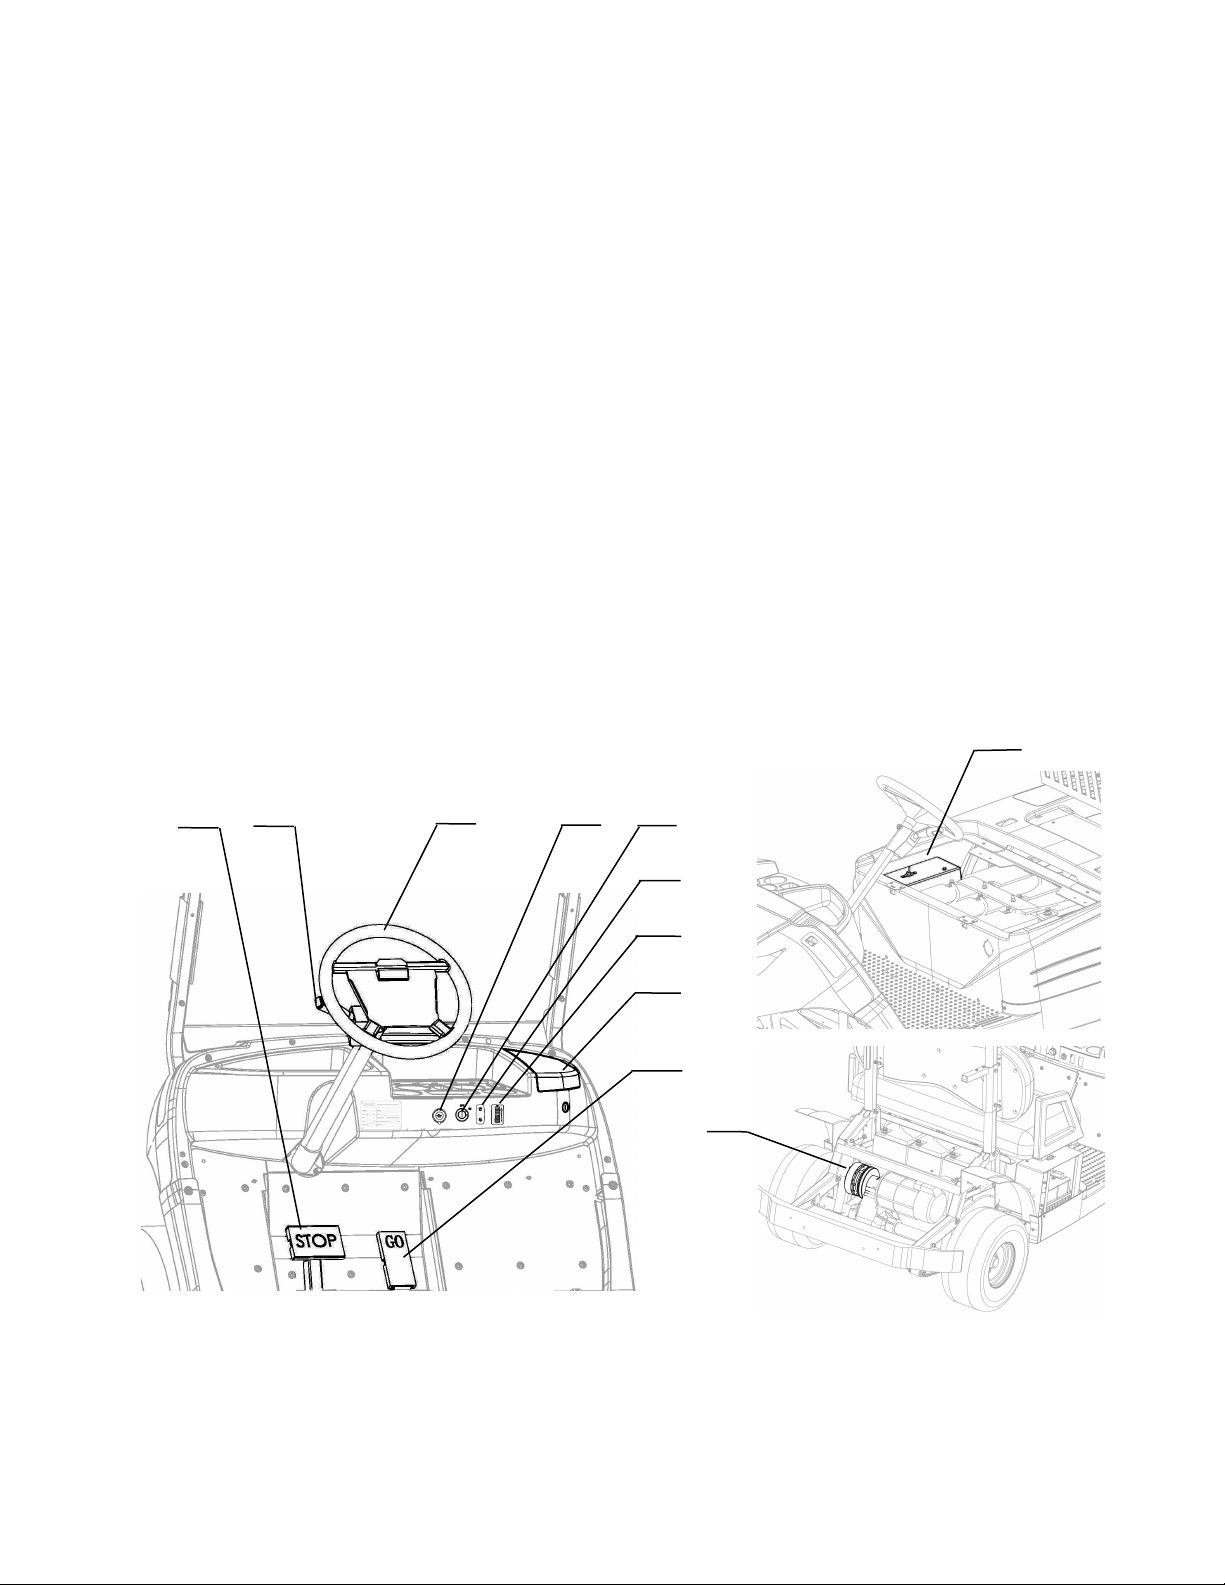
This switch is located on the dashboard. To enable the vehicle drive system, insert the key
into the key slot (OFF position) and turn clockwise to the ON position.
In this position the vehicle electrical system also will be fully enabled. The headlights, tail
lights and electrical accessories will be enabled.
To deactivate the vehicle electrical system, return the key to the OFF position.
WARNING∆…When the vehicle is left unattended, return the key to the OFF position
and remove the key to prevent unauthorized or unintended operation of the vehicle.
2.2 FORWARD/REVERSE DIRECTION SWITCH
This switch is located on the dashboard and allows the user to select the direction of travel,
‘F’ (forward) or ‘R’ (reverse). When the user leaves the vehicle unattended, this switch should be left
in the neutral position (between forward and reverse).
WARNING∆… Do not move the forward/reverse direction switch while the vehicle is moving as
this may result in loss of control or damage to the vehicle. The vehicle should be brought to a complete stop
before operating this switch.
NOTE∆…A warning buzzer will sound when this switch is in the REV position.
2.3 CHARGE STATUS INDICATOR
This indicator is located on the dashboard and displays the amount of charge that remains in the
batteries. The indicator is fully lighted when the batteries are fully charged. The lighted portion of
the indicator will drop as the battery charge is depleted.
2.4 ACCELERATOR PEDAL
This pedal is located on the floor of the vehicle on the driver’s side. When the key switch is in the
‘ON’ position, depressing the accelerator pedal powers the motor causing the vehicle to move
forward or in reverse depending on the position of the ‘F/R’ switch. Gradually depressing this pedal
will cause the vehicle to accelerate. Gradually releasing this pedal will cause the vehicle to
decelerate. Fully releasing this pedal eliminates the flow of power to the motor. When the vehicle is
moving on level terrain, releasing this pedal will cause the vehicle to slow and come to a stop.
WARNING∆…Depressing the accelerator pedal will result in the vehicle moving either
forward or in reverse. To avoid the possibility of severe injury or death, make sure the path ahead and behind the
vehicle are clear before depressing the accelerator pedal.
all rights reserved !OWNER’S MANUAL 2019-O-M-0016

2.5 STEERING WHEEL
The steering wheel controls the direction in which the vehicle is driven. Turning the steering
wheel clockwise will cause the vehicle to move to the right and turning the steering wheel
counterclockwise will cause the vehicle to move to the left.
WARNING∆….Always consider the vehicle speed, driving surface conditions and
grade when changing the direction of a moving vehicle. Never turn too abruptly for the
existing conditions, as this may cause the vehicle to overturn resulting in damage to the
vehicle as well as serious injury or death.
2.6 SERVICE BRAKE PEDAL
This pedal is located on the floor of the vehicle on the driver’s side. Depressing the brake
pedal will cause a moving vehicle to slow down and gradually bring it to a stop.
WARNING ∆… Never apply the brake pedal and accelerator pedal simultaneously,
as this may result in loss of control causing damage to the vehicle, as well as severe injury
or death.
2.7 ELECTRONIC PARKING BRAKE
The Electronic Parking Brake is a part of the rear axle assembly. Whenever the vehicle
comes to a complete stop, the electronic parking brake will be automatically activated.
Depressing the accelerator pedal automatically releases the electronic parking brake,
allowing the vehicle to move. Switching the Run/Tow switch to the Tow position will also
result in the automatic release of the electronic parking brake. (see section 2.11 RUN/TOW
SWITCH).
2.8 TURN SIGNAL AND HORN LEVER AND HEADLIGHT SWITCH
This lever is mounted on the left side of the steering column below the steering wheel. The
On/Off/ switch must be turned to the “On” or “Light” position for the turn signals to function.
To activate a turn signal move the lever up or down. Move the lever up to activate the right
turn signal. Move the lever down to activate the left turn signal. Depress the button at the end
of the lever to activate the horn.
There is a headlight switch located on the Turn Signal and Horn Lever. When the On/Off/
Switch is in the “ON” position, the Headlight Switch may be rotated to turn the headlights on
or off.
2.9 5V USB CAR CHARGER (USB for mobile phone or tablet computer)
This receptacle is located on the dashboard. It provides 5 volts, and may be used to charge any
electrical device that can be charged using a 5V source such as a mobile phone or tablet
computer.
all rights reserved !OWNER’S MANUAL 2019-O-M-0017

2.10 LOCKING GLOVE BOX
The vehicle is equipped with a locking glove box at the right edge of the dashboard. There
is a key switch that is used to unlock the glove box.
2.11 RUN/TOW SWITCH
The Run/Tow switch is located on controller cover. When the Run/Tow switch is in the Run
position, the controller and all operating features of the vehicle are enabled.
When the Run/Tow switch is in the Tow position, the controller and electronic parking
brake system are deactivated allowing the vehicle to roll freely.
NOTE∆... The Run/Tow switch must be moved to the Run position before operating
the vehicle. Make sure the Run/Tow switch is in the Tow position before towing the vehicle.
CAUTION∆…When the Run/Tow switch is moved from the Tow position to the Run position, there is a
delay of approximately 30 seconds before the vehicle’s electrical system is fully enabled.
WARNING ∆… The Run/Tow switch should be in the Tow position to disable the vehicle drive system and
avoid unintended movement of the vehicle during the performance of general vehicle maintenance activities.
all rights reserved !OWNER’S MANUAL 2019-O-M-0018

3. VEHICLE OPERATION
3.1 STARTING THE VEHICLE
▪Select the direction of motion using the Forward/Reverse Direction Switch.
NOTE….When the reverse direction is selected a beeper will sound until the Forward/Reverse
Direction Switch is moved to neutral or forward.
▪Turn the power switch to the ON position to enable the vehicle electrical system. The vehicle is now
ready to be driven.
WARNING∆….Do not depress the accelerator pedal before turning the power switch to the “ON”
position. Turning the power switch on while the accelerator is depressed may result in sudden
movement of the vehicle, loss of control and serious injury or death.
3.2 DRIVING THE VEHICLE
▪Check to make sure the path in the selected direction of travel is clear. Then slowly depress the
accelerator pedal. The vehicle will then move in the selected direction.
CAUTION∆….Do not change the position of the Forward/Reverse Direction Switch while the
vehicle is moving.
3.3 STOPPING THE VEHICLE
▪To bring a moving vehicle to a stop, depress the brake pedal. If the vehicle will be left unattended, turn
the power key to the OFF position and remove it from the ON/OFF switch.
all rights reserved !OWNER’S MANUAL 2019-O-M-0019

4. CHARGER INSTALLATION AND USE
!
This vehicle is equipped with a built-in charger. This charger is mounted under the driver’s seat beside the
batteries. A circuit must be dedicated to the charger. Information regarding appropriate circuit protection may be
found in the charger manual.
The charger output wires (DC cord) are connected to the batteries .Before beginning to charge the batteries, turn
the power key to the OFF position. To charge the batteries, just plug the charger (AC plug) into a dedicated and
grounded AC receptacle.
NOTE∆... This section of the vehicle manual contains important information about the use and care of the
charger that has been included with the vehicle. Additional detailed information is included in the manual that is
included with the charger. It is important to read and understand the information in the charger manual.
NOTE∆... Batteries must be properly charged to achieve maximum performance. Battery life will be
significantly reduced due to undercharging or overcharging the batteries. For a detailed description of the battery
charging cycle and procedure, refer to the instructions in the charger manual.
CAUTION∆... The charger will automatically start shortly after plug insertion and it will automatically stop
when the batteries are fully charged. When charging is complete, unplug the charger plug from the AC
receptacle. Then the vehicle may be used.
WARNING∆... DO NOT direct heavy water spray on the charger when cleaning the vehicle. Make sure
the AC plug is dry before charging the vehicle in order to avoid an electrical shock.
all rights reserved !OWNER’S MANUAL 2019-O-M-00110

5. VEHICLE CARE AND MAINTENANCE
WARNING∆….To avoid damage to the vehicle or severe injury or death DO NOT attempt any type of
maintenance or servicing operations before reading and understanding all NOTES, CAUTIONS AND
WARNINGS included in this manual. Servicing operations such as adjustments to the vehicle power train or the
removal or installation of batteries should be performed by an authorized ETECH dealer or trained technician.
5.1 BATTERY CARE AND MAINTENANCE
WARNING∆….In order to prevent a battery explosion that could result in severe physical injury or
death, DO NOT work on the batteries using metal (conductive) objects that could create a connection
between battery terminals without first insulating the metal object in a manner that will eliminate the
possibility of shorting between two battery terminals. Vinyl tape may be used to insulate metal surfaces
for this purpose. Never smoke or have an open flame or the potential for an electrical arc present in the
vicinity of the batteries.
▪Inspecting the batteries
oInspect the outside appearance of the batteries. The top surface of the batteries should be
clean, dry and free of dirt or corrosion.
oCheck all battery cables and connections. Any damaged cables should be replaced. Any loose
connections should be tightened.
▪Cleaning the batteries
oUsing a solution of baking soda and water, clean the tops of the batteries with a cloth or brush.
oRinse the batteries with water and dry with a cloth.
▪Charging Batteries
Charger Description: Full automatic high frequency high pulse charger, 110V/
220V AC input, 50Hz 48V DC output,
22A and CE certified
Batteries must be properly charged to achieve maximum battery performance. See the ‘Charger
Installation and Use’ section of this manual for instructions on charging the batteries.
oTo achieve optimum performance, batteries should be charged after each use, and charge
status should not be allowed to drop below 20% before recharging.
oWhen not used for a prolonged period of time, batteries should be charged every 30 days.
▪Installing new Batteries
Installation of new batteries should be performed by an authorized ETECH dealer or a licensed
electrician.
see the following figure for line connection
all rights reserved !OWNER’S MANUAL 2019-O-M-00111

1. Battery
2. Wire(long)
3. Wire(short)
4. Fixed screw
5. plastic insulation plate
6. spring washer
7. nut
!!
5.2 MOTOR CARE AND MAINTENANCE
CAUTION∆…Only an authorized ETECH dealer or qualified technician should be allowed to perform
maintenance on the motor.
•Periodic removal of any materials that cling to the motor housing such as mud or grass is necessary to
facilitate the radiation of the heat that is created by use of the motor. At the same time, low pressure air
should be used to remove dust that may accumulate on the motor brushes and commutator.
5.3 CONTROLLER CARE AND MAINTENANCE
all rights reserved !OWNER’S MANUAL 2019-O-M-00112

CAUTION∆…Only an authorized ETECH dealer or qualified technician should be allowed to perform
maintenance of the controller. Any attempt by a non-qualified individual to open or repair the controller may
result in damage to the controller and void the warranty.
•The controller is located in the battery compartment on the passenger’s side (see the following figure).
!
•Keep the controller clean and dry for optimum performance.
It is recommended that the controller be kept clean and dry and that its fault history file be checked and
cleared periodically.
Periodically cleaning the controller exterior will help protect it against corrosion and possible electrical
control problems created by the dirt, grime, and chemicals that are part of the operating environment.
•The controller fault history file should be accessed periodically using a handheld programmer. Any faults
that have occurred since the previous download should be diagnosed and appropriate corrective
measures should be taken to address the causes of these faults.
5.4 DC/DC CONVERTER CARE AND MAINTENANCE
CAUTION∆…Only an authorized ETECH dealer or qualified technician should be allowed
to perform maintenance of the DC/DC converter. Any attempt by a non-qualified individual to
open or repair the converter may result in damage to the controller and void the warranty.
•The DC/DC converter is located in the battery compartment on the driver’s side (see left figure
).
•Keep the DC/DC converter clean and dry for optimum performance.
all rights reserved !OWNER’S MANUAL 2019-O-M-00113

It is recommended that the DC/DC converter be kept clean and dry and that its fault history file be
checked and cleared periodically.
Periodically cleaning the DC/DC converter exterior will help protect it against corrosion and possible
electrical control problems created by the dirt, grime, and chemicals that are part of the operating
environment.
5.5 VEHCILE CLEANING
CAUTION∆….If pressure washing vehicle read and understand all instructions supplied by the
manufacturer of the pressure washer, and do not use pressure in excess of 600 psi when washing exterior of
vehicle. Use of excessive pressure may cause damage to the operator, bystanders or to parts of the vehicle
including body finish, seat coverings, seals and the electrical system.
•Use water and a clean soft cloth to clean the vehicle windshield.
•Use a mild soap solution to clean vinyl and plastic components, including the body of the vehicle. Apply
solution with a soft brush or cloth and dry with a clean soft cloth. A commercially available vinyl/plastic
cleaner may be used to remove stains such as oils or tar from vinyl/plastic surfaces.
•Occasional washing and then waxing of the vehicle with non-abrasive waxing products designed for use
with automotive clear coat finishes is recommended to preserve the appearance of painted surfaces.
5.6 PERIODIC VEHICLE MAINTENANCE
This vehicle will give years of satisfactory service, providing it is properly maintained. Refer to the Periodic
Service Schedule for appropriate service intervals. Servicing of the steering assembly, pedal assemblies, tie rods
and linkages, rear axle, suspension and wheel bearings should be performed by an authorized ETECH dealer or
qualified technician. Any service activity that requires lifting of the vehicle should be performed by an authorized
ETECH dealer or qualified technician.
CAUTION∆….The Periodic Service Schedule has been developed for average vehicle use. If a vehicle Is
used under severe driving, environmental or loading conditions, more frequent servicing is recommended.
all rights reserved !OWNER’S MANUAL 2019-O-M-00114

PERIODIC SERVICE SCHEDULE
√---CHECK C&A---CHECK&ADJUST CL---CLEAN R---REPLACE
SERVICE ITEM/INTERVAL
Bef
ore
eac
h
use
DAI
LY
5ro
und
s/5
h r s
25
mile
s/40
kms
WE
EKL
Y
20r
nds/
20
h r s
100
mile
s/
160
kms
MO
NT
HLY
60r
nds/
60
h r s
300
mile
s/
500
kms
QU
ART
ERL
Y
125
rnds
/125
h r s
600
mile
s/
100
0
kms
SE
MI-
AN
NU
AL
250
rnd
s/
250
h r s
120
0mil
es/
200
0
kms
AN
NU
AL
Tires-pressure, condition of tires & rims
√
Hardware-loose or missing – tighten as necessary
√
Reverse Warning Indicator-sounds when F/R switch set
to reverse.
√
Overall Vehicle Condition
√
Batteries-state of charge, condition, loose terminals,
corrosion, hold down & hardware
√
CL
Brakes-smooth operation of pedal, and function of
service brake
√
C&A
Brakes-aggressive stop test, brake holds on a hill
√
Accelerator-smooth operation
√
Wiring-loose connections, broken or missing insulation
√
Charger- clean and check fault history
√
Charger Connector and Receptacle
√
Steering Assembly-excessive play, loose, missing
hardware or grease leakage
√
Tie Rods and Linkages-excessive play, bent rods, loose
or missing hardware
√
Rear Axle-oil leakage, noise, loose or missing hardware
√
Rear Axle-drain & replace fluid
C&A
R
Front Axel &Suspension-damage strut oil leakage,
excessive play in hubs or kingpins, worn bushings,
loose or missing hardware
√
Front Wheel Alignment-unusual tire wear
C&A
Rear Suspension-shock oil leakage, worn bushings,
loose or missing hardware
√
Wheel Bearings-check and adjust as necessary
√
all rights reserved !OWNER’S MANUAL 2019-O-M-00115

6. TRANSPORTING THE VEHICLE
WARNING∆….To reduce the possibility of damage to the vehicle or severe injury or death never ride on a
vehicle that is being hauled and take the following steps before hauling the vehicle:
•Remove the windshield from the vehicle.
•Remove the vehicle canopy and secure seat bottom if hauling speed will exceed 45 miles per hour.
•Secure the vehicle and any contents. The vehicle should be secured using ratchet tie downs.
•The rated capacity of the truck or trailer used to haul the vehicle should exceed the total load weight
including the vehicle by no less than 1200pounds (545Kg)"
all rights reserved !OWNER’S MANUAL 2019-O-M-00116

7. TECHNICAL DATA
HA2
HA2+2
Dimensions(M)
96*47*73 in(2440*1200*1850mm)
108*47*75 in(2740*1200*1900)
Weight with Batteries(kg)
1212 lbs. (550 kg)
1367 lbs. (620 kg)
Load Capacity(kg)
800 lbs. (360 kg)
800 lbs. (360 kg)
Passengers
2
4
Motor Power
Letrika 48V 3.3 KW AC
Letrika 48V 5.0 KW AC
Controller power(R/min)
Curtis 300A AC
Curtis 300A AC
Battery System
ETECH Maintenance Free Battery
6*8V
ETECH Maintenance Free Battery
6*8V
Automatic Battery Charger
ETECH High frequency, With
temperature protection
ETECH High frequency, With
temperature protection
Charge input voltage
100-240V~50/60Hz 12-6A
Top Speed(km/h)
22.35 mph (36 km/h)
22.35 mph (36 km/h)
Max travel range(km)
62 miles (100 km)
62 miles (100 km)
Ground Clearance
4.3 in (110 mm)
4.3 in (110 mm)
Turning Radius
10 ft. (3.2 m)
10 ft. (3.2 m)
Wheel Base
65 in (1675 mm)
65 in (1675 mm)
Body Material
Plastic PP
Plastic PP
Front Suspension
Double-wishbone independent
suspension, coil over shocks
Double-wishbone independent
suspension, coil over shocks
Rear Suspension
Leaf spring and hydraulic shocks
Steering System
Double-ended rack and pinion
Brake System
Rear wheel mechanical drum brakes
with electric-mechanical parking brake
Rear wheel mechanical drum brakes
with electric-mechanical parking brake
Tire Size
Carlisle 205/50-10
Carlisle 205/50-10
Tire Pressure
30 psi
30 psi
Wheel Type
10 in aluminum alloy wheel
Roof
Plastic PP
Plastic PP
Drive Train
Direct rear drive with 10:1 ratio
Voltage Reducer
20A, 48V to 12V included
Windshield
Foldable
Foldable
Headlights and Taillights
LED
LED
Brake Lights
LED
LED
Turning Lights
LED
LED
Horn and Reverse Beeper
Included
Included
Seat Belts
3-point seat belts
3-point seat belts
Battery Indicator
Curtis 906D48
Curtis 906D48
all rights reserved !OWNER’S MANUAL 2019-O-M-00117

Feature and specification of vehicles subject to change without notice.
Vehicles as photographed may include options not included on base model.
8. LIMITED WARRANTY!
Forward/Reverse Switch
OTTO switch
OTTO switch
ETECH 2019 HA2 CAR WARRANTY
Vehicle Type
HA2
Length of Warranty Coverage
24 MONTHS
Frame
24 MONTHS
Suspension
24 MONTHS
Battery(s)
SUPPLIER
Pedals
24 MONTHS
Cables
24 MONTHS
Controller
24 MONTHS
Seats Structural-Backs, Bottoms, Hip Restraint
24 MONTHS
Seat vinyl
6 MONTHS
Canopy
24 MONTHS
Body Parts
24 MONTHS
Mats
24 MONTHS
Bumper
24 MONTHS
DC/DC Converter
24 MONTHS
Power wise QE Charger
24 MONTHS
Transaxle
24 MONTHS
Brakes
24 MONTHS
Steering Box, Column
24 MONTHS
Bag Carrier
24 MONTHS
Trim
24 MONTHS
Score Card Holder
24 MONTHS
Motor
24 MONTHS
all rights reserved !OWNER’S MANUAL 2019-O-M-00118

9. LABELS & PICTOGRAMS
!
NOTES:
1: REFERENCE “EXCLUSIONS” SECTION OF THE WARRANTY FOR DETAILS.
2: EXCLUDES NORMAL WEAR AND TEAR.
all rights reserved !OWNER’S MANUAL 2019-O-M-00119

!
!
!
all rights reserved !OWNER’S MANUAL 2019-O-M-00120
Table of contents