Zhongyi CA103 User manual

CA103&CA102S
Handy Multi-Functions Calibrator [User’s Manual]
http://www.zhoyi.com
Shaoxing Zhongyi Electronics Co.,Ltd.

CA103&CA102S Handy Multi-functions Calibrator Operating Instruction
1
Introduction
Notes
•The information contained in this manual is subject to change without
notice. Furthermore, the actual display items may differ slightly from the
ones appearing in this manual.
•Every effort has been made to ensure the information contained
herein is accurate. However, should any concerns, errors, or emissions
come to your attention, or if you have any comments, please contact us.
•Copying or reproduction of any or all of the content of this manual
without permission is strictly prohibited.
•The warranty is included in this manual. Be sure to read the warranty
to ensure you understand the terms, and then store it in a safe place. (The
warranty cannot be reissued.)
Revision Information
1st Edition: June 2014
Thank you for purchasing the Shaoxing Zhongyi Electronics
Co.,Ltd. developing CA103&CA102S Handy Multi-Functions Calibrator
.This User’s manual contains useful information regarding the
instrument's functions and operating procedures, as well as that
observed during use. To should be precautions ensure proper use of the
instrument, read the manual thoroughly before operating it. After you
have finished reading this manual, store it in the carrying case for
whenever a question arises. quick reference.
http://www.zhoyi.com

CA103&CA102S Handy Multi-functions Calibrator Operating Instruction
2
Checking the Contents of the Package
After opening the package, check the following items before use. If
the product is not the one you ordered, any item is missing, or there is a
visible defect, contact the dealer from whom you purchased the instrument.
Main Unit:
Check that the model name given on the name plate on the back
panel of the instrument matches the one on your order.
•Model
Model CA103、CA102S
•Serial No.
Should you need to contact the dealer from whom you purchased the
instrument, have your unit's serial number handy to give to the person.
Accessories:
Measurement lead cables
(CA-B01)
Alligator clip
(CA-B02)
AC Adapter
(CA-P01)
Ni-MH charge battery (CA-C02)
Carrying case (CA-B03)
Battery charger (CA-W01,Sold separately)
http://www.zhoyi.com

CA103&CA102S Handy Multi-functions Calibrator Operating Instruction
3
Safety Precautions
When operating the instrument, strictly observe the precautions in thi
s manual to ensure correct and safe operation. If you use other than as inst
ructed in this manual, our company is not liable for any damage that may re
sult.
Safety Symbols
Warning
Indicates a hazard that may result in the loss of life or serious injury of the
user unless the described instruction is abided by.
Caution
Indicates a hazard that may result in an injury to the user and/or physical
damage to the product or other equipment unless the described instruction
is abided by.
☞ Note
Indicates information that is essential for handling the instrument or should
be noted in order to familiarize yourself with the instrument's operating
procedures and/or functions.
Tip
Indicates additional information to complement the present topic.
http://www.zhoyi.com

CA103&CA102S Handy Multi-functions Calibrator Operating Instruction
4
Be sure to comply with the following safety precautions. Failure to do
so may result in loss of life or injury to personnel from such hazards as ele
ctrical shock, or damage to the instrument.
Warning
●Prohibition of Use in Gaseous Environments
Do not operate the instrument in the presence of inflammable and
explosive gases or vapors. Operating the instrument in such an
environment is extremely hazardous.
●External Connections
When connecting the instrument to the object to be tested or an external
control circuit, or if you need to touch any external circuit, turn off the power
to the circuit and make sure that no voltage is generated.
●Correct Use of Lead Cables
Be sure to correctly use the measurement lead cables and source lead
cables without mistaking them.
●Remove the Casing
Removing the casing and disassembling or modifying the instrument is
strictly prohibited. Some parts inside the instrument are extremely
dangerous because hey use a high voltage. When the instrument needs an
internal inspection or calibration, contact our company or the dealer from
whom you purchased the instrument.
To use the AC adapter safely, be sure to comply with the following
precautions.
Warning
● Power Supply
Make sure that the rated power supply voltage of the instrument matches
the voltage of the power supply before turning on the power.
http://www.zhoyi.com

CA103&CA102S Handy Multi-functions Calibrator Operating Instruction
5
Contents
INTRODUCTION.........................................................................................1
CHECKING THE CONTENTS OF THE PACKAGE.....................................2
SAFETY PRECAUTIONS............................................................................3
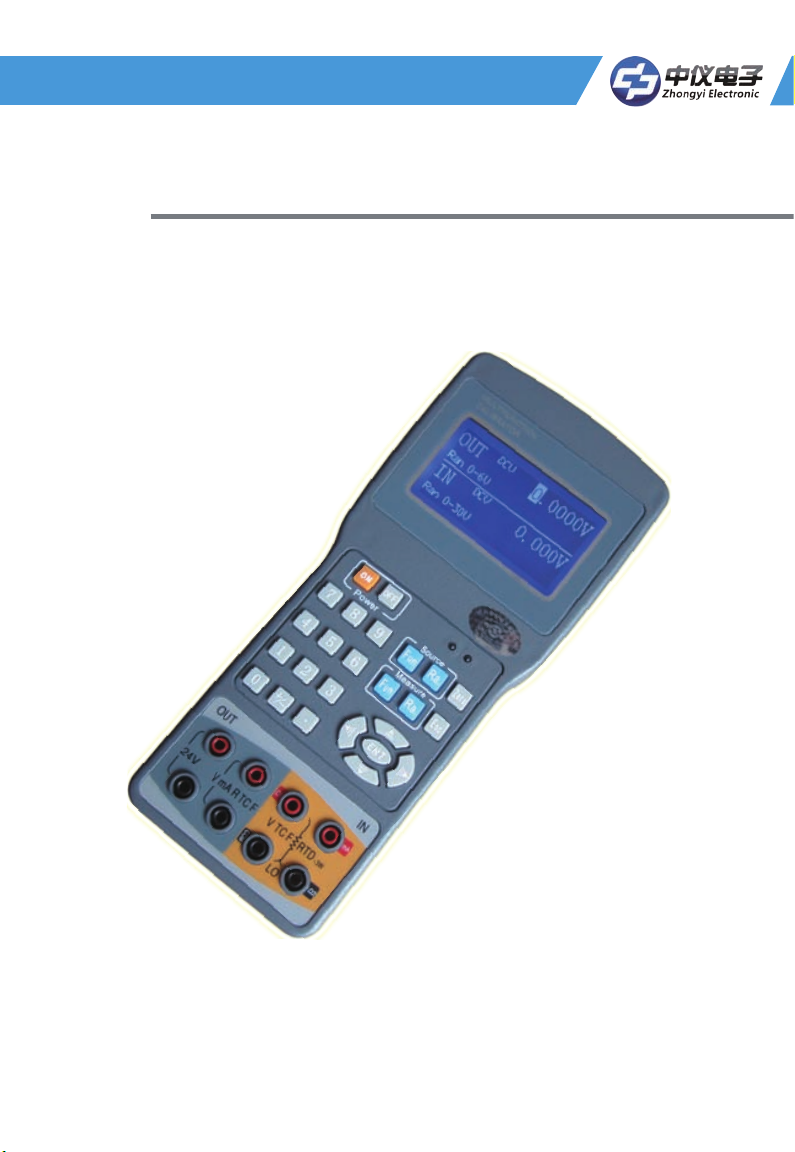
1. PRODUCT OUTLINE..............................................................................7
2. NAMES AND FUNCTIONS OF PARTS...................................................8
3. BEFORE STARTING SOURCE OR MEASUREMENT .........................10
3.1 USAGE PRECAUTIONS.........................................................................10
3.2 CONNECTING A POWER SUPPLY ...........................................................12
3.2.1Using an AC Adapter.........................................................12
3.2.2 Using an NiMH Battery Pack............................................12
3.3TURNING THE POWER ON AND OFF ......................................................14
3.3.1 Turning the Power On and Off .........................................14
3.3.2 Screen saver....................................................................14
3.3.3 Auto Power Off.................................................................14
3.4 OPERATING ENVIRONMENT..................................................................14
4. SOURCE...............................................................................................15
4.1 CONNECTING THE SOURCE TERMINALS.................................................15
4.2 SOURCE KEYS OPERATION..................................................................15
4.3 SOURCE DC VOLTAGE (DCV) SIGNALS ................................................16
4.4 SOURCE DC CURRENT (DCMV) SIGNALS.............................................16
4.4.1 Source DC Current Signals............................................16
4.4.2 20 mA SINK Function.....................................................17
4.5 SOURCE DC VOLTAGE (DCMV) SIGNALS..............................................18
4.6 SOURCE RESISTANCE (RESI) SIGNALS ................................................19
4.7 SOURCE THERMOCOUPLE (TC) SIGNALS ..............................................19
4.8 SOURCE FREQUENCY SIGNALS............................................................20
http://www.zhoyi.com

CA103&CA102S Handy Multi-functions Calibrator Operating Instruction
6
5. MEASUREMENT ..................................................................................20
5.1 MEASURING DC VOLTAGE (DCV) ........................................................21
5.2 MEASURING DC CURRENT (DCMA).....................................................21
5.2.1 Measuring DC Current.....................................................21
5.2.2 Measuring 24V LOOP......................................................22
5.3 MEASURING DC VOLTAGE (DCV) ........................................................22
5.4 MEASURING RESISTANCE TEMPERATURE DETECTOR(RTD)....................23
5.5 MEASURING THERMOCOUPLE (TC) ......................................................24
5.6 MEASURING FREQUENCY (FREQ) .......................................................25
6. PARAMETERS SETTING .....................................................................25
6.1 GENERAL PARAMETERS SETTING ..........................................................26
6.2 SECOND LEVEL (CALIBRATION)PARAMETER SETTING..............................27
7. NTERNATIONAL TEMPERATURE SCALE ITS-90...............................29
8. CHARGING...........................................................................................30
9. SPECIFICATIONS.................................................................................31
9.1 CA103 SOURCE UNIT RANGE AND ACCURACY ........................................31
9.2 CA103 MEASUREMENT UNIT RANGE AND ACCURACY...............................32
9.3 CA102S SOURCE UNIT RANGE AND ACCURACY ......................................33
9.4CA102S MEASUREMENT UNIT RANGE AND ACCURACY ............................34
http://www.zhoyi.com

CA103&CA102S Handy Multi-functions Calibrator Operating Instruction
7
1. Product Outline
Generation (SOURCE)
Function
Range
DC Voltage (DCV)
100mV, 6V
DC Current (DCA)
24mA, 24mA SINK
Resistance (Ω)
500Ω
Thermocouple (TC)
S,K,E,T,J,B,
R,N,WRe3-25
Frequency (FREQ)
1000Hz, 5kHz
Measurement (MEASURE)
Function
Range
DC Voltage (DCV)
30V, 100mV
DC Current (DCA)
30mA
Resistance temperature detector(RTD)
Cu50, Pt100
Thermocouple (TC)
S,K,E,T,J,B,
R,N,WRe3-25
Frequency (FREQ)
5kHz
http://www.zhoyi.com

CA103&CA102S Handy Multi-functions Calibrator Operating Instruction
8
2. Names and Functions of Parts
Output Range
Output Function
Output Value
Additional Information
Power Key
Numeric Key
Pen Outlet
Power Indicator
Charge Indicator
Function key
Direction key
Measurements
Measurement Range
Measurement Function
http://www.zhoyi.com

CA103&CA102S Handy Multi-functions Calibrator Operating Instruction
9
Function keys
Source Keys :Changes the source function. The measurement
sequence is DCV->DCmA->DCmV->R->TC->F->
(DCV).
:Changes the range for each function.
(DCmA–Range, it will switch to the follow the
sequence: 0-24mA->Sink1-24mA.
(RTD–Range, it will switch to the follow the sequence:
Cu50—>Pt100.
TC–Range, it will switch to the follow the sequence:
S->K->E->T->J->B->R->N->W325).
Measure Keys :Changes the measure function. The measurement sequence
is DCV->DCmA->DCmV->RTD->TC->F->(DCV).
:Changes the range for each function.
Common Keys
:Output value reset to default values.
:Enter to query mode for parameter setting and
escape to main screen.
:Confirmation button.
Direction keys
:Set the main screen and check the screen when the
cursor position value..Amend digit in parameter
setting.
:Locate cursor bits for the digit amending
Numeric Keys
:Key in the input/output setting, query reading directly.
http://www.zhoyi.com

CA103&CA102S Handy Multi-functions Calibrator Operating Instruction
10
3. Before Starting Source or Measurement
3.1 Usage Precautions
Safety Precautions
●Before using the instrument, be sure to thoroughly read "Safety
Precautions".
●In the case of an abnormality
If the instrument begins to emit smoke, give off an unusual odor, or
show any other signs of an abnormality, immediately turn off the power
switch. If you are using an AC adapter, unplug the power cord from the
outlet. Also turn off any object under test that is connected to the input
terminals.
●AC adapter and power coed
Use the designated AC adapter. Do not place anything on the AC
adapter or power cord, and prevent heat sources from coming into contact
with them. When unplugging the power cord from the outlet .be sure to hold
the plug and never pull the actual cord. If the power cord is damaged,
contact your dealer.
General Handling Precautions
●When carrying the instrument
Turn off the power to the object under test. Turn off the power to the
instrument and unplug the power cord from the outlet if you are using an
AC adapter. Then, disconnect all lead cables from the instrument. When
carrying the instrument, use the carrying case.
●Keep input terminals away from electrically charged articles as they
may damage the internal circuitry.
●Do not allow volatile chemicals to come into contact with the casing or
operation panel. Also, do not allow the instrument to come into contact with
any rubber or vinyl products for prolonged periods. Since the operation
http://www.zhoyi.com

CA103&CA102S Handy Multi-functions Calibrator Operating Instruction
11
panel is made of thermoplastic resin, be careful not to let it come into
contact with any heat sources such as a soldering iron.
●If the AC adapter will not be used for a prolonged period, unplug the
power cord from the outlet.
●Do not use the instrument with the cover for the battery holder left open.
Operating Environment
Use the instrument in locations that meet the following conditions:
• Ambient temperature and humidity
Ambient temperature: 0 to 40℃
Ambient humidity: 20 to 80% RH (no condensation)
Do not use the instrument in the following locations:
• In direct sunlight or near heat sources
• Where the instrument is exposed to water or other liquids
• Where there is a lot of mechanical vibration
• Near noise sources such as high-voltage equipment or power lines
• Near strong magnetic field sources
• Where an excessive amount of greasy fumes, steam, dust, or corrosive
gases are present
• In an unstable place
• Where, for example, fire and explosions caused by inflammable gases
and the like are possible
☞Note
• When you require high source and measurement accuracy, use the
instrument under the following conditions:
Ambient temperature: 23 ±5℃
Ambient humidity: 20 to 80% RH (no condensation)
When using the instrument in an ambient temperature range of 0 to
18℃or 28 to 40℃, add the temperature coefficient specified in "9.
Specifications" to the accuracy.
http://www.zhoyi.com

CA103&CA102S Handy Multi-functions Calibrator Operating Instruction
12
• When using the instrument in ambient humidity of 30% or less, use an
antistatic mat to prevent static electricity.
• Condensation may occur if the instrument is moved from a location of low
temperature and humidity to a location of high temperature and humidity, or
if the temperature otherwise changes suddenly. In such a case, leave the
instrument for at least one hour to ensure it is free from condensation
before starting operation
3.2 Connecting a Power Supply
Calibrator can use two other types of power supply.
• AC adapter
• NiMH (nickel hydrogen) battery(6 battery)
3.2.1Using an AC Adapter
Ratings
AC adapter power supply ratings
(Model:CA-P01)
Rated supply voltage
100~240V AC
Rated supply frequency
50/60Hz
Maximum input current
0.5A
Output voltage rating ofAC adapter
12V DC
Maximum output current rating ofAC adapter
1.0A
3.2.2 Using an NiMH Battery Pack
Charging type NiMH (nickel hydrogen) battery (optional): Model: CA-C02
Specifications Voltage: 1.2V×6 V
Capacity 1600 mAh
Number of times can be charged (life cycle): Approx. 300
times (varies depending on the operating environment)
Be sure to observe the following warnings on handling
the NiMH battery.
http://www.zhoyi.com

CA103&CA102S Handy Multi-functions Calibrator Operating Instruction
13
Warning
•The electrolyte solution contained in the NiMH battery pack is alkaline. If
it comes into contact with any clothing or skin due to a leakage from or
rupture in the battery pack, the clothing or skin may be damaged. In
particular, if the solution gets into an eye, it may cause loss of eyesight. In
such a case, do not rub the affected eye, but thoroughly wash it
immediately with clean water. Then see a doctor quickly for treatment.
•Do not leave the NiMH battery pack in strong direct sunlight, inside a
vehicle under the hot sun, or near a fire, otherwise it may result in a
solution leakage or deterioration in the performance and/or life.
•Do not disassemble or modify the NiMH battery pack, otherwise the
protective features of the battery pack may be damaged, resulting in
heating up or rupture.
•Do not short the NiMH battery as this may cause burns due to the battery
pack heating up.
•Do not dispose of the battery pack in a fire or apply heat to it, otherwise
there is a risk that it will rupture or its electrolyte solution will scatter.
•Do not apply excessive shock to the battery pack, for example, by
throwing it. Doing so may cause solution leakage, battery pack heating, or
rupture.
•Do not use a defective battery pack, such as one leaking solution,
deformed, discolored, or showing any other abnormality.
•Avoid any metal coming into contact with the battery pack when carrying
it, as there is a danger of a short.
•Do not immerse the battery pack in water or make it wet. Otherwise, it
may heat up or rust, as well as lead to a loss of functions.
If the battery pack will not be used for a prolonged period, remove it from
the instrument and store it in the following environment.
Storage period of 1 year or less: Temperature of -20 to 35℃(in locations
with low humidity)
Storage period of 3 months or less: Temperature of -20 to 45℃(in locations
http://www.zhoyi.com

CA103&CA102S Handy Multi-functions Calibrator Operating Instruction
14
with low humidity)
3.3 Turning the Power On and Off
3.3.1 Turning the Power On and Off
When the power is off, press the POWER key to turn the power on.
Press the POWER key again to turn the power off. Pressing the POWER
key after the power is turned off does not turn the power on for
approximately two seconds
3.3.2 Screen saver
After setting the screen saver, if within the set time if no operation, the
LCD into the screen saver, press any key to exit the screen saver status
LCD. "Screen Saver" parameter value is set to 0 to disable this function.
3.3.3 Auto Power Off
After setting the auto power off, if within the set time if no operation,
the instrument will auto power off. " Auto Power Off " parameter value is set
to 0 to disable this function.
☞Note
Set the screen saver and auto power off specified in "6 Parameter Settings.
3.4 Operating Environment
Ambient temperature and humidity
Use the calibrator in the following environment:
•Ambient temperature: 0 to 40℃
•Ambient humidity: 20 to 80 % RH (no condensation)
http://www.zhoyi.com

CA103&CA102S Handy Multi-functions Calibrator Operating Instruction
15
4. Source
The instrument can source DC voltage, DC current,current sink,
resistance, thermocouple, resistance temperature detector, and frequency.
☞Note
CA102S does not support the current sink function
4.1 Connecting the Source Terminals
Connect the supplied source lead cables (model: CA-B01) to the
output terminals of the instrument. Connect the clips 【Alligator clip(CA-
B02) 】to the input terminals of the target device.
Be sure to confirm the polarity to ensure the clips are correctly
connected to the input terminals.
Figure 4.1
4.2 Source Keys Operation
Source output value can be modified in the following two ways:
Target device terminals
http://www.zhoyi.com

CA103&CA102S Handy Multi-functions Calibrator Operating Instruction
16
①By cursor left and right arrow keys to select the location,
modify the value by this bit up and down keys;
②Enter the value directly by numeric keys, you have entered a
cursor automatically after a decimal point to the right place automatically
skip to the end automatically jump start bit (All of the following numeric
input can be modified by these two methods to achieve ).
4.3 Source DC Voltage (DCV) Signals
1 Connect the terminals Figure 4.1.
2 Use the FUNCTION key on the SOURCE ,when the output interface
is marked as DCV, this time to display DC voltage signal output range (Ran
0-6V), in the additional information column corresponds to the percentage
of the current output value 1 ~ 5V display, When data is beyond the
range, % will not display. When the output error exceeds "output error"
parameter settings, display "error"
3 Use the Direction keys or numeric keys to set the output value. Press
the Zero key, return to the initial value is set to "0."
4.4 Source DC Current (DCmV) Signals
4.4.1 Source DC Current Signals
1 Connect the terminals Figure 4.1.
2 Use the FUNCTION key on the SOURCE ,when the output interface
is marked as DCmV, this time to display DC current signal output range
(Ran 0-24mA), in the additional information column corresponds to the
percentage of the current output value 4-24mA display, When data is
beyond the range, % will not display. when the output error exceeds
"output error" parameter settings Or output terminal becomes open, display
"error"
3. Use the Direction keys or numeric keys to set the output value. Press
the Zero key, return to the initial value is set to "0."
http://www.zhoyi.com

CA103&CA102S Handy Multi-functions Calibrator Operating Instruction
17
4.4.2 20 mA SINK Function
The SINK function allows you to use DC current (DCmA) with the
polarity set to (minus). This allows drawing (SINK) the specified value of
the current from an external voltage source (distributor, etc.) in the direction
of the H terminal. Thus, you can use the instrument in a loop test, for
example, as a simulator for two wire transmitters.
☞Note
When using 20mA Sink function, prohibited the use of measurement
functions, otherwise it will cause damage to the calibrator.
Method 1:
Figure 4.1 DC power wiring Sink function method
Method 2:
Figure 4.3a Wiring external DC power supply Sink function method (1)
http://www.zhoyi.com

CA103&CA102S Handy Multi-functions Calibrator Operating Instruction
18
Figure 4.3b Wiring external DC power supply Sink function method (2)
☞Note
CA103 offers two kinds Sink function wiring, second way the power supply
for the external DC power supply should not exceed 30VDC.
1 Connect the terminals Figure 4.2 or Figure 4.3a or Figure 4.3b.
2 Use the FUNCTION key on the SOURCE. When the output interface
is marked as DCmV(DC current choice).
3 Use the Ra. Keys to select the type and range SINK current (SINK 1-
24mA).
In the additional information column corresponds to the percentage of
the current output value 4-24mA display. When data is beyond the
range, % will not display. When the output error exceeds "output error"
parameter settings, display "error".
4. Use the Direction keys or numeric keys to set the output value.
Press the Zero key, return to the initial value is set to "1."
4.5 Source DC Voltage (DCmV) Signals
1 Connect the terminals Figure 4.1.
http://www.zhoyi.com

CA103&CA102S Handy Multi-functions Calibrator Operating Instruction
19
2 Use the FUNCTION key on the SOURCE ,when the output interface
is marked as DCmV, this time to display DC voltage signal output range
(Ran 0-100mV), in the additional information column when the output error
exceeds "output error" parameter settings, display "error".
3 Use the Direction keys or numeric keys to set the output value.
Press the Zero key, return to the initial value is set to "0."
4.6 Source Resistance (RESI) Signals
1 Connect the terminals Figure 4.1.
2 Use the FUNCTION key on the SOURCE ,when the output interface
is marked as RESI, this time to display DC voltage signal output range
(Ran 10-510Ω).
3 Use the Direction keys or numeric keys to set the output value.
Press the Zero key, return to the initial value is set to "10."
4.7 Source Thermocouple (TC) Signals
Generate voltages (mV) corresponding to the following thermocouples.
Set the temperature with (℃). This enables calibration of a thermometer.
Thermocouple (TC) types: S,K,E,T,J,B,R,N,W325 (For
the temperature range, refer to the specifications.)
1 Connect the terminals Figure 4.1.
2 Use the FUNCTION key on the SOURCE, when the output interface
is marked as TC. (Thermocouple selection)
3 Use the RANGE key to select a thermocouple type.
In the additional information column shows the current measured
temperature corresponds International Temperature Scale ITS-90 value in
millivolts. When the output error exceeds "output error" parameter settings,
display "error".
4 Use the Direction keys or numeric keys to set the output value.
Press the Zero key, return to the initial value is set to "0."
http://www.zhoyi.com
This manual suits for next models
1
Table of contents
Popular Test Equipment manuals by other brands

Rohde & Schwarz
Rohde & Schwarz RTB2000 Series Getting started

PCE Health and Fitness
PCE Health and Fitness PCE-RT 11 instruction manual

ACE INSTRUMENTS
ACE INSTRUMENTS ALP-1 med quick start guide

Fluke
Fluke A40B instruction manual

BETACHEK
BETACHEK Visual Instructions for use

BACtrack
BACtrack ELEMENT product manual