2 modos de escaneo:
• METAL SCAN localiza metales ferrosos (magnéticos), como
barras de refuerzo, hasta 3" (75 mm) de profundidad y metal
no ferroso (no magnético), como tubo de cobre, hasta 11⁄2"
(38 mm) de profundidad
• AC SCAN localiza los cables AC* activos hasta 2" (50 mm)
de profundidad
La pantalla avanzada ColorTrip se iluminará de color azul en el
modo METAL SCAN y rojo en el modo AC SCAN. Detección
WireWarning automáticamente detecta y alerta al usuario
sobre cableado AC* activo (corriente alterna) en los ambos
modos. Cuando se detecte voltaje de cableado activo AC*,
la pantalla parpadeará en rojo.
*AC: Se refiere cables con corriente alterna (CA).
INSTALAR LA BATERÍA DE 9 VOLTIOS
Siempre utilice una nueva
batería alcalina con una fecha de
vencimiento extendida. Asegúrese de
no tirar de los cables al desconectar
la batería.
Indicador de Batería Baja
parpadeará cuando la carga de la
batería se encuentre demasiado baja,
para que el detector funcione correctamente.
ADVERTENCIA No confié exclusivamente en el
detector para localizar objetos
detrás de la superficie. Utilice información adicional
para ayudar a localizar los objetos antes de penetrar
la superficie. La información incluye planos de
construcción, puntos visibles de entrada de las tuberías
y el cableado en las paredes, como en un sótano, y las
separaciones estándar entre las vigas.
MetalliScanner®m60c
Escáner de Metal con Detección AC
ES ESCANEO PARA AC* (corriente alterna)
Utilice AC SCAN para localizar el cableado eléctrico activo
no protegido hasta 2" (50 mm) de profundidad de la
superficie escaneada.
SIEMPRE APAGUE LA ELECTRICIDAD CUANDO TRABAJE
CERCA DE CABLES ELÉCTRICOS (EXCEPTO CUANDO
ESCANEANDO).
1. Establezca el modo AC SCAN.
2. Sostenga el detector plano contra la pared, luego mantenga
presionado el Botón de Encendido. Un tono corto confirma
que la calibración está completa. NO MUEVA EL DETECTOR
DURANTE LA CALIBRACIÓN.
3. Con el Botón de Encendido presionado, lentamente deslice el
detector por la pared. Si detecta una señal fuerte, el Apuntador
SpotLite se iluminará, emitirá un sonido continuo, y el Icono
Indicador de Objetivo aparecerá en la pantalla. (Figura B)
4. Marque el punto donde la pantalla muestren más Barras
de Indicación de Objetivo. (Figura C)
5. Continúe deslizándose en la misma dirección hasta que las
barras se reduzcan, luego invierta la dirección. Marque el
punto donde la pantalla muestren más Barras de Indicación de
Objetivo. (Figura D) El punto medio entre las dos marcas es la
ubicación del cableado AC* activo. (Figura E)
Si la unidad indica un área grande con electricidad, reduzca la
sensibilidad del detector para perfeccionar el área de escaneo
y localizar con mayor precisión el cableado AC* activo (ver
PERFECCIONAR EL AREA A ESCANEO EN AC SCAN abajo).
ADVERTENCIA NO ASUMA QUE NO HAYA CABLES
ELÉCTRICOS CON CORRIENTE EN
LA PARED. NO TOME MEDIDAS QUE PUEDAN SER
PELIGROSAS SI LA PARED CONTIENE UN CABLE
ELÉCTRICO CON CORRIENTE. SIEMPRE APAGUE
LA ELECTRICIDAD Y DESCONECTE GAS, Y FUENTES
DE AGUA ANTES DE ATRAVESAR UNA SUPERFICIE.
EL INCUMPLIMIENTO DE ESTAS INSTRUCCIONES
PODRÍA PROVOCAR UNA DESCARGA ELÉCTRICA, FUEGO,
Y/O LESIONES GRAVES O DAÑOS A LA PROPIEDAD.
PERFECCIONAR EL AREA
A ESCANEO EN AC SCAN
1. Suelte el Botón de Encendido, luego coloque el detector sobre
una de las marcas anteriores. Esto reiniciará el detector a una
sensibilidad más baja y limitará el área de escaneo.
2. Mantenga presionado el Botón de Encendido, luego repita los
pasos 3 - 5 bajo ESCANEO PARA AC*.
3. Repita según sea necesario para una mayor precisión.
SELECCIONAR MODO / ENCENDER
Mueva el interruptor Selector de Modo al modo deseado:
METAL SCAN o AC SCAN.
Para activar el detector, mantenga presionado el Botón
de Encendido. Si el botón no se mantiene presionado,
la unidad se apagará.
ESCANEO PARA METAL
Utilice METAL SCAN para localizar
metal ferroso (magnético), como la
estructura/cuadrícula de acero o barras
de refuerzo, hasta 3" (75 mm) de
profundidad y metal no ferroso (no
magnético), como tubería de cobre,
hasta 11⁄2"(38 mm) de profundidad
de la superficie escaneada.
Para obtener mejores resultados,
sujete el detector como se muestra en
(Figura A) y muévalo lentamente al
escanear. No toque la superficie
durante la calibración o escaneo.
1. Establezca el modo METAL SCAN.
2. Para máxima sensibilidad al metal,
mantenga presionado el Botón de
Encendido. Sostenga el detector
alejado de la superficie hasta que un
tono corto confirme que la calibración
se haya completado, después
colóquelo contra la superficie que será
escaneada.
3. Con el Botón de Encendido
presionado, lentamente deslice el
detector por la pared. Si detecta una
señal fuerte, el Apuntador SpotLite se
iluminará, emitirá un sonido continuo,
y el Icono Indicador de Objetivo
aparecerá en la pantalla. (Figura B)
4. Marque el punto donde la
pantalla muestren más Barras de
Indicación de Objetivo. (Figura C)
5. Continúe deslizándose en la misma
dirección hasta que las barras se
reduzcan, luego invierta la dirección.
Marque el punto donde la pantalla
muestren más Barras de Indicación de
Objetivo. (Figura D) El punto medio
entre las dos marcas es la ubicación
del objeto metálico. (Figura E)
NOTA: Si el detector indica un
área grande de metal, puede
perfeccionar y estrechar el área
de escaneo.
PERFECCIONAR EL AREA
DE ESCANEO EN METAL SCAN
1. Suelte el Botón de Encendido, luego coloque el detector sobre
una de las marcas anteriores. Esto reiniciará el detector a una
sensibilidad más baja y limitará el área de escaneo.
2. Mantenga presionado el Botón de Encendido, luego repita los
pasos 3 - 5 bajo ESCANEO PARA METAL.
3. Repita según sea necesario para una mayor precisión.
NOTA: Si aparece alguna barra, hay presencia de
metal. Los objetivos pequeños u objetivos que se
encuentran en las profundidades de la superficie sólo
pueden mostrar dos o cuatro barras, y es posible que el
detector no pueda localizar el centro del metal.
NOTA: AC SCAN detectará sólo cableado AC* (activo)
sin blindaje. Consulte la declaración de ADVERTENCIA
en Detección WireWarning en la sección abajo para
obtener detalles importantes y advertencias sobre la
detección de AC*.
DETECCIÓN WIREWARNING La Detección WireWarning
de Zircon®trabaja continuamente en ambos modos. Cuando
se detecta voltaje de cableado AC* activo en el modo METAL
SCAN, se muestra el indicador de advertencia y la pantalla
parpadea en rojo. Si el escaneo comienza sobre un cableado
AC* activo, el indicador o las barras en medio (en AC SCAN)
parpadearán en pantalla roja continuamente.
Tenga extrema precaución bajo estas circunstancias, o siempre
que haya cableado AC *activo.
ADVERTENCIA ES POSIBLE QUE EL DETECTOR NO
DETECTE CORRIENTE ACTIVA SI LOS
CABLES ESTÁN A MÁS DE 2" (50 mm) DEBAJO DE LA
SUPERFICIE ESCANEADA, EN CONCRETO, EN UN TUBO,
DETRÁS DE UN MURO O PAREDES METÁLICAS, O SI HAY
HUMEDAD EN EL AMBIENTE O EN LA SUPERFICIE
ESCANEADA.
TRABAJAR CON
DIFERENTES MATERIALES
Papel tapiz Este detector funciona normalmente en paredes
cubiertas con papel tapiz o tela, a menos que los materiales
tengan láminas metálicas, contengan fibras metálicas o estén
aún húmedos después de haber sido aplicados. Es posible que
el papel tapiz necesite varias semanas para secarse totalmente
después de ser aplicado.
Paredes recién pintadas La pintura puede tardar una
semana o más para secarse después de la aplicación.
Listón y yeso Utilice el modo METAL SCAN para localizar las
cabezas de clavos que fijan los listones de madera a las vigas.
Si el yeso tiene refuerzo de malla metálica, este detector no
podrá detectar a través de ese material.
Paredes muy texturizadas, techos acústicos, pisos de
madera, contrapiso o panel de yeso sobre revestimiento
de contrachapado Utilice el modo METAL SCAN para
localizar clavos o tornillos para madera, alineados verticalmente
donde esté ubicado la viga o vigueta.
Cableado eléctrico y tuberías Es necesario tener precaución
siempre al clavar, cortar o taladrar en paredes, pisos y cielorrasos
que puedan contener estos elementos.
NOTA: La profundidad y precisión de detección del
detector pueden variar dependiendo de las condiciones
ambientales del escaneo, como el contenido mineral,
la humedad, la textura y consistencia de las paredes.
CONSEJOS ÚTILES & CONSEJOS PARA CONSTRUCCIÓN
SITUACIÓN CAUSAS PROBABLES SOLUCIONES
El área de voltaje aparece
mucho más grande que
el cable real en AC SCAN.
La detección del voltaje
puede extenderse en el
panel de yeso tanto como
12" (30 cm) en cada lado
del cableado.
Reduzca la detección de escaneo: 1. Apague el detector. 2. Enciéndalo de nuevo
sobre el borde donde se detectó el cable por primera vez. 3. Repita el escaneo.
Dificultad para
detectar metal.
El detector fue calibrado
sobre un objeto metálico
o el objeto metálico está
demasiado profundo o es
muy pequeño.
• El detector pudo haber sido calibrado sobre un objeto metálico, reduciendo la
sensibilidad. Intente calibrar en otro lugar.
• Escanee en ambas direcciones horizontal y vertical. La sensibilidad de detección
aumenta cuando el objeto metálico está paralelo al sensor.
La lectura de objetos
metálicos parece
más ancha que el
tamaño real.
El detector fue calibrado de
la manera que la sensibilidad
se quedara demasiado alta.
Para reducir la sensibilidad en el modo METAL SCAN, vuelva a calibrar el detector sobre
cualquiera de las dos primeras marcas (consulte los pasos en ESCANEO
PARA METAL).
La pantalla parpadea en
rojo continuamente al
comienzo del escaneo.
El detector fue calibrado
directamente encima de
un area donde el AC*
activo está presente.
Libere el Botón de Encendido, deslice el detector unas cuantas pulgadas (5-8 cm) a la
izquierda o la derecha y comience su escaneo.
Se supone que hay cables
eléctricos, pero nada
está detectado.
Los cables pueden estar
protegidos dentro de
conductos de metal,
una capa de alambre
trenzada, o revestimiento
metálico de la pared.
Pruebe con METAL SCAN para ver si puede localizar metal, cable, o conducto metálico.
Es posible que los
cables ubicados a mayor
profundidad de 2" (50 mm)
de la superficie no se
puedan detectar.
Si hay un interruptor de tomacorriente, asegúrese de que esté ENCENDIDO mientras
realizando el escaneo, pero apáguelo cuando trabaje cerca de los cables eléctricos.
Tenga especial cuidado si el área tiene madera contrachapada, madera gruesa de
soporte detrás de paneles de yeso o paredes que son más gruesas de lo normal.
Puede que los cables
no estén activos.
Enchufe una lámpara en el tomacorriente y enciéndala para comprobar si los cables
eléctricos están activos.
El Indicador de Batería
Baja parpadea y el
detector no funciona.
Batería baja. Instale una batería alcalina nueva de 9 voltios con una fecha de vencimiento extendida.
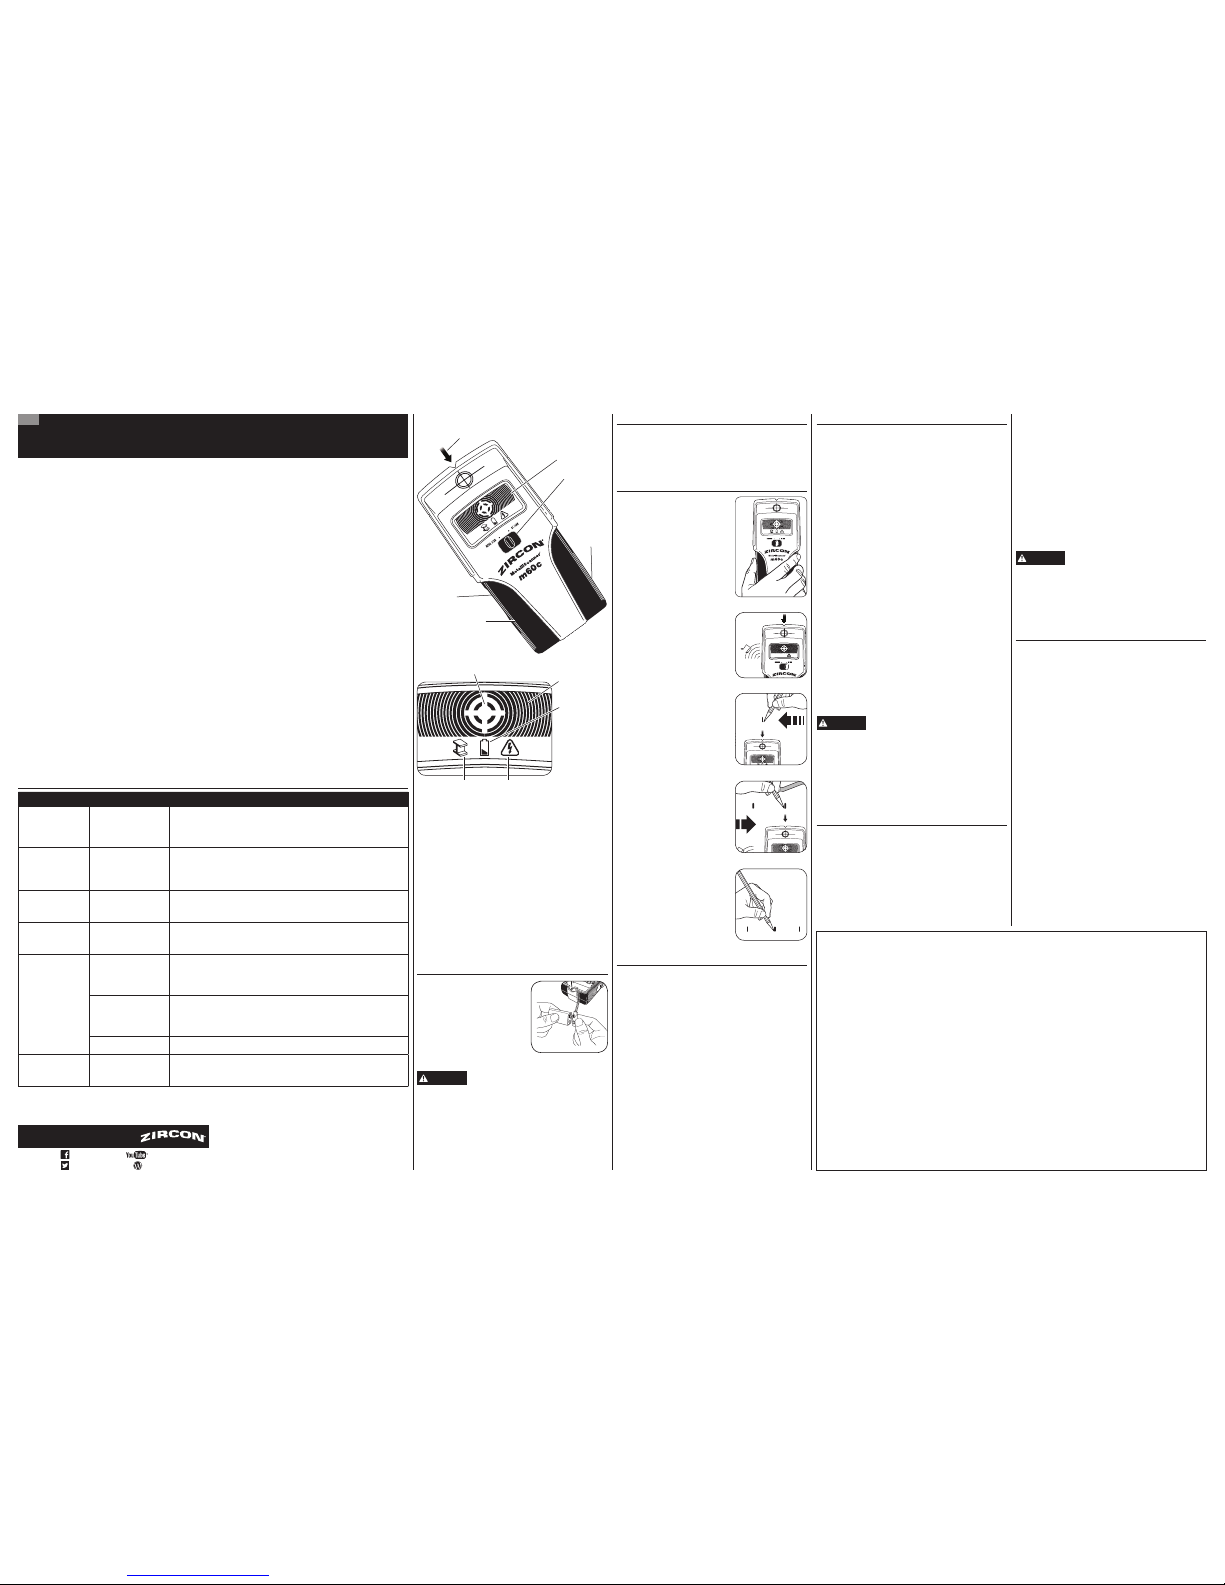
Apuntador SpotLite®
Pantalla ColorTrip™
Selector de
Modo
Lengüeta
de Tapa
de Batería
Barras de
Indicador de
Objetivo
Mango
Ergonómico
Botón Power
(Encendido)
Indicador de Modo
METAL SCAN
Indicador
de Batería
Baja
Indicador de Objetivo
Indicador de Modo AC SCAN /
Detección WireWarning®
Figura A
Figura B
Figura C
Figura D
Figura E
ANTES DE EMPEZAR
- Siempre utilice una nueva batería alcalina con una fecha de vencimiento extendida.
- No confié exclusivamente en el detector para localizar objetos detrás de la superficie. Utilice información adicional para ayudar a
localizar los objetos antes de penetrar la superficie. La información incluye planos de construcción, puntos visibles de entrada de las
tuberías y el cableado en las paredes, como en un sótano, y las separaciones estándar entre las vigas.
- Las lecturas siempre deben ser consistentes y repetibles.
- Los detectores Zircon son recomendados sólo para el uso interior.
- Otros objetos comunes en paredes, pisos o techos son tuberías de agua, líneas de gas, barrera cortafuego, y cableado eléctrico.
- La profundidad y precisión de detección del detector pueden variar dependiendo de las condiciones ambientales del escaneo, como
el contenido mineral, la humedad, la textura y consistencia de las paredes.
- Siempre apague la electricidad cuando trabaje cerca de cables eléctricos (exepto cuando escaneando).
- Debido a la proximidad de conexiones eléctricas o tuberías a la superficie de la pared, es necesario tener precaución siempre al
clavar, cortar o taladrar en paredes, pisos y cielorrasos que puedan contener estos elementos.
Visite www.zircon.com para las
instrucciones más actualizadas.
ZirconCorporation ZirconTV
ZirconTools
|
ZirconToolPro ZirconTools
Advertencia de Registro de la Parte 15 del FCC Clase B: Este aparato
cumple con las reglas Parte 15 de la FCC. Su operación está sujeta
a las siguientes dos condiciones: (1) este aparato no puede causar
interferencia dañina, y (2) este aparato debe aceptar cualquier
interferencia recibida, incluyendo la interferencia que pueda causar
la operación no deseada.
GARANTÍA LIMITADA DE 1 AÑO
El Corporativo Zircon (“Zircon”) garantiza al cliente
que este producto se encuentra libre de defectos en
sus materiales y mano de obra por un periodo de
un año a partir de la fecha de su compra. Cualquier
producto defectuoso devuelto a Zircon dentro del
periodo de garantía a la dirección indicada abajo, con
flete prepagado y comprobante de la compra, será
reparado o reemplazado a discreción de Zircon. La
reparación o reemplazo puede hacerse con un producto
y componentes nuevos o restaurados a discreción de
Zircon. Si el producto devuelto ya no está disponible,
Zircon puede sustituir el producto por un producto similar
en base a su funcionamiento. Esta garantía se limita a los
circuitos electrónicos del producto y a su carcasa original,
y específicamente excluye cualquier daño causado por
abuso, modificación, manejo contrario de uso de estas
instrucciones, otro uso no razonable o negligencia.
Este es su único y exclusivo recurso para el
incumplimiento de esta Garantía Limitada.
Esta garantía limitada es una parte de otras garantías,
expresas o implícitas y Zircon no será responsable por
ninguna otra afirmación o reclamo de naturaleza similar.
Toda garantía implícita que se aplique a este producto
está limitada a un periodo de un año a partir de la fecha
de su compra. Esta garantía limitada no cubre las piezas
consumibles, incluidas como las baterías o el software,
incluso si están empaquetadas con el producto.
EN NINGÚN CASO ZIRCON SERÁ RESPONSABLE POR
CUALQUIER DAÑO ESPECIAL, INCIDENTAL O COMO
CONSECUENCIA DE LA POSESIÓN, USO O EL MAL
FUNCIONAMIENTO DE ESTE PRODUCTO.
Algunos estados no permiten limitaciones en cuanto
al periodo de duración de una garantía implícita y/o
a la exclusión o a la limitación de daños secundarios
o consecuentes, de modo que las limitaciones y/o
exclusiones mencionadas anteriormente pueden no ser
aplicables en su caso. Esta garantía le otorga derechos
legales específicos, y Usted también podría tener otros
derechos que pueden variar de estado a estado.
Envíe el producto con flete prepagado y el comprobante
con la fecha de compra (recibo de ventas con fecha) a:
Zircon Corporation, Attn: Returns Department
1580 Dell Avenue
Campbell, CA 95008-06992 USA
Asegúrese de incluir su nombre y dirección para la
devolución. Permita de 4 a 6 semanas para la entrega.
Atención al Cliente, 1-800-245-9265 ó 1-408-963-4550
Lunes a Viernes, 8:00 a.m. a 5:00 p.m. Hora Estándar
del Pacífico
©2018 Zircon Corporation • P/N 68970 • Rev B 04/18
ColorTrip, MetalliScanner, SpotLite, WireWarning, y Zircon
son marcas de fábrica registradas o marcas registradas
de Zircon Corporation.