manuals.online logo
Brands
  1. Home
  2. •
  3. Brands
  4. •
  5. Zoeller
  6. •
  7. Water Pump
  8. •
  9. Zoeller 109 Series User manual

Zoeller 109 Series User manual

Other Zoeller Water Pump manuals

Zoeller 1073-0001 User manual

Zoeller

Zoeller 1073-0001 User manual

Zoeller AquaNot 507 Key User manual

Zoeller

Zoeller AquaNot 507 Key User manual

Zoeller QWIK JON ULTIMA 203 User manual

Zoeller

Zoeller QWIK JON ULTIMA 203 User manual

Zoeller 1332-0006 User manual

Zoeller

Zoeller 1332-0006 User manual

Zoeller 57 Series User manual

Zoeller

Zoeller 57 Series User manual

Zoeller 350 User manual

Zoeller

Zoeller 350 User manual

Zoeller 1043-0006Q User manual

Zoeller

Zoeller 1043-0006Q User manual

Zoeller QLS Series User manual

Zoeller

Zoeller QLS Series User manual

Zoeller 4290 User manual

Zoeller

Zoeller 4290 User manual

Zoeller The Shark Series Installation and maintenance instructions

Zoeller

Zoeller The Shark Series Installation and maintenance instructions

Zoeller Water Solutions 3098 Series User manual

Zoeller

Zoeller Water Solutions 3098 Series User manual

Zoeller 55/59 Series User manual

Zoeller

Zoeller 55/59 Series User manual

Zoeller Basement Sentry STBB200 User manual

Zoeller

Zoeller Basement Sentry STBB200 User manual

Zoeller 6355 User manual

Zoeller

Zoeller 6355 User manual

Zoeller X160 Series User manual

Zoeller

Zoeller X160 Series User manual

Zoeller QWIK JON PREMIER 201 User manual

Zoeller

Zoeller QWIK JON PREMIER 201 User manual

Zoeller N153 User manual

Zoeller

Zoeller N153 User manual

Zoeller AquaNot Fit 508 User manual

Zoeller

Zoeller AquaNot Fit 508 User manual

Zoeller AquaNot 508 Series User manual

Zoeller

Zoeller AquaNot 508 Series User manual

Zoeller X61 HD Series User manual

Zoeller

Zoeller X61 HD Series User manual

Zoeller 71 Series User manual

Zoeller

Zoeller 71 Series User manual

Zoeller Aquanot 508 User manual

Zoeller

Zoeller Aquanot 508 User manual

Zoeller ProPak 507 User manual

Zoeller

Zoeller ProPak 507 User manual

Zoeller AqyaNot 508 Active User manual

Zoeller

Zoeller AqyaNot 508 Active User manual

Popular Water Pump manuals by other brands

Watershed Innovations HYDRAPUMP SMART FLEX Instructional manual

Watershed Innovations

Watershed Innovations HYDRAPUMP SMART FLEX Instructional manual

Graco Modu-Flo AL-5M instructions

Graco

Graco Modu-Flo AL-5M instructions

Messner MultiSystem MPF 3000 operating instructions

Messner

Messner MultiSystem MPF 3000 operating instructions

Xylem Bell & Gossett WEHT0311M Installation, operation and maintenance instructions

Xylem

Xylem Bell & Gossett WEHT0311M Installation, operation and maintenance instructions

WilTec 50739 Operation manual

WilTec

WilTec 50739 Operation manual

Franklin Electric Little Giant 555702 HRK-360S instruction sheet

Franklin Electric

Franklin Electric Little Giant 555702 HRK-360S instruction sheet

Ingersoll-Rand PD02P Series Operator's manual

Ingersoll-Rand

Ingersoll-Rand PD02P Series Operator's manual

VS ZJ Series Operating	 instruction

VS

VS ZJ Series Operating instruction

Flotec FPZS50RP owner's manual

Flotec

Flotec FPZS50RP owner's manual

SKF Lincoln FlowMaster II User and maintenance instructions

SKF

SKF Lincoln FlowMaster II User and maintenance instructions

Xylem Lowara LSB Series Installation, operation and maintenance instructions

Xylem

Xylem Lowara LSB Series Installation, operation and maintenance instructions

Water Duro Pumps DCJ500 Operating & installation instructions

Water

Water Duro Pumps DCJ500 Operating & installation instructions

Action P490 Operating instructions & parts manual

Action

Action P490 Operating instructions & parts manual

Flo King Permacore Reusable Carbon Bag Disassembly. & Cleaning Instructions

Flo King

Flo King Permacore Reusable Carbon Bag Disassembly. & Cleaning Instructions

ARO ARO PD15P-X Operator's manual

ARO

ARO ARO PD15P-X Operator's manual

Pumptec 112V Series Operating instructions and parts manual

Pumptec

Pumptec 112V Series Operating instructions and parts manual

Virax 262070 user manual

Virax

Virax 262070 user manual

Neptun NPHW 5500 operating instructions

Neptun

Neptun NPHW 5500 operating instructions

manuals.online logo
manuals.online logoBrands
  • About & Mission
  • Contact us
  • Privacy Policy
  • Terms and Conditions

Copyright 2025 Manuals.Online. All Rights Reserved.

SRS Features:
•Preassembled – includes hoses,
tank, pump and fittings
•Internal reusable filter sock captures
debris
•Meets flushing requirements for
tankless water heating systems
Specifications:
•Pump – 1/6 HP, 3.0 FLA, 345 watts,
115V, air-filled (no oil), quiet running
submersible pump
•Tank & Lid – 5 gallon polyethylene
tank with stainless steel hardware
•¾” stainless steel braided flush lines
•Stainless steel handles
•Corrosion resistant components
•Recirculation rate: 3 gallons per
minute*
•100% factory assembled
*Will vary with application.
SECTION: 2.60.046
FM2591
1210
Supersedes
0710
Product information presented
here reflects conditions at time
of publication. Consult factory
regarding discrepancies or
inconsistencies. MAIL TO: P.O. BOX 16347 • Louisville, KY 40256-0347
SHIP TO: 3649 Cane Run Road • Louisville, KY 40211-1961
(502) 778-2731 • 1 (800) 928-PUMP • FAX (502) 774-3624
visit our web site:
www.zoeller.com
© Copyright 2010 Zoeller Co. All rights reserved.
Product may not be exactly as pictured.
109 Series
NEW!
Removes line
build-up in
tankless water
heating units
SRS
SCALE
REMOVAL
SYSTEM
This product is not approved for use with
any chemical other than food grade vinegar. Other
acidic or caustic chemicals will cause premature failure
of the pump and are therefore not approved for use with
this system. Use of alternate chemicals will void the
manufacturer's warranty.
Patent Pending
© Copyright 2010 Zoeller Co. All rights reserved.
Flushing/Descaling Procedures
1. Follow and understand all safety related information provided
with the tankless water heater as well as the flushing system
beforestartingtheflushingoperation. Wearappropriatesafety
apparelincluding safety glasses and rubber gloves. Inspect all
hoses and electrical cords for any kinks, cuts, etc. that could
resultinanelectricalshockhazardorfluidleakage. Replaceany
worn or damaged components. Consult appliance instruction
manual for complete flushing instructions.
2. Disconnect power to the tankless water heater, following the
instructions provided with the appliance.
3. Drain the water heater following the instructions provided with
the appliance.
4. Close the Cold Water Supply Valve and Water Heater Outlet
Valve, isolating the heat exchanger.
5. Connect a hose (supplied with the system) from the fitting
labeled “Pump Discharge” on top of the Flushing System to
the Service Valve on the Cold Water Supply side of the water
heater.
6. Connect a hose (supplied with the system) from the fitting
labeled “Return” on top of the Flushing System to the Service
Valve on the Hot Water outlet side of the water heater.
7. Remove the black threaded cap on top of the system and add
nomorethan 2 gallons of virginfoodgrade white vinegar to the
tank. Replacethethreadedcap. Makesuretheincludedo-ring
is properly seated in the cap to provide a leak proof seal.
8. OpentheHot and Cold Service Valves tothewater heater heat
exchanger.
9. PlugPower Cord from theFlushingSystemPumptoa properly
grounded electrical receptacle. Never allow the pump to run
without adequate liquid in the tank or possible damage to the
pump may occur.
10. Allow the pump to circulate the vinegar solution for at least 45
minutes or per the appliance manufacturer’s recommendation
(consult appliance instruction manual). Monitor the system for
leaks or any peculiar behavior. Unplug the power cord if the
pump stops, an external leak develops, or the flow is greatly
reduced.
11. After therequired time expires, unplugthepower cord from the
receptacle.
12. Close the Service Valve on the Cold Water Supply line and
disconnect the hose end from the Service Valve.
13. Disconnect the hose end from the Flushing System “Return”
Line Connection and route it to a suitable drain or to a bucket.
Connect an extra length of hose if necessary.
14. OpentheColdWaterSupplyValvetoflushthewaterheaterwith
fresh water, rinsing out the cleaning solution. Let the system
flushfor5minutesorasrequiredpertheapplianceinstructions.
Monitor the discharge from the hose. If using a bucket, empty
as needed.
15. After the required time expires, close the Hot Water Service
Valve and disconnect the hose.
16. Open the Hot Water Supply Valve.
17. Restore power to the heater system and return it to service.
After completing the flushing operation:
1. Discard the contents of the Flushing System by removing the
threadedcapfromoneofthetankaccessconnectionsonthetop
or side of the tank. Pour the contents into a suitable drain.
2. Remove the Return fitting from the top of the tank to access
the strainer assembly. The strainer element is connected to
the fitting with a hose clamp. Loosen the clamp to remove the
strainer. Discard the contents of the strainer and rinse away
any remaining particles. Inspect the strainer for any tears or
damage. Replace the strainer as needed. Order P/N 150786.
Re-assemble the strainer to the fitting assembly and tighten
clamp.
3. Replace the fitting assembly into the cover of the tank.
4. Add approximately one gallon of fresh water to the tank.
ConnectahosetothePumpDischargeconnectionandrouteto
a suitable drain. Plug in the pump to flush the vinegar solution
out of the pump. Pour any remaining liquid from the tank and
replace threaded caps.
5. Store the pump system in an appropriate location to prevent
damage by impact and temperature extremes.
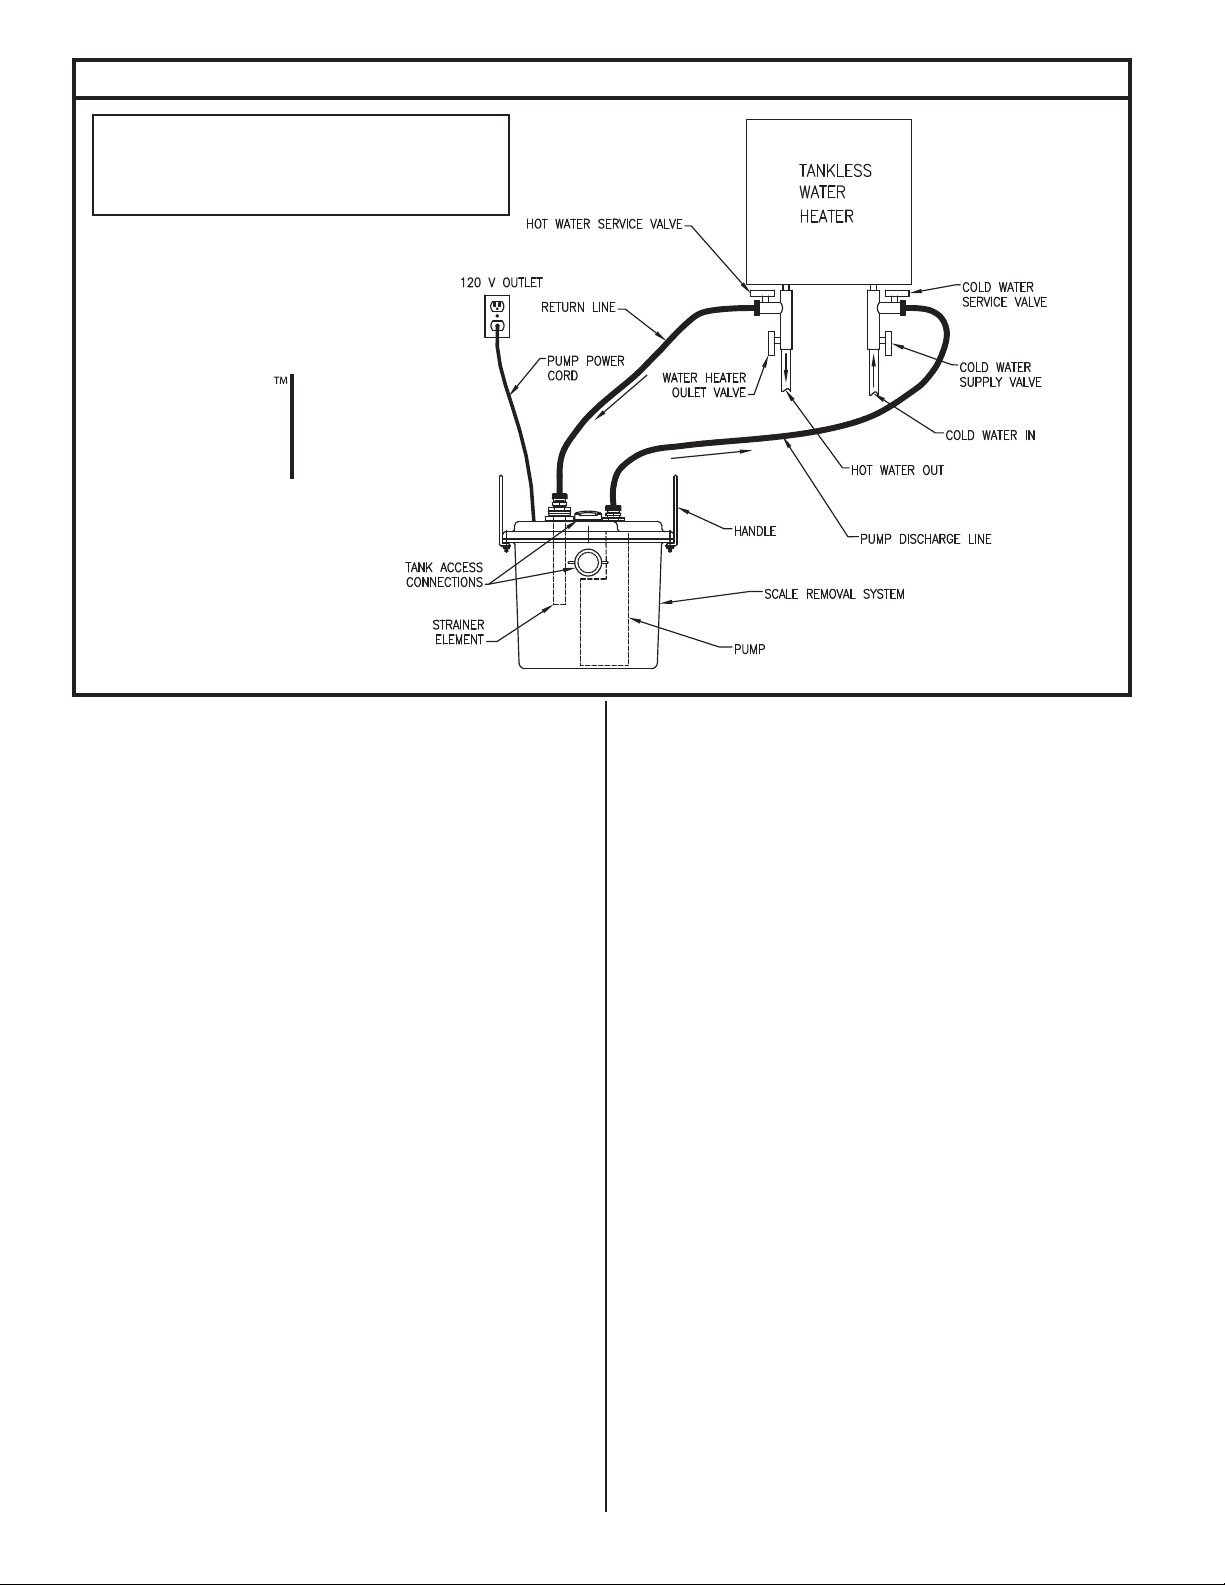
SK2793
Typical Installation
Water heater connections may vary.
Consult appliance owner's manual for
actual connection locations.
SRS
SCALE
REMOVAL
SYSTEM