manuals.online logo
Brands
  1. Home
  2. •
  3. Brands
  4. •
  5. Zoo Med
  6. •
  7. Heater
  8. •
  9. Zoo Med REPTITHERM RH-4 User manual

Zoo Med REPTITHERM RH-4 User manual

GUARANTEE: ZOO MED Laboratories, Inc., guarantees the materials and workmanship of the ReptiTherm®
heater for a period of one year from date of purchase. If heater should fail during this time period, simply
mail the heater back to us with a note explaining failure. Please include your receipt. No other guarantees
apply whether expressed or implied.
If anything is unclear in this manual please feel free to contact us for clarification. You can phone, e-mail
or write us at our address listed on the back of this manual.
Caution:
• Do not use cedar products, ground corn cob, or walnut shells as a substrate with reptiles or
amphibians.
• Do not place your terrarium where it will receive direct sunlight.
• If your house temperatures can rise above 80°F (26.6ºC) we recommend you use a reptile
thermostat (i.e. Reptitemp 500R Thermostat) to shut off/control the heat output of the
ReptiTherm®heater. If not using a reptile thermostat please unplug the ReptiTherm®Heater if
your inside house temperatures rise above 80°F (26.6ºC).
• The ReptiTherm®is not designed for use with water in any way. That means no turtle aquariums,
fish tanks, paladariums, or any other situation where there is any water (with or without gravel or
other substrates) on the bottom of the cage.
INSTRUCTIONS
ReptiTherm®(Product # RH-4, 5, 6)
ReptiTherm®Mini (Product # RH-7)
Helpful Hints:
Use Zoo Med’s High Range or Analog Reptile Thermometer to monitor the temperature of your
terrarium. To properly monitor the temperature in your terrarium, it is recommended that you use
one thermometer per each 20 gallons (i.e. use 2 thermometers for a 40 gallon terrarium etc.). Most
reptiles sold in pet shops are tropical species (i.e.; boas, pythons, iguanas, water dragons, etc.)
requiring a minimum air temperature of 80ºF (26.6ºC). Heater operates at about 95-100ºF and
brings ambient temperture in enclosure up by 2-10ºF. The average house ranges from 65-75ºF
(18-24ºC), and requires an additional heat source to keep the terrarium in the safe 80-88ºF (26.6-
31ºC) zone. Incandescent lamps, ceramic heat emitters, and heat cables are also good additional
heat sources.
Terrarium Top: The screen or glass top plays an important part in the overall temperature
control of your terrarium. If you are keeping desert type reptiles, small rodents or your terrarium
is in a particularly humid area, we recommend a full screen top. If you are keeping a tropical
species (i.e., iguanas, tree frogs, tree agamids, etc...), we recommend using a glass top to cover
a portion of the top of your terrarium. This will trap a certain amount of humidity in the terrarium,
which is necessary for most tropical species. This will also help to increase the heat in your
terrarium should it be placed in a particularly cold area.
Cleaning: Make sure the ReptiTherm® has been unplugged and cooled down before cleaning
the terrarium.
CAUTION: Please Read The Following Before Installing
Your New ReptiTherm®Heater.
Any of the following situations constitutes improper use of the
ReptiTherm®and can lead to stress cracks and/or other hazards:
• A gravel or sand substrate deeper than 1.5” (3.81cm) when the heater is on the bottom of
the tank. Any other substrate should be no deeper than 2”.
• A larger size ReptiTherm®on a smaller tank; i.e. 50-60 gallon heater on a 30 gallon tank
or multiple ReptiTherm®s under one tank.
• Placing the ReptiTherm®inside of a terrarium.
• Placing a heat bulb or ceramic heat emitter directly over the area where the ReptiTherm®
Heater has been placed, resulting in a high build up of heat.
• Placing a hide or decoration directly over the area where the ReptiTherm®Heater has
been placed, resulting in a high buildup of heat.
• Any other use not described in this manual is not covered by the warranty.
• For indoor use only.
LOOK FOR THESE OTHER QUALITY ZOO MED HEATING PRODUCTS
VERY IMPORTANT INSTRUCTIONS
PLEASE READ!
Not following the provided instructions voids
any and all guarantees and/or warranties.
USE ON EXTERIOR OF TERRARIUM ONLY.
REPTICARE®
CERAMIC INFRARED
Heat Emitter
NOCTURNAL INFRARED
HEAT LAMP™
REPTI BASKING
SPOT LAMP™
REPTICARE®ROCK HEATER
ZOO MED LABORATORIES
3650 SACRAMENTO DR.
SAN LUIS OBISPO CA 93401
PHONE: 805-542-9988
TOLL FREE: 888-496-6633
email: [email protected]
www.zoomed.com
REPTITHERM
®
U.T.H.
UNDER TANK HEATER
Warning: Risk of electric shock.
The ReptiTherm®Heater is for indoor use only.
Do not submerge the heater for any reason.
Do not rest tank on cord or plastic housing.
Discard pad if it shows any signs of deterioration such as cracking, blistering, melting, or
discoloration.
Follow all instructions.
Inspect cord periodically. Do not use if cord is damaged or frayed.
Warning: Risk of fire.
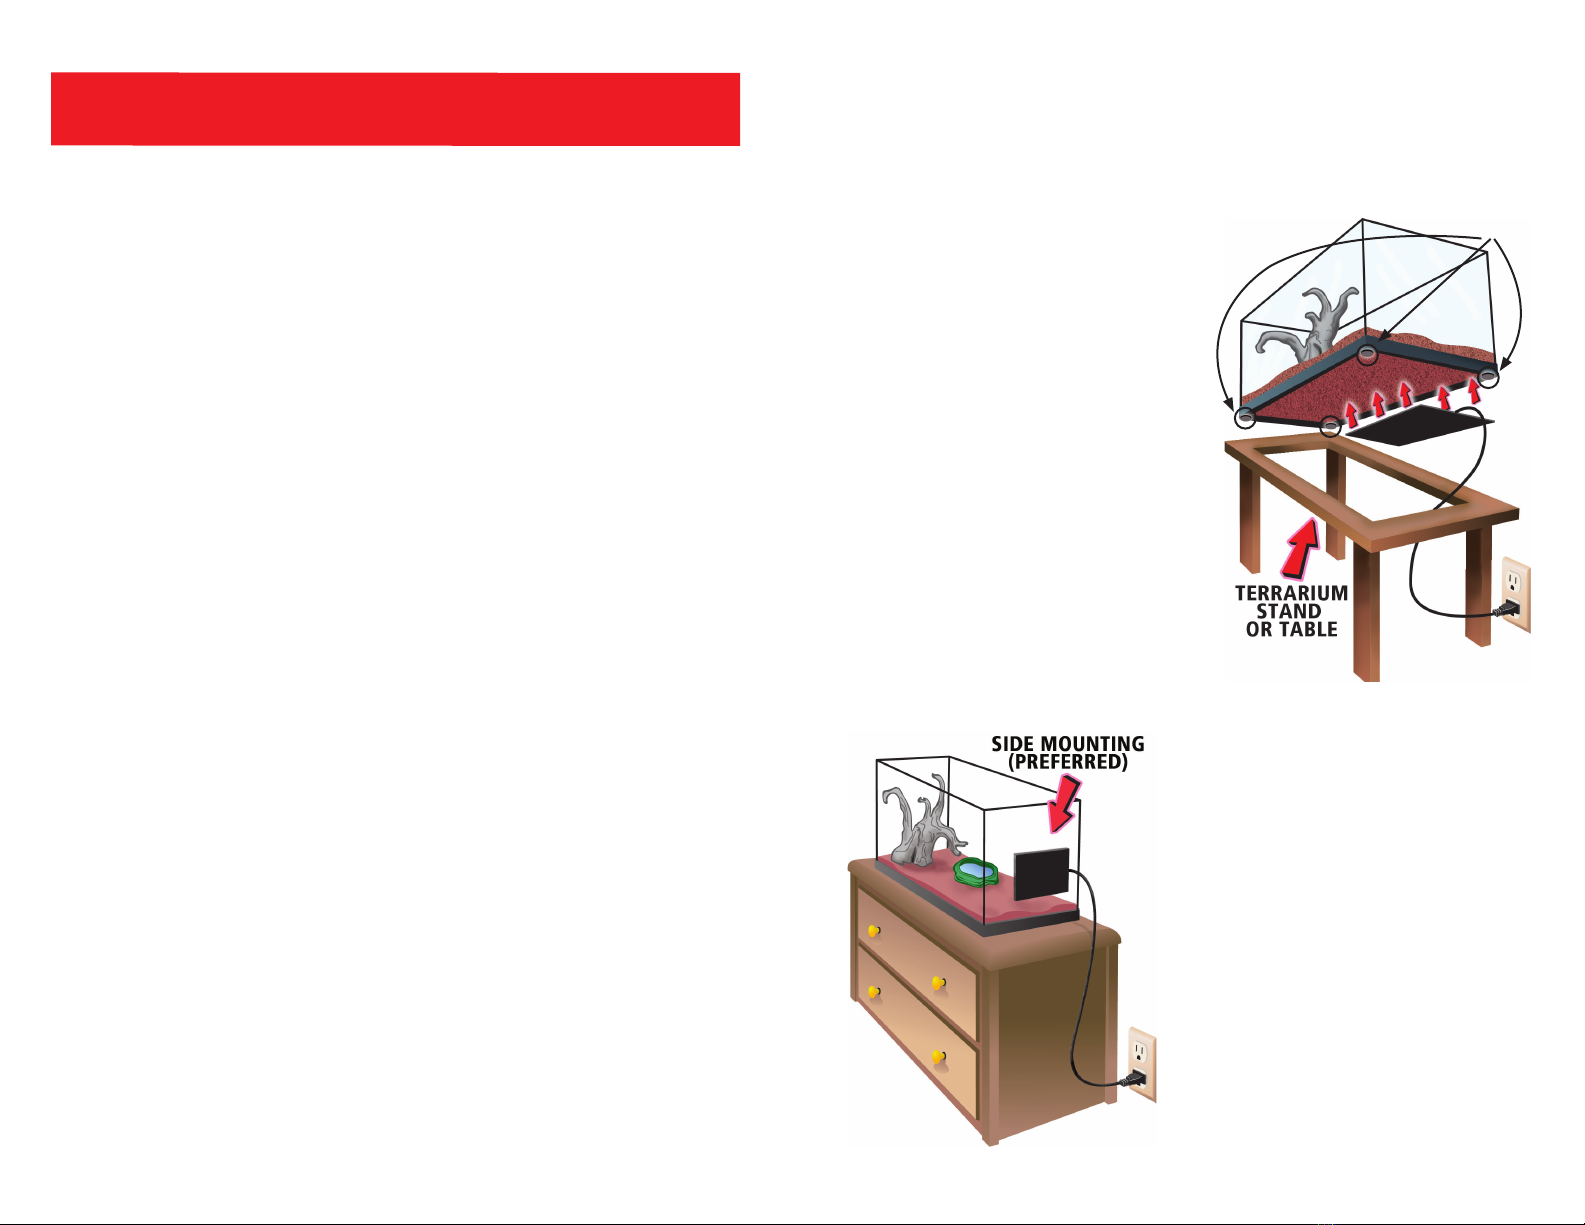
Never mount the ReptiTherm®heater in a manner that would encapsulate heat. (i.e.
mounting it on the bottom of a terrarium and then setting the terrarium directly on any type of
table or the floor/carpet). Always use the enclosed rubber feet to elevate your terrarium thus
allowing the heat to escape. If unsure of bottom mounting, the side mounting of the ReptiTherm®
Heater is the preferred application.
Placement of terrarium:
Do not place on heat sensitive surfaces (i.e. antique furniture, plastic, etc...)
Do not place the terrarium where it will receive direct sunlight.
The ReptiTherm®is for use on standard glass aquariums only. We cannot be responsible for
custom or homemade cages and use of the ReptiTherm®on such cages will not be covered by
the warranty. Do not use the ReptiTherm®on anything other than glass terrariums:
NO ACRYLIC cages
NO METAL cages
NO WOOD cages
NO PLASTIC cages (Only the RH-7 Mini is suitable for use on “Keeper” type
plastic cages because of it’s low heat output. Always place the heater on the
back or side wall of this type of cage)
NO FOAM cages
NO FIBERGLASS cages
NO STONE cages
Hot Weather:
ALWAYS unplug your ReptiTherm®heater if the inside of your house rises above 80ºF (26.6ºC).
(Unless using a reptile thermostat to control the heater.)
Water Dish placement, substrate and cleaning:
DO NOT PLACE WATER DISH ABOVE HEATER. Avoid spilling or spraying water on glass
where heater is attached; water spilled directly on the glass where the heater is could cause
a stress crack. Note: If the bottom of your terrarium can get wet this could cause a “stress
crack” with this type of heater. Always use a substrate that will absorb water and keep
your water dish on the opposite side of the terrarium from the ReptiTherm®Heater. Because
of the many variables involved in terrarium glass thickness, set up and husbandry, Zoo Med
does not guarantee against stress cracks in your terrarium. If you wish to maximise against
the possibility of stress cracks from water spills, ect., then we recommend side mounting of the
ReptiTherm®Heater. (See Diagram 2).
INSTRUCTIONS: PLEASE READ CAREFULLY
Bottom Mounting: Clean the surface of the terrarium, peel adhesive paper off back of heater
and “stick” the heater to the bottom of your terrarium; remember to place heater on either the right
or left side of terrarium and gently rub heater to make firm contact. This allows one side of your
terrarium to be warmer than the other, providing a natural temperature gradient. The ReptiTherm®
must be stuck to the terrarium.
Rubber Feet: Remove adhesive paper and stick
the rubber feet to each of the four bottom corners
of your terrarium. This allows slight elevation of
the terrarium thus allowing excess heat to
escape (very important).
Moving or Detaching Heater: DO NOT remove the
Heater once it has been attached to your terrarium.
REMOVAL of the heater once attached voids all
guarantees as this can easily damage the internal
wire connections.
Side Mounting: If your terrarium is located on any
type of antique stand or dresser or if there is fabric
(i.e; tablecloth, etc...) underneath your terrarium
then side mounting of the ReptiTherm®Heater
is preferred. To side mount, simply remove adhesive
paper from the back of the ReptiTherm®Heater and
“stick” to the lower right or left side of your terrarium
(see Diagram 2).
Substrate: If the ReptiTherm®is on the bottom
of the tank, you must use some type of substrate
material. Good substrate choices are Zoo Med’s
Eco Carpet™, Zoo Med’s Repti Sand®or Zoo Med’s
Repti Bark®. If using very lightweight substrates
such as aspen shavings or sphagnum moss, you
must put a layer of Zoo Med’s Eco Carpet™ down
first. This prevents snakes and burrowing reptiles
from pushing substrate aside and resting on top of the glass directly above the heater, resulting
in possible burns! Using newspaper, paper
towels, cloth towels, or any similarly
light product in place of a substrate
is not appropriate with this kind of
heater, and such use will void any and
all guarantees and release Zoo Med
from any liability for damage to product,
property, or animals. Also, some liners or
cage inserts have plastic or rubberized backings
that could melt; use such items with caution. We
recommend Zoo Med’s Eco Carpet™ for safe use
with a ReptiTherm®. When using gravel or sand
type substrates, it is important to use no
more than 1.5” (3.81cm) depth of gravel/
sand type substrates. Slate or tile cannot
be used as a substrate.
Plug Heater In: The ReptiTherm®is designed
to slowly heat glass, and then the air inside of
your terrarium. The heater will take a minimum of
six hours before you get an accurate temperature
reading in your terrarium. If your animal spends all
of its time near the heater it means that there is
not enough heat in the cage. Supplemental heat
should be added immediately.
Please read the following before using
your new ReptiTherm®Heater.
DIAGRAM 1
DIAGRAM 2
RUBBER FEET

This manual suits for next models

3

Popular Heater manuals by other brands

Serene S6068 Sorroco Operation manual

Serene

Serene S6068 Sorroco Operation manual

JAYLINE SPITFIRE FS CA 2006 Installation & operation instructions

JAYLINE

JAYLINE SPITFIRE FS CA 2006 Installation & operation instructions

Conrad 560142 operating instructions

Conrad

Conrad 560142 operating instructions

Stelpro SPIDER user guide

Stelpro

Stelpro SPIDER user guide

Orbegozo BP 3200 instruction manual

Orbegozo

Orbegozo BP 3200 instruction manual

Viessmann VITOPLANAR EI2 Operating Instructions for the System User

Viessmann

Viessmann VITOPLANAR EI2 Operating Instructions for the System User

Qlima R124C operating manual

Qlima

Qlima R124C operating manual

emerio FH-121976 instruction manual

emerio

emerio FH-121976 instruction manual

Clarke DEVIL 5000PTC Operation & maintenance instructions

Clarke

Clarke DEVIL 5000PTC Operation & maintenance instructions

VonHaus 2514074 instruction manual

VonHaus

VonHaus 2514074 instruction manual

BN Thermic SystemX XR-30 instructions

BN Thermic

BN Thermic SystemX XR-30 instructions

Space-Ray SRLP25 Installation, servicing and operating instructions

Space-Ray

Space-Ray SRLP25 Installation, servicing and operating instructions

Pinnacle Remington REM-360A-TTC-O User's manual & operating instructions

Pinnacle

Pinnacle Remington REM-360A-TTC-O User's manual & operating instructions

Mestek EMBASSY INDUSTRIES HIDEAVECTOR3 installation instructions

Mestek

Mestek EMBASSY INDUSTRIES HIDEAVECTOR3 installation instructions

DeWalt DXRH008E instruction manual

DeWalt

DeWalt DXRH008E instruction manual

Zehnder Rittling Alban Electric ALZER-100-50/F quick start guide

Zehnder Rittling

Zehnder Rittling Alban Electric ALZER-100-50/F quick start guide

Ozeanos OT-FH-2000T instruction manual

Ozeanos

Ozeanos OT-FH-2000T instruction manual

Dimplex Girona GFP050E instruction manual

Dimplex

Dimplex Girona GFP050E instruction manual

manuals.online logo
manuals.online logoBrands
  • About & Mission
  • Contact us
  • Privacy Policy
  • Terms and Conditions

Copyright 2025 Manuals.Online. All Rights Reserved.