Zoom Q8n-4K User manual

Operation Manual
You must read the Usage and Safety Precautions before use.
©2021 ZOOM CORPORATION
Copying or reprinting this manual in part or in whole without permission is prohibited.
Product names, registered trademarks and company names in this document are the property of their respective companies. All trademarks and
registered trademarks in this document are for identification purposes only and are not intended to infringe on the copyrights of their respective owners.
Proper display is not possible on grayscale devices.

Notes about this Operation Manual
The contents of this document and the specifications of the product could be changed without notice.
• Windows® is a trademark or registered trademark of Microsoft® Corporation.
• iPhone, iPad, iPadOS and Mac are trademarks of Apple Inc.
• App Store is a service mark of Apple Inc.
• iOS is a trademark or registered trademark of Cisco Systems, Inc. (USA).
• The microSDXC logo is a trademark.
• The Bluetooth® word mark and logo are registered trademarks of Bluetooth SIG, Inc. and these marks
are used under license by ZOOM CORPORATION.
• Other product names, registered trademarks and company names in this document are the property of
their respective companies.
• All trademarks and registered trademarks in this document are for identification purposes only and are
not intended to infringe on the copyrights of their respective owners.
• Recording from copyrighted sources, including CDs, records, tapes, live performances, video works
and broadcasts, without permission of the copyright holder for any purpose other than personal use is
prohibited by law. ZOOM CORPORATION will not assume any responsibility related to infringements of
copyrights.
• The illustrations and display screens in this document could differ from the actual product.
2

Contents
Notes about this Operation Manual........................................................................................................................ 2
Functions of parts....................................................................................................................................................... 5
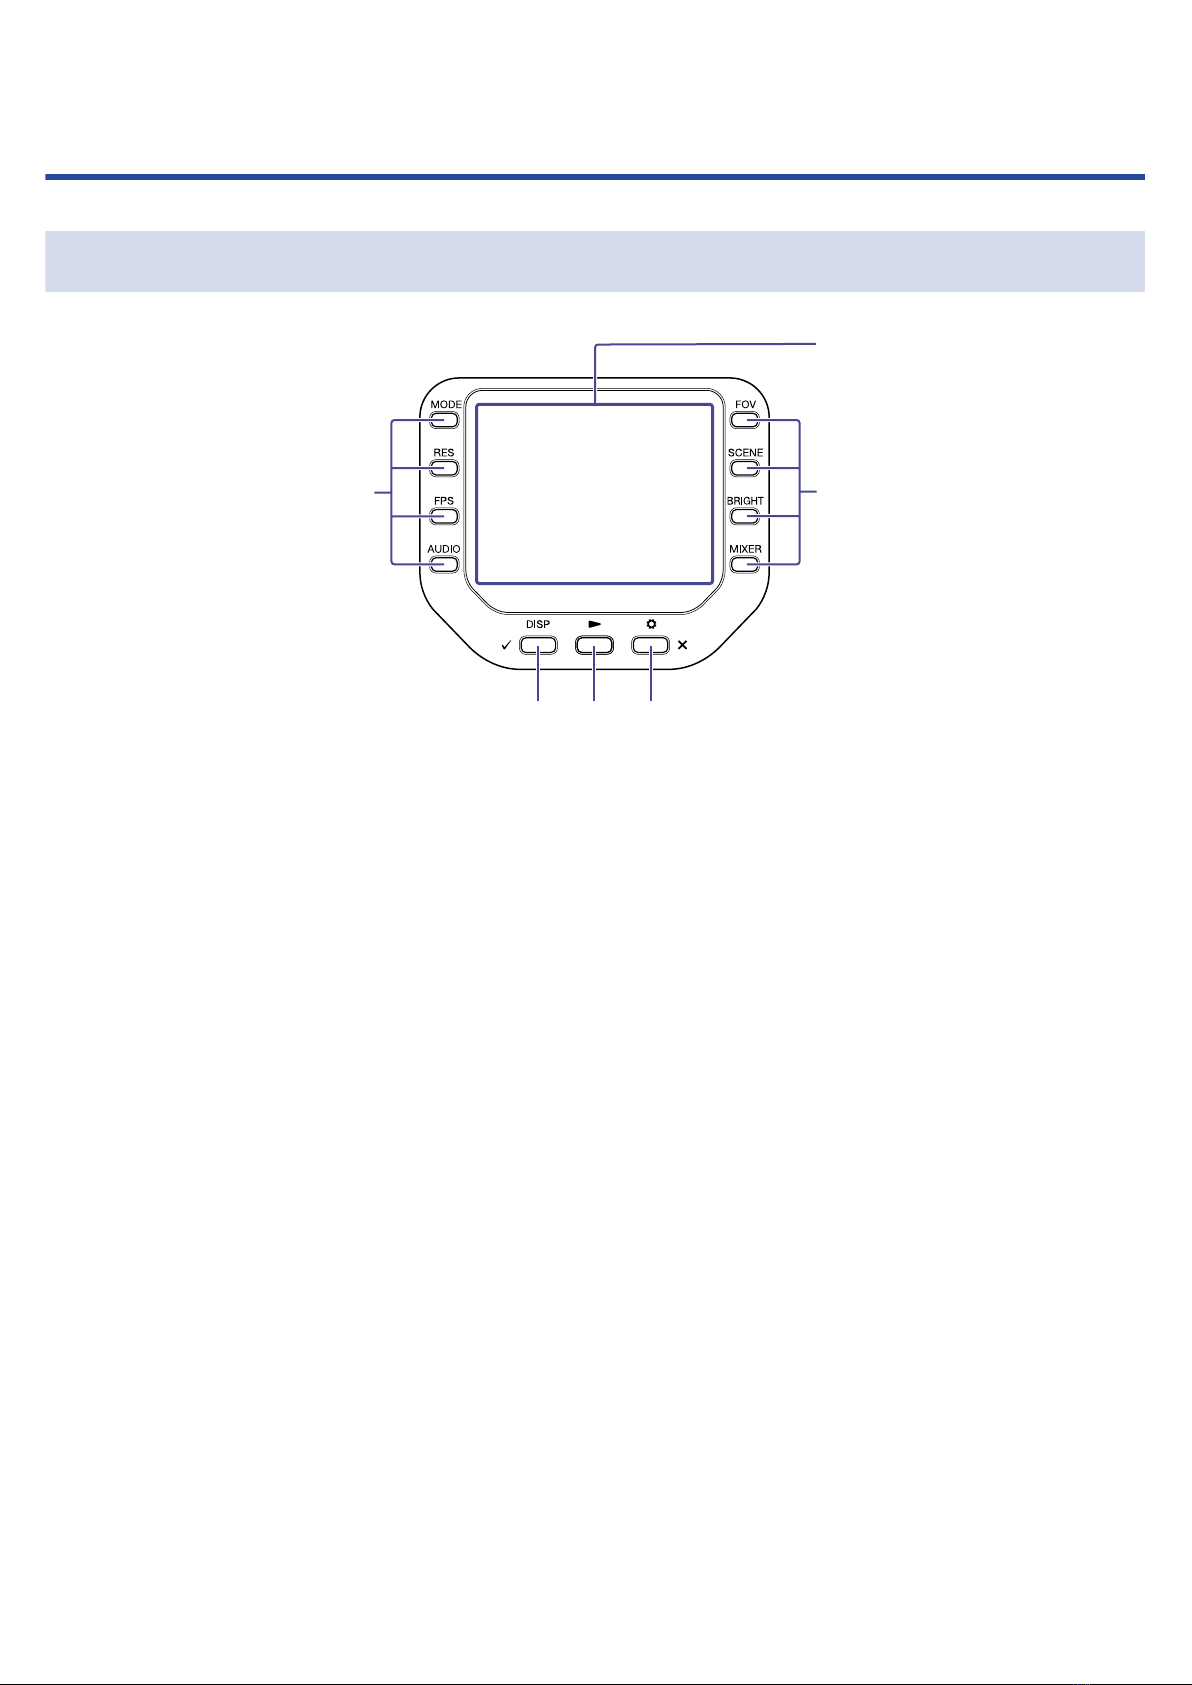
Back (display closed)................................................................................................................................................... 5
Back (display open)..................................................................................................................................................... 6
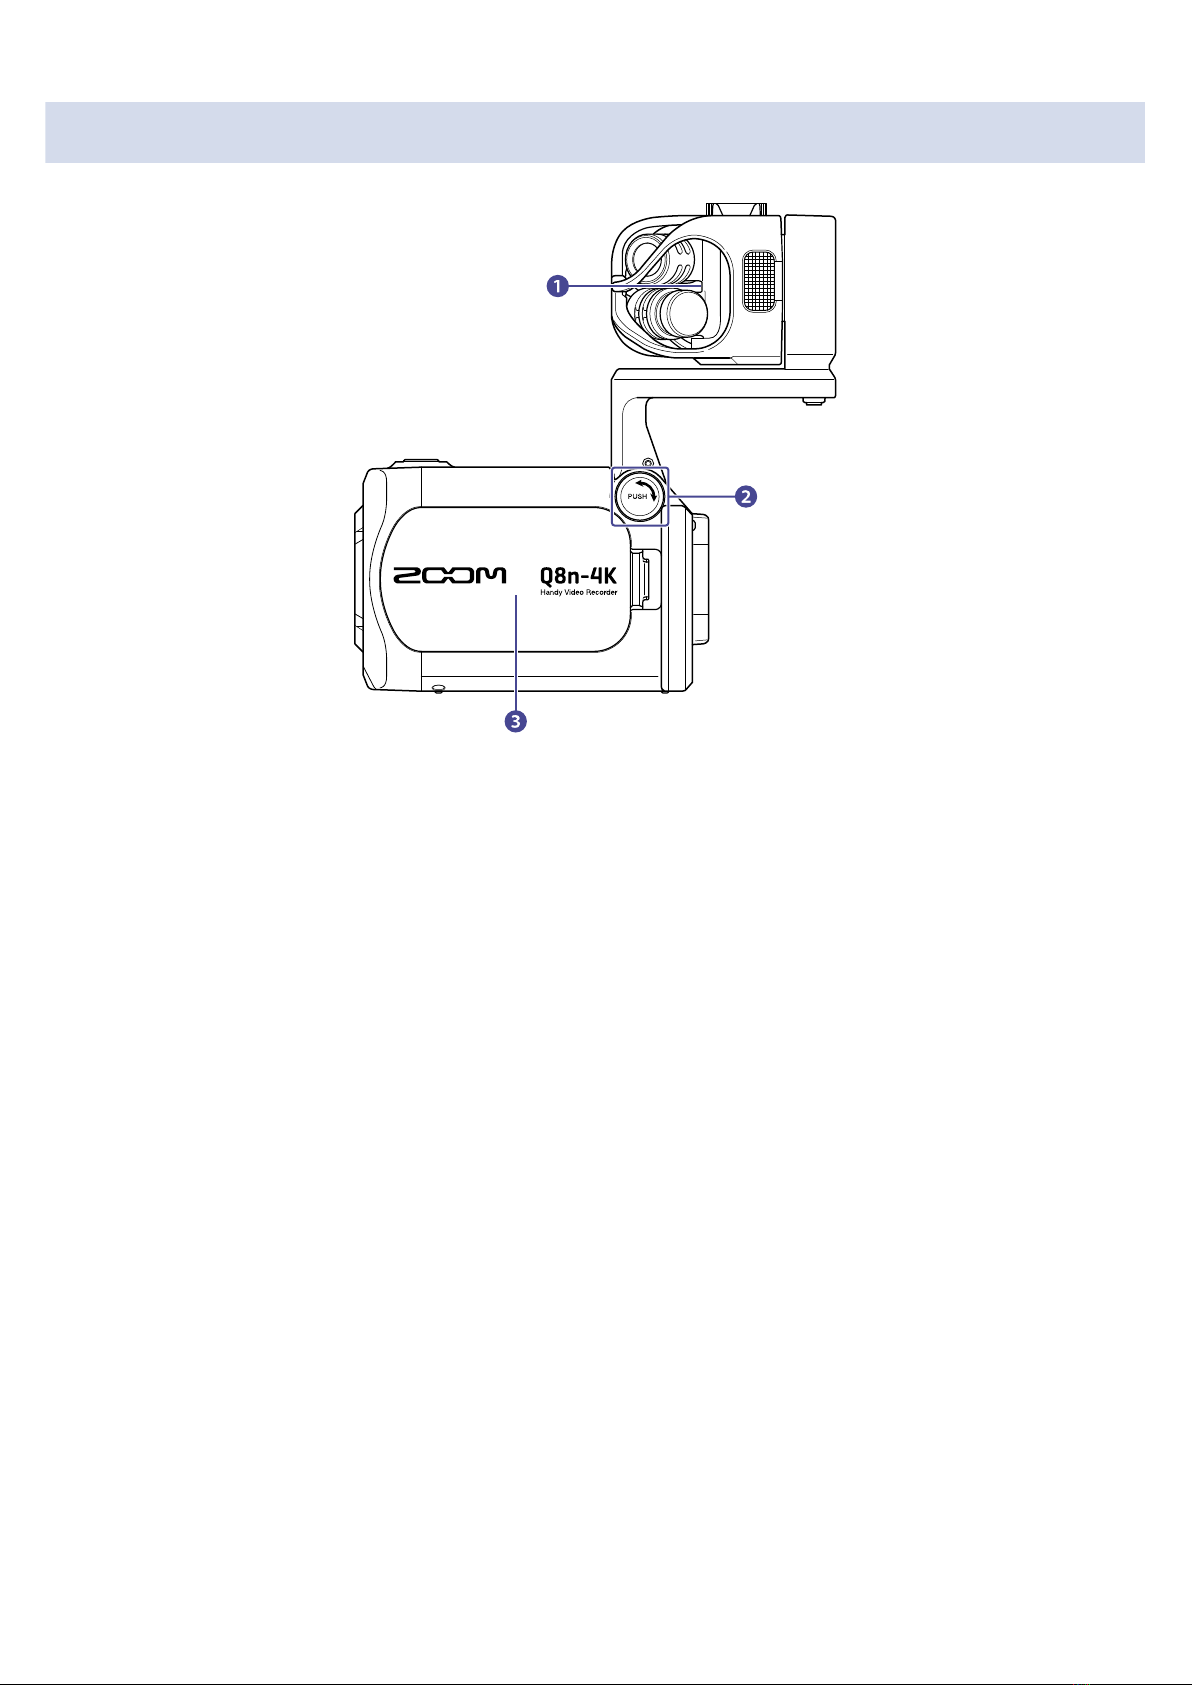
Left side.........................................................................................................................................................................7
Right side.......................................................................................................................................................................8
Front...............................................................................................................................................................................9
Top............................................................................................................................................................................... 10
Bottom.........................................................................................................................................................................11
Preparations...............................................................................................................................................................12
Installing the battery.................................................................................................................................................12
Recharging the battery............................................................................................................................................. 13
About the mic arm....................................................................................................................................................14
Inserting microSD cards........................................................................................................................................... 15
Turning the power on/off........................................................................................................................................ 16
Setting up when first turned on (language setting / date and time setting)....................................................17
Connecting..................................................................................................................................................................19
Connecting / disconnecting mic capsules..............................................................................................................19
Connecting mics / instruments / mixers................................................................................................................20
Adjusting audio (setting input/output).................................................................................................................. 22
Enabling channels to record....................................................................................................................................22
Using phantom power..............................................................................................................................................22
Setting phantom power voltage............................................................................................................................. 23
Adjusting recording (input) levels........................................................................................................................... 24
Using the PAD function............................................................................................................................................ 25
Mixer Screen...............................................................................................................................................................26
Reducing noise (low frequency cut)....................................................................................................................... 27
Setting effects (Comp/Limiter/Gate).......................................................................................................................28
Recording.................................................................................................................................................................... 30
Recording Screen.......................................................................................................................................................30
Selecting a recording mode.....................................................................................................................................32
Setting the video recording format........................................................................................................................33
Setting the audio recording format....................................................................................................................... 35
Adjusting the video quality...................................................................................................................................... 36
Starting recording......................................................................................................................................................39
Playing recordings..................................................................................................................................................... 42
Starting playback....................................................................................................................................................... 42
Playback Screen......................................................................................................................................................... 43
Playback operations.................................................................................................................................................. 44
Enabling continuous playback.................................................................................................................................45
3

Changing the audio channel for playback............................................................................................................ 46
Managing files............................................................................................................................................................47
Displaying file information.......................................................................................................................................47
Deleting files...............................................................................................................................................................48
Using USB functions................................................................................................................................................. 49
Connecting to a computer or iOS/iPadOS device................................................................................................ 49
Turning the power on when connected to a computer..................................................................................... 52
Using as a web camera............................................................................................................................................53
Using as a USB mic...................................................................................................................................................55
Managing files recorded on the SD card.............................................................................................................. 56
Managing SD cards................................................................................................................................................... 58
Checking SD card information................................................................................................................................ 58
Formatting SD cards................................................................................................................................................. 60
Operating from an iOS/iPadOS device (Q8n Control)..........................................................................................62
Connecting an iOS/iPadOS device.......................................................................................................................... 62
Disconnecting from the iOS/iPadOS device.......................................................................................................... 64
Using connected to a TV / monitor by HDMI........................................................................................................65
Checking the Recording Screen on an HDMI-compatible TV / monitor............................................................65
Playback on an HDMI-compatible TV / monitor................................................................................................... 66
Setting the unit..........................................................................................................................................................68
Setting the volume of the operation sound (Beep)............................................................................................. 71
Enabling Power Saving............................................................................................................................................. 72
Setting the date and time........................................................................................................................................76
Setting the language shown.................................................................................................................................... 78
Restoring default settings........................................................................................................................................ 80
Managing the firmware............................................................................................................................................82
Checking the firmware versions............................................................................................................................. 82
Updating the firmware............................................................................................................................................. 83
Mic capsule information.......................................................................................................................................... 84
Checking mic capsule information......................................................................................................................... 84
Troubleshooting.........................................................................................................................................................86
There is no sound or output is very quiet............................................................................................................86
Recorded sound cannot be heard or is very quiet..............................................................................................86
Recording audio/video is not possible...................................................................................................................86
The recorder becomes warm..................................................................................................................................86
A “Low Speed Card!” warning appears frequently / Stopping recording takes a very long time...................87
Charging is slow or not possible............................................................................................................................ 87
Computer does not recognize it even though it is connected to a USB port.................................................. 87
A channel keeps blinking on the Recording Screen............................................................................................ 87
Specifications..............................................................................................................................................................88
4

Functions of parts
Back (display closed)
❶
❷
❷
❸ ❹ ❺
❶Display (LCD)
This shows the video and various types of information.
❷Function buttons
Use these to operate the functions shown on the display.
❸DISP/Check button
Change what is shown on the Recording Screen and Playback Screen. Use this to confirm operations on
confirmation screens.
❹Play button
Use this to play files recorded by the Q8n-4K.
❺Settings/Exit button
Use this to open and close the SETTINGS Screen, for example. Use this to cancel on setting and
confirmation screens.
5

Back (display open)
❶Power button
This turns the power on/off.
❷PAD switch
This attenuates the input signals of equipment connected to Inputs 1/2 by 20 dB.
❸PHANTOM switch
This turns Input 1/2 phantom power ON/OFF.
The phantom power voltage can be set to +12 V / +24 V / +48 V.(→ Using phantom power)
❹Channel buttons
These turn each channel on/off.
❺microSD card slot
Insert a microSD card here.
6

Left side
❶Mic capsule
Other mic capsules can be swapped for different applications.
❷UNLOCK button
Press in to enable moving the mic arm.
❸Battery cover
Remove this when installing or removing a battery.
7

Right side
❶Inputs 1/2
Connect mics and instruments to these. These can be used with XLR plugs.
❷Input volume 1/2
These adjust input volumes.
❸Output volume
This adjusts output volume.
❹Strap holes
Use these to attach a strap.
❺Headphone output jack
This can output sound to headphones.
❻Micro HDMI port
This can output video and audio to an HDMI-compatible TV or other device.
❼USB (Type-C) port
Connect this to a computer or iOS/iPadOS device to use the Q8n-4K as a web camera, card reader or
USB mic.
A dedicated AC adapter (ZOOM AD-17) can also be connected here to use AC power. Connecting this
when the power is off will charge the battery.
8

Front
❶Lens
This lens has F2.8 brightness and a 150º wide angle.
❷REMOTE connector
Connect a BTA-1 or other dedicated wireless adapter here. This enables operation of the Q8n-4K from
an iOS/iPadOS device using a dedicated controller app.
9

Top
❸
❶
❷
❶Mic input volume
This adjusts the mic input volume.
❷Speaker
This outputs the sound of files and the beep.
❸Record button
This starts and ends recording video/audio.
10

Bottom
❶Tripod mounting threads
Use these screw threads to attach a tripod (not included).
11

Preparations
Installing the battery
1. Turn the power off, and open the battery cover while pressing the latch.
2. Install the rechargeable battery.
3. Close the battery cover.
12

Recharging the battery
1. Turn the Q8n-4K off.
2. Connect a USB power supply (running computer or ZOOM AD-17 AC adapter).
While the battery is charging, the charging LED will stay lit.
3. When charging is complete, disconnect the cable from the USB power supply.
After charging has completed, the charging LED will become unlit.
NOTE:
• The battery will not charge when the power is on.
• The ambient temperature should be between 5°C and 35°C when charging. Charging at other
temperatures can cause the battery to overheat, break or deteriorate.
• Do not leave the cable connected for a long time after charging is complete.
• In addition, regarding battery use, follow the instructions in Precautions for Li-ion battery.
13

About the mic arm
Raising the mic arm
While pressing , raise the mic arm until it reaches the fixed position.
Lowering the mic arm
While pressing , lower the mic arm.
14

Inserting microSD cards
1. Turn the power off and open the microSD card slot cover.
2. Insert a microSD card into the card slot.
To remove a microSD card, push it further into the slot and then pull it out.
NOTE:
• Supported recording media
microSDHC: 4 GB – 32 GB
microSDXC: 64 GB – 512 GB
• Use a microSD card that is Class 10 or higher.
When recording at 4K resolution, use a microSD card that is UHS Speed Class 3 or higher.
• When recording for long periods of time with a microSDHC card, recording files will be split every 4 GB.
When using a microSDXC card, recording to a single file is possible even if the file size exceeds 4 GB.
15

Turning the power on/off
Turning the power on
1. Open the display (LCD).
2. Press .
Turning the power off
1. Press and hold .
After "Goodbye See You !" is displayed, the power turns off.
NOTE:
When Auto Power Off is set to on, the power will be turned off automatically after a certain period of time.
16

Setting up when first turned on
(language setting / date and time setting)
Language setting / date and time setting screens automatically appear when first turned on or when first
turned on after being reset.
1. Turn the power on.
The Language Screen opens.
2. Use and to select the language.
3. Press .
The language is set and the SET DATE Screen opens.
17

4. Press the corresponding to change the date and time.
5. Press .
The date and time are set and the Recording Screen opens.
NOTE:
If four minutes or more have passed with the battery removed while the power is off, the date and time
setting could be reset.
18

Connecting
Connecting / disconnecting mic capsules
Connecting mic capsules
Push a mic capsule into place until it locks.
Disconnecting mic capsules
While pressing the buttons on the left and right sides of the mic, pull it out of the unit.
NOTE:
• Do not use too much force when disconnecting. Doing so could damage the mic capsule and the unit.
• Recording will stop if a mic capsule is removed during recording.
19

Connecting mics / instruments / mixers
You can connect mics, mixers, and other instruments to Inputs 1 and 2 of the Q8n-4K. The L/R input from
the mic capsule and Inputs 1/2 can be used together to record up to 4 channels at the same.
Concert video recording
❶
❷
❷
❸
❶L/R input
This records the sound of the entire concert hall.
❷Inputs 1/2
Connect to the line outputs from the PA mixer to record the clear sound of instruments and vocals.
❸PA mixer
20
Other manuals for Q8n-4K
2
Table of contents
Other Zoom DVR manuals