ZowieTek LiveV400 Series User manual

High Definition
Bonding Live Video Streaming Encoder
User Manual
LiveV400 Series
Revision
K1.2.0
Release
2021-10-25
Product
30501-0XX

1
Contents
Chapter 1 General........................................................................................................................ 1
1.1 Overview......................................................................................................................................... 1
1.2 Feature............................................................................................................................................ 2
Chapter 2 Quick Start Guide-Connection....................................................................................... 3
2.1 What’s in the Box............................................................................................................................ 3
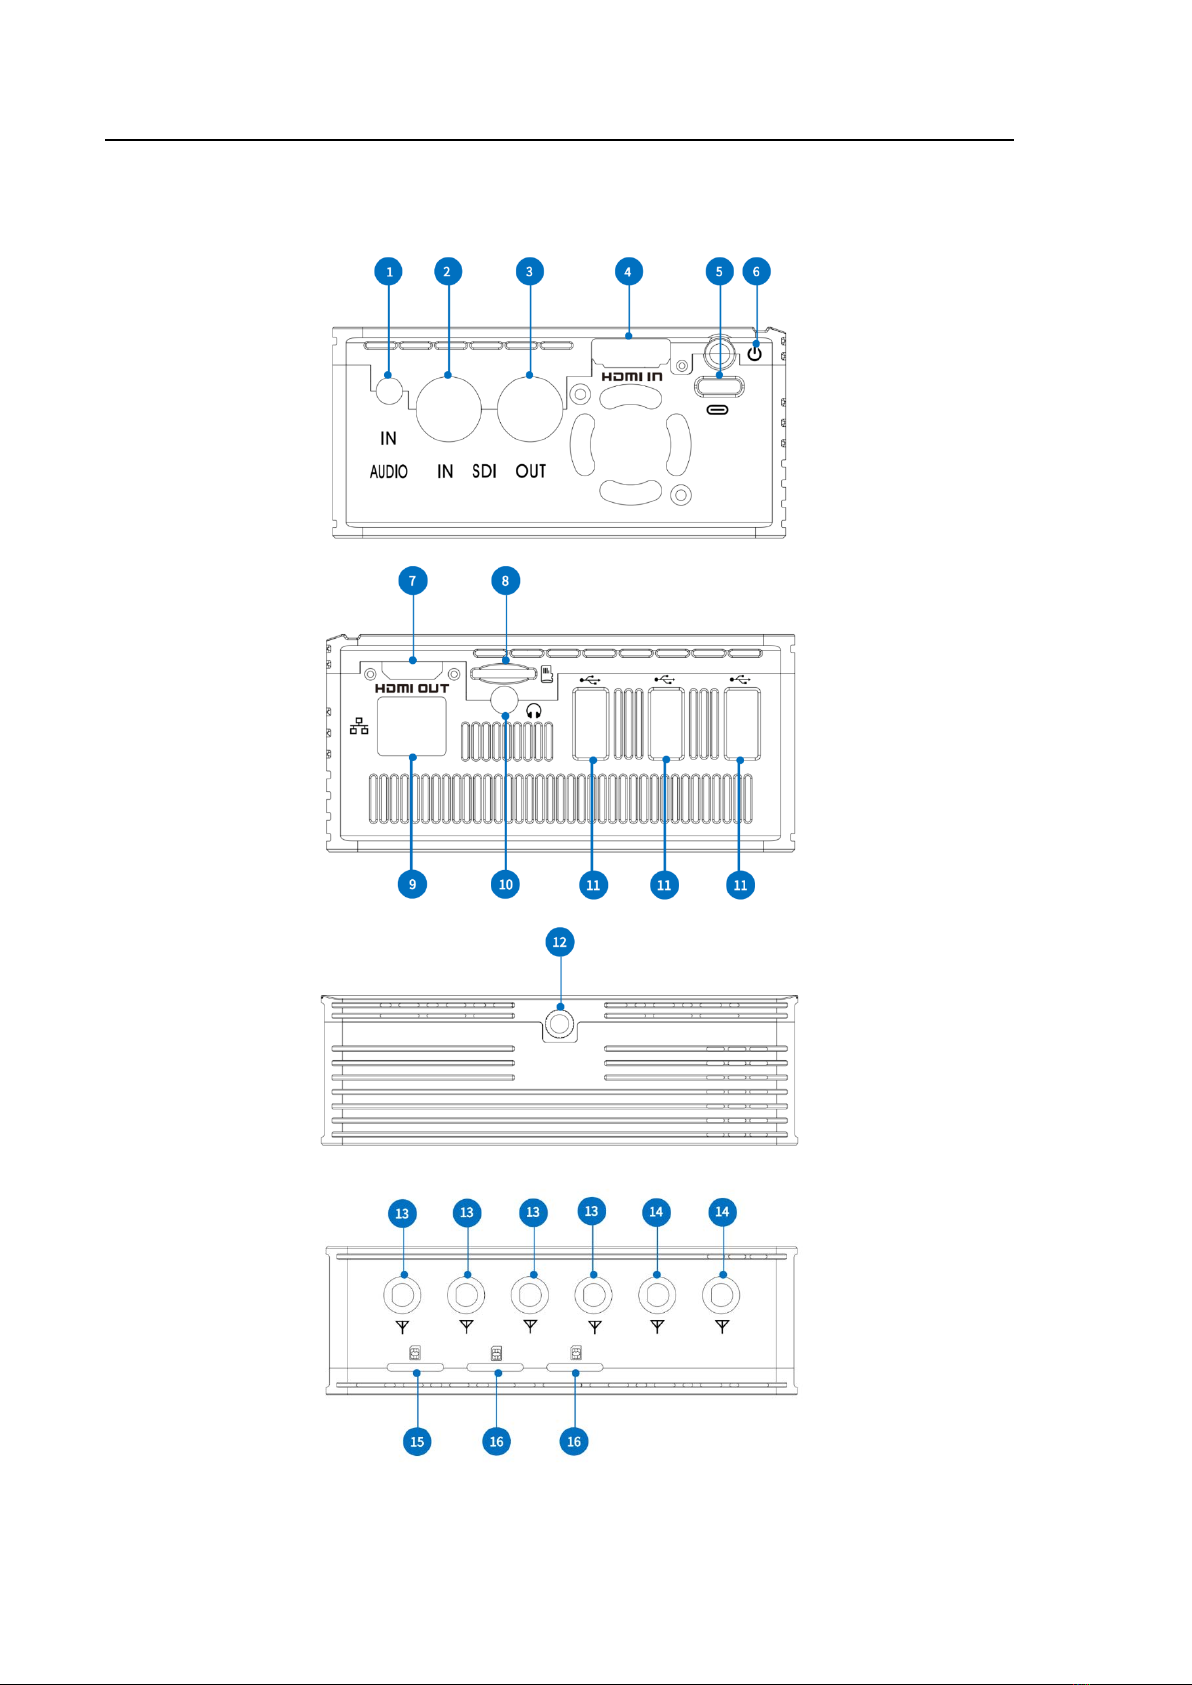
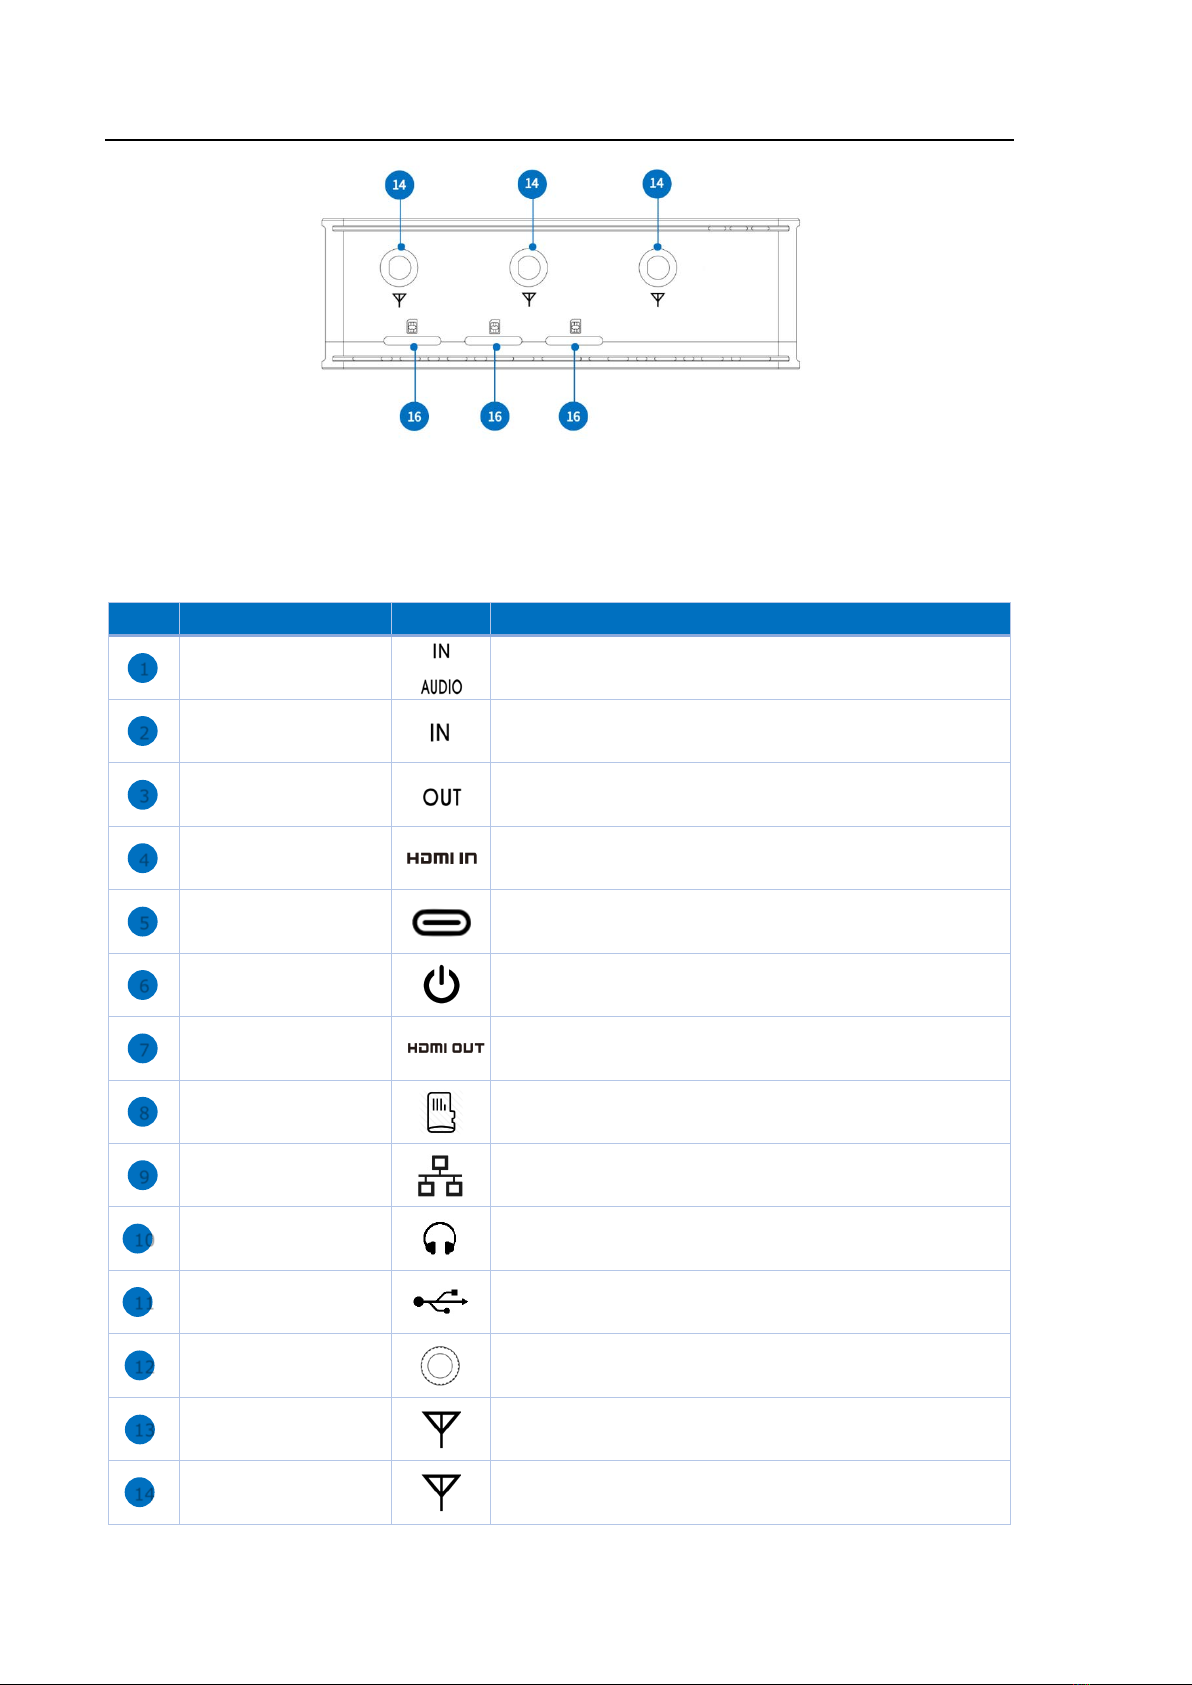
2.2 Connections and Controls............................................................................................................... 4
2.2.1 Physical Connections............................................................................................................ 5
2.3 Screen Display................................................................................................................................. 6
2.4 Menu/Setting.................................................................................................................................. 7
2.5 Quick Start Guide.......................................................................................................................... 15
Chapter 3 Web Control User Interface..........................................................................................16
3.1 Main Control Interface.................................................................................................................. 16
3.2 Device Info .................................................................................................................................... 16
3.3 Signal Input ................................................................................................................................... 17
3.4 Network Setting ............................................................................................................................ 18
3.4.1 LAN..................................................................................................................................... 18
3.4.2 WIFI.................................................................................................................................... 18
3.4.3 5G/4G................................................................................................................................. 19
3.4.4 Side USB 4G........................................................................................................................ 21
3.4.5 USB 4G Dongle ................................................................................................................... 21
3.5 Audio Param.................................................................................................................................. 23
3.6 Video Encoder............................................................................................................................... 24
3.7 RTMP Param.................................................................................................................................. 26
3.8 OSD ............................................................................................................................................... 31
3.9 Video Collage ................................................................................................................................ 33
3.10 Time Setting ................................................................................................................................ 34
3.11 Upgrade ...................................................................................................................................... 34
3.12 Language..................................................................................................................................... 35
3.13 Recovery ..................................................................................................................................... 35
Chapter 4 Mobile-Phone Backend Setting ....................................................................................35
4.1 Status ............................................................................................................................................ 36
4.2 Device ........................................................................................................................................... 38
4.3 Network ........................................................................................................................................ 38
4.4 Record........................................................................................................................................... 40
4.5 Output........................................................................................................................................... 40
4.6 RTMP............................................................................................................................................. 41
4.7 Audio............................................................................................................................................. 42
4.8 Encoder ......................................................................................................................................... 43
4.9 OSD ............................................................................................................................................... 44
4.10 Video collage............................................................................................................................... 46
4.11 Date Time.................................................................................................................................... 48

2
4.12 Authority..................................................................................................................................... 49
4.13 Upgrade ...................................................................................................................................... 50
4.14 Wallet.......................................................................................................................................... 50
Specification ...................................................................................................................................51

2
Warnings and Precautions
1. Read all of these warnings and save them for later reference.
2. Follow all warnings and instructions marked on this unit.
3. Unplug this unit from the Power Adapter before cleaning. Do not use liquid or aerosol
cleaners. Use a damp cloth for cleaning.
4. Do not use this unit in or near water.
5. Do not place this unit on an unstable cart, stand, or table. The unit may fall, causing
serious damage.
6. Slots and openings on the cabinet top, back, and bottom are provided for ventilation. To
ensure safe and reliable operation of this unit, and to protect it from overheating, do not
block or cover these openings. Do not place this unit on a bed, sofa, rug, or similar surface,
as the ventilation openings on the bottom of the cabinet will be blocked.
7. This unit should never be placed near or over a heat register or radiator. This unit should
not be placed in a built-in installation unless proper ventilation is provided.
8. This product should only be operated from the type of power source indicated on the
marking label of the AC adapter. If you are not sure of the type of power available, consult
your LiveV400 dealer or your local power company.
9. Do not allow anything to rest on the power cord. Do not locate this unit where the power
cord will be walked on, rolled over, or otherwise stressed.
10. If an extension cord must be used with this unit, make sure that the total of the ampere
ratings on the products plugged into the extension cord do not exceed the extension cord
rating.
11. Never push objects of any kind into this unit through the cabinet ventilation slots, as they
may touch dangerous voltage points or short out parts that could result in risk of fire or
electric shock. Never spill liquid of any kind onto or into this unit.
12. Except as specifically explained elsewhere in this manual, do not attempt to service this
product yourself. Opening or removing covers that are marked “Do Not Remove” may
expose you to dangerous voltage points or other risks, and will void your warranty. Refer
all service issues to qualified service personnel.
13. Unplug this product from the Power Adapter and refer to qualified service personnel
under the following conditions:
a) When liquid has spilled into the unit.
b) When the product has been exposed to rain or water.
c) When the product does not operate normally under normal operating conditions.
Adjust only those controls that are covered by the operating instructions in this
manual; improper adjustment of other controls may result in damage to the unit and
may often require extensive work by a qualified technician to restore the unit to
normal operation.
d) When the product has been dropped or the cabinet has been damaged.
e) When the product exhibits a distinct change in performance, indicating a need for
service.

4
Disposal
For EU Customers only - WEEE Marking
This symbol on the product or its packaging indicates that this product
must not be disposed of with your other household waste. Instead, it is
your responsibility to dispose of your waste equipment by handing it
over to a designated collection point for the recycling of waste electrical
and electronic equipment. The separate collection and recycling of your
waste equipment at the time of disposal will help to conserve natural
resources and ensure that it is recycled in a manner that protects human health and the
environment. For more information about where you can drop off your waste equipment for
recycling, please contact your local city office, your household waste disposal service or the
shop where you purchased the product.

General
1
Chapter 1 General
1.1 Overview
Thank you for purchasing LiveV400 – HD Live Streaming Encoder. The LiveV400 is a portable
standalone, hardware-based video streaming encoder that can be mounted on top of the
cameras or carried on a backpack. LiveV4X0 can encode and transmit video of camcorder or
camera via 5G, 4G, WIFI or LAN to the cloud server in real-time for live broadcasting.
LiveV400 opened 5G live streaming era. It is a high definition, bonded dual video input
streaming encoder plus video router. It is cost effective, easy to use, with tripod mount,
supports modern USB Type-C charger and a range of innovative features.
The LiveV400 offers 1 *5G LTE channel and 5* 4G LTE channels (including 2 built-in 4G and 3 external
4G), 1 built-in WIFI and 1 Gigabit Ethernet port. Convenient users in indoor, outdoor and other bad
situations live. In addition, the LiveV400 offers aggregation capabilities that aggregate LAN, WIFI,
2x built-in 4G, 3x external 4G, 5G eight-way network, adaptive link quality, and joint push. And after
aggregation can be distributed 9 RTMP streams.
LiveV400 has 4.3” touch screen and user-friend operation and video and camera collage preview, live video
switch, setup, status. It has full touch screen UI and full control of encoder. PC, phone and remote web
encoder and settings are also supported.
LiveV400 supports dual 1080P HD video signal input, supports a variety of video graphics puzzles
including two video seamless switching, picture-in-picture and so on, up to 6 different live display
combinations, and also provides 2 user-defined video puzzles, can freely adjust HDMI and SDI dual
video display size, location and so on.
LiveV400 uses efficient H.264 digital audio and video hardware encoding, encoding compressed
video circulation too much network aggregation RTMP push to the server platform, replacing the
traditional PC and video acquisition card, without the need for special PC software.
The LiveV400 provides multiple network channels, and when a network connection fails, the device
automatically selects other available network push streams that are connected, without additional
setup by the user. In addition, when the bandwidth of the push streaming network is less than the
set target code rate, the user can choose to use the aggregation mode to push the stream, the
encoder aggregates multiple networks to push the stream together, to achieve the set target code
rate.

General
2
1.2 Feature
4.3ʺtouchable LCD for in field setting and video monitoring
Up to 8 network links, include 3 built-in + 3 side USB 4G/LTE, Built-in WIFI and 1 Giga-Bit
Ethernet port
At the same time LAN/WIFI/5G 8-way aggregation improves the bandwidth and stability of
live broadcast
Up to 10mbits/s video stream by encoder, up to 20mbits/s for bonding server.
Support multi-channel network bonding streaming mode, up to 9 RTMP Address stream
at the same time
SDI and HDMI dual channel inputs, as well as analog stereo audio in, SDI and audio out
Accept RTMP and RTSP video stream over router
SDI and HDMI dual channel seamless handover, picture in picture, customize the display
area, position and background of dual-channel video
Standalone and long battery life for up to 6-hour live event in the Single mode, live time
is reduced by half in the Bonding mode
QR Code scan for quick configuration with mobile phone. Local and remote management
by mobile phone and PC
Advance hardware H.264 MP/HP video codec for highest stability
AAC audio encoder with HDMI/SDI embedded audio support
Analog audio input and audio output for embedded and analog
Automatic dual input resolution, format detection, no professional setting required
Powerful and flexible OSD, text, logo and stamp can be supported with easy-to-user
configuration
With standard camera tripod mount
Based on very stable Linux system. Local and online upgrades are available
Onboard recording to TF for backup or post event editing
The standard USB TYPE C power supply interface is portable and convenient
Full web remote control without installing a mobile app
Support various live streaming platforms such as YouTube, Facebook, twitch etc.
Light weight and small size design for outdoor activities.
Portable hardware encoder, no expensive PC and video captured card required.

Quick Start Guide
3
Chapter 2 Quick Start Guide-Connection
2.1 What’s in the Box
Encoder includes:
LiveV400 unit
USB TYPE C Travel Charge
Type C cable
4 x 5G Antenna and 2 x 4G Antenna for LiveV400 (5G version); 3 x 4G Antenna for LiveV400
(4G version)
Hot shoes
Storage Bag
USB 4G Dongle (Optional)

Quick Start Guide
4
2.2 Connections and Controls
LiveV400 (5G version) TOP

Quick Start Guide
5
LiveV400 (4G version) TOP
2.2.1 Physical Connections
Label
Name
Icon
Description
Audio In
Stereo audio input.
SDI Input
Connect up to SDI signal.
SDI Loop Out Connect a SDI cable from this connector to a monitor or
projector.
HDMI Input Connects HDMI and DVI signals (using an adapter).
Type-C Power
Connector
Plug the power supply in here. The port requires a 15V DC
power source (center-positive).
RED Power Button
Press to turn on encoder.
Press and hold more than 5 seconds to turn off.
HDMI Loop Out
Connect a HDMI cable from this connector to a monitor or
projector.
TF Card Slot
Plug the TF card in here.
RJ-45 Ethernet
Ethernet network port.
3.5mm Audio Output
For audio confidence monitoring. Plays the audio for the
currently visible channel
USB Connector Connect to USB 4G Dongle.
Hot Shoe Mount
Mount encoder to camera
SMA Connector
Connect to Internal 5G LTE antenna.
SMA Connector
Connect to Internal 4G LTE antenna.
1
2
3
4
5
6
7
8
9
10
11
12
13
14

Quick Start Guide
6
SIM card slot
Built-in 5G, Plug the NANO SIM card in here.
SIM card slot
Built-in 4G, Plug the NANO SIM card in here.
NOTE:
LiveV400 has an internal rechargeable battery, so please keep it turning off and charging until
fully charged when users first use it. This is required only for the first use.
2.3 Screen Display
If Lan, WIFI, 4G network are connected, the screen will display all of the network information.
Label Description
The IP address of LAN network
The IP address of wireless network
SDI signal input, display Resolution and Frame Rate of SDI inputs;
Display No Signal when the no SDI input or SDI connection fail
HDMI signal input, display Resolution and Frame Rate of HDMI inputs;
Display No Signal when the no HDMI input or HDMI connection fail
Pull stream Signal input, display Resolution and Frame Rate of Stream inputs;
Display No Signal when the no Stream input or Stream connection fail
15
16
1
2
3
4
5

Quick Start Guide
7
HDMI Display ON
Display
LAN when the LAN connection is successful
Display uplink speed of LAN when the encoder using LAN as streaming network;Otherwise“
0kb”
is displayed
Display the WIFI SSID when the WIFI connection is successful
Display 0 kb when the WIFI is not involved in streaming
Display the Operator when the Built-in 5G/4G connection is successful
Display 0 kb when the Built-in 5G/ 4G is not involved in streaming
Streaming Icon.
The Streaming Icon is grey, when the streaming is offline
Streaming Resolution
Streaming Mode: means: Normal (Single) ; means Bonding
Streaming Icon and Video streaming bit rate, display 0 kb when the streaming is offline
Battery Level and Battery percentage
Power Off
Hide / Display desktop
Hide / Display text and icons on the LCD screen
Lock / Unlock screen
Video Collage
Customize layout, Picture in picture,Supports 6 fixed and 2 custom screen compositions
Menu
Setting
Streaming button
2.4 Menu/Setting
After clicking the Menu button, the Device Menu main interface will be shown as follows, including
“Network”, “Live”, “Audio”,“Video”,“Record”, “QR code”and “System”. And the detailed description of
each part will be given below.
6
7
8
9
10
11
12
13
14
15
16
17
18
19
20

Quick Start Guide
8
1. Network
LAN
The default Network mode of the encoder is DHCP mode. Once the DHCP mode is selected to “open”,
all of these network parameters will be set automatically. In addition, user can also fill in network
parameters.
WIFI
First of all, please switch the “WIFI” button to “Open”, then the user can press the “Scan”button, find
WIFI name and connect it. The second method is to click on the "Setting" button, enter "SSID" and
"Password" to determine the connection to WIFI, and finally don't forget to click the "√".

Quick Start Guide
9
Mobile
Turn on/off Mobile Reset, recognizing display connection status and its IMEI.
2. Live
Live
Live: Button for Start/Stop streaming.
Bonding: Turn on/off network bonding mode.
URL:Combination of RTMP URL and Stream Key, equivalent to RTMP Address.
Network select: User can select LAN, WIFI, 4G, 4G-1,4G-2, Side 4G-1, Side 4G-2 or Auto as the
streaming network.
Note: 4G USB(Side-4G) automatically displays according to the quantity of inserted dongle.

Quick Start Guide
10
3. Audio
Audio
Turn on/off audio output. Audio loop out, it can connect to earphone to monitor.
Source
LINE IN: Use the analog stereo input as the audio source.
HDMI: Use the embedded digital stereo audio of HDMI input as the audio source.
SDI: Use the embedded digital stereo audio of SDI input as the audio source.
Auto Gain
Turn on/off Auto Gain, the default setting of Auto Gain is on.
Volume
Set a volume when Audio gain is turn off. The range of volume is 0~100.
Loop Out
Turn on/off, monitor audio.

Quick Start Guide
11
4. Video
Bit rate(kbps)
The bitrate range of LiveV400 is 100 kbps~2,0000kbps.
I Frame interval
The range of I frame interval is 5~200. The default is recommended 40.
Bitrate control
CBR: Constant Bit Rate.
VBR: variable Bit Rate.
Resolution
The Resolution choose from 360P, 576P, 720P, 960P or 1080P. The default value is 1080P.

Quick Start Guide
12
5. Record
Turn on/off, insert the TF card to record.
6. QR Code
Please scan by mobile browser or camera app, tap the notification to open the link. Click the “Create
account” , if you don’t have account.
7. System
About
Display device Name,Model, Serial Number, Hardware Version, Software Version,and support users
to rename the device.

Quick Start Guide
13
Software Update
Display current Software version and support users upgrade software while the network was
connected.
Language
Language can be chosen from English or Chinese (simplified).

Quick Start Guide
14
Silent fan
Turn on, the fan will be stopped; turn off, the fan will be open.
Note: In the silent fan mode, the encoder will stop charging the battery.
Output
HDMI Output turns on/off to connect the HDMI monitor to watch the preview video.

Quick Start Guide
15
Restart & Reset
Restart: Restart the device.
Restore: Restore the device to factory default status.
2.5 Quick Start Guide
Please follow the following steps for a quick connection guidance of the encoder.
Step1. Make the Power Adapter plugged.
Step2. Press the RED Power button on the left of encoder to turn on the system.
Step3. Turn on your camera or video source and connect the output to corresponding connection of the
encoder.
Step4. (Optional) Plug speakers or headphones into the 3.5 mm headphone jack of encoder.
Step5. Connect encoder to Network.
Encoder allows you to connect multiple ways. Find brief descriptions of these modes below.
Other manuals for LiveV400 Series
1
This manual suits for next models
2
Table of contents
Other ZowieTek Media Converter manuals