manuals.online logo
Brands
  1. Home
  2. •
  3. Brands
  4. •
  5. ZTECH
  6. •
  7. Medical Equipment
  8. •
  9. ZTECH 8A Series User manual

ZTECH 8A Series User manual

WARNING
NO RESTRAINT can protect
user from injury and/or death.
Recommended set up can be
located at z-techsports.com.
(Series 8A -
Seat Belt goes
over Shoulder)
Limited Warranty
No restraint can protect the user from injury
and/or death. For maximum protection, the
restraint must be set up as instructed and
seat belts and tethers must be fastened
securely at all times.
If the restraint experiences a significant
accident, return to manufacturer for
inspection or destroy and replace with a
new restraint.
It is recommended to have a trained Z-Tech
Dealer set up your restraint.
For maximum protection, the Restraint must be set
up as instructed and seat belts and tethers must be
fastened securely and correctly at all times.
USE of your Restraint
Proper storage is important to avoid damage to your
restraint. Avoid contact with extreme heat or cold.
Do not use any solvents or chemicals to clean your
restraint.
For cleaning, use mild soapy water and wipe dry with
a clean cloth. Allow restraint to fully dry prior to
storage.
Your restraint has been designed for the restraint to
absorb energy from a severe accident. If your
restraint has damage and needs to be replaced
within two years of purchase, Z-Tech has an accident
replacement program which can be found at
www.z-techsports.com Info Page.
This warranty gives original purchaser specific legal
rights and you may also have other rights which vary
from state to state.
A Z-Tech restraint found to be defective in materials
and/or workmanship within one year of purchase will
be repaired or replaced at the option of Z-Tech Sports
when returned with freight prepaid. The warranty
does not cover modification, abuse or neglect. This
warranty does not cover incidental or consequential
damages.
CARE of your Restraint
Accident Replacement
Operating a Motor Vehicle is Dangerous.
WARNING: Read Carefully
Head & Neck Restraint
Owners Manual
Series 8A
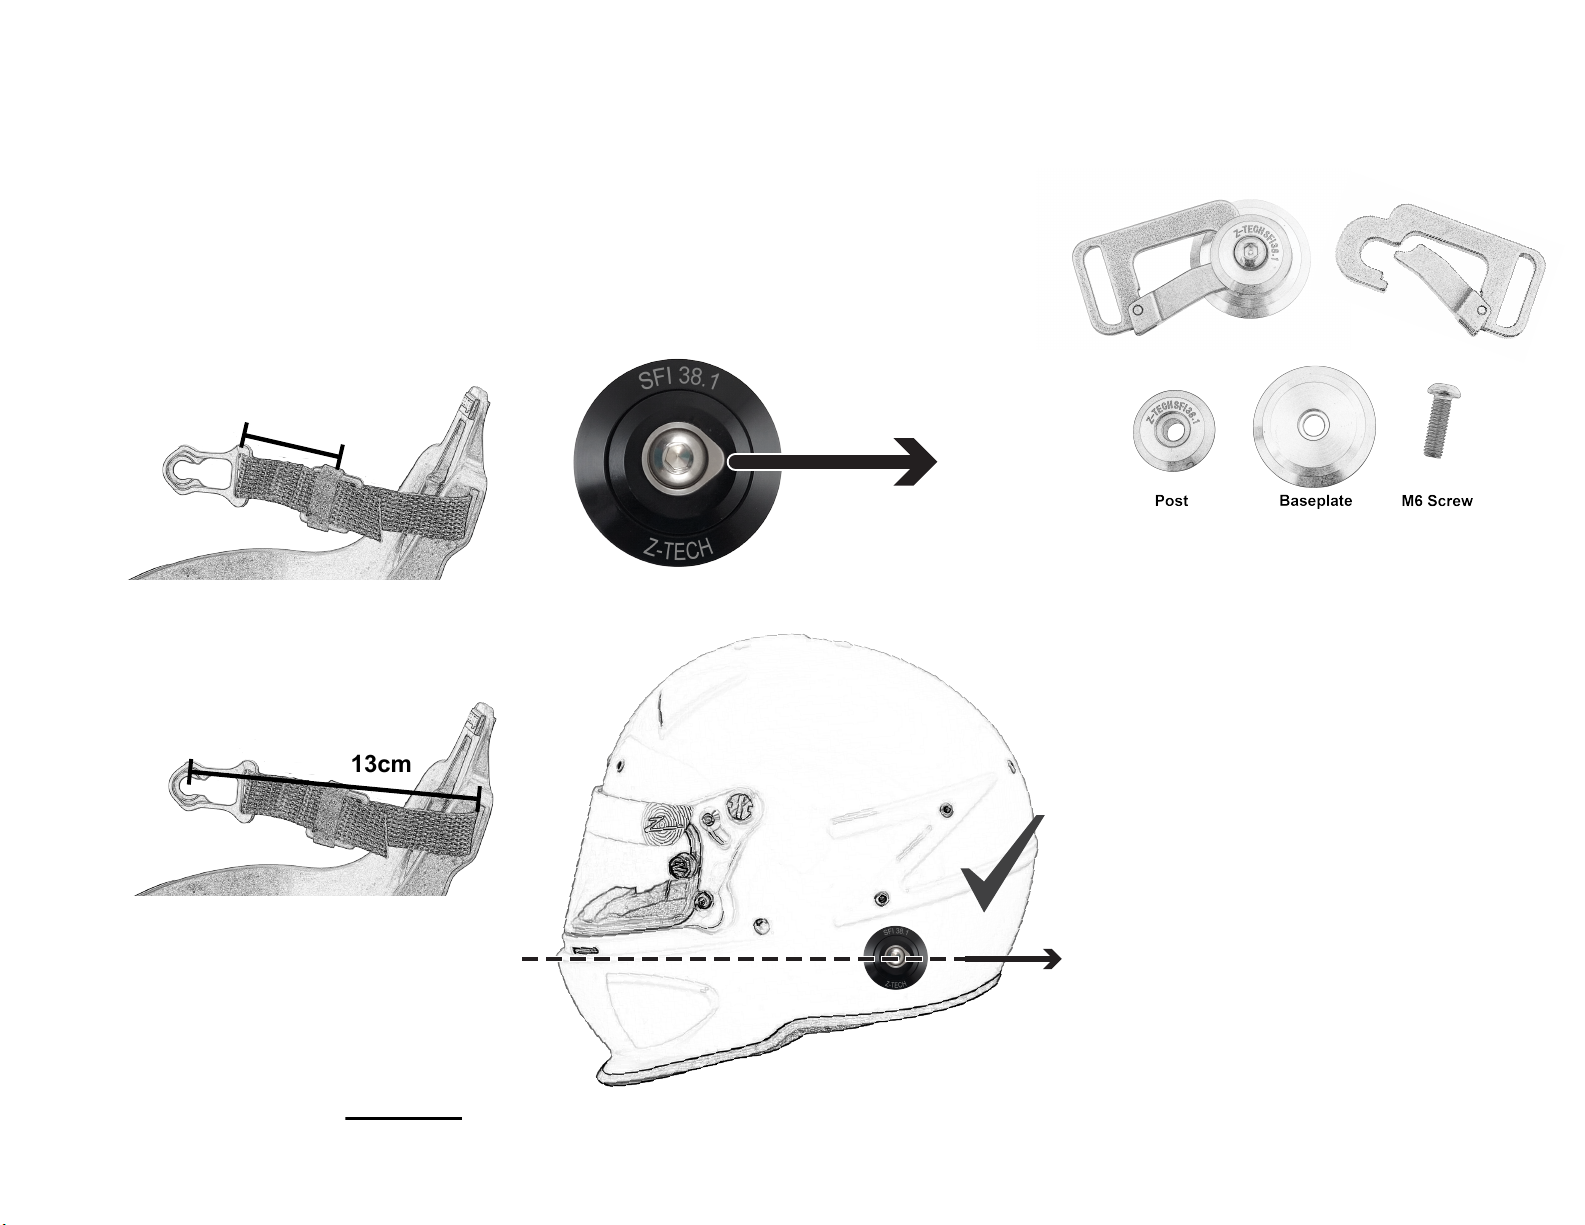
Setting Up Helmet Kit (not included)
Setting Up Helmet with M6 Inserts
Note: Helmet inserts that are not certified are not
recommended.
Remove black cap from back of Helmet Kit
before installing. Set the Baseplate (pictured
above) against helmet shell centered to the M6
insert. Then put the M6 Screw through the
Post with thread lock-tite “blue” on the end
of the screw. Align the Post and M6 Screw
through the Baseplate and carefully tighten the
M6 Screw into the helmet without
cross-threading during installation. Tighten
snuggly and allow thread lock-tite to dry.
If your helmet does not have M6 Inserts in the
helmet, Zamp carries an accessory Backplate
(part #NZBP0016). To install, slide the backplate
between the Shell and EPS/Dense Foam upper
liner, carefully positioning it center of the hole.
Once the Backplate is positioned correctly,
follow the instructions above to install the
Baseplate, Post, and M6 Screw. Insure M6 Screw
has “blue”lock-tite, is tightened snugly, and
lock-tite allowed to fully dry. More detailed
instructions available at:
z-techsports.com
Helmet Kit Option 2: #NZCH001A
Helmet Kit Option 1: #NZCH008A
(If Series 8A was purchased with alternate Helmet
Clips, #NZCH1015, and alternate Helmet Kit,
#NZCH001A)
Remove black cap from back of Helmet Kit before
installing on helmet
Set Up of Your Restraint
(diag. 1a: 4cm between end of clip
and center of H buckle)
Step 1 - Adjust strapping:
It is recommended that you evaluate the video on
www.z-techsports.com in regards to adjustment of
tethers and strapping. You will want to make sure the
strapping stays in the same configuration throughout
the hardware as you receive it from the mfg. There is
only one point on each side of the Series 8A which you
will want to adjust as shown in diag (1a) and (1b). The
following measurement is the standard starting point,
you will want to adjust this measurement so the
clips engage with the straps 1.75-2” from your
natural driving position.
4cm
13cm
(diag. 1b: 13cm between center of
clip and frame)
Note: the Series 8A does not
include a Helmet Kit
Center post of 8A
Helmet Kit must point
towards back of helmet

Popular Medical Equipment manuals by other brands

AVE CALL02P quick start guide

AVE

AVE CALL02P quick start guide

Cosmed Quark PFT manual

Cosmed

Cosmed Quark PFT manual

Huntleigh D920 Instructions for use

Huntleigh

Huntleigh D920 Instructions for use

Physio Control lucas 2 Instructions for use

Physio Control

Physio Control lucas 2 Instructions for use

LionsGate Technologies Kenek Edge user manual

LionsGate Technologies

LionsGate Technologies Kenek Edge user manual

Babycare TENS OBITENS+ instruction manual

Babycare TENS

Babycare TENS OBITENS+ instruction manual

GE BK MEDICAL 8815 Series user guide

GE

GE BK MEDICAL 8815 Series user guide

Ossur Miami Lumbar Posteo Instructions for use

Ossur

Ossur Miami Lumbar Posteo Instructions for use

Inogen One G3 user manual

Inogen

Inogen One G3 user manual

Ossur AFO Dynamic Instructions for use

Ossur

Ossur AFO Dynamic Instructions for use

Mizuho Evans DT Series Instructions for use

Mizuho

Mizuho Evans DT Series Instructions for use

Thomashilfen ThevoActiv user manual

Thomashilfen

Thomashilfen ThevoActiv user manual

Steris Hausted MBC Operator's and service manual

Steris

Steris Hausted MBC Operator's and service manual

SUBLIMED actiTens quick start guide

SUBLIMED

SUBLIMED actiTens quick start guide

Kyoto Kagaku NW8 instruction manual

Kyoto Kagaku

Kyoto Kagaku NW8 instruction manual

Nidek Medical ConfoScan4 Service manual

Nidek Medical

Nidek Medical ConfoScan4 Service manual

HAGER & WERKEN Spandex Processing instructions

HAGER & WERKEN

HAGER & WERKEN Spandex Processing instructions

Enraf Nonius Curapuls 670 Information sheet

Enraf Nonius

Enraf Nonius Curapuls 670 Information sheet

manuals.online logo
manuals.online logoBrands
  • About & Mission
  • Contact us
  • Privacy Policy
  • Terms and Conditions

Copyright 2025 Manuals.Online. All Rights Reserved.