200A 300A
90*55*50 116*78*74
6.0V/7.4V
réglable/8A
6.0V/7.4V
ajustable/8A
8-24NC/3-8Lipo 18-36NC/6-12Lipo
1/5th Buggy/Truck 1/5th Buggy/Truck
Beast SLL Beast Pro
●Amélioration de la réponse de l'accélérateur, excellente accélération, linéarité et maniabilité.
●Beast Pro et Beast Series utilisent l'interface PC avancée qui vous permet de configurer, programmer
ou mettre à jour le firmware.
●Entièrement programmable par carte de programmation.
●Sortie BEC puissante et réglable.
●Fonctions de protection multiples : Protection contre les pertes de tension, protection
contre la surchauffe et protection contre la perte de signal.
En cas d'utilisation d'un moteur brushless sans capteur, le fil bleu (A), le fil jaune (B) et le fil orange (C) du
moteur de l'ESC doivent être raccordés aux bornes (A, B, C) du fil sans capteur. Ne modifiez pas l'ordre des
fils.
Remarque : Si le moteur est en marche arrière, cela peut être modifié dans les réglages du programme.
Caractéristiques et avantages
Mode sans capteur
Raccordement au récepteur
Affichage LED
Etalonnage de la plage de commande des gaz
Fonctionnalités LED LED Statut
Sous-tension de la batterie LED rouge Clignotant
Surchauffe de l'ESC et du moteur (95℃) LED bleue Clignotant
Mode capteur LED rouge et bleue Allumée
Mode sans capteur LED bleue Allumée
Câble blanc Signal de réception
Câble rouge +6,0 V
Câble noir Réception -
Spécifications
Mode capteur
En cas d'utilisation d'un moteur brushless avec capteur, le fil bleu (A), le fil jaune (B) et le fil orange (C)
du moteur de l'ESC doivent être raccordés aux bornes du moteur (A,B,C) du capteur. Il est nécessaire de
raccorder le câble du capteur à la prise "Sensor" de l'ESC. Ne modifiez pas l'ordre des fils.
Séries
Produits
Taille (LxlxH)mm
BEC
Batterie NiXX/Lipo
Véhicule adapté
Eclaboussures
Complètement
Avec capteur
Sans capteur
Beast
45A 、60A 80A 、120A 120A 、150A
45*32*37/52*36*38 52*38*36 55*48*37
6V/2A 6V/3A 6.0V,8.4V
réglable/3A
5-10NC/ 2-3Lipo 5-12NC/ 2-4Lipo
Carte de
programmation
Étanche
5-18NC/ 2-6Lipo
LED
LCD
1/10th
Buggy/Truck
1/10th
Buggy/Truck
1/8th
Buggy/Truck
Beast SLL
45A 、 60A
41*33*35
6V/2A
5-10NC/ 2-3Lipo
RTR-1/10th
Buggy/Truck
Beast Pro
120A Turbo 220A
38.1*36.4*31 55*40*34
6V/5A 6.0V/7.4V
réglable/8A
5-10NC/ 2-3Lipo 8-18NC/3-6Lipo
1/10th Touring 1/8th Touring/
Buggy/ Truck Racing
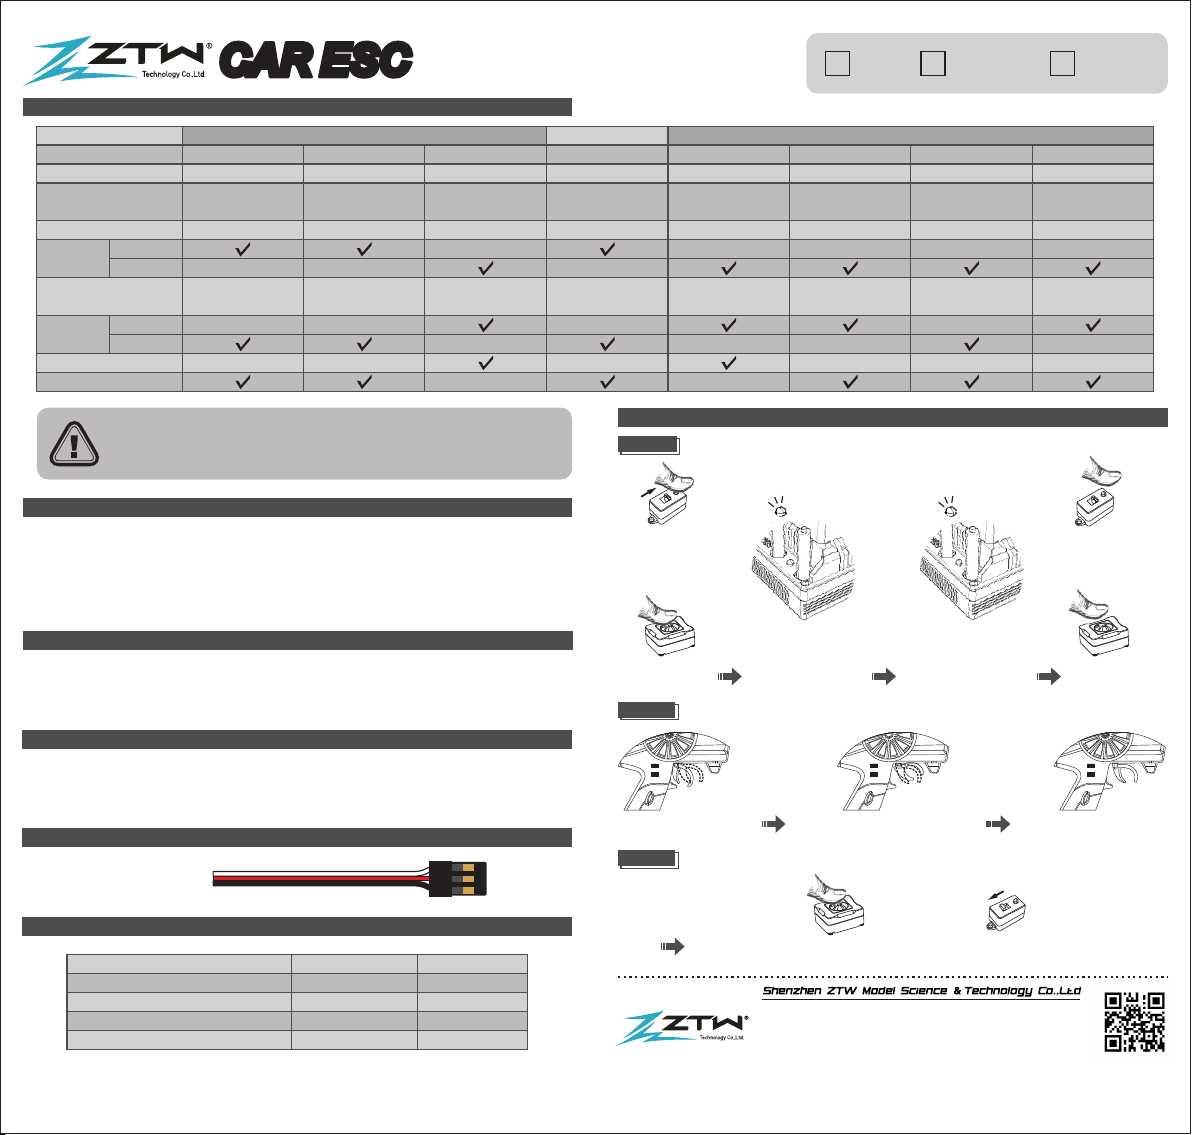
Quick Guide
CAR ESC CAR ESC CAR ESC Beast
La LED rouge
est éteinte et la
LED bleue s'allume.
Relâchez
l'interrupteur.
La LED bleue clignote,
puis la LED s'allume,
Moteur : "~beep~beep~".
Relâchez la
gachette des gaz.
Maintenez le
bouton La LED rouge
et bleue s'allume.
2 secondes
Freiner à fond
La LED rouge
clignote, puis la LED
s'allume, moteur :
"~beep~".
La LED rouge et bleue clignote
pendant 1 seconde, puis la LED
"Motor"~beep~beep~beep~" s'allume.
Etape 1
Accélérez à plein régime
Etape 3
Si vous maintenez la touche
"Switch" enfoncée pendant 2
secondes, le régulateur s'éteint.
Etape 2
SET
OFF
SET
OFF
SET
OFF
Ou Ou
Ou
Maintenir la touche "set"
enfoncée, puis mettre le
régulateur sous tension.
Relâcher la touche
"set".
Eteindre le régulateur.
CH: HRC Distribution GmbH, 4132 Muttenz
EU: Hartweg R/C, 79540 Lörrach
Remarques etc:
1.Certains ESC ont deux câbles de commande : le câble long est destiné au
récepteur, le câble court est destiné à la carte de programmation.
2.Le commutateur de 200A、3 00A est different des autres contrôleurs.
Plusiers Manuals sur:
hrcdistribution.com