manuals.online logo
Brands
  1. Home
  2. •
  3. Brands
  4. •
  5. Zu Audio
  6. •
  7. Speakers
  8. •
  9. Zu Audio DRUID MK4/08 Manual

Zu Audio DRUID MK4/08 Manual

guidebook | spec’s | other info
Druid Mk.IV loudspeakers shipped beginning January 1, 2008 have the new ‘08 full-range driver,
super-tweeter, high-pass network, 0.1% tolerance matched components and 0.5% matched drivers.
Guidebook last updated February, 2009
Sales Copy
Druid is a high efficiency, high output, direct radiating floor standing loudspeaker designed for high fidelity home audio and theater
use. It is a crossoverless, full-range single driver loudspeaker, complimented by a high output super-tweeter, matched to a cabinet
utilizing the Zu-Griewe technology.
There are many definable aspects of what makes for good playback fidelity but none more important than dynamic realism. In order
for music and other sonic events to sound real through recording and playback, the electronics, recording medium, environment and
loudspeaker must be capable of recreating the natural dynamic range and contrast of the event. Druid loudspeakers will give you
dynamic realism, something only a handful of loudspeakers can, and of those, only the Druid recreates timing, tone, texture and
natural stereophonic recreation with the same level of believability.
The Druid Mk4 / 08 builds on the mark-four platform, significantly raising its ability to recreate recorded or engineered acoustic
space; yeah, all the previous generations that have came before did a good job at imaging, but the mark-four ‘08 takes it to a whole
new level. In addition, we also found a few ways to improve overall resolution, bass extension, and lower noise. In musical terms;
better articulation, and improved depth of space and texture, more instrument color comes through, as does presence; when dialed
in the sound they give is about as good as it gets. We are confident in our products and offer a full 60-day money back guarantee.
What other speaker company gives you that promise? Try a pair in your home, with your gear, and know what all the buzz is about.
The original Druid loudspeaker was launched in 2001 and has since received world-wide critical acclaim, as well making boatloads
of users very happy. Druid has received great press from audio magazine from all over the world; Hong Kong, UK, USA, Germany,
Hungry, New Zealand, China, Russia, Finland, Sweden, Brazil, Japan, Vietnam, Singapore, Norway.... Of note are a few of the follow-
ing awards:
Audiotechnique loudspeaker of the Decade
6moons.com Lunar Eclipse Award!
Positive Feedback Online Writers’ Choice Award
HiFi Would Five Stars
Audiophiliac / c|net Loudspeaker of the Year
Because of the high efficiency of the Druid, and the very friendly 12 Ohm load it presents to the amplifier, users are able to explore a
whole new world of amplifier possibilities—from the 1 Watt to huge, and cheap to hand built exotica. inexpensive solid-state receivers
will sound much better than expected on a pair of Druids thanks to the easy 12 Ohm load; low powered amplifiers will have no prob-
lem mating with and driving the Druids to very respectable levels with the Druid’s high efficiency transduction of power; and since
Druid also has high power capacity, those who really want to kick out the jams have all the big amps shouting to be matched up.
Druid Mk.IV/08 Changes and Features
Super-tweeter changes:
Complete remanufacture of driver with the removal of all shims, gaskets and screws.
Ferro-fluid is removed from gap.
Polyurethane bonding and the removal of all voids and shims on tweeter top-plate waveguide / voicecoil frame.
Complete bonding of composite phenolic dome diaphragm suspension to driver top-plate.
Repositioned / enhanced voicecoil / gap alignment.
Dynamic alignment process of voicecoil and gap to ensure correct tone and shove (pre PU adhesive set).
Reflow voicecoil lead-in pots with high quality lead-free silver bearing solder (RoHS).
0.5% or better matching for quality of tone and efficiency.
160 hours minimum factory burn-in post network termination.
Super-tweeter high pass network changes:
Simple two component (Cs + Rs) network.
Kimber Kap 1.0 uF now featured in place of the Solen based network.
New top performing Mills resistor with revised values.
Reduction of termination joints by two-thirds.
Direct connection of capacitor, resistor, FastOn, via cold-forged and sealed termination.
FastOn terminals are now terminated using the solderless Amp crimping process.
Dramatic reduction of solder joints. In fact, the voicecoil lead-in pots are all that remain.
0.1% matching.
Full-range driver changes:
Improvement in cone and cone binders.
Improved assembly tolerance.
0.5% or better matched pairs.
160 hours minimum factory burn-in, as we’ve been doing, but this time we kit and batch them to burn-in with the matched super-
tweeter assembly. Also using some new music James selected for good, well rounded, musical appreciation.
Zu is not a company that changes for change sake, so why all the changes? Blame the Zu / DL-103. Applying lessons learned
with the phono pickup, like removing all possible voids and removing or controlling resonance on plates, we’ve created a dramati-
cally improved tweeter. All the above listed tweeter changes reduce resonance by more than 30dB and spread the Q by an octave;
together changes also yield very tight batch tolerances—80% of the batch measuring within 2%.
Not a lot of changes to the full-range drivers, the majority of the improvements can be attributed to refined processes, batching,
testing, matching, and QC to ensure identical sound between channels. These changes were not possible when we were doing small
runs. Now that we are batching 100 units at a time, or greater, we are able to hit these pretty fantastic tolerances. We have also
improved the binders used in the paper cone and now have about as consistent a product as can be had.
Druid Mk4 / 08 loudspeakers also feature CNC machined from billet Alcoa 6061 super-tweeter lenses. 6061 billet aluminum driver
reinforcing 1/4” deep trim rings. Machined from billet aluminum binding post plates, machined serial numbers, machined driver
motor components and input lugs. Other features include our Zu B3 silver alloy internal cabling, cold forged terminations for the
highest possible conductance and fidelity between interconnecting terminals; CNC machined cabinets featuring an MDF core and
composite shell; and the highest quality finish and finish tolerance in the business. One look, or listen to a pair of Druid Mk4 / 08
loudspeakers will convince you that they are without question a world-class product made with the highest possible care—learning
that they can be yours for a very approachable price is sensational.
Druid loudspeakers, like everything we do, are manufactured by us in Ogden, Utah—USA.
Druid History
2000, Zu incorportates—funding and final design for the Druid.
2001, original Druid launched, essentially the same look and platform as the current Druid Mk4 / 08. Product featured billet alumi-
num everything including base. Debuts the original Zu260FR driver with accordion surround, complimented by a 3/4” French made
Audax high output dome tweeter. Speakon 8-pole connector facilitating B3 interface for loudspeaker cable input along with Cardas
Patented Binding Post for traditional spade inputs. Originally priced at $3600 / pair.
2002, Druid Mk2 was launched with revised super-tweeter filter and improved cabinet construction.
2003, Audax informs us that they can no longer produce the tweeter we are using as they are closing their French production of hi-fi
drivers. We scramble to finish the driver lens and network we had been working on and launch the Druid Mk3 with time-aligned,
machined from billet lens, phase-plug, composite dome, super awesome super-tweeter. Zu260FR/G2 was also introduced, featured a
double-roll surround, and revised motor for improved bass response. B3 interface is dropped as a feature. Billet aluminum base was
replaced by a wood core base.
2004, Druid Mk4 is launched with slightly improved cabinet, improved cabinet construction, improved cabinet precision from CNC
milling. Improved harness assembly with the reduction of joints and solder. Revised super-tweeter network. Addition of iridescent
and matte finishes. Matte finish is a true matte, but is rough like sandstone.
2008, Druid Mk4 / 08 launched.
Foundation for Druid
1982 - 1995, Sean studies and builds horns, works in the local pro, car and hi-fimarkets. Tries about every pro and hi-fidriver made
with all types of enclosures and alignments. Starts messing with original designs, meets many like-minded audio freaks. After a bit
longer than a decade—starting in high efficiency horn designs and then trying everything hi-fiand low efficiency—Sean finally comes
around that high efficiency is prime.
Druid Mk.IV gap height
Gap height refers to the space between the flooring and the bottom side of the Zu Druid Mk4 loudspeaker. Setting the gap height
on this specific model is essential in getting proper performance, most noticed in the bass region of the music. Improper gap height
destroys the advantage gained in the Zu-Griewe loudspeaker technology. Too little or too much gap height and the Zu-Griewe will not
function. Minimum / maximum measures for gap height are:
Min. 5/64” (2 mm)
Max. 5/8” (16 mm)
Average sweet spot is 3/8” (10 mm) one standard sized CD jewel case. Increasing the gap height, depending on amplifier, usu-
ally results in increased bass weight in kick drum and wood timbre, but it nearly always results in less output in deep bass. More
gap height usually increases bass noise as well, causing the timbre to be a bit thick or wooly sounding. Less then 3/8” (10 mm) will
increase bass articulation / attack, increases bottom octave amplitude, but does reduce overall bass amplitude a bit. Typically, I find
my gap height to be just about 3/16” (5 mm), which is the size of those skinny half-hight CD jewel cases, perfect for a quick and
easy gauge. I would say 95% of Druid Mk4 users are going to find their system sounds best somewhere between one CD jewel case
gap height and half CD jewel case gap height. But again, each amp will respond differently as the gap height influences the load
impedance. Sweet! Because you can now better match amp and speaker, and room. Damn, because there’s one more thing you can
fiddle with. But here is a super great time saving idea regarding adjusting your Druid’s gap height...
Insiders info on how to make adjusting gap height simple. We, like you, have music to listen to, and really hate fiddling with the
Druid’s gap height—getting down on your knees, looking up at the bubble level, checking to make sure all four spikes are solid...
it gets old fast. So, once you get your speakers where you like ‘em—making sure the left and right channels are spaced the same
distance from the listeners center line, that they have the same toe-in, that they are both level, and that the spikes are equally
weighted, with no cabinet wobble—set the gap height to roughly 3/8”, the thickness of one standard CD jewel case. Likely they will
sound great, but still, you should mess around with the gap height, with some amps it makes a huge difference. The easy, and best
way to do this is shimming the gap with standard letter sized paper. The paper will be placed on the floor, centered under the Druid,
center between all four spikes, don’t lift the speaker up, you don’t want your spikes on the paper, you want them firmly coupled to
the floor. Best place to start is with a stack of paper that will take up roughly half the gap space, listen and go from there. You might
want to take some sheets out, increasing the gap height a bit, or add a few reducing the gap height, experiment. Do the gap height
shimming with just your left channel connected (or right), it reduces the work to half. After you get the left side sounding the way
you want, mirror the changes on the right channel. You might find the difference to be huge, we usually do. It’s easy and free, mess
with it, there’s nothing to loose.
We really hate fiddling with the Druid’s gap height—getting down on your knees, looking up at the bubble level, checking to make sure all
four spikes are solid... it gets old fast. So, once you get your speakers where you like ‘em—making sure the left and right channels are
spaced the same distance from the listeners center line, that they have the same toe-in, that they are both level, and that
the spikes are equally weighted, with no cabinet wobble—set the gap height to roughly 3/8”, the thickness of one standard CD jewel
case. Likely they will sound great, but still, you should mess around with the gap height, with some amps it makes a huge difference. The
easy, and best way to do this is shimming the gap with standard letter sized paper. The paper will be placed on the floor, centered under the
Druid, center between all four spikes, don’t lift the speaker up, your spikes will continue to contact the flooring. Best place to
start is with a stack of paper that will take up roughly half the gap space, listen and go from there. You might want to take some sheets out,
increasing the gap height a bit, or add a few reducing the gap height, experiment. Do the gap height shimming with just your left channel
connected (or right), reduces the work to half. After you get the left sounding the way you want, mirror what you did with the left on the
right channel. You might find the difference to be huge, we usually do. It’s easy and free, what do you have to loose, mess with it.
Placement fine tuning
COMPACT
DIGITAL AUDIO
10mm
10mm
Paper shim here
Shim between floor and speaker.
Spikes continues to contact floor.
Druid Mk4 / 08 gap height image
Thank you for your purchase of the Druid Mk4 / 08 loudspeaker. Every element is designed for a lifetime of trouble free high
performance playback. It is our desire to exceed your expectations in product performance, quality, durability and service. If we have
simply met your expectations or have fallen short, we would sincerely appreciate knowing how we may improve. Likewise, if we have
exceeded your expectations we hope to hear from you too.
Impressions of new realities struggle and flow—eventual transition.... Awareness of surroundings, songs of tranquility and warning—
history and intuition instruct that patterns of sound have been a fundamental constant. Observance of nature, both physical and
spiritual, teach us of the endless interplay of vibrational forces.
While traveling the line of time we can see many periods of increased awakening and technological advancement but none so
powerful and rapid as that of the Scientific Revolution, Enlightenment and the birth of modern physics. The dramatic increase of
understanding regarding possibility, vibration and energy coincide with our collective ability to listen and express patterns of life.
David Toop in his book Ocean Of Sound paints a powerful image of our modern musical creativity: “...Starting with Debussy in 1889,
is an erosion of categories, a peeling open of systems to make space for stimuli, new ideas, new now, this environment included
sounds of the world—previously unheard musics and ambient sounds of all kinds, urban noise and bioacoustics... unfamiliar tuning
system and structuring principles, improvisation and chance.”
Welcome to Zu,
WARNING, never leave children unattended in your playback room. Even though the Druid’s base and supporting spikes are well
outside the body, care should be taken while positioning, packaging, connecting, or working around your loudspeaker. Never let a
child play near a floor standing loudspeaker. WARNING, electrocution through loudspeaker cable is possible, though very unlikely.
To avoid electrocution make sure your amplifying gear is powered down prior to connecting or disconnecting loudspeaker cables. This
will also reduce the possibility for accidental damage to your audio amplifier. WARNING, lift with your legs not your back and ask a
friend to assist you. WARNING, the Druid loudspeaker driver create stray magnetic fields that extend far beyond the boundaries of
the cabinet. We recommend you keep magnetically sensitive electronics and media at least 2.5 feet (76cm) from the loudspeaker.
WARNING, Druid loudspeakers are capable of extreme sound levels, play responsibly.
Included With Each Pair Of Druid Mk4 /08 Loudspeakers
Installed User Serviceable Hardware:
(8) 1” stainless-steel 3/8” x 16, ball-end feet. Installed.
(8) 5/8” stainless-steel 3/8” x 16, jam nuts. Installed.
Additional Items Included In Package:
(8) 1-3/4” stainless-steel 3/8” x 16, carpet spikes.
(1) connector polishing kit for copper lugs.
(1) loudspeaker finish care kit.
(1) Guidebook.
Initial placement and spiking (please note diagrams on following page)
While your initial placement for the Druid loudspeakers may not be the sonic best, the Druid is not overly sensitive to placement
(bass response relative to listening area and room may prove otherwise). Satisfactory room integration is attainable from nearly any
position within a room, particularly if a subwoofer augments the lowest octave. Nevertheless, the following details may assist you in
the pursuit of fidelity.
Placement for left / right mains: Druid loudspeakers should be placed to work with the natural acoustics of the room rather than fight
them. The following basic points should be followed.
The supplied spikes must be used. Long sharp spikes for carpet and short blunt spikes for hard floors, coins may also be placed
between hardwood floor and spikes. Each loudspeaker must be leveled with all spikes equally weighted with the hex-nuts locking the
spikes. Spikes are used to facilitate proper base / floor spacing “gap height”, and mechanical coupling of loudspeaker mass and floor.
Because most floors are not exactly level or smooth, it is usually necessary to adjust each spike so all four make uniform contact.
Gap between floor or carpet and base on Druid Mk4 / 08 loudspeaker should be between 1/8” and 3/8”
• Druid loudspeakers should point at, or a foot or two behind the listening position.
• From the listening position, Druid loudspeakers should be equidistant.
• Generally, Druid loudspeakers should be placed no closer than 2 feet (60cm) from side wall. This distance is measured from the
center point (Y axis) of the loudspeaker and not the side.
• Angle at the central listening area should be between 60° and 110°. Wider is usually better for both stereo and home theater.
Input terminals and connections
All connections should be made with the equipment powered down. Make sure you connected the “+” output of the amplifier to the
“+” (red) input of the loudspeaker and the “–” to the “–”. The Druid features Cardas® pure copper unplated binding posts and are
internally terminated using a high pressure crimp system in place of solder. They accept standard and oversized spade lugs, bare
wire and banana plug. While they accommodate a wide array of terminals we recommend spade lugs with strong recommendation
on the use of our unplated pure copper spades. In some countries, 4mm banana plugs are considered a safety hazard and of similar
interest the binding posts featured on the Druid comply with CE standards regarding loudspeaker binding post inputs.
Druid Recommended Setup Starting Point (Stereophonic)
Listener, left channel, right channel = equidistant: forming an equilateral arrangement between observer and stereo loudspeakers.
If you have a 10’ spread between loudspeakers the listener should also be seated roughly 10’ from either loudspeaker.
Experiment! There is rarely nothing as profound—be it gear, accessories, or mods—as getting your loudspeakers placed right.
This is simply a starting point, please carefully read the this guidebook.
Perhaps it has been the lack of skilled engineers, maybe audiophiles at large have lacked discipline; for whatever reason the current
consumer playback world is lost in its conception of acoustics and the nature of sound—much has been written in consumer magazines
but little of it is genuine. Original recommended works on the subject include: Music, Physics and Engineering (formerly titled Musical
Engineering) by Harry F. Olson, Science & Music by Sir James Jeans, Fundamentals Of Musical Acoustics by Arthur H. Benade,
Fundamentals Of Acoustics by Lawrence E. Kinsler, Austin R. Frey, Alan B. Coppens and James V. Sanders. There are several other good
sources of researched data; these represent a good cross-section.
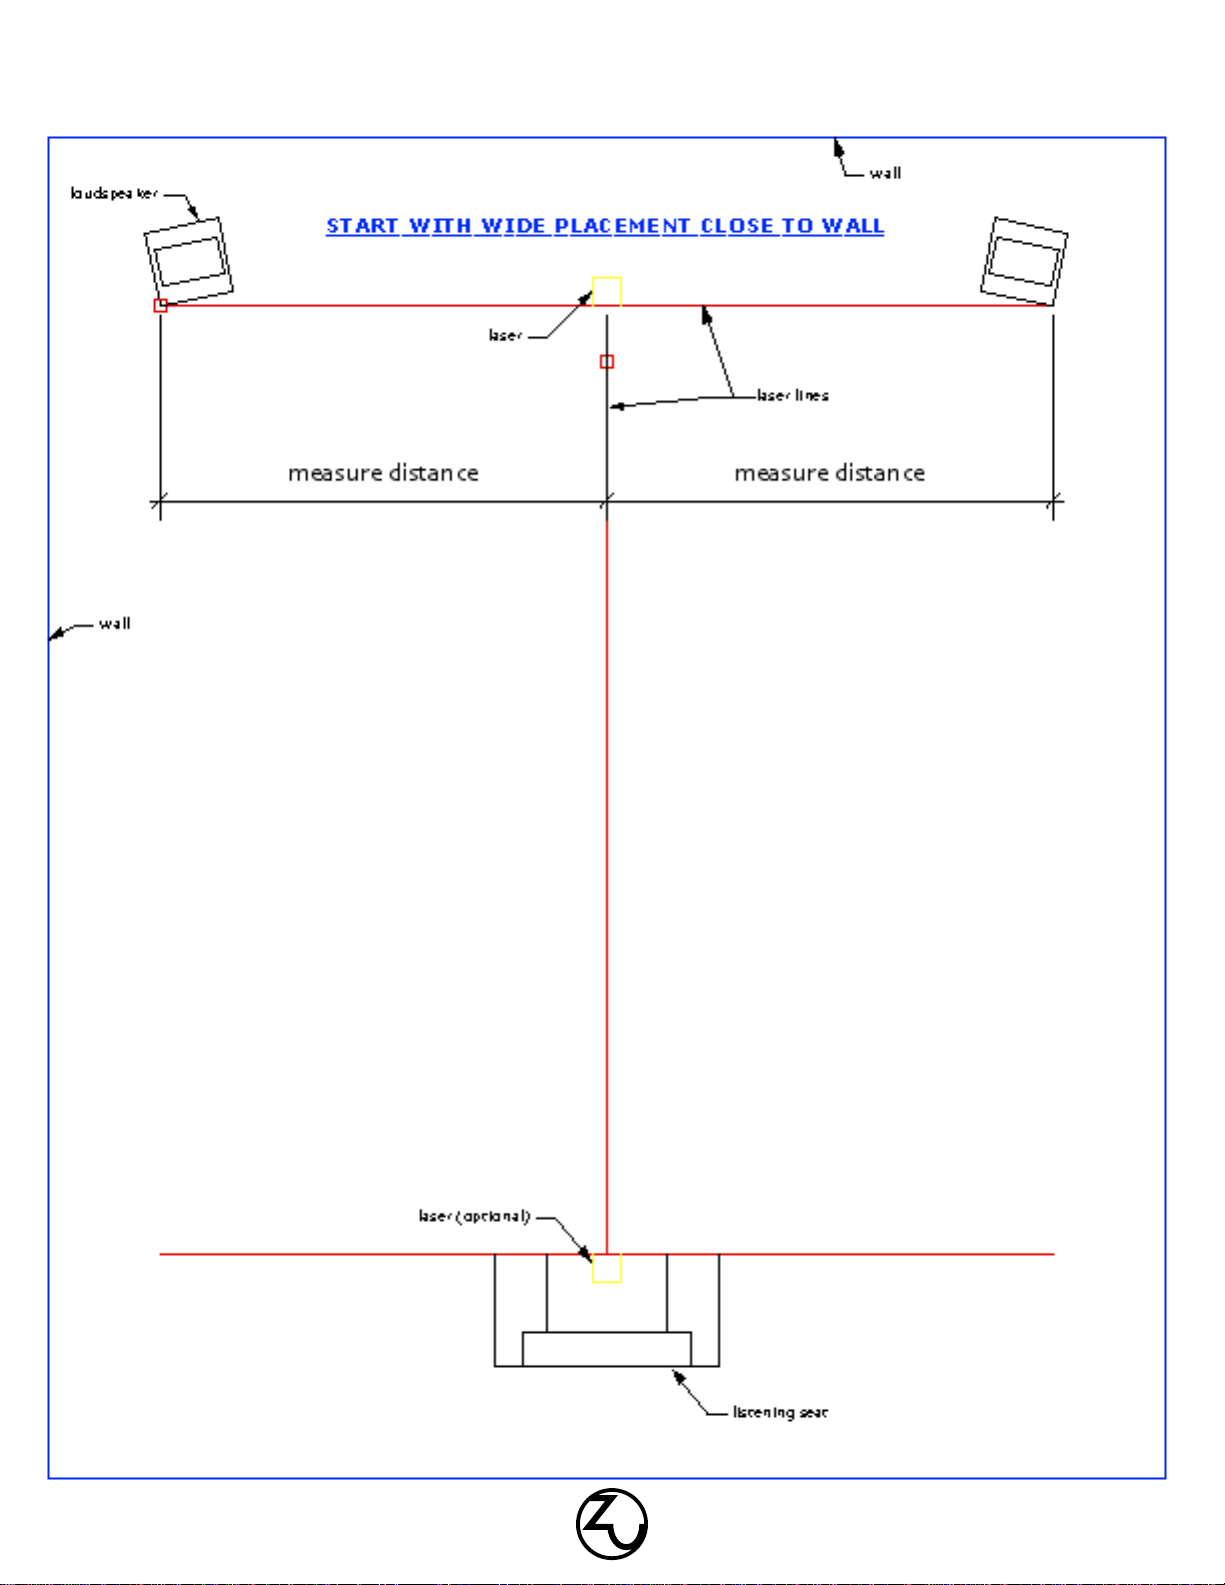
The following technique is Druid specific. It addresses the loudspeaker’s relationship with the room and works for both 2-channel and
multi-channel setups. How and where the loudspeakers excite the room and how the room reacts is relative to the type and source
of excitation and room reactance—a function of boundaries (walls, floors, etc.), boundary properties (mass, compliance, Q, damping,
texture and structure), area impedances (shape, volume), diffusion and absorption (furnishings, people, flooring, etc.), source and type
of wave excitation (loudspeaker design and placement), resonators (closets, forced air ducts, hallways, etc.), even atmospheric pressure
and humidity, though minor, will influence sound. While the above are beyond the scope of this guidebook, the recommendations and
listed books will start you down the proper acoustic path. Again, before you trust another modern work relative to playback and acoustics
please research the above listed references!
With your loudspeakers positioned for visual appeal, livability and fidelity, you can now begin fine-tuning. This involves three major steps.
In sequence they are bass, mids and treble. If you can’t fine-tune your system within an evening please contact us.
Base: Usually, you will have one loudspeaker that is framed with more wall space, this is the loudspeaker you will fine-tune and then
simply mirror the other. Select recordings with large amounts of sustained low frequency information; dramatic pipe organ and dance
music work as do test recordings that have warbled low frequency tracks (50 - 100 Hz range). Note that steady state sine, triangle and
square wave signal prove very difficult to interpret. Bass information with some transient content will enable the listener to make fast
work of fine-tuning. So here we go, with the loudspeaker playing at a moderate level, (only the “tuning loudspeaker” should be on)
walk over and kneel down next to it. Kneeling will put your head in the seated listening horizontal plane and allow you to hear how the
loudspeaker integrates with the room. Now move your head to either side of, and back and forth of the loudspeaker, say a half-meter (a
foot or so) in each axis. Listen to the fidelity of the bass, does it sound woolly and muddy right behind the loudspeaker? Is the bass more
defined a bit to the left or right? If the bass sounds better a bit to the left, move the loudspeaker to this position and then listen again.
Remember that moving the sound source also changes how the room reacts. You should only have to move the loudspeaker three or four
times to get the bass dialed in.
Midrange and treble: Once the lower octaves are sounding good, natural, vibrant midrange and treble can now be dialed in. Before you
begin I think it’s important to understand a few details. Midrange tuning, while similar to that of bass, is a task of a inches (decimeters)
rather than feet (half meters) and upper octaves a mater of fractions of an inches (centimeters / millimeters) and loudspeaker firing axis.
Even though midrange and treble changes can be heard at the being positioned loudspeaker, it is helpful to have a friend position while
you listen in the seating area. Here, you may want to select less bass heavy recordings; jazz, space-ambient, violin solos, guitar solos,
stuff with good overtone color and not too heavy.
Staying with the same loudspeaker “room-tuned” for low frequencies, (remember you only tune one channel and mirror its mate) and
with your favorite less heavy recording playing, start tuning for mids and highs. Move it toward the closest wall, in increments of a few
inches (4 - 6cm). While moving, the “sweet spot” listener, and possibly the person positioning the loudspeaker, should notice midrange
color transition from low-presence and masked to open and intimate. There may be several spots within the good sounding bass area
that have good presence, go with the widest point (closest to the wall) for an expansive and engaging soundstage. Don’t worry about
center focus, the Druid will knock your socks off with its capacity for expansive and focused soundstage recreation. Once a midrange
position is selected its time to work on the highest octave. This is usually as simple as rotating the Druid loudspeaker to face directly at,
or just behind, the seated listener. Now listen again for voice openness and intimacy, minor placement adjustments and loudspeaker face
angle may be necessary.
Additional thoughts about playback, room, and tonality
The attack, more than any other aspect of a waveform, gives the listener the clues to process source, direction, amplitude, character,
intelligence, and so on. Close in importance are the dynamics within that immediately follow the attack. A simple example: When a piano
key is struck, three main components are set in motion. These make up the attack of a note; the mechanical noises including that of
the impinging hammer, initial string motion, which has many extra components and initial coupling of piano body and sound board. The
first few milliseconds are very dynamic and have many features. To get the attack correct is solely a function of the playback system and
has very little to do with the room. Aside from placement, if you have changed your system to combat your room, attack and dynamics
can never be correct. Most people can only pinpoint tonal problems with steady-state or semi steady-state music or signal, this is a big
problem because room influence on steady-state sounds are huge, usually the single largest influence. Not realizing this, people usually
tweak things to get the steady-state and decay tonally correct which inadvertently kills the life in the attack. This is a reason why cables
as tone control, digital room correction, parametric equalizers and the like can never fix fundamental problems, unless of course the time
axis is also programmed and correlated to harmonic structure and then set to react to any dynamic anomalies within the signal—we’re a
few decades out on that I think.
Break-in
All Zu loudspeakers shipped after September 31, 2006 are manufactured and processed under the Zu burn-in system. This new aging
process cannot be duplicated and ensures your Zu loudspeakers will sound their very best. A new pair of Zu loudspeakers that have
been hit with the Zu burn-in process will reach peak performance within a very short time of a user firing them up, less than three days
typically, depends on weather and shipping conditions, and the user no longer needs to be concerned with burning them in with specified
program material or at high playback levels. We are pretty excited about the system and process and we hope you are too.
The old recommendation for burn-in on Zu loudspeakers: Zu does not recommend recordings specifically designed for loudspeaker,
system or cable burn-in. The quickest and most enjoyable way to break-in your Druid loudspeaker is to play music and movie scores
that are fun, dynamic and harmonically dense. The louder you play the quicker they break-in. (This assumed that users would really
poor it on, finally having a hi-filoudspeaker that could handle real levels of playback for rock and big orchestral stuff. We assumed
incorrectly and found that only one in a hundred would ever play our loudspeakers loud enough to properly run them in.)
Burn-in Phenomenon: A running-in of driver suspension components is the prime influencing factor in loudspeaker break-in. Cable
burn-in is also a factor but secondary. Druid loudspeakers will go through two break-in sound transformations. The first is mechanical
effecting bass and intimacy. The second is electrical and primarily effects soundstage and resolution.
The following table is an approximation of Zu Druid loudspeaker break-in. Double the hours for each if played at low power levels.
(SET amp users may want to find a solid-state amp to run them in with.)
* 50 hours of play 50% of break-in
* 100 hours of play 80% of break-in
* 250 hours of play 95% of break-in
* 1000 hours of play 100% of break-in
Amplification
Bipolar or F.E.T., class A or switching, O.T.L. or transformer isolated, one bottle single ended triodes or 500 Watt “who needs central
heating” pentodes; Druid loudspeakers will work well with most all audio amplification designs. Sure some will prefer one over another,
for assistance on which might fit your idea of playback fidelity please give us a call, we’re hear to help.
Loudspeaker cable
The most common abuse in hi-fiis to use cable as a form of tone control. Doing so usually leads to frustration and further loss of fidelity.
When cable affects timbre it affects timing, phase, frequency response, and so on. Timbre problems are usually solved with loudspeaker
break-in and correct loudspeaker placement. One last note on tonality and cable, if the cable has good properties relative to phase, gain,
group delay, impedance, and bandwidth, it will likely convey with fidelity the transmitted emotion and color.
While insulation, jacket materials, pigments, conductor shape, metallurgy and structure are important, all pale compared to the influence
of field, virtual ground plane and conductor relational geometry. This final cable geometry largely determines measured attributes. Druid
features a specifically engineered B3 silver alloy cable for internal hook-up. We strongly recommend the use of our Ibis, Libtec or Wax
loudspeaker cable terminated with our pure copper spade lugs.
Improvements that will be noticed from well engineered cables should include bass depth and resolution, system noise floor, harmonic
structure and timbre, attack, soundstage size and accuracy, easy of listening—simply a lot closer to the recorded event.
Maintenance and cleaning of finish
For cleaning and dusting of your Druid loudspeaker simply use a clean damp cotton towel. Dusting of the 10” drivers should only be done
with hand-held compressed air as used in photograph and sensitive electronics dusting.
Maintenance and cleaning of binding post terminals
The unplated pure copper binding post terminals should also be cleaned once or twice a year using the supplied polishing compound.
Once you have cleaned and polished the binding posts and spade lugs (if you are also using our unplated pure copper spade lugs) avoid
touching the spades or the binding posts. Keeping the contacts free of the halides and oils of your skin help ensure a long term and
trouble free connection.
Instructions for cleaning and polishing the Druid binding posts
1. Wash your hands with soap and water prior to cleaning the terminals.
2. Completely remove the machined aluminum binding post nut and black plastic terminal block.
This will make for easy access of the pure copper lugs.
3. Using the supplied polish cloth (jar labeled “polish”), rub the exposed copper lug until it is clean, usually about 15 - 30
seconds is all that is needed.
4. Wipe the polish off the copper lugs with the supplied white buffing cloth. (DO NOT WASH THE POLISH OFF, POLISH MUST BE
REMOVED BY BUFFING ONLY.)
5. Refit the black plastic terminal block and machined aluminum binding post nut.
6. Again wash your hands with soap and water. The polishing does contain a small amount of petroleum distillate.
If you are also using our loudspeaker cable fitted with our pure copper spade lugs, we recommend that you clean your spades the same
time that you clean your Druid binding posts. Polish each spade for 15 to 30 seconds then buff with the white buffing cloth.
Warranty information
Zu products are designed and manufactured to the highest quality. However, if something does go wrong Zu will fix or replace the product
free of charge.
All standard Zu cables have a limited lifetime warranty with the exception of the Mobius headphone cable which has a two-year limited
warranty. Cable warranty does not cover misuse or broken connectors damaged from misalignment or over tightening. Limited lifetime
warranty is available to the original purchaser only.
Zu loudspeakers have a five year limited warranty from date of purchase to original owner. If under normal home use you have any
problems with drivers, cable, parts, cabinet, we are going to fix or replace the product. Loudspeaker warranty and service can usually
be performed by the user, also known as DIY Service, in such cases Zu will provide full technical support, instructions usually including
a DVD video, and any special tools. This provides faster repair of product reducing down time, minimizes handling hassle and damage
potential to both Zu and you, and reduces shipping costs.
Zu loudspeaker finish warranty covers color changes, finish checking, and oxidizing. While every effort is made to ensure a perfect finish
that will last a lifetime, this warranty does not cover damage from impact and abrasion; or seam / core construction visibilities in extreme
high temperature / high humidity environments.
Zu phonograph cartridges have a limited two year materials and workmanship warranty. This warranty does not cover misuse or accident.
It does not cover premature stylus wear from playing dirty records.
Zu products are designed to be used in temperature and humidity controlled environments, namely your home or office unless otherwise
stated. Storage of Zu Audio products, particularly loudspeakers, in uncontrolled environment may cause damage to the product and will
void the warranty.
If in the highly unlikely event that a Zu product arrives to you Dead On Arrival (D.O.A.), and after discussing it with a Zu tech, we will
ship another of the same product at our expense and arrange for the D.O.A. product to be collected. If after inspection however we
find that you have misrepresented a returned product’s condition, and that it was improperly handled or used, Zu will charge you for all
damaged parts, labor, shipping and handling of the product.
Warranty does not apply to damage caused by operating the product outside the intended use, accident, another product, misuse, abuse,
flood, fire, earthquake or any other external causes. Warranty does not cover damage caused by modification or service performed by
anyone other than a Zu representative. Cosmetic damage is also excluded from warranty, as is all product that has any part of the Zu
serial number removed.
When a product or part is exchanged the replacement becomes your property and the suspect or damaged part becomes Zu’s property.
Parts provided by Zu must be used in products for which the warranty service is claimed.
What you can expect if warranty service is needed
Cable: exchange for new or at least functionally equivalent to the original cable product, or repair.
Loudspeakers: replacement of product or parts including user-serviceable parts, or repair.
Phonograph cartridges: exchange for new or at least functionally equivalent to the original product, or repair.
If warranty becomes necessary, you must call or email for a Return Material Authorization (R.M.A.) number, or to arrange for user
serviceable parts. This provides opportunity to assist in diagnosing the problem and helps us to schedule for rapid turnaround in the
event that parts, service or repair is needed. Upon factory inspection of parts or product, warranty eligibility will be determined.
While service options, parts availability and response times will vary, we do our best to keep you happy and strive for same day
turnaround on cable problems, and one to three day turnarounds on phonograph and loudspeaker problems. Depending on the situation
you may be responsible for shipping and other charges. International customers should know that Zu will comply with all applicable
export / import laws and regulations, you may be responsible for custom duties, taxes, broker fees, freight, and other charges.
When shipping of product or part is required, repackage the complete product, or part, in its original packaging. If you have any
questions about packaging please call or email. Product damage caused from incorrect repackaging is not eligible for refund or warranty
and the freight company may also reject your insurance claim. Until we have the product back in the shop and sign off that it is eligible,
the product is still your property, we recommend you insure or declare the full value when shipping. We also recommend that you only
ship with a freight company that has a good reputation and offers tracking and insurance for the full amount.
Within the package you need to also include your contact information.
ZU AUDIO, ATTENTION REFUND + RMA NUMBER
OGDEN COMMERCIAL INDUSTRIAL PARK
3350 S. 1500 W.
OGDEN, UT 84401
USA
Zu Audio
Ogden Commercial Industrial Park
3350 South, 1500 West
Ogden, Utah 84401 USA
www.ZuAudio.com
+1-801-627-1040
Manufactured in Ogden, Utah—USA
Druid is a high efficiency, high output, direct radiating floor standing loudspeaker.
It features a full range driver made by Zu, is crossoverless, and complimented by a
high output time matching Zu super-tweeter.
Mark 4 / 08
2008 January
50” x 11” x 6.3” (127 x 28 x 16 cm)
12” x 12” (30.5 x 30.5 cm)
60 pounds (28 kgs)
One per shipping box, 65 pounds (30 kgs) 55” x 16” x 15.5” (140 x 41 x 40 cm)
Zu260FR/G2-08, 10.3” full-range driver
Zu-T1 super-tweeter with Zu/APT30/G3 driver.
1/4” spade (6.3 mm fork)
standard and oversized spades, 1/4” ring lugs, bare wire, pin, banana (banana plugs
are clamped between block and lug, not socketed).
101 dB @ 1 watt / meter
12 Ω(nominal full bandwidth)
2 - 6 Watt
8 - 24 Watt
20 - 60 Watt
300 Watt
250 Watt
35 Hz - 30 kHz
< 5 ms
125 dB
40” (101 cm)
30˚
30˚
None
Mk4 / 08 high-pass first-order filter network, rolling out at 12 kHz
Zu silver alloy B3 (Ibis, half mass)
MDF core with composite shell
3/8” x 16 TPI
Zu Smooth Matte: black, charcoal, cobalt, phoenix red, moss, sage, dune
Hand cut and polished gloss available
Spies-Heckler™/ PPG™ Vibrance™ / DuPont™ Chroma™ / House Of Kolor™, Zu can
match or create any color or optical effect desired including foregrounds.
Stainless-steel hard-surface floor footers, S.S. jam nuts, S.S. carpet spikes,
owners manual; binding post cleaning kit.
5 years
USA
99%
Design
Version
Launched
H W D
Footprint
Weight
Packaged
Driver Compliment
Recommended Connector
Accepted Connectors
Efficiency
Impedance
Average Room / Moderate Volume
Large Room / Loud
Large Room / Concert Level
Max Music Input Power (Full Bandwidth)
Max sustained RMS Power (Full Bandwidth)
Bandwidth
Group Delay
Dynamic Range
Horizontal Acoustic Center
Horizontal Listening Window
Vertical Listening Window
Full-range Driver Network
Super-tweeter Network
Internal Cabling
Cabinet
Spike / Feet Insert Thread
Standard Finishes
Custom Finishes
Included With Loudspeaker
Warranty
Manufacturers Country Of Origin
% Of Product Made In USA
Druid™ Loudspeaker Specifications (Mk4 / 08)
July 1, 2008
Last update July 1, 2008
Druid Mk4 / 08 shipping container is a two piece slip fit type box with four internal close-cell foam bulkheads.
1. Lay the box horizontal, Zu logo facing the sky.
2. Cut the bands.
3. Remove the top box. This will expose the loudspeaker.
4. Rotate the box 180 degrees, loudspeaker and supporting bulkheads now
resting on the floor.
5. Remove the bottom half of the box.
6. Pivot the loudspeaker upright.
7. Remove foam bulkheads, leaving the bottom in place to allow for easy placement.
8. Position loudspeaker.
9. Remove protective film.
10. Remove base bulkhead.
11. Adjust spikes and gap height.
Druid Mk4 / 08 loudspeaker unpacking instructions
e
ment.

Other manuals for DRUID MK4/08

1

Other Zu Audio Speakers manuals

Zu Audio UNION 6 User manual

Zu Audio

Zu Audio UNION 6 User manual

Zu Audio DW 6 Standard User manual

Zu Audio

Zu Audio DW 6 Standard User manual

Zu Audio Presence Manual

Zu Audio

Zu Audio Presence Manual

Zu Audio Defi nition Mk2 User manual

Zu Audio

Zu Audio Defi nition Mk2 User manual

Zu Audio DRUID MK4/08 Manual

Zu Audio

Zu Audio DRUID MK4/08 Manual

Popular Speakers manuals by other brands

Pyramid PW876S Specifications

Pyramid

Pyramid PW876S Specifications

Harman Harman/Kardon ONYX STUDIO 5 quick start guide

Harman

Harman Harman/Kardon ONYX STUDIO 5 quick start guide

Omnitronic OD-T Series user manual

Omnitronic

Omnitronic OD-T Series user manual

Audio Pro Ego 313 Technical data

Audio Pro

Audio Pro Ego 313 Technical data

Biamp L Series Installation & operation guide

Biamp

Biamp L Series Installation & operation guide

Infinity CLASSIA C255ES owner's guide

Infinity

Infinity CLASSIA C255ES owner's guide

OEM A-LCRS installation guide

OEM

OEM A-LCRS installation guide

Vonyx SBS50B quick start guide

Vonyx

Vonyx SBS50B quick start guide

Samsung HW-R47M Full manual

Samsung

Samsung HW-R47M Full manual

Charge IT CH-4335 instruction manual

Charge IT

Charge IT CH-4335 instruction manual

Alphasonik AS26 manual

Alphasonik

Alphasonik AS26 manual

Barefoot Sound MiniMain12 owner's manual

Barefoot Sound

Barefoot Sound MiniMain12 owner's manual

ION Stadium quick start guide

ION

ION Stadium quick start guide

Russound ACCLAIM 5 OUTBACK installation manual

Russound

Russound ACCLAIM 5 OUTBACK installation manual

KRHÜNER 50387 instruction manual

KRHÜNER

KRHÜNER 50387 instruction manual

Bang & Olufsen BeoLab Penta user guide

Bang & Olufsen

Bang & Olufsen BeoLab Penta user guide

RSR TB232SW quick start guide

RSR

RSR TB232SW quick start guide

Heco CONCERTO GROSSO Owner's manual/warranty document

Heco

Heco CONCERTO GROSSO Owner's manual/warranty document

manuals.online logo
manuals.online logoBrands
  • About & Mission
  • Contact us
  • Privacy Policy
  • Terms and Conditions

Copyright 2025 Manuals.Online. All Rights Reserved.