ZUMMI Halo 204588 User manual

Halo
Travel System
Instruction Manual
IMPORTANT:
RETAIN FOR FUTURE
REFERENCE
READ CAREFULLY

WARNINGS:
2
Read these instructions carefully before assembly and use and
keep for future reference. The child may be hurt if you do not follow
these instructions.
Before using, remove and dispose of any plastic bags and other
packaging (e.g. fasteners, fixing ties, etc.) and keep them out of reach
of children.
WARNING! This product is suitable from birth up to 9kg with the
carrycot (pram mode) and from 6 months, up to 22kg using the seat
unit (pushchair mode).
WARNING! The carrycot is suitable for one child from birth who
cannot sit up unaided, roll over and cannot push itself up on their
hands and knees.
WARNING! The carrycot is not suitable for overnight sleeping.
WARNING! The overall load on the vehicle may not exceed 47kg
(including the basket).
WARNING! Never leave the child unattended.
WARNING! Ensure that all locking devices are engaged before use.
WARNING! To avoid injury ensure that your child is kept away when
unfolding and folding this product.
WARNING! Do not let your child play with this product.
WARNING! Do not add an additional mattress to the pram.
WARNING! ALWAYS USE THE HARNESS RESTRAINT SYSTEM.
WARNING! Always use the crotch strap in combination with the
waist belt section of the harness.
WARNING! Check that the pram body or seat unit attachment
devices are correctly engaged before use.
WARNING! This product is not suitable for running or skating.
WARNING! The seat unit is not suitable for children under 6 months.
WARNING! Do not let other children play unattended near the
product.
WARNING! Any load attached to the handle affects the stability of
the stroller.

WARNINGS:
3
WARNING! Do not use this product if any part is broken, torn or
missing.
WARNING! Do not place the product near an open fire or other
source of strong heat.
WARNING! Use only on a firm, horizontal level and dry surface.
WARNING! When using as a tandem, load primary child into the
main seat first. After child is secured in the main seat, place second
child into the lower seat. DO NOT place a child in the lower seat
without a child in the main seat.
• YOUR CHILD’S SAFETY IS YOUR RESPONSIBILITY.
• Adult assembly is required.
• When in use, the head of the child in the product should never be
• lower than the body of the child.
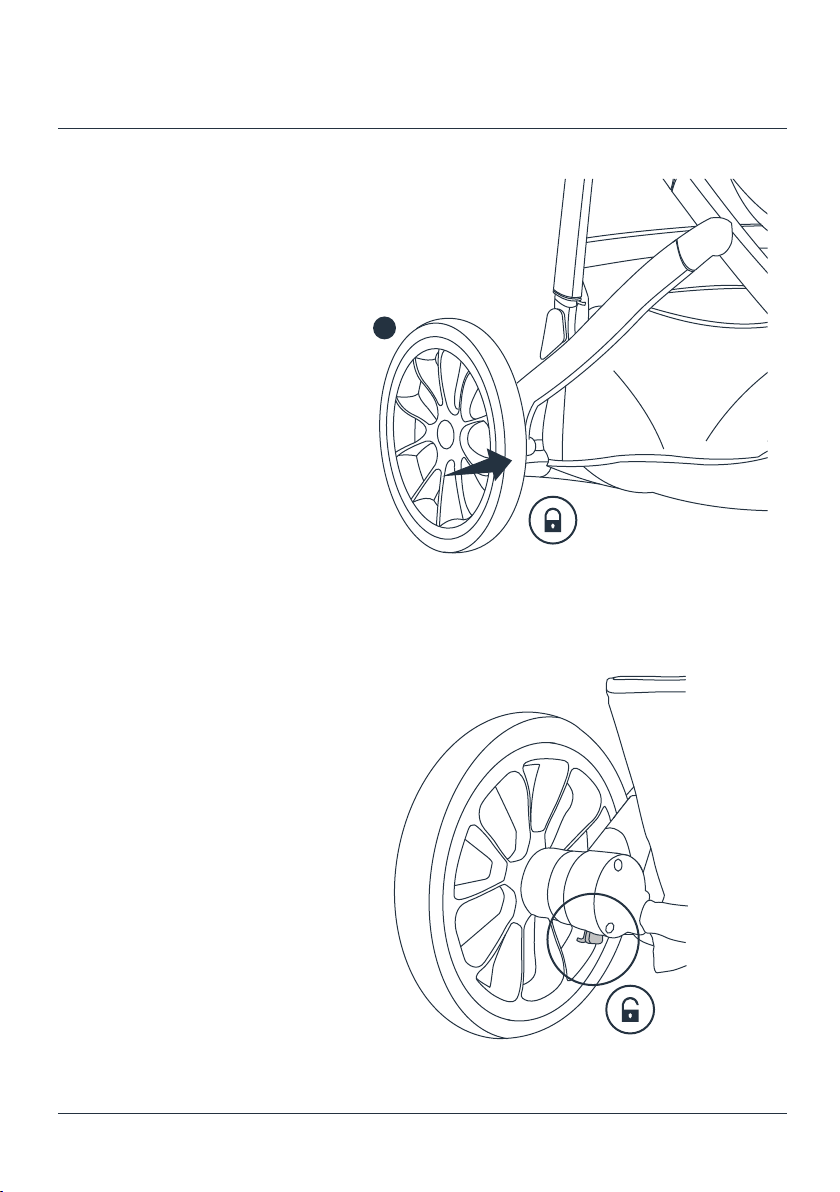
• Ensure that the parking brake is engaged during the loading and
• unloading of children.
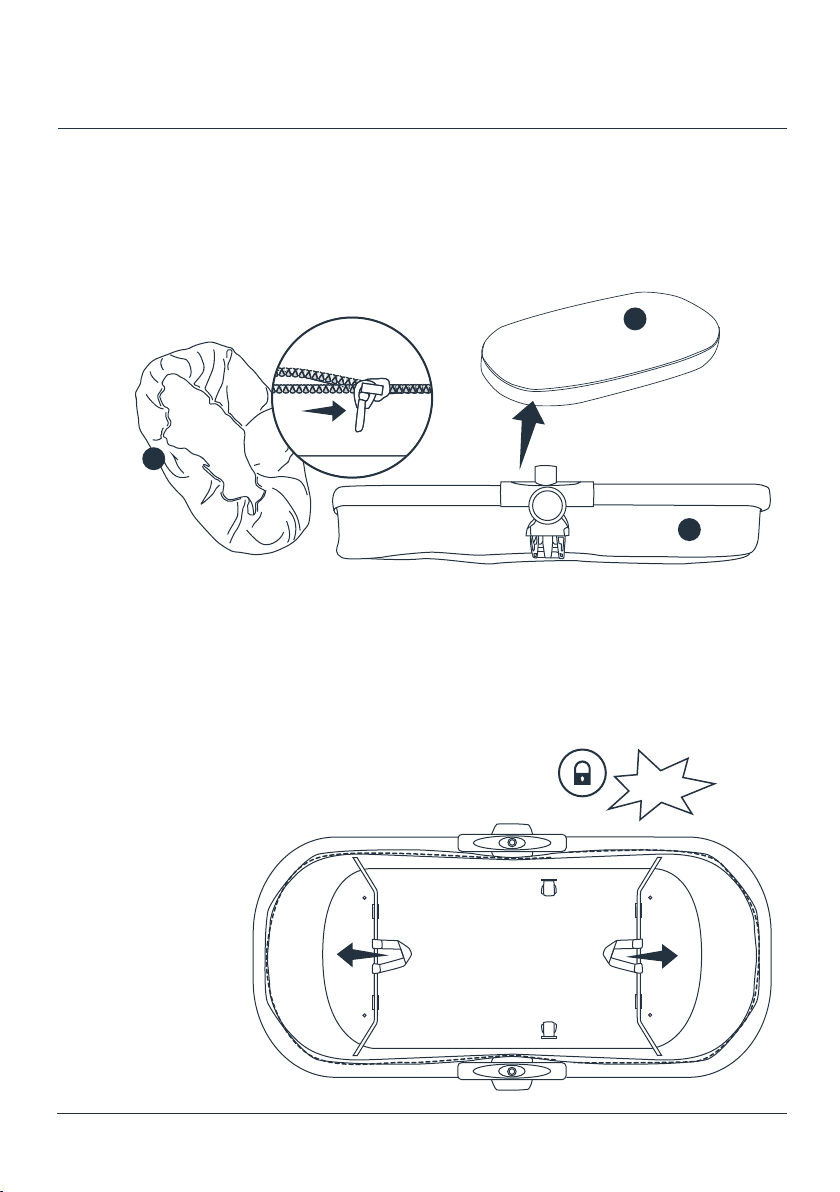
• The handles and the bottom of carrycot should be inspected
• regularly for signs of damage and wear.
• Do not add another mattress on top of the mattress provided or
• recommended by the manufacturer.
• If a mattress is purchased separately, the carrycot depth from the
• top of the mattress to the top of the carrycot side must be at least
• 150mm.
• The basket can carry a maximum load of 10kg.
• The cup holder can carry a maximum load of 0.5kg.
• The organiser can carry a maximum load of 2kg.
• Any load attached to the handle and/or on the back of the backrest
• and/or on the sides will affect the stability of the product.
• Before carrying or lifting, make sure that the handle is in the
• correct position of use.
• Do not overload the pram with additional children, goods or
• accessories.
• Always apply the parking brake when the pram is stationary.
• Take care when going up or down kerbs.

WARNINGS:
4
• Use only replacement parts supplied or approved by the
• manufacturer.
• Any additional or replacement parts should only be obtained from
• the manufacturer or distributer.
• Never substitute parts.
• Keep the plastic packaging away from children to avoid danger of
• suffocation.
• Take extra care in windy conditions.
• Remove your child and fold the pram when going up or down stairs
• or escalators.
• Do not use this pram near an open fire or exposed flame.
• For car seats used in conjunction with a chassis, this vehicle does
• not replace a cot or a bed. Should your child need to sleep, then it
• should be placed in a suitable cot or bed.
• To prevent damage, always remove the raincover before folding
• the pram.
• Do not place anything on top of the raincover.
• Never leave a raincover, hood or apron on the product indoors,
• in a hot atmosphere or near a heat source, as the child may
• overheat.
This product conforms to EN 1888-2:2018 and EN 1466:2014

5
Stroller Parts List:
Chassis x 1
AFront wheels x 2
BRear wheels x 2
C
Seat unit x 1
DCanopy x 1
EBumper bar x 1
F
Seat liner x 1
HOrganiser x 1
ICup holder x 1
JCar seat x 1
K
Raincover x 1
G

6
.
Carrycot Parts List:
Carrycot x 1
LLining x 1
MMattress x 1
N
Canopy x 1
OBumper bar x 1
PApron x 1
Q
Adaptors:
Car seat
adaptors x 1 set
RElevate adaptors x 1 set
STandem adaptors x 1 set
T
Maxi-Cosi®/
Cybex®/Nuna®
Maxi-Cosi®/
Cybex®/Nuna®
Front Front

Chassis Assembly:
7
Unpack all contents and check that all parts are present before starting assembly.
Please refer to the parts list.
1a. Undo the locking catch
and lift up the handle to open
the chassis (A).
1b. When the chassis is completely
open, you should hear a “click”
sound on both sides indicating it
is locked in place.
WARNING! Always ensure
the opened chassis is locked
in place before you use it. CLICK
A

Chassis Assembly:
8
C
2b. To remove the rear wheels,
pull and hold the locking pin at
the bottom surface of the rear
wheel axle and pull the wheel
o.
2a. Push each rear wheel (C) into the
sides of the rear wheel axle until
you hear a “click”.
Give them a tug to ensure they
are attached securely.

Chassis Assembly:
9
3a. Insert each of the front wheel (B)
pins into the center of the socket until
you hear a “click”.
Give each wheel a firm tug to ensure
they’re securely attached.
3b. To remove the front wheels,
push and hold the locking pin
and pull the wheel o.
B
CLICK

Carrycot Assembly:
10
WARNING! The carrycot is suitable for one child from birth who
cannot sit up unaided, roll over and cannot push itself up on their
hands and knees (approx. 9kg).
1. Remove the carrycot mattress (M) and
unzip the carrycot lining (N) to remove
from the carrycot (L).
2. Pull the metal rods into place as
shown. The metal rods should engage
with the plastic holders in the carrycot
base board. This will give your carrycot
its structure.
WARNING! Ensure metal rods are
fully engaged before continuing.
Failure to do so could cause
collapse and fatality.
CLICK
L
.
M
N

3. Re-zip the carrycot lining (M) onto the
carrycot frame and re-insert the carrycot
mattress (N).
WARNING! Do not add an additional
mattress to the carrycot.
Carrycot Assembly:
11
4. Attach the canopy (O) to the carrycot.
First attach the plastic canopy clips
to their respective sides.
And then do the zip around
the back.
.
O

Carrycot Assembly:
12
5a. The canopy can be opened or closed
by pulling forward or backward on the
canopy rim.
5b. There is also a mesh air vent for
maximum air circulation. Lift up the
fabric panel at the base of the canopy
to reveal the mesh panel.
6a. Attach the bumper bar (P)
onto the connection posts. Listen
for the “click” signalling correct
assembly. Give the bumper bar a
tug to ensure it’s secured in place.
6b. To remove the bumper bar,
simply press the release buttons
on either or both sides and lift up.
CLICK
P

Carrycot Assembly:
13
7. Starting from the right, zip the
apron (Q) onto the carrycot.
Fasten the press studs to the
inside of the canopy frame.
Q
WARNING! The carrycot is
not suitable for overnight sleeping.

Pram Mode:
14
1. Attach the carrycot to the chassis.
Line up the carrycot connectors with the
chassis connection points and press
downwards. Listen for a ‘click’ to signal
correct assembly.
2. Press the button both sides
of the connectors to remove
the carrycot from the chassis.
2
CLICK
1

Pram Mode:
15
Suitable from birth in pram mode up to a maximum weight of 9kg or until the
child can sit up unaided, roll over or push itself up on its hands and knees.
WARNING! Always use pram mode with carrycot parent facing.

Seat Unit Assembly:
16
1a. Attach the canopy (E) to the
seat unit (D). First secure the canopy
to the frame with the zip.
D
1b. Next, attach the plastic
canopy clips to their respective
sides.
E

Seat Unit Assembly:
17
2a. Attach the bumper bar (F)
onto the connection posts. Listen
for the “click” signalling correct
assembly. Give the bumper bar a
tug to ensure it’s secured in place.
2b. To remove the bumper bar,
simply press the release buttons
on either or both sides and lift up.
F
CLICK

Pushchair Mode:
18
1a. Attach the seat unit to the chassis.
Line up the seat connectors with the
chassis connection points and press
downwards.
Listen for a “click” to signal correct
assembly.
1b. Press the button both sides
of the seat connectors to remove
the seat unit from the chassis.
WARNING! The seat unit is
not suitable for children under
6 months.
CLICK
2
1

Pushchair Mode:
19
2a. The seat unit is reversible in pushchair mode.
It can be forward or parent facing.
2b. Press the button both sides of the seat
connectors to remove the seat unit from the
chassis. To re-attach the seat unit to the
chassis, line up the seat connectors with the
chassis connection points and press downwards.
Listen for a “click” to signal correct assembly.
forward
facing
parent
facing
1
2
CLICK

Press down the brake pedal on the
rear axle to engage the brake.
Raise the pedal to release the brake.
WARNING! Always apply the
parking brake when the pram
is not moving.
WARNING! Always apply the
brake when you are placing and
removing the child.
WARNING! Always apply the
brake when you are making
adjustments to the pram i.e.
changing seat direction.
Brakes:
20
Table of contents