Zyris Isolite User manual

EN
DA
DE
EL
ES
FI
FR
IT
JA
NL
NO
PL
PT
SV
TR
EN
DA
DE
EL
ES
FI
FR
IT
JA
NL
NO
PL
PT
SV
TR
Illuminated Dental Isolation System
INSTRUCTIONS FOR USE

2
TABLE OF CONTENTS
INDHOLDSFORTEGNELSE
INHALTSVERZEICHNIS
ΠΙΝΑΚΑΣ ΠΕΡΙΕΧΟΜΕΝΩΝ
CONTENIDO
SISÄLLYSLUETTELO
TABLE DES MATIÈRES
INDICE
目次
INHOUDSOPGAVE
INNHOLDSFORTEGNELSE
ÍNDICE
INNEHÅLLSFÖRTECKNING

3
EN
DA
DE
EL
ES
FI
FR
IT
JA
NL
NO
PL
PT
SV
TR
EN
DA
DE
EL
ES
FI
FR
IT
JA
NL
NO
PL
PT
SV
TR
EN
DA
DE
EL
ES
FI
FR
IT
JA
NL
NO
PL
PT
SV
TR
EN
DA
DE
EL
ES
FI
FR
IT
JA
NL
NO
PL
PT
SV
TR
Isolite® Illuminated Dental Isolation System: Instructions for Use
Isolite® illumineret tandisolationssystem: Brugsanvisning
Isolite® Zahnmedizinisches Isolierungssystem mit Licht: Gebrauchsanweisung
Φωτιζόενο σύστηα οδοντική αποόνωση Isolite®: Οδηγίε χρήση
Sistema de aislamiento dental iluminado Isolite®: Instrucciones de uso
Valaisimella varustettu hammaslääketieteellinen
Isolite®-eristysjärjestelmä: Käyttöohjeet
Système d’isolation dentaire avec éclairage Isolite®: Mode d’emploi
Sistema di isolamento dentale illuminato Isolite®: Istruzioni per l’uso
Isolite® 歯科用照光式アイソレーションシステム:取扱説明書
Isolite®-systeem met verlichting voor tandisolatie: Gebruiksaanwijzing
Isolite® belyst dentalt isolasjonssystem: Bruksanvisning
System do izolacji stomatologicznej Isolite® z podświetleniem:
Instrukcja użytkowania
Sistema de isolamento dentário com iluminação Isolite®:
Instruções de utilização
Isolite® tandisoleringssystem med belysning: Bruksanvisning
Isolte® Aydınlatmalı Dental İzolasyon Sstem: Kullanım Talmatları

4
Device Description
Isolite®Illuminated Dental Isolation System
h EIL0201 (USA) h EIL0204 (EU) h EIL0205 (AUS)
This system is intended for use with the Mouthpieces developed by
Zyris, Inc. These Mouthpieces are available in a wide range of sizes for
effective isolation.
Each Isolite Illuminated Dental Isolation System is comprised of four main
components: 1) Titanium Control Base, 2) Vacuum Light Pipe, 3) Power
Hose, 4) LED Smart Stick.
Titanium Control Base
h PIL0201
The Titanium Control Base
includes two Vacuum Levers
(P/N: PIL0205) to adjust suction
in the upper and lower areas of
the Mouthpiece.
LED Smart Stick
h PIL0202
The LED Smart Stick controls the
LED light source. The one-button
light control adjusts: on/off,
5 levels of brightness, and a
cure-safe mode.
Vacuum Light Pipe
h PIL0204
The Vacuum Light Pipe transmits
ultra-bright light while channeling
suction. The Mouthpiece attaches
onto the Vacuum Light Pipe.
Power Hose
h PIL0203 (USA) (1.82 m / 72 in)
h PIL0208 (USA) (0.91 m / 36 in)
h PIL0209 (USA) (1.22 m / 48 in)
h PIL0210 (USA) (1.52 m / 60 in)
h PIL0211 (EU/AUS) (1.32 m / 52 in)
The Power Hose delivers both power
and vacuum suction from the
vacuum canister to the Control Head.
The Power Hose connects to the
vacuum canister. At the end of the
Power Hose, an indicator light will
alert the user if an incorrect power
adapter has been plugged into the
Power Hose.
Power Adapter
h PIL0207
The Power Adapter delivers electrical
power to the Power Hose and the
LED Smart Stick. It connects to the
Power Hose at the Power Jack and
plugs into a standard power outlet
(110v or 220v).

5
EN
Plug Adapter kit
h AIL0219 (EU)
h AIL0220 (NZ/AUS)
International power plug adapters.
Suction Line Plug
h PIL0206
O-ring Maintenance Kit
h AIL0206 (USA/AUS)
h AIL0223 (EU)
3/8" Y-Adapter Kit
h AIL0207 (USA/AUS)
9.5 mm Y-Adapter Kit
h AIL0222 (EU)
Double End Tube Brush
h AIL0204
Mouthpiece Lubricant
h AIL0202
Barrier Sleeves
h AIL0203 (non-sterile)
Sold Separately
Non-sterile Control Head Barrier Sleeves
are available for additional protection
from cross-contamination. Use of Barrier
Sleeves does not eliminate the need to
follow disinfecting and sterilization
recommendations for the Control Head
and Vacuum Light Pipe.
Mouthpieces
h CILXX0X (non-sterile)
Sold Separately
Mouthpieces are single use only and
available in various sizes. The Mouthpieces
are constructed of a soft, flexible polymer
and are not made with natural rubber latex.
They do not contain phthalates or BPAs. For
more information on sizes, go to Zyris.com.
Intended Use
Isolite is a dental isolation system for
clinical use by dental professionals. The
system is designed to isolate two
quadrants at once, simultaneously
providing intra-oral illumination, tongue
and cheek retraction, and continuous
suction. The retraction and continuous
suction are the important functions that
control the oral environment, reducing
contamination and improving bond
strength while protecting the airway and
soft tissue.
Contraindications
No known contraindications. Do not use
without reviewing how to select the
correct Mouthpiece size for each patient.
Do not use if unable to position the
Mouthpiece correctly.

6
Side Eects
Use of the Mouthpiece may trigger a
pharyngeal reflex (laryngeal spasm) in
hypersensitive patients, or if it is not
placed correctly within the oral cavity.
How Supplied
Isolite
The Isolite Illuminated Dental Isolation
System contains: Titanium Control Base,
LED Smart Stick, 6 Vacuum Light Pipes,
Power Hose, Power Supply, Plug Adapter
Kit (for specific countries), Instructions
for Use.
Accessories: Suction Line Plug, Mouthpiece
Lubricant, Y-adapter Kit, Double End Tube
Brush, and O-ring Maintenance Kit.
Mouthpieces
Mouthpieces (sold separately) are supplied
in convenient operatory boxes. Each
Mouthpiece is individually packaged.
Installation
Isolite is designed to install easily in most
dental operatories (Figure 1). Installation
and usage instructions, including a video
demonstration, are also available at
zyris.com.
Step 1 Connect the Power Hose to the
vacuum canister by fitting the end of the
vacuum hose onto an auxillary HVE port
on the vacuum canister. If an auxillary HVE
port is not available, use the provided
Y-adapter, so that the standard HVE hose
may remain connected.
Control
Head
Vac Canister
Hose
HVE Port 2 HVE Port 1
Power
Jack
Standard
HVE Hose
Power Hose
Vac Canister
Figure 1. Installation
Power
Adapter

7
NOTE: For countries outside the USA, installation may
need to be completed by a qualied service
technician. Please consult your in-country
representative for additional information.
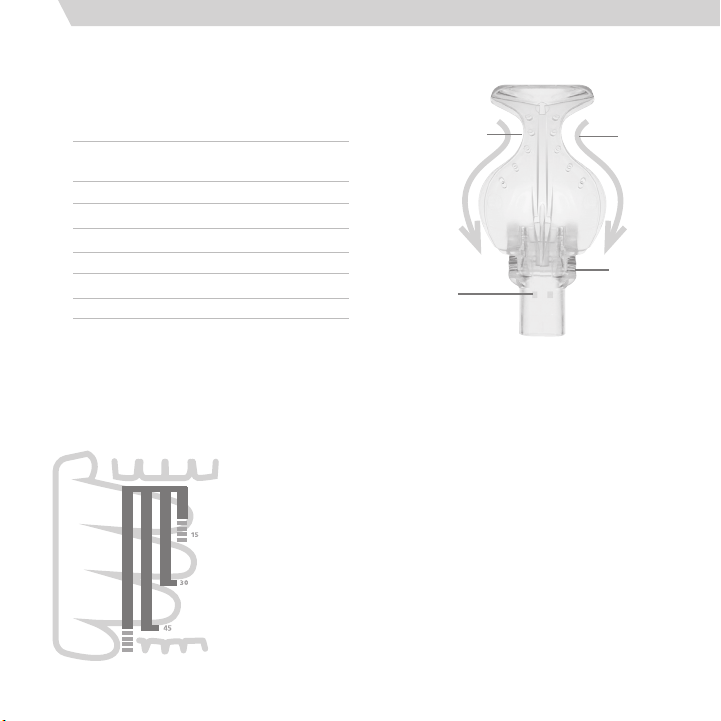
Step 2 Plug the Power Adapter into an
electrical outlet. Plug the DC connector
into the Power Jack at the end of the
Power Hose. Connect the Control Head to
the head of the Power Hose. When
properly installed, a green LED indicator
light will appear on the LED Smart Stick.
Once connected, test the dual Vacuum
Levers to confirm suction functionality.
NOTE: For countries outside the USA, attach the
appropriate plug adapter to the power adapter. See
the illustration included with the Plug Adapter Kit.
Direct wire installations require completion by a
qualied service technician. Please consult your
in-country representative for additional information.
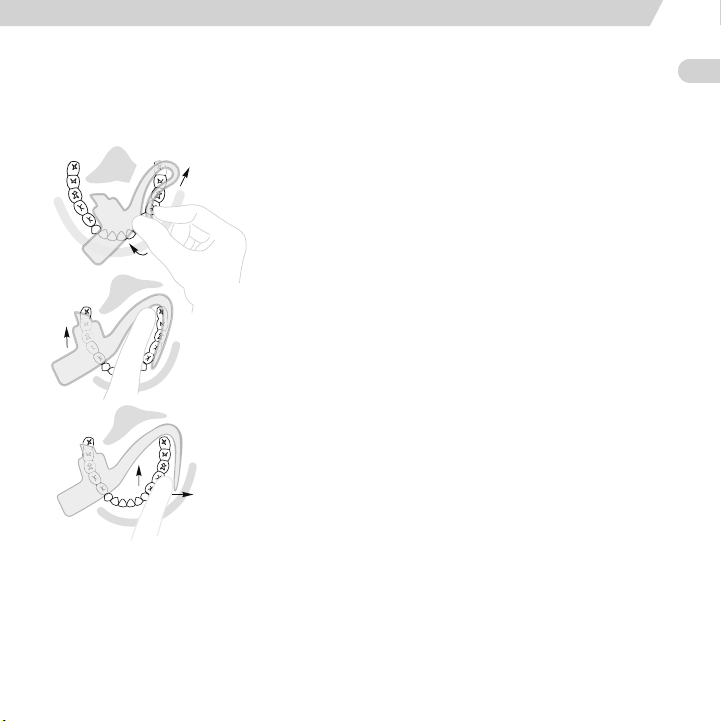
Step 3 Place the Isolite in an open slot on
the toolbar when not in use.
How to Operate
Using the Dual Vacuum Levers
Dual Vacuum Levers adjust suction
intensity in both the upper and lower
quadrants. To adjust, rotate the left and
right Vacuum Levers to the desired
suction intensity for each quadrant. To
shut off suction, rotate the levers to the
most downward position.
Using The Led Smart Stick
Adjust lighting functions by using the
one-button light control.
Operation Action
Turn light on / off Tap button once
Set brightness Press and hold button to cycle
through brightness levels;
release to set
Engage / disengage
cure-safe mode
With light on,
double-tap button
Table 1. LED Operation
The LED Smart Stick features an LED indicator
which provides the status of the system.
LED Indicator Status
Steady green, pulsing
every 10 sec
System is ready; power is
connected and the light is off
Steady green Light is on
Blinking blue With button pressed and
held, marks each of the
5brightness levels
Steady amber Cure-safe mode
Steady blue Self-regulating temperature
control has automatically
lowered the brightness to
reduce heat level
Table 2. LED Status
EN

8
Cheek Shield
Flexible Isthmus
Integrated
Bite Block
Tongue Retractor
Locking Barb
Openings
Mouthpiece Sleeve
Figure 3. Mouthpiece
Vacuum
Channels
Attaching the Mouthpiece
Slide the Mouthpiece onto the Vacuum
Light Pipe until the two locking barbs
engage. Water or mouthpiece lubricant
may be used to lubricate the inside
surface of the Mouthpiece sleeve to
ease attachment.
Selecting the Mouthpiece
To select the correct Mouthpiece size, measure
the patient’s interincisal opening. If between
sizes, you may select the smaller size.
Mouthpiece Size
Approx. Interincisal
Opening
Pediatric (PED) < 30 mm
Extra Small (XSM) < 30 mm
Small (SML) 30 mm
Medium (MED) 30-45 mm
Medium Deep Vestibule (MDV) 30-45 mm
Large (LRG) > 45 mm
Table 3. Mouthpiece Sizes
The Finger Method
The finger method may also be used to select
the appropriate Mouthpiece size (Figure 2).
For additional assistance, watch a video
demonstration online at Zyris.com.
Pediatric / Extra Small
One Finger (< 30 mm)
Small
Two Fingers (30 mm)
Medium / Medium DV
Three Fingers (30-45 mm)
Large
Four Fingers (> 45 mm)
Figure 2. The Finger Method
INTERINCISAL OPENING IN MM

9
Placing the Mouthpiece
Prior to placing the Mouthpiece within the
patient’s oral cavity, moisten the Mouthpiece
and the patient’s lips.
Figure 4, 5, & 6. Mouthpiece Placement
Step 1
Step 2
Step 3
Step 1
Hold the sides of the Control Head with
your index finger and thumb. With your
other hand, fold the Cheek Shield onto
the Tongue Retractor. Gently slide the
folded mouthpiece into the buccal
vestibule on the side to receive treatment.
Angle the mouthpiece to allow the lower
edge of the Tongue Retractor to move
along the buccal edge of the teeth.
Step 2
Move the bite block onto the occlusal
surface of the teeth, just distal to the
mandibular cuspid. Instruct the patient to
“rest gently”on the bite block to secure.
Step 3
Place the Cheek Shield into the buccal
vestibule. Move the Isthmus onto the
retromolar pad behind the maxillary tuberosity.
Adjust the Tongue Retractor in the lingual
vestibule as needed. Move the bite block
distally to provide more vertical working room.
EN

10
Disassembly of the Control Head
Step 1
Press the release button (Figure 7) on
the underside of the Titanium Control
Base to release and disconnect the
Vacuum Light Pipe.
Step 2
Remove the LED Smart Stick from the
Titanium Control Base.
Step 3
Holding the head of the Power Hose, pull
to remove the Titanium Control Base. Do
not twist.
Vacuum
Levers
Release
Button
Vacuum
Light Pipe
Led Smart Stick
(Do Not Autoclave)
LED Light
Control
Button
Titanium
Control
Base
Vacuum Tubes
Figure 7. Control Head
Vacuum Tubes
Disinfection, Cleaning, and
Sterilization
Surface Disinfection of the Titanium
Control Base
Zyris, Inc. recommends performing a
surface disinfection of the Titanium Control
Base between each patient. To disinfect the
Titanium Control Base, first remove the
Vacuum Light Pipe and the LED Smart Stick.
If the Titanium Control Base is visibly
soiled with biomatter or blood, use an
intermediate level disinfectant wipe
with a claim to inactivate Mycobacterium
tuberculosis. Otherwise, use a hospital grade
disinfectant and follow the manufacturer’s
instructions for contact time.
Surface Disinfection of the LED
Smart Stick
Zyris, Inc. recommends performing a
surface disinfection of the LED Smart Stick
between each patient.
Spray a ready-to-use, fast-killing disinfectant
onto entire surface of the LED Smart Stick
and allow to remain wet per manufacturer’s
instructions. Using a nylon bristle brush,
clean around the light control button area.
Do not press the button while cleaning.
Gently work the bristles in a circular motion,
following the groove between the housing
and the button for approximately
60 seconds to remove all visual debris.
Repeat if any contaminants are still visible.

11
Wipe the LED Smart Stick thoroughly with a
ready-to-use, fast-killing disinfectant for the
specified contact time per manufacturer’s
instructions. Dry off the LED Smart Stick and
gold connector pins before use.
Surface Disinfection of the Power Hose
Zyris, Inc. recommends performing a
surface disinfection of the Power Hose
between each patient.
Use a hospital grade disinfectant per
manufacturer’s instructions. If components
are visibly soiled with biomatter or blood,
use an intermediate level disinfectant wipe
with a claim to inactivate Mycobacterium
tuberculosis. Barrier Sleeves may also be
used and changed between patients.
Cleaning and Sterilization of the
Vacuum Light Pipe
Zyris, Inc. recommends sterilization of the
Vacuum Light Pipe between each patient.
Remove biomatter and other debris from the
suction channels using the provided Double
End Tube Brush with a neutral pH (6.5-7.5)
enzymatic cleaning solution. Do not use
solution to hold parts. After cleaning, rinse
with tap water, dry, and place components in
an autoclave pouch to be sterilized in a
steam autoclave. Use validated sterilization
cycles (Table 4).
Cleaning and Sterilization of the
Titanium Control Base
Zyris, Inc. recommends following normal
infection control protocol for dental devices.
Users may sterilize the Titanium Control Base
at their discretion.
Remove the Vacuum Levers from the
Titanium Control Base. Remove biomatter
and other debris from the suction channels
using the provided Double End Tube Brush
with a neutral pH (6.5-7.5) enzymatic
cleaning solution. Do not hold parts in
cleaning solution or use ultrasonic cleaners.
After cleaning, rinse with tap water, dry, and
place components in an autoclave pouch to
be sterilized in a steam autoclave. Use
validated sterilization cycles (Table 4).
After sterilization, lubricate the Vacuum Lever
O-rings with the Dow 111 O-ring lubricant
provided in the O-ring Maintenance Kit.
Validated Sterilization Cycles
Min. Exposure Min. Drying
Cycle Temperature Time Time
Standard 121 °C / 250 °F 30 min 30 min
Standard 132 °C / 270 °F 15 min 15 min
Prevacuum 132 °C / 270 °F 4 min 20 min
Prevacuum 134 °C / 273 °F 3 min 20 min
Table 4. Validated Sterilization Cycles
EN

12
Power Hose
Clean the inside of the Power Hose
regularly according to frequency of use to
prevent the accumulation of biofilm. Start
by vacuuming water through the Power
Hose. Then vacuum a dental hose cleaner
through the hose per manufacturer’s
instructions. The vacuum hose cleaner
should be non-foaming, deodorizing,
anti-microbial, and able to dissolve organic
debris. Most enzymatic cleaners with a pH
between 6 and 8 are acceptable. Do not
use disinfectants as a vacuum hose
cleaner. If further disinfection is necessary,
consult your vacuum manufacturer for
recommendations.
To lubricate the Power Hose O-ring,
remove the Titanium Control Base from
the Power Hose. The black O-ring is
located approximately 13 mm (½ inch)
down the inside of the blue fitting at the
head of the Power Hose. (Figure 10) Swab
the O-ring with the Dow 111 O-ring
lubricant provided in the O-ring
Maintenance Kit.
Figure 10. Power Hose
O-ring
Maintenance
Titanium Control Base
The Vacuum Lever O-rings require weekly
lubrication to operate at peak efficiency.
Remove the Titanium Control Base from
the Power Hose. To remove the Vacuum
Levers, push the levers to the“off”position
and keep pushing gently until each lever
pops out, or gently pry them out. Coat
the O-ring by applying a small amount of
the Dow 111 O-ring Lubricant provided in
the O-ring Maintenance Kit. Apply an
additional amount to the Titanium
Control Base retainer rings as well.
Reattach the Vacuum Levers to the
Titanium Control Base (Figure 8 and 9).
Figure 9. Titanium Control Base
Retainer Ring
O-ring
Figure 8. Vacuum Levers

13
Warnings
YDdiL
YWARNING: Shock hazard if incorrect
power supply is used. Only use the power
adapter supplied with your Isolite. Use of
other power sources may damage
electronics and voids your product
warranty. The electrical system
requirement is 5.0 VDC, 1.0 amp.
YWARNING: Do not place a metal HVE
valve onto the Power Hose. This may
damage electrical components and may
present a shock hazard.
D WARNING: Mouthpieces are single
use only. Reuse can result in the
transmission of infectious pathogens.
Mouthpieces must be discarded after use.
Mouthpieces cannot be safely resterilized
after use.
LWARNING: Do not use if the individual
Mouthpiece package has been previously
damaged or opened. Mouthpieces are
individually packaged in polyethylene
bags.
YWARNING: Be sure to use
established protocols and patient
monitoring when using the Mouthpiece
in conjunction with sedation
dentistry. Patient management
by a certified anesthesiologist is
strongly recommended.
Precautions
YCAUTION: When performing dental
procedures requiring high levels of blood
evacuation, it is recommended that the
Mouthpiece be intermittently flushed
with water to prevent coagulation in the
Mouthpiece to avoid loss of suction and
light transmission.
YCAUTION: Do not block access to the
Power Adapter. The Power Adapter should
be easily accessible so that it can be
unplugged from the wall outlet if necessary.
YCAUTION: To avoid electrical shock,
the use of an extension cord with the
Power Adapter is not recommended.
YCAUTION: Do not crimp or fold the
Power Hose to shut off suction. Internal
damage to the Power Hose wiring
may occur.
YCAUTION: The LED Smart Stick
contains sensitive electronics and requires
special care and handling. Do not
submerse, autoclave, Chemclave, or place
in ultrasonic cleaner.
YCAUTION: The LED Smart Stick should
only be removed and installed while the
Titanium Control Base is attached to the
power hose. Failure to do so may result in
damage to the gold connector pins.
EN

14
YCAUTION: Do not autoclave the
Titanium Control Base at temperatures
above 135 °C; higher temperatures could
damage components and void your
product warranty.
YCAUTION: Do not press the LED Light
Control Button while cleaning.
YCAUTION: Do not hold Titianium
Control Base or LED Smart Stick in cleaning
solution or use ultrasonic cleaners.
YCAUTION: Failure to maintain properly
lubricated O-rings can result in damage
to the Isolite that is not covered by
product warranty.
YCAUTION: With regular use, cleaning,
and maintenance, the device is designed
to last for years. Check the device for wear
prior to use to make sure that it is
adequate for use.
Guide to Symbols
Non-sterile Catalog
number
Caution
Do not re-use Positive
polarity
Consult
Instructions
for Use
Do not use
if package is
damaged
Type B
applied part
electrical
hazard
Date of
manufacture
Manufacturer Storage
Conditions
r
15:
30:

15
EN
Limited 1-Year Warranty
Zyris Inc. warrants this product to
be free from defects in material and
workmanship for a period of one year
from the date of original purchase. If
the product exhibits such a defect,
Zyris, Inc. will, at its option, repair or
replace it without costs for parts and
labor. The product must be returned
by the customer to Zyris, Inc. in
accordance with current Return Material
Authorization procedures. Proof of date
of original purchase may be required.
This warranty does not cover finishes or
normal wear, nor does it cover damage
resulting from accident, misuse, dirt,
tampering, unreasonable use, failure
to provide reasonable and necessary
maintenance, service performed or
attempted by unauthorized individuals
or service agencies, or devices that
have been otherwise modified. All
implied warranties, including any
implied warranty or merchantability or
fitness for any particular purpose, are
limited in duration to one year from the
date of receipt of the product. In no
event will Zyris, Inc. be responsible for
consequential damages resulting from
the use of this product.
Instructions for Use may also be found at:
Zyris.com

16
Enhedsbeskrivelse
Isolite®illumineret tandisolationssystem
h EIL0201 (USA) h EIL0204 (EU) h EIL0205 (AUS)
Dette system er beregnet til brug sammen med de mundstykker, der
fremstilles af Zyris, Inc. Disse mundstykker fås i mange forskellige
størrelser og giver effektiv isolation.
Hvert Isolite illumineret tandisolationssystem består af fire
hovedkomponenter: 1) Titaniumkontrolbase, 2) Vakuumlysrør,
3) Strømførende slange, 4) LED Smart Stick.
Titaniumkontrolbase
h PIL0201
Titaniumkontrolbasen omfatter
to vakuumhåndtag
(delnummer: PIL0205) til
justering af sugning i det
øverste og nederste område af
mundstykket.
LED Smart Stick
h PIL0202
LED Smart Stick'en styrer
LED-lyskilden. Lyskontrollen
med en knap justerer: tænd/
sluk, 5 lysstyrker og en
cure-safe-tilstand.
Vakuumlysrør
h PIL0204
Vakuumlysrøret udsender
ultrastærkt lys under kanalisering
af sugning. Mundstykket
fastgøres på vakuumlysrøret.
Strømførende slange
h PIL0203 (USA) (1,82 m/72 tommer)
h PIL0208 (USA) (0,91 m/36 tommer)
h PIL0209 (USA) (1,22 m/48 tommer)
h PIL0210 (USA) (1,52 m/60 tommer)
h PIL0211 (EU/AUS)
(1,32 m / 52 tommer)
Den strømførende slange leverer
både strøm og vakuumsugning fra
vakuumbeholderen til kontrolhovedet.
Den strømførende slange kan sluttes
til vakuumbeholderen. Et indikatorlys
for enden af den strømførende
slange vil advare brugeren, hvis der er
sluttet en forkert strømadapter til den
strømførende slange.
Strømadapter
h PIL0207
Strømadapteren leverer elektrisk
strøm til den strømførende slange og
LED Smart Stick'en. Den sluttes til den
strømførende slange ved jackstikket
og sluttes til en standardstikkontakt
(110 V eller 220 V).

17
EN
DA
DE
EL
ES
FI
FR
IT
JA
NL
NO
PL
PT
SV
TR
Stikadaptersæt
h AIL0219 (EU)
h AIL0220 (NZ/AUS)
Internationale strømstikadaptere.
Stik til sugeledning
h PIL0206
O-ring-vedligeholdelsessæt
h AIL0206 (USA/AUS)
h AIL0223 (EU)
3/8" Y-adaptersæt
h AIL0207 (USA/AUS)
9,5 mm Y-adaptersæt
h AIL0222 (EU)
Rørbørste med dobbeltende
h AIL0204
Smøremiddel til mundstykke
h AIL0202
Barrieremuer
h AIL0203 (usterile)
Sælges separat
Usterile barrieremuffer til kontrolhovedet
er tilgængelige til yderligere beskyttelse
mod krydskontaminering. Brug af
barrieremuffer betyder ikke, at det er
overflødigt at følge desinfektions- og
steriliseringsanbefalingerne til
kontrolhovedet og vakuumlysrøret.
Mundstykker
h CILXX0X (usterile)
Sælges separat
Mundstykker er kun til engangsbrug og fås i
forskellige størrelser. Mundstykkerne er
fremstillet af en blød, fleksibel polymer og er
ikke fremstillet af naturligt gummilatex. De
indeholder ikke ftalater eller BPA'er. Få flere
oplysninger om størrelser på Zyris.com.
Anvendelsesformål
Isolite er et tandisolationssystem til
klinisk brug for tandlæger. Systemet er
udviklet til at isolere to kvadranter på
én gang og samtidig give mulighed
for intraoral illumination, tunge- og
kindtilbagetrækning og kontinuerlig
sugning. Tilbagetrækningen og den
kontinuerlige sugning er vigtige
funktioner, som giver kontrol over det
orale miljø, reducerer kontamineringen
og forbedrer bindingsstyrken, idet
luftvejene og det bløde væv beskyttes.
Kontraindikationer
Ingen kendte kontraindikationer. Må ikke
bruges uden at gennemgå, hvordan den
rigtige mundstykkestørrelse udvælges til
hver patient. Må ikke anvendes, hvis
mundstykket ikke kan placeres korrekt.

18
Bivirkninger
Brug af mundstykket kan udløse en
svælgrefleks (laryngospasme) hos meget
følsomme patienter, eller hvis det ikke
placeres korrekt i mundhulen.
Leveringsmåde
Isolite
Isolite illumineret tandisolationssystem
indeholder: titaniumkontrolbase, LED
Smart Stick, 6 vakuumlysrør, strømførende
slange, strømforsyning, stikadaptersæt (til
bestemte lande), brugsanvisning.
Tilbehør: Stik til sugeledning,
smøremiddel til mundstykke,
Y-adaptersæt, børste til rør med
dobbeltende og O-ring-
vedligeholdelsessæt.
Mundstykker
Mundstykker (sælges separat) leveres i
praktiske kasser til klinikbrug. Hvert
mundstykke er pakket enkeltvist.
Installation
Isolite er udviklet til enkel installation på
de fleste tandlægeklinikker (Figur 1).
Installations- og brugervejledning,
herunder en videodemonstration, er også
at finde på Zyris.com.
Trin 1 Slut den strømførende slange til
vakuumbeholderen ved at fastgøre
enden af vakuumslangen til en HVE-
hjælpeport på vakuumbeholderen. Hvis
der ikke er en tilgængelig HVE-
hjælpeport, skal den medfølgende
Y-adapter bruges, så den almindelige
HVE-slange kan forblive tilsluttet.
Kontrol-
hoved
Vakuum-
beholder-
slange
HVE-port 2 HVE-port 1
Jackstik
Almindelig
HVE-slange
Strømførende
slange
Vakuumbeholder
Figur 1. Installation
Strøm-
adapter

19
EN
DA
DE
EL
ES
FI
FR
IT
JA
NL
NO
PL
PT
SV
TR
BEMÆRK! I lande uden for USA kan det være
nødvendigt at få en kvaliceret servicetekniker til at
fuldføre installationen. Kontakt landsrepræsentanten
for at få yderligere oplysninger.
Trin 2 Slut strømadapteren til en
stikkontakt. Slut jævnstrømsstikket til
jackstikket for enden af den strømførende
slange. Slut kontrolhovedet til hovedet på
den strømførende slange. Efter korrekt
tilslutning lyser et grønt LED-indikatorlys
på LED Smart Stick'en. Når de to
vakuumhåndtag er tilsluttet, skal de testes
for at bekræfte sugningens funktionalitet.
BEMÆRK! I lande uden for USA skal den relevante
stikadapter sluttes til strømadapteren. Se
illustrationen, der er vedlagt stikadaptersættet.
Installationer med direkte ledningsføring skal
udføres af en kvaliceret servicetekniker. Kontakt
landsrepræsentanten for at få yderligere oplysninger.
Trin 3 Anbring Isolite i en ledig
værktøjsplads, når den ikke er i brug.
Betjening
Sådan bruger du to vakuumhåndtag
To vakuumhåndtag justerer sugekraften i
både den øvre og nedre kvadrant.
Justering foretages ved at dreje det
venstre og højre vakuumhåndtag til den
ønskede sugekraft for hver kvadrant.
Du lukker for sugningen ved at dreje
håndtagene hen til den nederste position.
Anvendelse af Led Smart Stick'en
Juster belysningsfunktionerne ved hjælp
af lyskontrollen med en knap.
Funktion Handling
Tænd/sluk for lyset Tryk en gang på knappen
Indstil lysstyrken Tryk på knappen, og hold
den inde for at køre gennem
lysstyrkeniveauerne. Sæt
indstillingen ved at slippe
Aktiver/deaktiver
cure-safe-tilstanden
Tryk to gange på knappen med
lyset tændt
Tabel 1. LED-funktion
LED Smart Stick'en indeholder en
LED-indikator, som viser status for systemet.
LED-indikator Status
Konstant grøn,
blinker hvert 10. sek.
Systemet er klart. Strømmen er
tilsluttet, og lyset er slukket
Konstant grøn Lyset er tændt
Blinker blåt Markerer hvert af de
5lysstyrkeniveauer med knappen
trykket ned og holdt inde
Konstant gul Cure-safe-tilstand
Konstant blå Selvregulerende
temperaturkontrol har
automatisk reduceret lysstyrken
for at reducere varmeniveauet
Tabel 2. LED-status

20
Kindskjold
Fleksibel
isthmus
Integreret
bidplade
Tungeholder
Åbninger
for låsende
modhager Mundstykkets
Figur 3. Mundstykke
Vakuum-
kanaler
Fastgørelse af mundstykket
Skub mundstykket ind mod
vakuumlysrøret, indtil de to modhager
går i indgreb. Der kan bruges vand eller
mundstykkesmøring til at smøre den
indvendige del af mundstykkets muffe for
at lette fastgørelsen.
Valg af mundstykke
For at vælge et mundstykke i den korrekte
størrelse måles patientens interincisale
åbning. Hvis resultatet ligger mellem to
størrelser, kan du vælge den mindste størrelse.
Størrelse på mundstykker
Omtrentlig
interincisal åbning
Pædiatrisk (PED) < 30 mm
Ekstra lille (XSM) < 30 mm
Lille (SML) 30 mm
Medium (MED) 30-45 mm
Mellemdybt hulrum (MDV) 30-45 mm
Stor (LRG) > 45 mm
Tabel 3. Størrelse på mundstykker
Fingermetoden
Fingermetoden kan også bruges til at vælge
den rette størrelse på mundstykket (Figur 2).
For yderligere hjælp henvises der til en
videodemonstration online på Zyris.com.
Pædiatrisk/Ekstra lille
Lille
Medium/Medium DV
Stor
Figur 2. Fingermetoden
INTERINCISAL ÅBNING I MM
Table of contents
Languages:
Popular Medical Equipment manuals by other brands

Care Fusion
Care Fusion Alaris Directions for use

B. Braun
B. Braun Aesculap MACS T 011148 Instructions for use/Technical description

Hillrom
Hillrom Pal Pro Stirrups Instructions for use

ARJO HUNTLEIGH
ARJO HUNTLEIGH Enterprise 5000X Quick reference guide

Cooper Surgical
Cooper Surgical Prima PSV-2L Directions for use

I-Tech
I-Tech MAG700 user manual

B-K Medical
B-K Medical UltraView 2202 Getting started

ARJO HUNTLEIGH
ARJO HUNTLEIGH Akron Streamline Europe Continental Instructions for use

Bionet
Bionet BM1 user manual

B. Braun
B. Braun Flexima Uro Silk Instructions for use

Owlstone Medical
Owlstone Medical BREATH BIOPSY CASPER user manual

Contec Medical Systems Co.
Contec Medical Systems Co. 22-01-CMS50D instructions