Appuyez sur le bouton WPS du Zyxel MPro Mesh Router. Relâchez-le lorsque le voyant Zyxel
MPro Mesh Router WPS LED clignote.
Appuyez une fois sur le bouton WPS du WAP6807 et relâchez-le. Les voyants POWER et
LINK LEDs clignotent en orange pour indiquer que l'association est en cours.
Les voyants LINK et POWER LEDs du WAP6807 s'allument en vert si la connexion est
réussie.
Sur votre smartphone ou votre client sans fil, trouvez le SSID du Zyxel MPro Mesh Router.
Entrez la clé sans fil du Zyxel MPro Mesh Router pour vous connecter.
Remarque : Le voyant POWER LED du WAP6807 indique si le WAP6807 est prêt à
rejoindre le réseau WiFi. Le voyant LINK LED du WAP6807 indique la qualité de la liaison
WiFi et l'état de l'association WPS. Voir le tableau des LED.
Premere il tasto WPS sul Zyxel MPro Mesh Router. Rilasciarlo quando il Zyxel MPro Mesh
Router WPS LED lampeggia.
Premere una volta il pulsante WPS sul WAP6807, e poi rilasciarlo. Quando il POWER e il
LINK LEDs lampeggiano sul giallo significa che l'accoppiamento è in corso.
Il WAP6807 LINK e il POWER LEDs si accendono sul verde se il collegamento è riuscito.
Sullo smartphone o sul client wireless, trovare l'SSID Zyxel MPro Mesh Router. Inserire la
chiave wireless del Zyxel MPro Mesh Router per connettersi.
Nota: Il POWER LED sul WAP6807 indica se il WAP6807 è pronto ad entrare nella rete
WiFi. Il LINK LED sul WAP6807 indica la qualità della connessione al WiFi e lo stato
dell'accoppiamento del WPS. Vedere la tabella dei LED.
Druk op de WPS-knop op de Zyxel MPro Mesh Router. Laat deze los zodra de Zyxel MPro
Mesh Router WPS LED knippert.
Druk eenmaal op de WPS-knop op de WAP6807 en laat deze los. Dat de POWER en
LINK LEDs amber knipperen geeft aan dat het koppelen bezig is.
De WAP6807 LINK en POWER LEDs worden groen als de verbinding succesvol is.
Zoek de Zyxel MPro Mesh Router SSID op uw smartphone of draadloze client. Voer de
draadloze sleutel van de Zyxel MPro Mesh Router in om verbinding te maken.
Opmerking: De POWER LED op de WAP6807 geeft aan wanneer de WAP6807 klaar is om
te verbinden met het WiFi netwerk. De LINK LED op de WAP6807 geeft de kwaliteit van de
WiFi-link en de WPS koppelingsstatus aan. Zie LED tabel.
Paina Zyxel MPro Mesh Router WPS-painiketta. Vapauta se, kun Zyxel MPro Mesh Router
WPS LED vilkkuu.
Paina WAP6807:n WPS-painiketta kerran ja vapauta painike. Kun POWER ja LINK LEDs
it vilkkuvat keltaisina, paritus on käynnissä.
WAP6807 LINK - ja POWER LEDs palavat vihreinä, jos yhteys onnistuu.
Etsi älypuhelimellasi tai langattomalla asiakasohjelmalla Zyxel MPro Mesh Router SSID.
Syötä langaton Zyxel MPro Mesh Router -avain yhdistääksesi.
Huomautus: POWER LED WAP6807 ilmoittaa onko WAP6807 on valmis liittymään
WiFi-verkkoon. LINK LED WAP6807:lla ilmoittaa WiFi-yhteyden laadun ja WPS paritusti-
lan. Katso LED-taulukko.
Tryck på WPS-knappen på Zyxel MPro Mesh Router. Släpp den när Zyxel MPro Mesh Router
WPS LED blinkar.
Tryck på WPS-knappen på WAP6807 en gång och släpp. POWER och LINK LEDs
blinkar gult vilket indikerar att hopkoppling pågår.
WAP6807 LINK och POWER LEDs lyser grönt om anslutningen lyckas.
Hitta Zyxel MPro Mesh Router SSID på din smarta telefon eller trådlösa klient. Ange Zyxel
MPro Mesh Router trådlösa nyckel för att ansluta.
Obs! POWER LED på WAP6807 indikerar om WAP6807 är redo att ansluta till wifi-nätver-
ket. LINK LED på WAP6807 indikerar wifi-länkkvalitet och WPS-hopkopplingsstatus. Se
LED-tabellen.
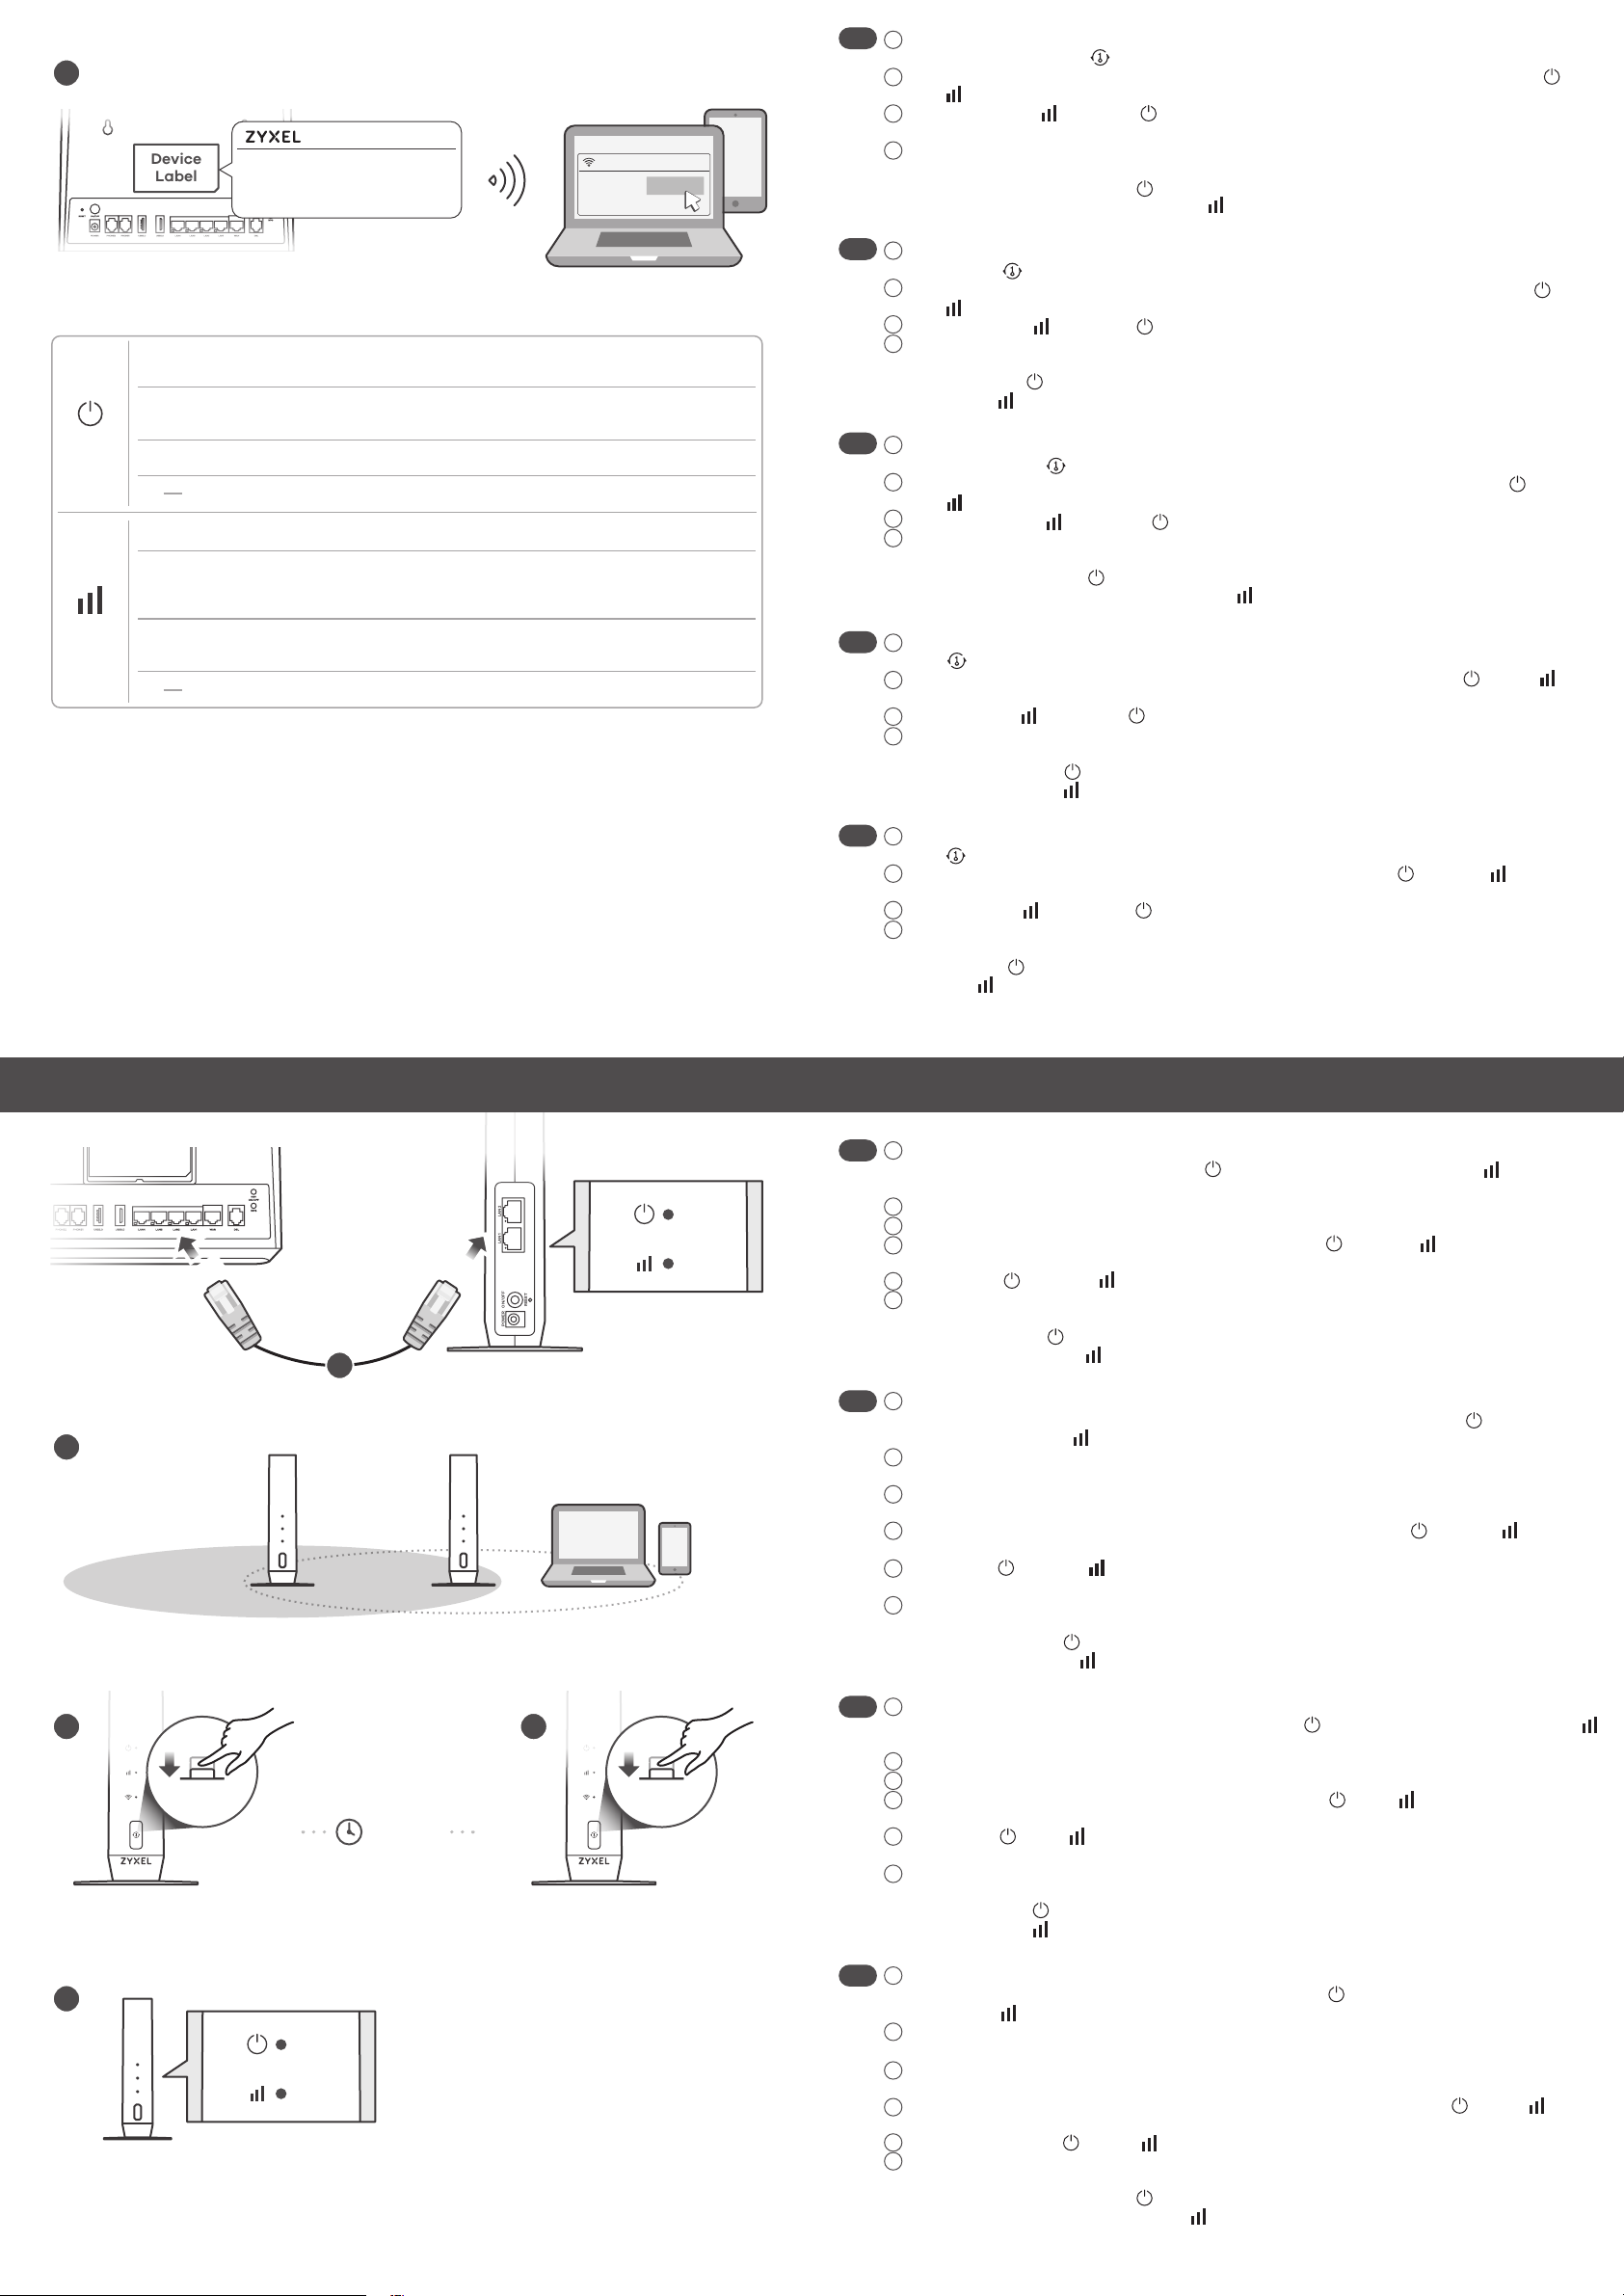
Use the included Ethernet cable to connect the WAP6807 LAN port to the Non-MPro Mesh
Router LAN port. Wait until the POWER LED lights up amber and the LINK LED lights
up green.
Place the second WAP6807 (WAP6807-2) where you want to extend your wireless network.
Press the WPS button once on the WAP6807 connected directly to the router (WAP6807-1).
Press the WPS button once on WAP6807-2. The POWER and LINK LEDs blink amber
indicate the pairing is in process.
The POWER and LINK LEDs light up green if the connection is successful.
On your smartphone or wireless client, find the WAP6807-1 SSID. Enter the WAP6807-1
wireless key to connect.
Note: The POWER LED on the WAP6807-2 indicates if the WAP6807-2 is ready to join the
WiFi network. The LINK LED on the WAP6807-2 indicates WiFi link quality and WPS
pairing status. See the LED table.
Verwenden Sie das mitgelieferte Ethernet-Kabel, um den WAP6807 LAN Port mit dem
Non-MPro Mesh Router LAN Port zu verbinden. Warten Sie, bis die POWER LED gelb
leuchtet und die LINK LED grün leuchtet.
Stellen Sie den zweiten WAP6807 (WAP6807-2) dort auf, wo Sie Ihr drahtloses Netzwerk
erweitern möchten.
Drücken Sie einmal auf die WPS-Taste am direkt mit dem Router verbundenen WAP6807
(WAP6807-1).
Drücken Sie einmal auf die WPS-Taste des WAP6807-2. Die POWER und LINK LEDs
blinken gelb, um anzuzeigen, dass die Kopplung ausgeführt wird.
Die POWER und LINK LEDs leuchten grün, wenn die Verbindung erfolgreich hergestellt
wurde.
Suchen Sie die WAP6807-1 SSID auf Ihrem Smartphone oder Client. Geben Sie den
WAP6807-1 WLAN Schlüssel ein, um eine Verbindung herzustellen.
Hinweis: Die POWER LED am WAP6807-2 indicates if the WAP6807-2 is ready to join the
WiFi network. Die LINK LED am WAP6807-2 indicates WiFi link quality and WPS pairing
status. Siehe LED Tabelle.
Utilice el cable Ethernet incluido para conectar el puerto LAN WAP6807 al puerto LAN del
Non-MPro Mesh Router. Espere hasta que el POWER LED se ilumine en ámbar y el LINK
LED se ilumine en verde.
Sitúe el segundo WAP6807 (WAP6807-2) donde desee extender su red inalámbrica.
Pulse una vez el botón WPS del WAP6807 conectado directamente al router (WAP6807-1).
Pulse una vez el botón WPS del WAP6807-2. Los POWER y LINK LEDs parpadearán en
ámbar para indicar que el emparejamiento está en proceso.
Los POWER y LINK LEDs se iluminarán en verde si la conexión se ha realizado con
éxito.
Encuentre en su smartphone o cliente inalámbrico, el SSID del WAP6807-1. Introduzca la
clave inalámbrica del WAP6807-1 para conectarse.
Nota: El POWER LED del WAP6807-2 indicates if the WAP6807-2 is ready to join the WiFi
network. El LINK LED del WAP6807-2 indicates WiFi link quality and WPS pairing status.
Vea la tabla de LED.
Utilisez le câble Ethernet fourni pour connecter le port LAN du WAP6807 au port LAN du
Non-MPro Mesh Router. Attendez que le voyant POWER LED s'allume en orange et que le
voyant LINK LED s'allume en vert.
Placez le deuxième WAP6807 (WAP6807-2) à l'endroit où vous souhaitez étendre votre
réseau sans fil.
Appuyez une fois sur le bouton WPS du WAP6807 connecté directement au routeur
(WAP6807-1).
Appuyez une fois sur le bouton WPS du WAP6807-2. Les voyants POWER et LINK LEDs
clignotent en orange pour indiquer que l'association est en cours.
Les voyants POWER et LINK LEDs s'allument en vert si la connexion est réussie.
Trouvez le SSID du WAP6807-1 sur votre smartphone ou sur votre client sans fil. Entrez la clé
sans fil du WAP6807-1 pour vous connecter.
Remarque : Le voyant POWER LED du WAP6807-2 indicates if the WAP6807-2 is ready to
join the WiFi network. Le voyant LINK LED du WAP6807-2 indicates WiFi link quality and
WPS pairing status. Voir le tableau des LED.
POWER ON/OFF LAN1 LAN2
RESET
2/3
WAP6807-1
(Controller)
WPS WPS
WAP6807-2
EN
MPro Mesh Network Scenario 2: With Non-MPro Mesh Router and Two WAP6807s
within
2
minutes
None MPro Mesh
Router
LAN
LAN
1
2
3
4
5
6
DE 1
2
3
4
5
6
ES 1
2
3
4
5
6
FR 1
2
3
4
5
6
1
2
3 4
WAP6807-1
(Controller)
WAP6807-1 WAP6807-2
Need WiFi here
Clients
NL
FI
1
2
3
4
FR 1
2
3
4
IT 1
2
3
4
1
2
3
4
SE 1
2
3
4
On - Good WiFi connection to the MPro Mesh router.Green
On - Signal is too strong. Suggest to move the WAP6807 away from the
MPro Mesh router.
Blinking - Connecting to the MPro Mesh router. Please wait.
Amber
On - Signal is too weak. Move the WAP6807 closer to the MPro Mesh
router.
Red
Off - No connection.
Link
On - Device ready in Repeater mode.
Blinking - Device booting. Please wait.
Green
On - Device ready in AP mode.
Blinking - Device joining WiFi network. Please wait.
Amber
On - Device failed to join the WiFi network.Red
Off - Device is not receiving power.
Power
5
WAP6807-2
MPro Mesh Router
SSID: Zyxel_XXXXXX
Wireless key: XXXXXXXXXX
WiFi
Zyxel_XXXXXX
Connect
4


