123SEND AXEPT S800 User manual

axept® S800
Quick Start Guide

www.123send.net
123 - axept® S800 Quick Start Guide v1.5.1
1
Contents
1Initial Setup...................................................................................................... 3
1.1 Terminal Overview ......................................................................................... 4
1.2 Screen Overview............................................................................................. 5
1.2.1 Screen Icons Overview................................................................................... 5
1.3 Initial Terminal Setup...................................................................................... 6
1.4 Connecting to the Network............................................................................ 7
2Logging On ..................................................................................................... 8
3Processing a Sale (Chip and PIN).................................................................. 10
4Processing a Sale (Contactless) .................................................................... 14
Contact Details
.......................................................................................................... 18

www.123send.net
123 - axept® S800 Quick Start Guide v1.5.1
2
Welcome
Thank you for choosing your axept® S800 terminal from 123 Send/Hire.
The axept® S800 is designed to process transactions as quickly as possible
whilst providing valuable reporting and other functionality backed by the
Optomany Control Centre (OCC) web portal.
This quick-start guide is designed to provide users of the axept® S800 with
everything needed to set-up, register and process your first transaction.
Should you have any queries on anything in this guide, please do not hesitate
to contact 123’s Customer Support Team using the details on page 18.

www.123send.net
123 - axept® S800 Quick Start Guide v1.5.1
3
1Initial Setup
Before starting to use the axept® S800, please take a few moments to check the contents of the box; you should
have received the following:
axept®
S800 Terminal
External AC Power Adapter
External AC Power Cable
Thermal Paper Roll
Ethernet Cable
Quick Start Guide (This Document)
IMPORTANT
PLEASE CONFIRM THAT THE TAMPER BAG AND TERMINAL SERIAL
NUMBER MATCHES EMAIL NOTIFICATION(S) FROM 123.
If anything is missing or damaged or you experience issues during the
installation/activation, please contact 123 on
0800 54 23 123 (Outside of the UK, please call: 0044 207 592 7760)

www.123send.net
123 - axept® S800 Quick Start Guide v1.5.1
4
1.1 Terminal Overview
An overview of the axept® S900 terminal.

www.123send.net
123 - axept® S800 Quick Start Guide v1.5.1
5
1.2 Screen Overview
An overview of the axept® S900 screen.
Descriptions of the axept® S800 screen icons.
Icon
Description
Internet connection present
No internet connection present
Transaction data stored on the terminal (not displayed once data uploaded)
Terminal configuration download required
Confirmation option
Cancel option
Ready for card (Chip and PIN, Contactless or Swipe)
Green contactless LED (blinks when idle, incrementally lights up if card is being read)
Contactless LED (unable to read card)

www.123send.net
123 - axept® S800 Quick Start Guide v1.5.1
6
1.3 Initial Terminal Setup
01
Insert the thermal paper roll into the axept® S800 terminal.
•Pull lever on the terminal to open the lid (as highlighted)
•Insert paper roll leaving at least 1cm exposed
•Close Lid
02
Turn the axept® S800 over so the connections on the underside are
visible.
Connect the power supply into the socket labelled ‘Power’ (as
highlighted).
Connect the Ethernet cable (providing internet connectivity) to the port
labelled ‘LAN/RS232B’ (as highlighted).
03
Once connected, run the cables through the cable management
sections of the axept® S800 (as shown left).
This ensures that the cables are protected and the axept® S800 terminal
will sit flat on the desk/counter.

www.123send.net
123 - axept® S800 Quick Start Guide v1.5.1
7
1.4 Connecting to the Network
Power on the axept® S800 by pressing and holding the key on the keypad for a few seconds until the terminal
screen lights up (the start-up process may take a few minutes).
INFO
Please refer to the axept® S800 User Guide (See Further Reading –Page 18) for more information on
manually configuring Ethernet settings if you do not wish to use DHCP.
01
Once the loading process is complete, the Network Configuration menu
will appear.
Highlight ‘ETHERNET’ using the and keys on the keypad
and press the key on the keypad to continue.
02
axept® S800 supports Dynamic Host Configuration Protocol (DHCP)
which automatically obtains all network settings.
To use this service, press the key on the keypad to continue.
03
axept® S800 validates the network connection and communicates with
the DHCP server to obtain an IP address and other network settings.
04
A confirmation screen will briefly be displayed once all network settings
have been successfully configured.
An icon will be displayed on the status bar afterwards to show
axept® S800 is connected via Ethernet.

www.123send.net
123 - axept® S800 Quick Start Guide v1.5.1
8
2Logging On
Now set-up and activation are complete, axept® S800 is ready for the first logon.
01
Once axept® S800 has completed the start-up process, it will prompt for
confirmation of the Department ID. Press the key on the keypad
to continue.
If the Department ID needs to be changed, press the key on the
keypad and enter the new Department ID.
02
Enter the User ID sent to you by Optomany using the keypad and press
the key on the keypad to continue.
03
Enter the password sent to you by Optomany using the keypad and
press the key on the keypad to continue.
04
Please wait whilst axept® S800 processes the log on details.

www.123send.net
123 - axept® S800 Quick Start Guide v1.5.1
9
INFO
To Logon using a different Department ID, press the key on the keypad on the Logon confirmation
screen in step
01
05
Once the log on has been completed, the main menu will be displayed.
If this is still the correct Department ID, press the key on the
keypad to continue.
If the Department ID needs to be changed, press the key on the
keypad and enter the new Department ID.
Once entered, press the key on the keypad to continue.

www.123send.net
123 - axept® S800 Quick Start Guide v1.5.1
10
3Processing a Sale (Chip and PIN)
Once the logging on process has been completed, axept® S800 is ready to process transactions. The following
describes the end-to-end operation of a Chip & PIN sale:
01
From the main menu, select option 1: Sale
(Press the key on the keypad).
Alternatively, ask the cardholder to insert their card into (with the Chip of
the card on top, facing towards you) into the Chip and PIN card slot at
the base of the terminal.
02
Enter the amount of the sale using the keypad.
(axept® S800 will automatically enter the decimal place for you).
Press the key on the keypad to continue.
03
If required, enter the reference for the transaction. If a reference is not
needed, press the key on the keypad to skip.
To use alpha characters, press the numeric key containing the alpha
character required multiple times until it is displayed.
Press the key on the keypad to continue.

www.123send.net
123 - axept® S800 Quick Start Guide v1.5.1
11
04
If the card holder’s card has been previously inserted, skip to Step
06
,
otherwise axept® S900 will prompt for the card to be presented.
05
Insert the card (with the Chip of the card on top, facing towards you) into
the Chip and PIN card slot at the base of the terminal.
06
Once the card is inserted, axept® S800 will process the card.
Please wait and do not remove the card whilst this is in progress.
07
Press the key on the keypad to confirm cashback is required or
the key on the keypad to skip.
Only Merchants offering cashback and have this option setup will have
the cashback facility.
Skip to step
10
if cashback is not required.
08
If cashback is required, enter the cashback amount using the keypad.
(axept® S800 will automatically enter the decimal place for you).
Press the key on the keypad to continue.

www.123send.net
123 - axept® S800 Quick Start Guide v1.5.1
12
09
The total amount of the sale and cashback will be displayed. Press the
key on the keypad to confirm the amount is correct or press the
key on the keypad to cancel.
10
On the Enter PIN screen, pass the axept® S800 terminal to the
cardholder and ask them to enter their PIN.
After the PIN has been keyed in, the cardholder will then need to press
the key on the keypad to continue.
11
axept® S800 will provide a PIN OK confirmation if the PIN has been
correctly entered.
12
axept® S800 will attempt to authorise the transaction with your chosen
acquirer.
13
axept® S800 will confirm that the payment is complete if authorisation
is successful.
www.123send.net
123 - axept® S800 Quick Start Guide v1.5.1
13
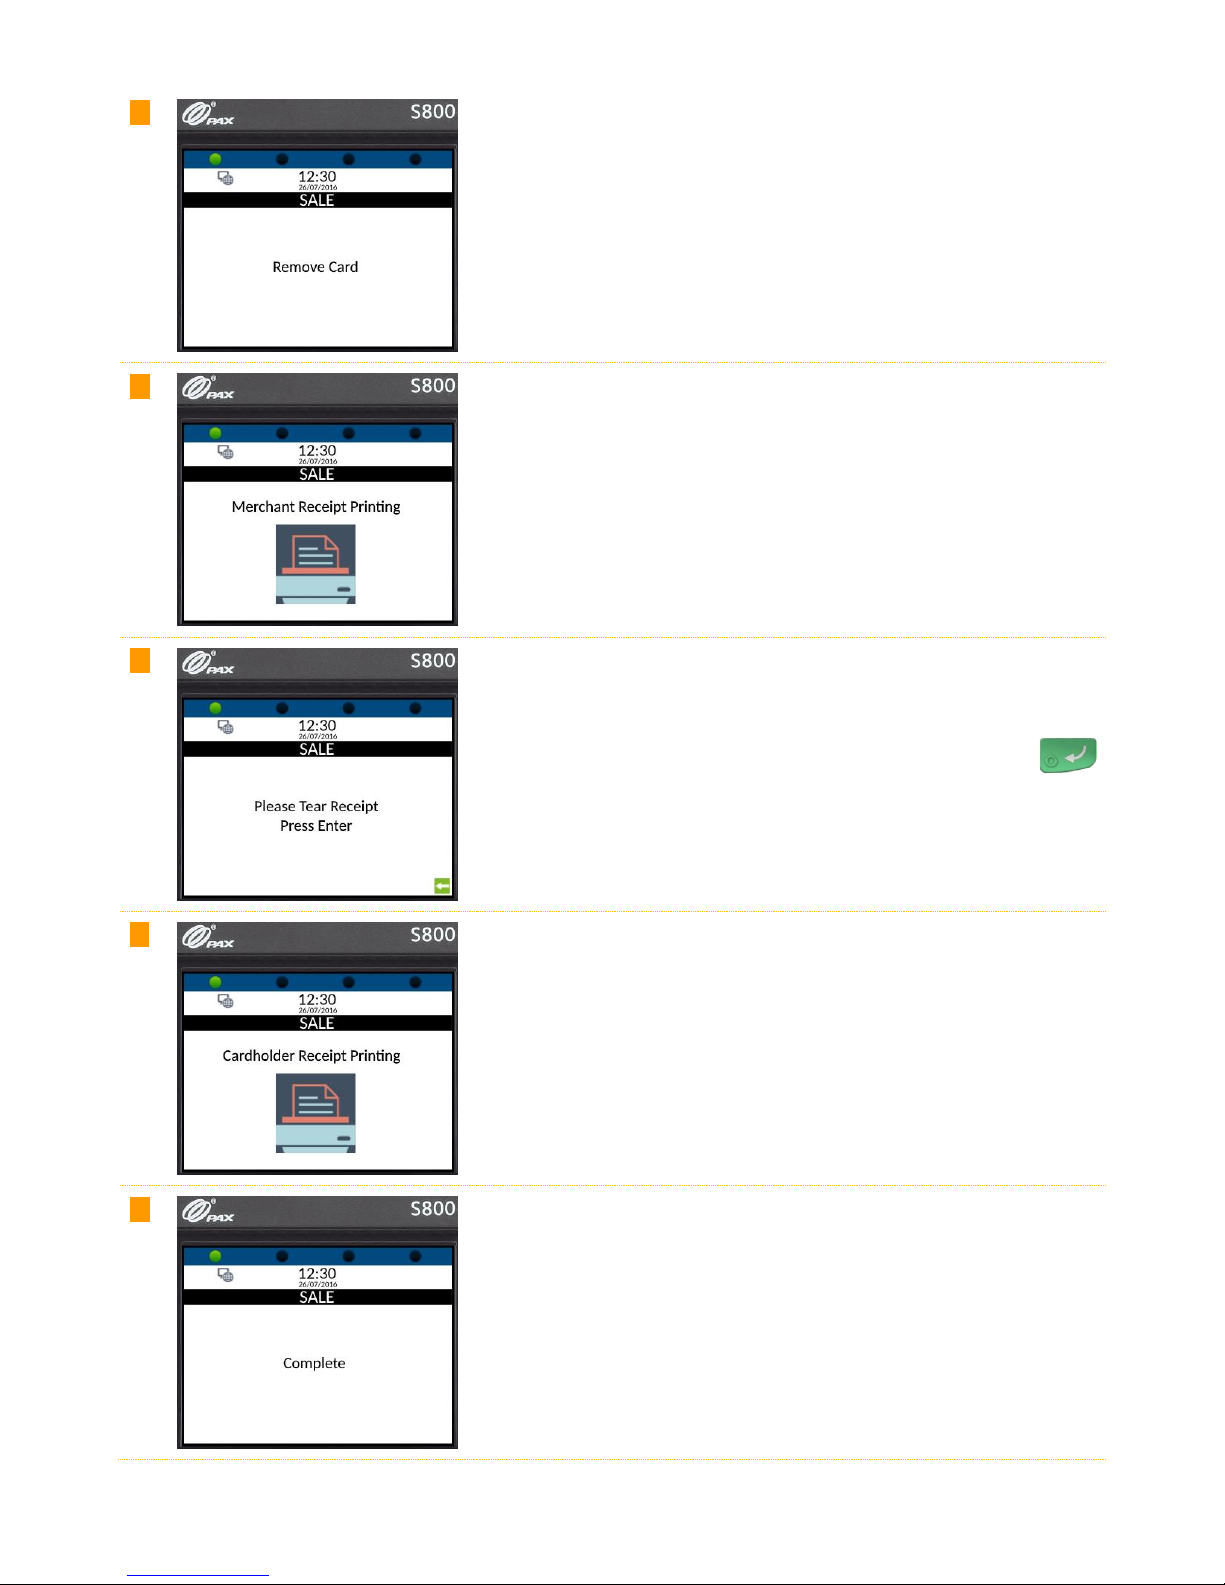
14
Once the payment is complete, axept® S800 will prompt for the card to
be removed.
15
Once the card is removed, the Merchant Receipt will begin printing.
16
Tear off the receipt from the axept® S800 terminal and press the
key on the keypad to continue.
17
The cardholder receipt will then begin printing and can be torn off once
printing has completed.
18
The payment processing procedure is now complete and axept® S800
will return to the main menu.

www.123send.net
123 - axept® S800 Quick Start Guide v1.5.1
14
4Processing a Sale (Contactless)
axept® S800 supports contactless payments (including technologies such as Android Pay, Apple Pay etc.) and can
be used where a cardholder has the contactless feature enabled on their card or device. The following describes
the end-to-end operation of a contactless payment sale:
01
From the main menu, select option 1: Sale
(Press the key on the keypad).
02
Enter the amount of the sale using the keypad.
(axept® S800 will automatically enter the decimal place for you).
Press the key on the keypad to continue.
03
If required, enter the reference for the transaction. If a reference is not
needed, press the key on the keypad to skip.
(To use alpha characters, press the numeric key containing the alpha
character required multiple times until it is displayed).
Press the key on the keypad to continue.
04
axept® S800 will prompt for the card or device to be presented.

www.123send.net
123 - axept® S800 Quick Start Guide v1.5.1
15
05
Position the (contactless enabled) card or device around the screen area
of the terminal for a few seconds until a ‘beep’ sound confirms the card
has been read (the green contactless LEDs will incrementally light up as
the card is being read).
06
The ‘Card Read OK’ message will be displayed momentarily to confirm
the card has been successfully read.
07
axept® S800 will attempt to authorise the transaction with your chosen
acquirer.
08
axept® S800 will confirm that the payment is complete if authorisation
is successful.
09
The Merchant Receipt will begin printing.

www.123send.net
123 - axept® S800 Quick Start Guide v1.5.1
16
10
Tear off the receipt (after printing has completed) from the axept® S800
terminal and press the key on the keypad to continue.
11
The payment processing procedure is now complete and axept® S800
will return to the main menu.

www.123send.net
123 - axept® S800 Quick Start Guide v1.5.1
17
INFO
A customer/cardholder copy of the receipt is not automatically printed for contactless transactions as it is
not a mandatory requirement. However, axept® S800 provides a facility to print a customer/cardholder
copy of the receipt if required.
The following steps describe the process for printing a customer/cardholder copy of the receipt for contactless
transactions.
01
From the main menu, select option 1: Sale
(Press the key on the keypad).
02
From the Reprint menu, select option 2: Customer Copy
(Press the key on the keypad).
03
The cardholder receipt will then begin printing and can be torn off once
printing has completed and axept® S800 will return to the main menu.

www.123send.net
123 - axept® S800 Quick Start Guide v1.5.1
18
Further Reading
Should you need further information regarding the available functions of the terminal please access the
full
axept®
S800 user guide at: http://www.123send.net/user-guides/axept800.pdf
Contact Details
If you have any questions or require support, please get in touch with us using the details below:
123 Technical Support
Phone: 020 8102 8102
(outside of the UK, please call: 0044 207 592 7760)
Customer support team hours are:
Days
Hours Covered
Monday - Saturday
08:00 –23:00
Sunday and Bank Holidays (excluding Christmas Day)
10:00 –17:00
A 24-hour call answering service is available outside of these hours.
Non-urgent requests can be emailed to customerservice@123send.net.
Should you need to contact 123 for something other than support, the details are below.
123 Head Office
Address:
123 Send/Hire Ltd.
120 Leman Street,
London,
E1 8EU.
Phone:
0800 54 23 123
Email:
customerservice@123send.net

www.123send.net
123 - axept® S800 Quick Start Guide v1.5.1
19
Issued by 123Send / 123Hire Ltd. Company Numbers: 03736624 & 04332502. 123Send and 123Hire are part of the CR7 Services Group of companies. Registered
Address: New Barn, Roberts Farm, Smarden Road, Smarden, Ashford, Kent, TN27 8QJ. Trading address: 120 Leman Street, London, E1 8EU. All details are correct
at the time of print - March 2017. v1.5.1
Table of contents


