2B Warm PN1000G User manual

INSTRUCTION MANUAL
PANEL GLASS
CONVECTION HEATER
MODEL: PN1000 with WIFI & App Connectivity
2B Warm Panel Glass Convection Heater by :
KPVE PTY LTD (PO Box 33, Sylvania NSW 2224)
PH : 1300 2BWARM E: [email protected]

Introduction
To get the most out of your new heater, please read through these instructions and the
attached safety regulations before use. Please also save the instruction manual in case
you need to remind yourself of the heater’s functions at a later date.
Technical Specification
Important
Before plugging the unit into the mains, ensure by visual inspection that the unit is intact
and has not suffered any damage during transit.
Caution
The appliance must be always placed on a flat and stable surface.
In order to avoid a hazard due to inadvertent resetting of the thermal cutout, this appliance
must not be supplied through an external switching device, such as a timer, or connected
to a circuit that is regularly switched on and off by the utility.
For your own safety
1. Read all instruction before using the heater.
2. Only connect the heater to a single-phase socket with a mains voltage as specified on
the rating plate.
3. Do not leave your home long time while the appliance is in function: ensure that the
switch is in OFF (0) position and the thermostat is in minimum position. Always unplug
the appliance.
4. Keep combustible material such as furniture, cushions, bedding, paper, clothes,
curtains etc. at least 100cm away from the heater.
5. Do not hand anything on or in front of the heater.
6. Always use the heater in an upright position.
7. Do not use the appliance in rooms less than 4m²area.
8. Always unplug the heater when not in use long time. Do not pull the cord to unplug the
heater.
9. Keep the air inlet and outlet free from objects at least 1m in front and 50cm behind the
heater.
10. Do not install the heater immediately below a socket- outlet.
11. Do not let animals or children touch or play with the heater. Pay attention the air outlet
gets hot during operation.
12. Do not cover. If covered, there is the risk of overheating.
Details
PN1000G
PN1500G
PN2000G
Voltage
220-240V
220-240V
220-240V
Frequency
50/60Hz
50/60Hz
50/60Hz
Power
500/1000W
750/1500W
1000/2000W
IP Waterproof
IP24

13. Do not use this heater in the vicinity of showers, bath tubs, wash basins or a swimming
pool etc.
14. Do not use the heater in the rooms containing explosive gas inflammable solvents,
varnish or glue.
15. Keep the heater clean. Do not allow any objects to enter any ventilation or exhaust
opening as this may cause electric shock, or fire or damage to the heater.
16. If the heater has been dropped or damaged it should not be used until it has been
inspected by a qualified service center.
17. Close supervision is necessary when the heater is being used by or near children,
persons suffering from any physical impairment or pets.
18. Do not use to dry clothes or any fabric.
19. Do not use the heater to dry your laundry. Never obstruct the intake and outlet grilles
(danger of overheating).
20. Do not move the appliance while it is functioning in order to avoid overheating with the
additional risk of fire.
21. If any part of the heater or supply cord becomes damaged, it must be replaced by a
qualified electrician. In order to avoid a hazard.
22. The heater must not be located immediately below a socket- outlet.
23. Do not use this heater with a programmer, timer or any other device that switches the
heater on automatically, since a fire risk exists if the heater is covered or positioned
incorrectly.
24. Children should be supervised to ensure that they do not play with the appliance.
25. This appliance can be used by children aged from 8 years and above and persons
with reduced physical, sensory or mental capabilities or lack of experience or
knowledge if they have been given supervision or instruction concerning use of the
appliance in a safe way and understand the hazards involved.
26. Children shall not play with the appliance. Cleaning and user maintenance shall not be
made by children without supervision.
27. Children of less than 3 years should be kept away unless continuously supervised.
28. Children aged from 3 years and less than 8 years shall only switch on/off the appliance
provided that it has been placed or installed in its intended normal operating position
and they have been given supervision or instruction concerning use of the appliance in
a safe way and understand the hazards involved.
29. Children aged from 3 years and less than 8 years shall not plug in, regulate and clean
the appliance or perform user maintenance.
30. Do not leave unattended when plug in to the mains supply.
Caution
Some parts of the heater can become very hot and cause burns. Do not touch hot
surfaces.
Particular attention has to be given where children and vulnerable people are present.
Note
These heaters are intended for domestic use only. They can be used as both portable
appliance and wall mounting appliance.
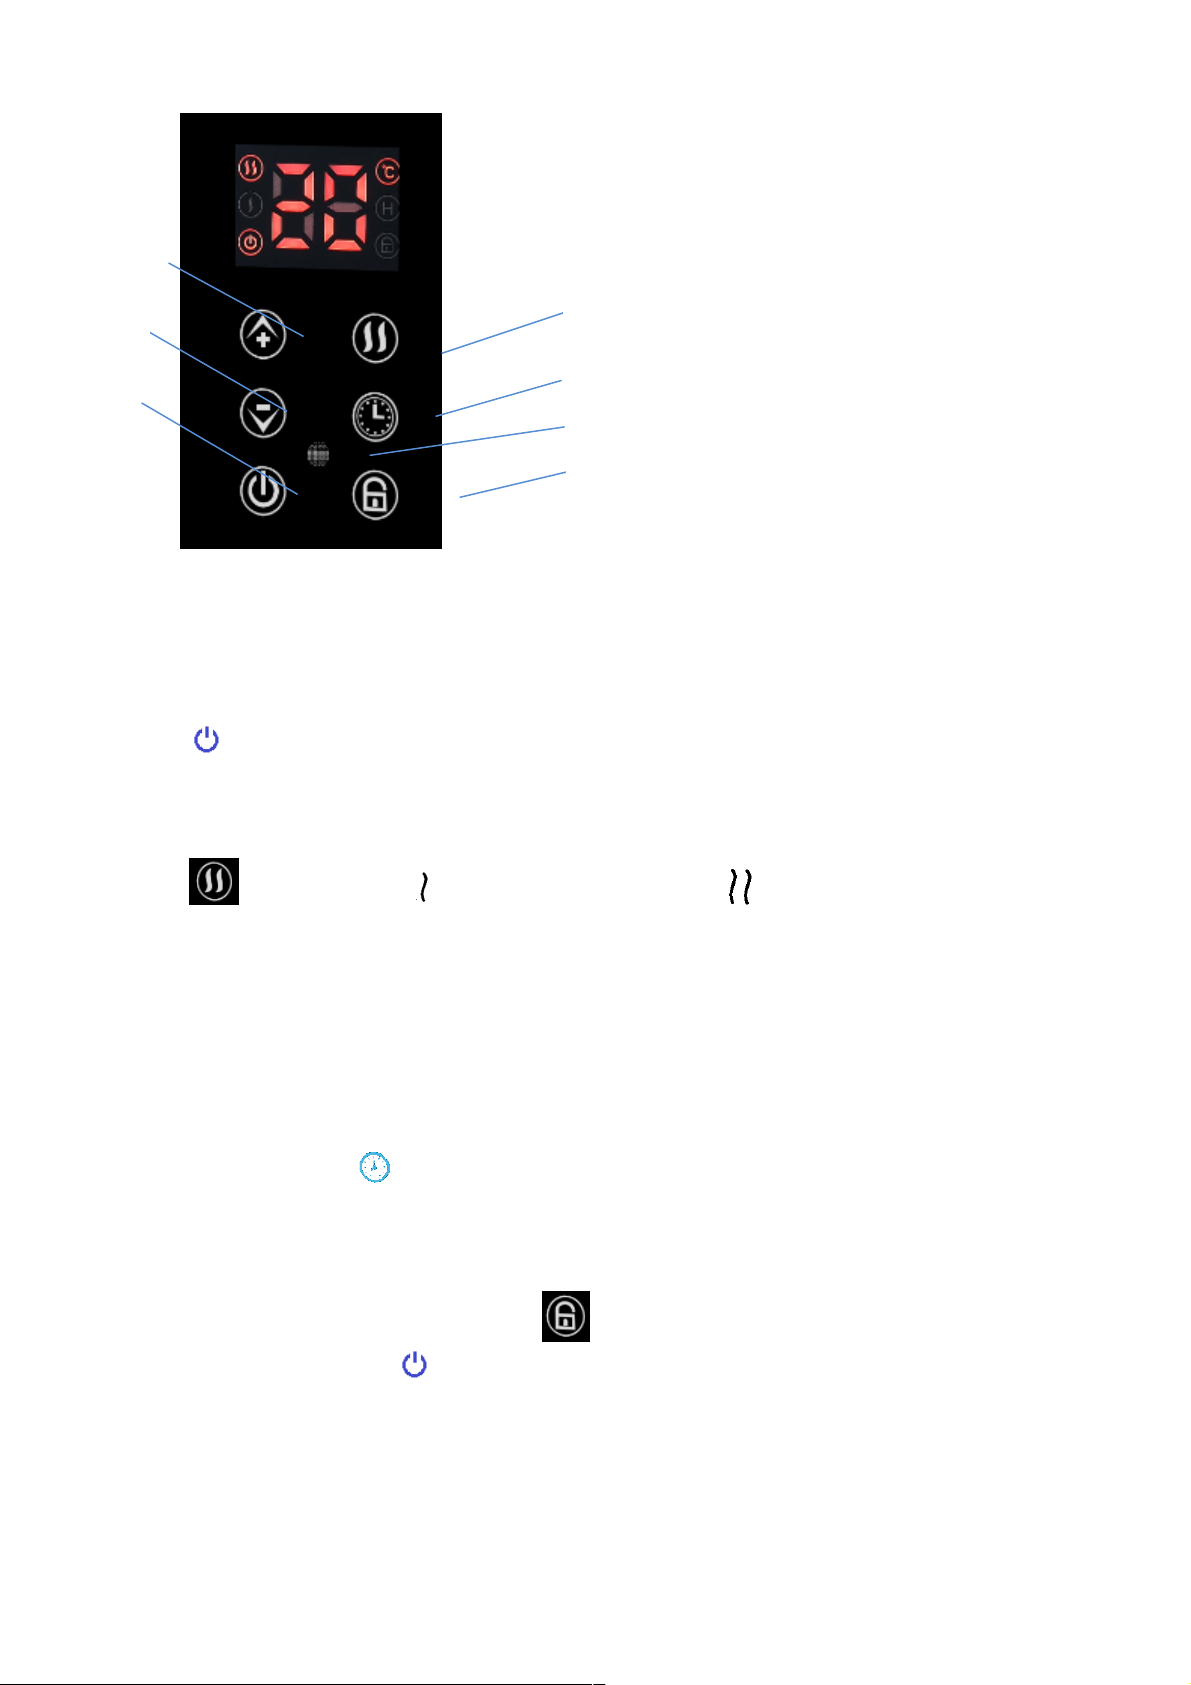
Product features
1. Elegant black glass panel.
2. High quality aluminum heating element: quick heating with higher energy savings.

3. Touch screen control and remote control.
4. Timer from 1 to 24 hours to turn the convector heater on or off at the desired time.
5. Digital display with automatic room temperature display.
6. For wall mounting or free standing with tripod.
Installation (While use on the floor as portable appliance)
Please attach the feet on the heater’s housing, and fixing them with supplied
ST4x12mm(8pcs) screws.
Wall mounting (While use the heater as fixed appliance)
Please note that the product must be installed at least 15 cm from the floor and 50
cm from the ceiling.
-For wall mounting study scheme
1.Install the bracket with screws firstly,see the image1
2.Drill the holes at each sides on the wall,then insert the plastic expanded plugs within,
Fix the bracket in the wall with screw,see the image2
3.Fit the heater into suitable position ensuing that the holes align with bracket.see image3
4.Tight the screw on the top of bracket to catch steady
Operation
Insert the plug into a suitable socket outlet on an A.C. power supply having the same
voltage as that shown on its rating label.
The touch screen buttons located on the product correspond to the remote control
functions:
1

Power function
Before you working the heater,your should turn on the switch in side.
Press “ ” to set functions. The upper part of the display shows the room temperature
The heater is working at low power heating conditions.
Mode
Press “ ” to regulate low , or high temperature power
Temperature selection
Press "+" or "-" button to select the desired temperature from a range of 5°-40°C. The
temperature indicator will remain lit for a long time.
Timer
Press the timer button” ”, to select the desired range between 1 hour to 24 hours.
he remaining time will appear.
Child clock
Press the child clock botton 3 seconds,” ” will be display on the screen,so you can not
make any operate beside” ”,and same ways to touch to delete the child clock function.
WIFI Function
1.Use your phone to scan the QR code below or search “Tuya Smart” in
Application on market to download and install the App.
1. Display
2. Temperature“+” button
3. Temperature“-“ button
4. Power button
5. Mode button
6. Timer button
7. Receiver
8. Child clock button
2
3
4
5
6
7
8

2.Select your country code, enter the cellphone number and tap “Get” to get a message
containing verification on code.
3.Enter the verification on code in the message and tap“Login” to login the App.
4.Go to the App, tap “add device” at the bottom, as shown in the picture 1
5. please make sure the device’s instructor light quickly flashes。
c.If the light is not flashing as the status as above described, please long press the
device’s reset button for 5 seconds or longer until it flashes correctly as shown in the
picture below,
6.Select the Wi-Fi, enter password and tap “Next”, as shown in the picture 2 below,
For quick connect mode, the App interface will go through the changes during the
network configuration on processas shown in the picture 3,Picture 4 shows the interface
when the device is connected successfully.

Pic 2 Pic 3 Pic 4
7.After the device is connected successfully,tap “Devices” at the bottom. The device
name shows in the list in the picture 5. Tap it to enter the control panel of the smart
socket.
Remarks:
When device is online, there will be a green dot at the front of the device icon;
When the device is offline, the dot will be grey;
If is the device shared by others, there will bedouble loop.
Pic 5 Pic 6 Pic 7

8.“My profile” is where users could manage personal information. The key information is as
follows see picture 6:
a.Personal information:including account name and cellphone number
b.Information of shared devices
c.Message center
d.Entry to submit feedback
e.F.A.Q
f.Phone binding: if you sign in with social network account, you could bind your phone
number with your account
g.About
9.Add sharing: As shown in the picture, users could type in a new member’s cellphone
number and share the device with him. The new member could control the device with
his own account, please see picture 7
Operating sound
The appliance emits a beep upon each operation setting.
Cleaning and maintenance
Before cleaning always remove the plug from the electrical socket outlet.
Clean the air inlet and outlet grilles frequently.
Never use abrasive powders or solvents.
Disposal Information
Should you want to dispose of this item please do not put it with the household waste.
Used electrical and electronic equipment and batteries must be made available for
separate collection.
Private households may return their used electrical and electronic equipment to
designated collection facilities free of charge. Identify where your local collection points are
and return the product there. (Facilities are usually available at the municipal waste site.
your electrical retailer, or your local authority may provide separate collection from the
household.)
By disposing of this product correctly you will be providing positive help to the
environment.
Separate collection.
This symbol means the product must not be discarded
with the general household waste. There is a separate
collection system for these products.
This manual suits for next models
2
Table of contents
Popular Heater manuals by other brands

Trane
Trane BAYEACC25BK1B Installer's guide

Stelpro
Stelpro APCH series user guide

Klimatronic
Klimatronic Heat Block PTC manual

Detroit Radiant Products
Detroit Radiant Products HL2 Series Insert manual

HEAT1
HEAT1 ECO pro-line 2000W instructions

Heat Outdoors
Heat Outdoors SHADOW PD 2000 Safety instructions and operation manual

DeLonghi
DeLonghi DRAGON 3 instructions

Heatstore
Heatstore HSQH2000 Installation and operating instructions

Conrad
Conrad 56 11 64 operating instructions

Conrad
Conrad Compact 55 13 12 operating instructions

Clarke
Clarke DEVIL 4035 operating & maintenance manual

CONVECTAIR
CONVECTAIR Piccolo 7831 Installation & operation instructions