2kiters Arno Haft's User manual

Arno Haft's Vogeldrachen
(Bird Kite)
©Bob and Charmayne Umbowers
3 March 2007
www.2kiters.com

The Arno Haft Bird Kite
Arno Haft's bird kite is from the 1950's. The original kite was made from cotton canvas and
wood spars. Herr Haft lived in Hamburg Germany. He flew many of the classic kites such as the
Rolo Plan. One of his specialties was line climbers used for aerial photography. Your bird will be
made from our modern-day materials of ripstop nylon and composite rods. Fly your kite in
moderate wind with 80 to 100 pound test line.
Please note: Metric measurements have generally been used in this manual. In some cases the English
measurements are used when that is how the item is supplied in the USA.
Supply list:
2 yards of 60 inches wide 3/4 ounce ripstop nylon (2.5 yards of 54 inch wide or 2 yards cut
on the cross grain). Metric requirements: 1.8-2.3 meters
Small amount of black white and yellow ripstop nylon for eyes and beak (optional)
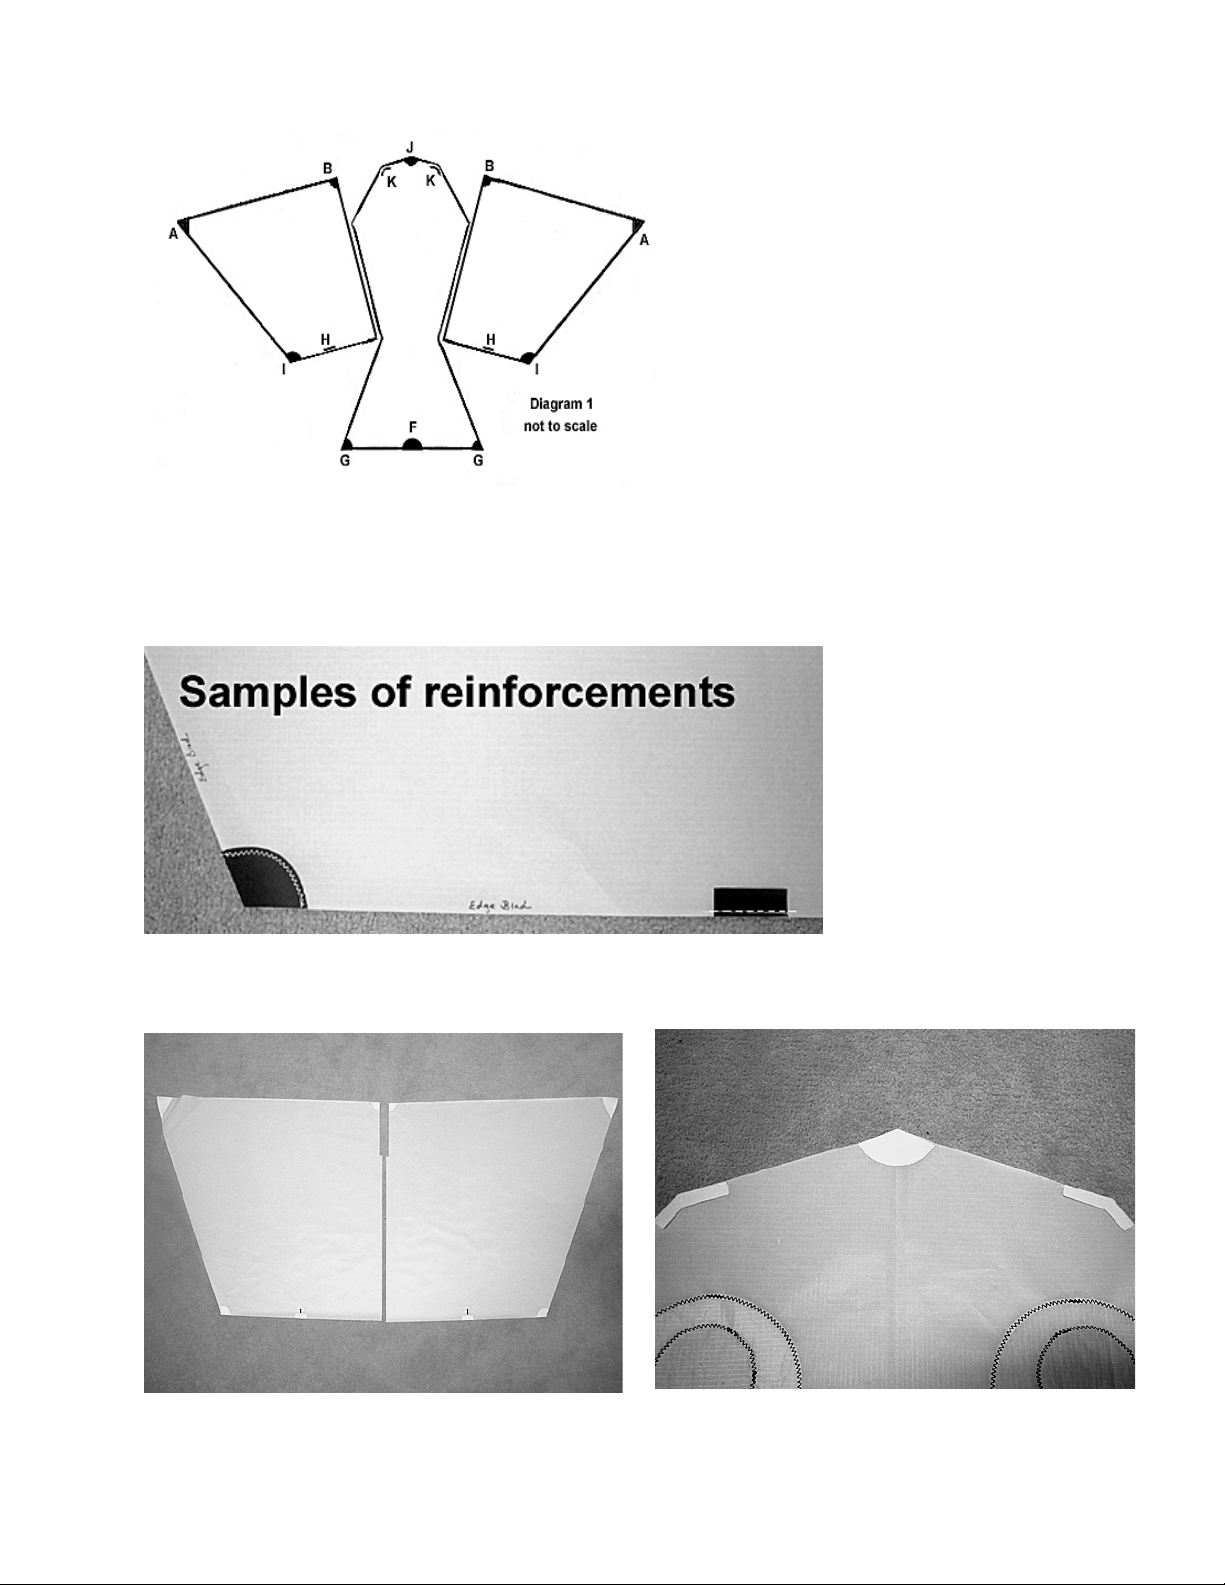
60 cm of 3 inch wide 3.9 ounce Dacron for reinforcements
60 cm of 1 inch wide black 3/4 ounce ripstop edge binding split in half lengthwise
9.5 meters of 1 inch wide black 3/4 ripstop edge binding
10 meters of 80 pound test line. It will be cut into the following lengths see instructions:
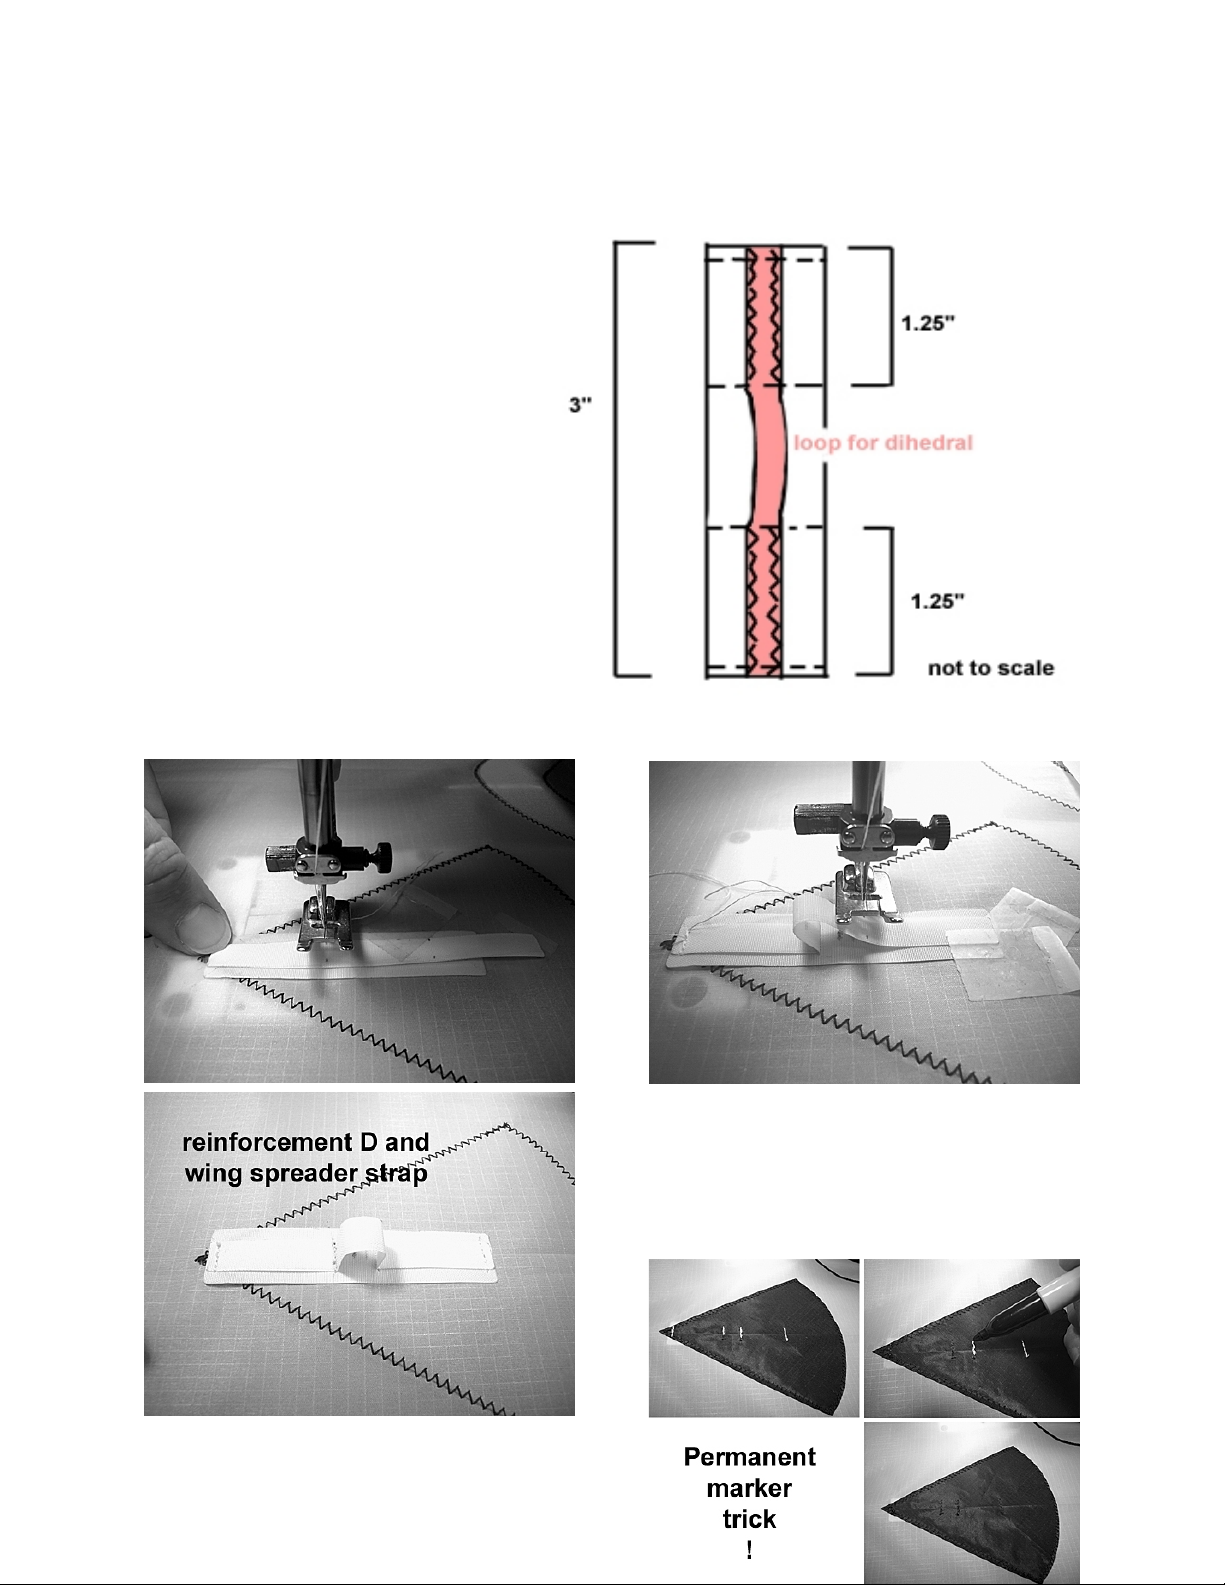
spine line and loop (30 cm and 6.5 cm respectively.)
2 wing tip lines (60 cm total. Divide in half.)
2 lower wing loops (122 cm total. Divide in half.)
4 tiny upper wing and head loops (26 cm. Divide in fourths.)
2 small tail loops (13 cm total. Divide in half.)
rigging lines between tail / wing and between spine / outer tail tips (2 meters total. Do not
divide until reading instructions.)
bridle (5.5 meters or remainder of 80# test line.)
112 cm of 30 pound test line. It will be cut into the following lengths see instructions:
Line for rigging between head and wing (1 meter total. Divide in half.)
Line for cheater line on one tail loop. (12 cm.)
2 Dihedrals (4" and 2.5" of aluminum tubing formed to a 150 degree angle.)
(3) small solid aluminum rings (1/4 inch)
(2) hooks size 3
(3) Graphite .2200 / 5.6 mm x 48" rods plus 27 cm of a 4th rod. Purchase (4) rods total.
(4) Stubby Nock - .2200"
(1) Aluminum ferrel # 2200
(1) Graphite .1800 / 4.6 mm x 29.5" rod
(2) Stubby Nock - .1960"
Other materials: high quality black thread thread matching the bird's color thin Super Glue
narrow double sided tape Scotch tape beeswax black permanent pen such as a Sharpie pencil
or chalk pencil.
Note: Please read instructions carefully paying close attention to indicated front and bac .

3
Cutting and mar ing:
60 inch wide fabric:
Fold fabric in half with cut edges together
and the selveges even. Position wing
template close to the cut edges end NOT
THE FOLD. Cut the wings. Refold
remaining fabric lengthwise. Position
body template on the fold. Cut one body
piece on the fold.
54 inch wide fabric: cut on the cross grain. Cut
body on the fold and wings separately.
Mark wings: mark the spreader rod line
and the position for the line and
reinforcement on the lower wing edge.
Mark body: Mark the spreader rod line at
the spine. Mark position for optional eyes
and beak.
Cut 2 strips for the wing spreader sleeves:
each 96.5 cm x 4.5 cm. Cut 1 spine sleeve: 133 cm x 4.5 cm. 1 tail spreader sleeve: 8 cm x 2.8
cm. English: 2 wing spreader sleeves each 38 inches long x 1 3/4 inches wide each. 1 spine
sleeve: 52 1/4 inches long x 1 3/4 inches wide. Cut 1 strip of lack ripstop for the tail spreader
rod sleeve: 3 inches long x 1 1/8" wide.
Cut then heat seal all reinforcements from 3.9 ounce Dacron. See reinforcement diagram. Fine
tune as necessary before sewing in place.
Sewing procedures:
Optional Appliqué Appliqué the black pupils onto the white eye pieces. Do not back cut.
Scotch tape in place on the body. Use black thread and zig zag stitch the outer edge of the eye
onto the body. Trim excess black fabric. Back cut leaving the white under the pupil. Appliqué
the beak using white to back the yellow fabric. I do not
back cut the beak unless necessary. This is a stress
point on the kite and back cutting will weaken this area.
Black may also be used for the beak color. Set aside.

4
Reinforcements Use matching thread.
Sew the reinforcements onto the back of
the kite skin. Use a Zig zag stitch. Look
at the samples pictures and Diagram1
for correct placement and the side to
sew. Reinforcements C and E will be
sewn in place after the wings and body
are sewn together.
Part 1. (of 4 Parts) Wings: Sew A B
and I onto the wings. Make a right and a
left wing. Sew H on the wings. The
center of H is 10.5 inches / 26.6cm from
the inner edge. Straight stitch the outer edge. It will be covered with the edge binding and the top
edge will be sewn as you edge bind. It is helpful later if you position a piece of tape with a mark
on it pointing to the center of H.
Note: Sewing all
edges is not necessary.
Reinforcements A B I and H Reinforcements J and K

5
Part 2. Body: Position and sew on G F J K. These use the same methods as for the wing.
Part 3. Reinforcement D: This is the 3" x
5/8" or 7.75 x 15 cm piece of Dacron.
Center it on the back of the body where
the spine and spreader cross. Don't sew it.
Tape it in place. Place the dihedral strap
(1/4" x 3.5" or .6 x 9 cm) so that it is
centered horizontally on the taped D
piece. The ends are even top and bottom
forming a loop in the center. Sew with a
straight stitch across the ends and where
the loop starts. Zig zag on the strap. See
drawing. Later when you are putting the
spine sleeve in place you will catch the
outer edges of piece D. (Note: The
dihedral will slide into the strap but will
not stay in place.) Diagram 8 on page 10
shows the strap's location. Reinforcement D

6
Edge binding part 1 of 2 parts: Body: Fold the edge binding
in half position body inside the binding at the fold. Use a
narrow zig zag stitch with black thread. Stitch close to the
edge. Edge bind the head and the tail as shown in diagram 2
and the photo below.
(Head) Spine loop 80# test line. Position the 6.5 cm spine loop on
top of the reinforcement on the FRONT of the kite. Stitch in place
securely. See Diagram 3. (1)
(Tail) Spine line 80# test line. Position the 30 cm spine line on top of the reinforcement on the

BACK of the kite. Stitch in place securely. See Diagram 8 on page 10 (A)
7
Construct the ing spreader and spine sleeves This sleeving method is quite different from
most methods used today. It is the method Herr Haft used. Start by folding the ends to the right
side and sewing in place. Then fold all three sleeves in half lengthwise wrong sides together. Do
not make a hard crease. Straight stitch 14 mm (scant 5/8" inch) from the fold. I suggest you pin
the sleeves before sewing to keep the fabric from creeping lengthwise. Make all three sleeves.
Set aside the 2 shorter (wing spreader) sleeves.
Attach spine sleeve to the body Fold the
body in half and crease. On the right side of
the body draw a pencil line at intervals on the
crease to make sleeve placement easier. Also
mark the position of the dihedral loop which
is on the back. Open out the seam allowances
on the sleeve. Position the seam of the sleeve
on the pencil line. You are putting the spine
sleeve on the FRONT of the body. Use tape
tabs and secure the sleeve on each seam
allowance. Push the sleeve to one side and

8
zig zag close to the seam removing the tape tabs as you get to them. Jump over the loop
backstitching each side of the jump. The loop must remain free. Do not sew into the sleeve stay
on the allowance. Repeat on the other side. The following pictures may help you. You may also
straight stitch close to the seam of the sleeve and then zig zag close to the sleeve edge. This is the
neatest and most secure method but involves more work.

9
Tail rod sleeve Sew the ends back to the right
side. Center the sleeve over the spine line on the
BACK of the bird. Zig zag lower edge. Make a
tunnel and sew other long edge being careful not
to catch the spine sleeve on the front. This sleeve
is tight; sew close to the edges.
Wings to body Using a 1 cm or 3/8" seam allowance sew the wings to the body as shown in
Diagram 6. Right sides together. You may use narrow double sided tape inside the seam
allowance as this seam will be top stitched in place. Straight stitch. Finger press seams towards
the wings.
Reinforcements part 4: Position
and sew on reinforcements C and E
onto the back of the kite. Diagram 6.

10
Decorative detailing wing/body detail:
Using the narrow 1/2" edge binding position
it on top of the seam between the body and
the wing. It will follow the line from the
edge of the wing down to the tail dividing
the wing from the tail. See diagram 7. It
goes from reinforcement C to reinforcement
E. Stitch both sides.
Edge binding part 2 Finish the rest of the edge binding so that the entire bird is outlined.
Spreader sleeves These go on the BACK of the kite. Follow the method for the spine. Center
the sleeve between the wing tip and the spine. The sleeve does not span the entire distance.
Diagram 8 shows their position.

11
Upper ing and head loops 80# test line. 26 cm total divided in fourths. BACK of the kite.
Position and sew in place the 4 loops as shown in the diagram 8. 2 3 4 5.
Tail loops 80# test line. 13 cm total divided in half. BACK of the kite. Position and sew the 2
loops as shown in the Diagram 8. 6 and 7. These catch the stubby nocks and hold the tail
spreader rod in place. Cheater loop: make a loop of 30# line (12 cm.) and lark's head it to one
loop. You will use it to pull the 80# test loop over the stubby nock.
Wing tip lines 80# test line.60 cm total divided in half. Sew in place the 2 wing tip lines on the
BACK of the kite. See Diagram 8 . B and C.
Lo er ing loops 80# test line.122 cm total divided in half. Stitch one end of the lower wing
loop line in place on the BACK of the kite on top of reinforcement I. Slide a small ring over the
line and stitch the other end of the line to reinforcement H. Both ends of the line must be sewn
off the bottom of the kite. See photo on the next page and diagram 8 . 8 and 9.
Framing lines, rods, bridling:
Framing line at head and ing: Divide the 1 meter piece of 30 # test line in half. Using the
photographs on page 14 construct the sliding tensioner lines between the head and wings. One
end of the line is tied to the wing loop. The other end forms the adjusting tensioner through the
head loop. Trim excess.
Rods: 1. Spine: Use 2 graphite .2200 / 5.6
mm x 48" rods. Use one rod full length and glue
a .2200 Stubby nock onto one end. Cut the other
rod to 27cm. Glue the ferrel to one end of the
short rod. The rod goes half way into the ferrel.
Glue a .2200 Stubby nock onto the other end of
the short rod.
The long rod will always remain in the kite. The
short rod can be removed for transport.
Lark's head the remaining ring to the spine line
about midpoint on the line. This will hold the
spine in place and can later be tensioned
properly. Put the spine into the kite. For now
move the ring high enough on the line just to
hold the spine in place.
2. Wing spreaders: Use 2 graphite .2200 / 5.6 mm x 48" rods. Dry fit the rods with the stubby
nocks and dihedral. You should not need to cut the rods. After the dry fit glue a stubby nock to
one end of each rod. Glue one rod into the dihedral. Put the rods into the kite and tension the
head/wing lines.
3. Tail spreader rod: Use the graphite .1800 / 4.6 mm x 29.5" rod dry fit using 1 stubby nock.
Cut to fit. It will be about 71 cm long. Cut it in half. Dry with with stubby nocks and dihedral.
Glue the dihedral and one stubby nock on one rod a stubby nock on the other. Insert into tail.

12
Next take the 2 meter long piece of line for
rigging between tail / wing and between spine /
outer tail tips. Cut off (2) 40 cm pieces. Set aside
the remainder. Using about 10 cm form a loop in
one end by tying an overhand knot. The loop
should be about 5 cm long. Lark's head it over
the tail spreader rod behind the stubby nock. You
may super glue it to the rod. Now thread the
other end of the line through the eyes of the
flattened hook and make the sliding tensioner
knot. Repeat with the other line. The tail rod is
done and may be put into the kite and the hooks put through the lower wing loop rings.
The tensioning line attached to tail spreader rod hooks
to lower wing loop.
Framing lines at spine and outer tail: Using the
remaining piece of line you set aside find the center
and lark's head it to the ring on the spine line. This
piece is approximately 120 cm long.

13
Now construct a sliding tensioner
loop on each end of the line. You
will not use a ring or hook.
Rather the loop formed will slip
over the tail spreader rod stubby
nock.
Bridling: Cut one 30 cm piece of line from the bridle line. Make a loop and set aside. This will
be your tow point.
Use the remaining line for your bridle. Attach
one end 16 cm (6.25 inches) from the top. Using
a needle penetrate the spine sleeve and wrap the
line around the rod. Leave it loose enough to be
able to remove the spine rod if necessary. Tie a
knot. Repeat with the other end of the bridle line
at 26 cm (10.25 inches) up from the bottom of
the ite s in (not from the bottom of the rod).
Lark's head the loop to the bridle as your tow
point. A good starting point for the tow point is a
bit less than 2 meters from the top bridle point.
A nice sized bag will measure 165 long x 15cm wide (finished size laying flat). Cut size
approximately 170 cm x 32 cm wide.
Done! Enjoy flying your replica Vogeldrachen or bird kite.
Questions? Email us at [email protected] Bob and Charmayne

How to ma e the sliding not to tension framing lines: 14
Step 1 Step 4 tighten
Step 2 Step 5
Step 3 Step 6 tighten
The loop can be adjusted to tension the line
between two areas.

15
Note: add a seam
allowance on both wings
and body where they join
together.
Reinforcements are not quite to
scale. Use for shape only.
Table of contents
Popular Toy manuals by other brands

Multiplex
Multiplex EXTRA 330SC Indoor Edition Building instructions

Mattel
Mattel Disney Y6652-0520 instructions

Hasbro
Hasbro Transformers Prime Optimus Prime Autobot quick start guide

Hasbro
Hasbro my LiTTLE PONY E5106 quick start guide

Brookstone
Brookstone RACER quick guide

Model Shipways
Model Shipways Sultana instruction manual

TTS
TTS EY10007 user guide

The Wings Maker
The Wings Maker Handyman Twins instruction manual

Fisher-Price
Fisher-Price W9913 instruction sheet

WARCRADLE STUDIOS
WARCRADLE STUDIOS DYSTOPIAN WARS HOCHMEISTER BATTLEFLEET Assembly instructions

Mattel
Mattel D-REX M8577 instructions

Connoisseur Models
Connoisseur Models Six Wheeled All Third Coach instructions