3SIXT 3S-0959 User manual


3
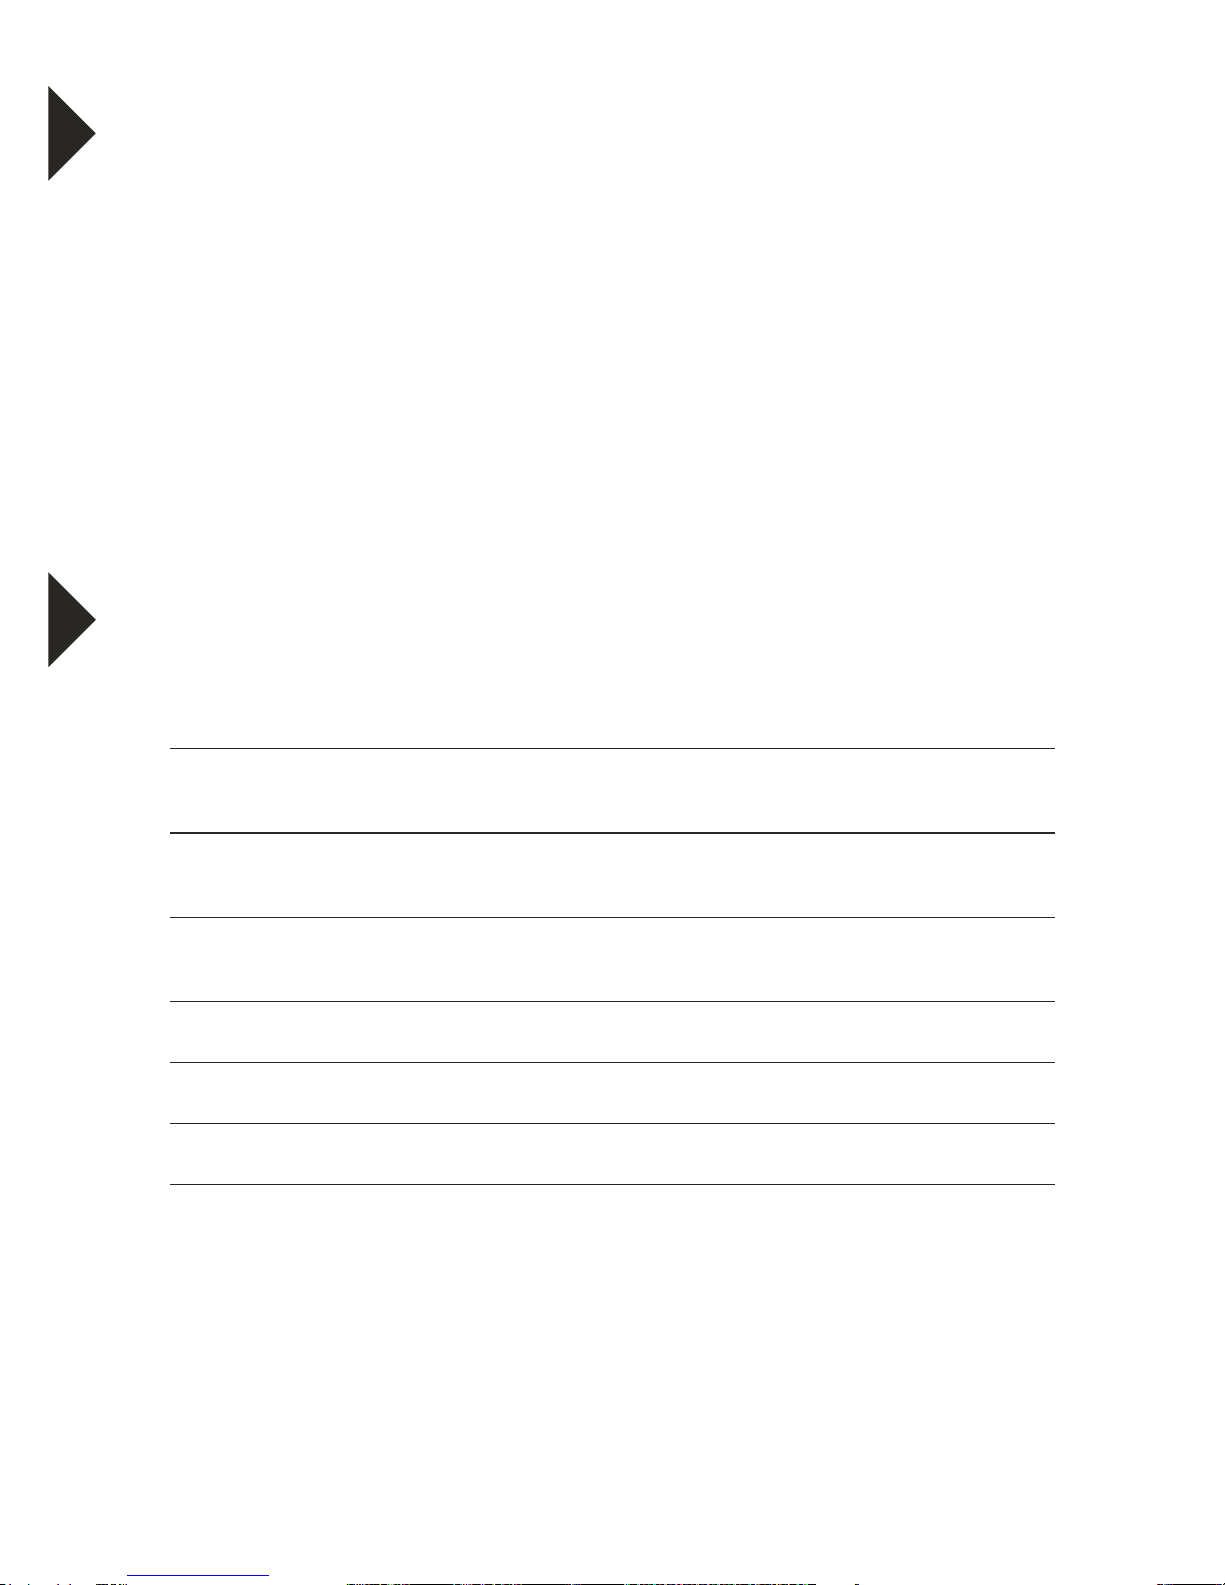
MIC
AVRESETUSB
THE BASICS
Buttons & Ports
1- Microphone
2- Mini HDMI Out
3- MicroSD Slot
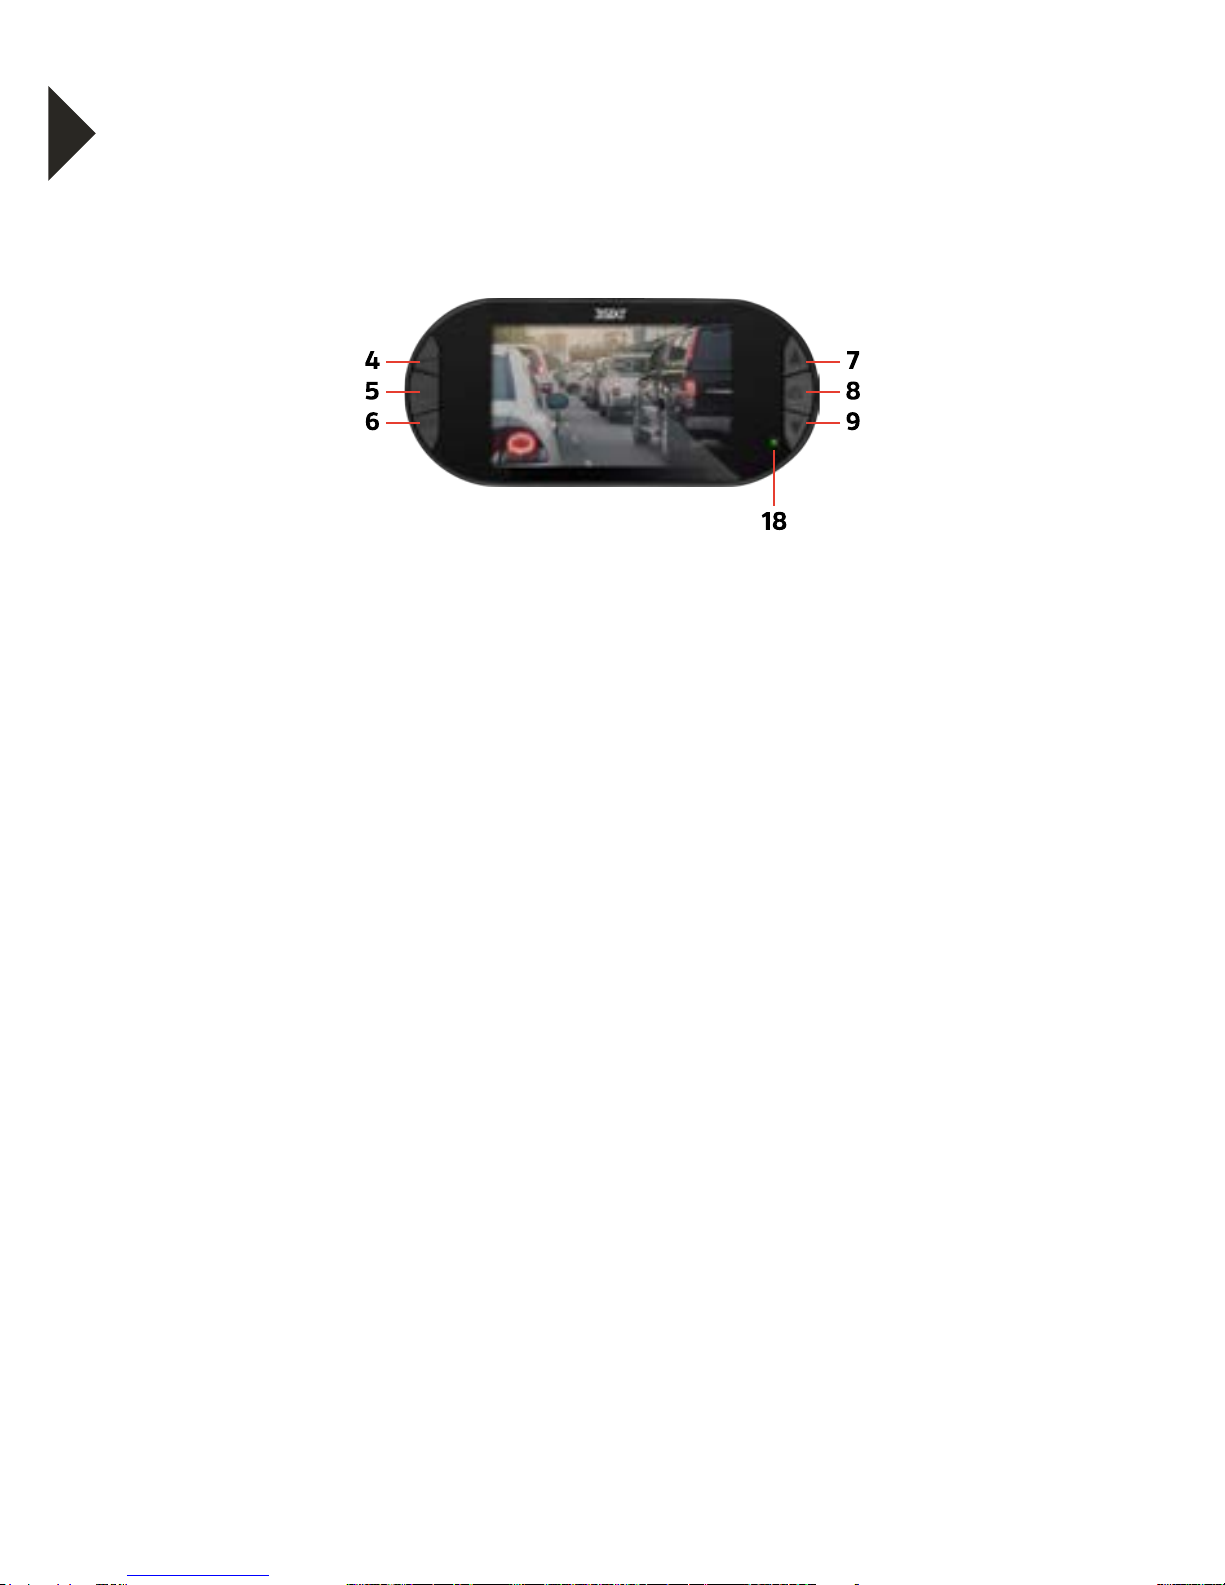
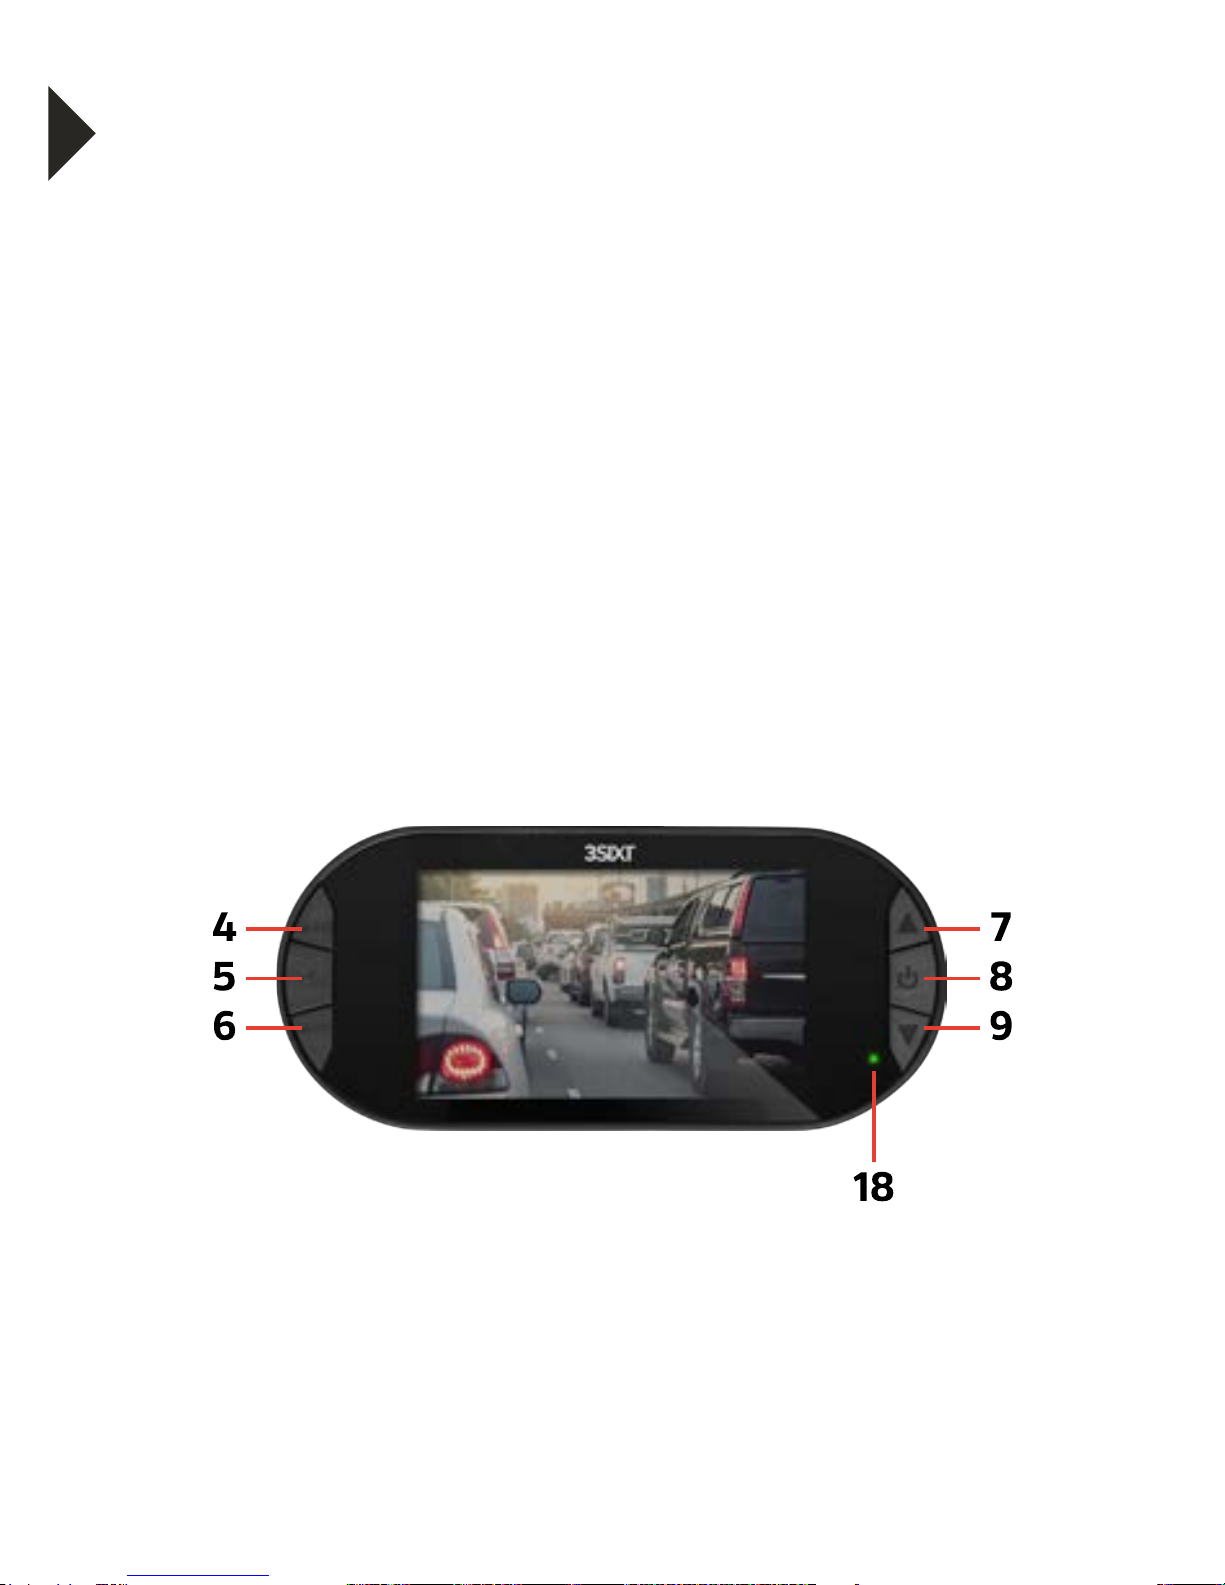
4- Mode Button
5- OK Button
6- Menu Button
7- Up Button
8- On/Off Button
9- Down Button
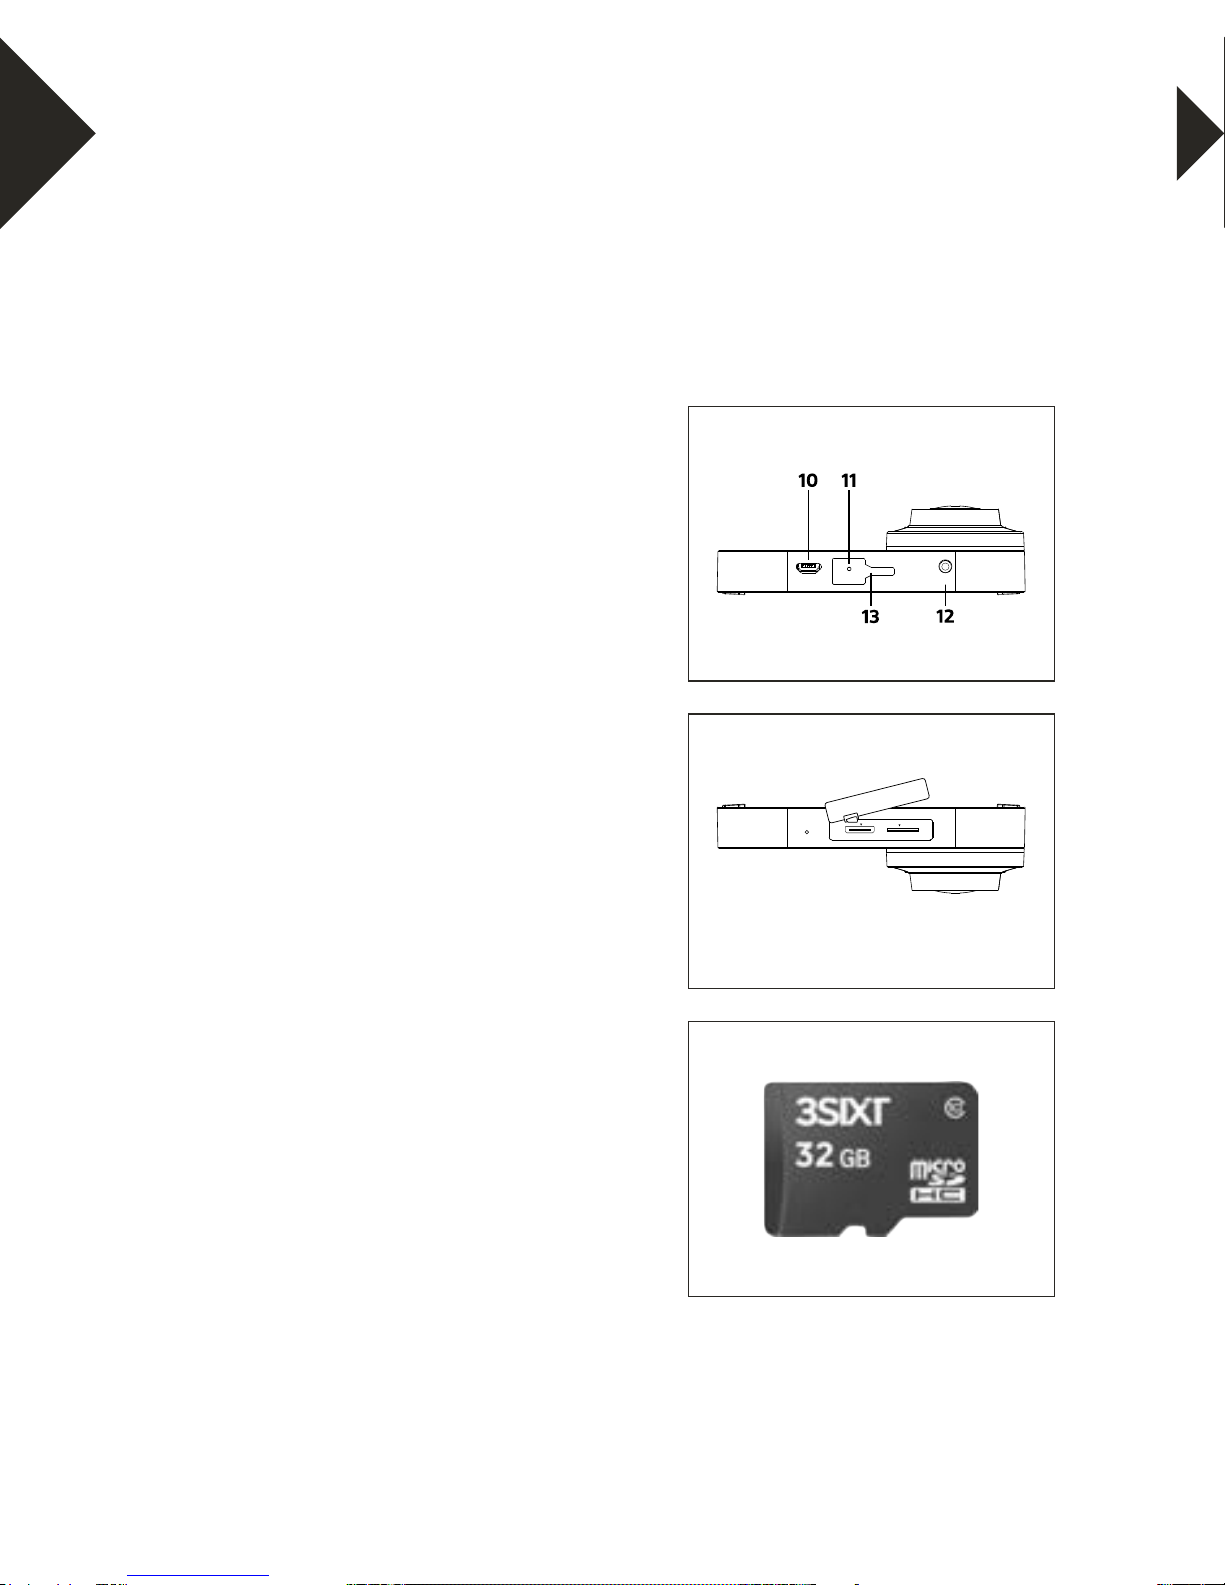
10- Mini USB Port
11- Reset Button
12- Audio Out
13- Mount Slot
14- Lens
15- Infra Red LED
16- Speaker
17- Operating LED
18- Charging LED
19- Dust Cover

4
Package Contents
3SIXT Car DVR
Car Charger
USB Cable
User Guide
Window Mount
Installation of the Camera
1. Clean the interior of your windscreen ensuring that the desired point of
installation is free of dust and is not obstructing the drivers’ view.
2. Attach the camera to the included mount by inserting the mount’s
lock peg into the mounting socket (13) on the camera firmly sliding the
mount from right to left along the mount connection locking the
camera in place.
3. Remove the protective stickers on the suction cup of the mount, the
2.7” LCD Screen and the lens.
4. With the suction mount lock switch in the up position, press the
suction cup onto the desired position on your windscreen.
5. Lock the mount in place by pressing the lock switch in the down
position.
6. Use the nut to adjust the angle and position of the camera and tighten
to lock your positioning.
7. Connect the camera to power using the included miniUSB power
supply.

54
1. First, make sure that the camera is
OFF before inserting or removing
the miniUSB charging connector
2. Check the miniUSB port (10) for any
obstructions or foreign matter
3. Insert the miniUSB connector from
your connected car charger or
charge cable into the miniUSB port
(10) on the camera.
4. The charging indicator light (18) will
illuminate red whilst charging and
turn off when the battery capacity
is at 100%
5. The MiniUSB connector can only
be inserted into the port one way.
Please do not force the connector
into the port.
6. Keep the miniUSB port clear of any
obstructions
AVRESETUSB
AVRESETUSB
CHARGING THE BATTERY
The camera is designed to be used with a car charger
(included). The internal battery is an emergency back
up and is not designed to power the camera for the
intended usage.
WARNING: Using a car charger other than a 5V 1A Charger
can damage the camera battery and could result in fire or
leakage. Only use chargers marked: Output 5V 1A.
6
1. Make sure the camera is OFF when
inserting or removing the microSD
card.
2. Using your fingernail gently remove
the dust cover (20) to expose the
microSD slot (17).
3. Make sure the memory card is
inserted in the correct direction
(the gold contacts of the microSD
card should face the front of the
camera) into the microSD card slot
(17). Failure to do so may lead to
damaged or lost data.
4. To remove the microSD card,
press down on the card with your
fingernail until it clicks and pops up.
5. If a microSD card is removed
or power supply is interrupted
when the camera or computer is
connected to the card (i.e. during
reading, writing and formatting),
your captured images and video may
be lost or damaged.
AVRESETUSB
MicroSD
Mini HDMI
MIC
INSTALLING THE MICROSD CARD
It is recommended to use 32GB Class 10 microSD cards
for maximum performance.
76
TURNING THE CAMERA ON/OFF
Fully Charge the battery and insert the microSD card as
described on page 5 & 6.
AUTOMATICALLY TURN ON THE CAMERA
When the camera is connected to the car charger and the car is started
the camera is automatically activated and video recording will
automatically commence. The LCD screen displays the 3SIXT welcome logo
and a start up tone is emitted. The Green LED (18) will be flashing.
AUTOMATICALLY TURN OFF THE CAMERA
When the camera is connected to the car charger and the car is turned
off, the camera will automatically be de-activated and the current video
recording will be automatically saved. The LCD Screen display turns OFF
and a shutdown tone is emitted.
MANUALLY TURN ON THE CAMERA
Press and hold the Power Button (8) for 2 seconds until the LCD screen
displays the 3SIXT welcome logo and a start up tone is emitted. The
camera will start recording automatically. The Green LED (18) will be
flashing.
MANUALLY TURN OFF THE CAMERA
Press and hold the Power Button for 2 seconds until the LCD Screen
displays OFF. A shutdown tone is emitted. The last file is saved
immediately. If the camera is in a “low power” state (<10%) the camera will
auto power off and save the last file.

8
IMPORTANT DASH CAMERA SETTINGS
Please take the time to review these settings. They will
ensure your camera is operating at it’s full potential.
Set Time & Date
It’s important to have your time and date set correctly as it will
record directly onto your video stream and is critical information to
prove your case to insurance companies etc.
To set the time on your camera follow the directions below,
1. Ensure you are not currently recording. If the red record
indicator is flashing at the top left of the camera’s screen,
push the OK (5) button to stop recording.
2. Push the MENU(6) button twice, taking you to the SETUP
menu
3. Using the DOWN (9) button highlight the setting named
“Date/Time” and push OK (5).
4. Use the Up (7) and Down (9) buttons to cycle through the
numbers and use the OK (5) button to confirm and move
between fields.
5. Time is set and displayed in a 24 hour format.
6. After setting the date and time the bottom DD/MM/YY
fields are used to change format that the date will be
displayed.
7. Once the date and time have been set, the MENU (6) button
can be used to save and exit back to the SETUP menu.
Set Loop Recording
Your camera has the ability to record in a Loop mode, which means
older blocks of video files will be overwritten once the memory card
becomes full. You can set the amount of video block time the
camera will record before a new video file is started. To change the

98
length of the videos that the camera records follow the directions
below.
To set the time on your camera follow the directions below:
1. Use the MODE (4) button to make sure you are in VIDEO
mode (Video camera icon will be displayed in the top left
corner of the screen).
2. Ensure you are not currently recording. If the red circle
record indicator is flashing at the top left of the camera’s
screen, push the OK (5) button to stop recording.
3. Push the MENU (6) button taking you to the VIDEO menu.
4. Use the DOWN (9) button to highlight the setting named
“Loop Recording” and push OK (5).
5. Use the UP (7) and DOWN (9) buttons to highlight the
required video length (The OFF setting will record the
longest possible loops keeping the file size under 2GB, which
is around 7 minutes at 1080P resolution).
6. To confirm selection push the OK (5) button, the camera will
take you back to the VIDEO menu.
Set G-Sensor
The G-Sensor monitors any unnatural movements of the vehicle
and logs the associated footage as “Locked” ensuring any footage
of potential incidents are not recorded over with the regular loop
footage.
To set the G-Sensor follow the directions below:
1. Use the MODE (4) button to make sure you are in VIDEO
mode (Video camera icon will be displayed in the top left
corner of the screen).
2. Ensure you are not currently recording. If the red circle
record indicator is flashing at the top left of the camera’s
screen, push the OK button to stop recording.
3. Push the MENU (6) button taking you to the VIDEO menu.

10
4. Use the DOWN (9) button to highlight the setting named
“G-Sensor” and push OK (5).
5. Using the UP(7) and DOWN (9) button, highlight the
required sensitivity of the G-Sensor (2G is the most sensitive
setting only requiring small bumps to log footage as Locked,
and 8G is the least sensitive requiring a larger amount of
activity to log footage as Locked).
6. To confirm selection push the OK (5) button, the camera will
take you back to the VIDEO menu.
Set Park Mode
Park Mode will monitor for activity using the G-Sensor after the car
is parked, even if your ignition is turned off. If activity is detected, the
camera will record 10 seconds of footage.
To set park mode on your camera follow the directions below:
1. Ensure you are not currently recording. If the red record
indicator is flashing at the top left of the camera’s screen,
push the OK (5) button to stop recording.
2. Push the Menu (7) Button twice, taking you to the SETUP
menu.
3. Using the DOWN (9) button highlight the setting named
“Park Mode” and push OK (5).
4. Using the UP (7) and DOWN (9) button, highlight the
required sensitivity of the GSensor (2G is the most sensitive
setting only requiring small bumps to trigger recording, and
8G is the least sensitive requiring a larger amount of activity
to trigger recording).
5. To confirm selection push the OK (5) button, the camera will
take you back to the SETUP menu.

1110
Set Motion Detection
Motion Detection monitors on screen movement and will start
recording when movement is detected. Motion Detection will also
stop recording after 10 seconds of no on screen movement.
To set up Motion Detection on your camera follow the directions
below:
1. Use the MODE (4) button to make sure you are in VIDEO
mode (Video camera icon will be displayed in the top left
corner of the screen).
2. Ensure you are not currently recording. If the red circle
record indicator is flashing at the top left of the camera’s
screen, push the OK button to stop recording.
3. Push the MENU (6) button taking you to the VIDEO menu.
4. Using the DOWN (9) button Highlight the setting named
“Motion Detection” and push OK (5).
5. Use the UP (7) and DOWN (9) buttons to highlight either
OFF or ON.
6. To confirm selection push the OK (5) button, the camera will
take you back to the VIDEO menu..

12
VIDEO MODE
To record a video, make sure the camera is in Video mode which
should be displayed on the LCD Screen.
If not, short press the Mode Button (4) repeatedly until the video
camera icon (1) appears.
TO START RECORDING:
Press the OK Button (5). The Green LED Light (18) will start
flashing to indicate video recording is in progress. The red dot on
the screen will also start flashing.
VIDEO SCREEN DIAGRAM

1312
Menu Select Settings Remark
Resolution FHD1080p 1920x1080
1080p 1440x1080
720p 1280x720
WVGA 848x480
VGA 640x480
Higher resolution gives your
footage more detail but uses more
storage space. Lower resolution
saves storage space.
Loop recording Off / 1 Min /
2 Mins / 3 Mins /
5 Mins / 10 Mins
Loop Recording’ defines the length
of time the camera records before
creating a new file. Using the Off
setting will record the longest
possible loops under the file size of
2GB (around 7 mins at 1080P).
Exposure
Compensation
-+2.0, +5/3, +4/3,
+1.0, +2/3, +1/3, +0.0,
-1/3, -2/3, -1.0, -4/3,
5/3, -2.0
Adjusting the exposure will counter
balance high or low light conditions.
To brighten your footage, adjust to
a higher exposure. To make your
footage darker change to a lower
exposure. The default setting for
this is balanced at +0.0.
Motion
Detection
Off / On When activated, the Motion
Detection feature allows visible
movement to trigger recording.
Record Audio Off / On Turning this setting off mutes the
built in microphone.
Date Stamp Off / On Date stamps the footage.
G-Sensor Off / 2G / 4G / 8G Setting to adjust the sensitivity
of the G-Sensor. 2G is the highest
sensitivity 8G is the lowest.

14
PHOTO MODE
To take a photo, make sure the camera is in Photo mode which
should be displayed on the LCD Screen. If not, short press the
Mode Button (4) repeatedly until the camera icon appears.
TO TAKE A PHOTO:
Press the OK Button (5). The camera will make a short beep then
emit the camera shutter sound.
PHOTO SCREEN DIAGRAM

1514
Menu Select Settings Remark
Resolution 12M 4032 x 3024
10M 3648 x 2736
8M 3 264 x 2448
5M 2 592 x 1944
3M 2 048 x 1536
2M 1920 x 1080
1.3M 1280 x 960
VGA 640 x 480
Higher resolution gives your footage
more detail but uses more storage
space. Lower resolution saves storage
space.
Sequence Off / On The Sequence setting will set the
camera to take a sequence of 3 photos
every time the shutter is triggered.
Image Quality High quality /
Normal / Fine
Sets the quality of the image. Lower
quality images are more space efficient.
Sharpness Strong / Standard
/ Soft
Sharpness determines how bold the
camera focus is.
White Balance Auto / Daylight
Cloudy / Tungsten
/ Fluorescent
White balance gives the option of 4 pre-
set lighting settings to easily allow you to
optimize your camera for your lighting.
ISO Auto / 100 / 200 The lower the ISO, the lower the
sensitivity of the image will be. Higher
ISO will capture more light and reduce
motion blur.
Exposure +0.0, -1/3,-2/3, -1.0,
-4/3, -5/3, -2.0,
+2.0, +5/3, +4/3,
+1.0, +2/3, +1/3
Adjusting the exposure will counter
balance high or low light conditions. To
brighten your photos, adjust to a higher
exposure. To make your photos darker
change to a lower exposure. The default
setting for this is balanced at +0.0.
Anti-Shake Off / On This feature reduces the amount of blur
caused by shaking when taking hand
held photos.
Quick Review Off / 2 secs /
5 secs
Quick Review sets the amount of time
a photo will display on the screen after
being taken.
Date Stamp Off / On Date stamps the footage.

16
Menu Select Settings Remark
Delete Delete Current /
Delete All
Allows you to delete either the selected
or all photos and video stored on the
inserted Micro SD Card.
Protection Lock Current /
Unlock Current
/ All Lock /
Unlock All
Allows you to lock or unlock the
selected, or all videos and photos stored
on the inserted Micro SD Card.
PLAYBACK / REVIEW MODE
To view your videos and photos make sure the camera is in Video
or Photo Playback mode which should be displayed on the LCD
Screen by short pressing the Mode button(4).
PLAYBACK / REVIEW SCREEN DIAGRAM
1716
CAMERA SETTINGS
• Press the Menu button (6) to enter either the Video or
Picture sub menu.
• The Camera Settings menu is identified with a Wrench icon.
To enter this camera settings menu press the menu button (6).
• To select or change one of the settings, use the Up/Down
Buttons to choose an option and press the OK Button (5) to
change the setting.
• Once a menu option has been changed you will be returned
to the Camera Settings menu.
• To exit the sub-menu settings options menu without
changing any of the settings options press the Mode Button
(4). You will be returned to the main settings menu.
• To exit the main settings menu and return to camera mode,
press the Mode Button (4).

18
Menu Select Settings Remark
Park Mode Off / 2G / 4G / 8G When activated, this feature uses the
built in battery and G-Sensor to monitor
any activity after you have parked your
car. When triggered Parking Mode will
record 10 seconds of footage.
Date/Time Set Time and Date Using the UP DOWN and OK button
enter the date and time (24Hr clock) to
stamp onto your footage. Once you have
finished use the MENU button to save
and return to the Settings menu.
Automatic
Power Off
Off / 1 min / 3 mins Sets the amount of time of inactivity
before the camera powers down.
Screen Saver Off / 3 mins /
5 mins / 10 mins
Screen Saver determines the amount
of time before the screen powers down
(even when the screen powers down in
screen saver mode the camera will keep
recording).
Beep Sound Off / On Mute control for key beeps.
Language Select Language Select Menu language.
TV Mode NTSC / PAL Changes the output format to either
PAL or NTSC.
Optical Frequency 50Hz / 60Hz Screen Hz setting
Flash On/Off Control for the infrared LEDs on the
front of the camera.
Format Cancel / OK Format the inserted Micro SD Card,
deleting all photos, videos and data.
Default Setting Cancel / Ok Restore factory settings.
Version Ok Displays the installed firmware
version.
CAMERA SETTINGS MENU GUIDE
1918
CONNECTING TO A PC OR MAC USING
SUPPLIED MICRO USB CABLE
Turn the camera ON and connect it to a PC or MAC’s
USB 2.0 port via the supplied micro USB cable.
For PC: Your captured videos and images will be located in
My Computer > Removable Disc.
For MAC: Your captured videos and images will be located in
the desktop item No Name.
SYSTEM REQUIREMENTS
WINDOWS
Microsoft® Windows XP with Service Pack 3, Windows Vista with Service
Pack 1 or Windows 7 or later
Pentium® 4 processor (or above) 1 GB of RAM, 250 MB available hard
disk space
QuickTime® 6 or higher Microsoft® Internet Explorer 7 or higher Windows
Media Player 10 or higher DirectX 9 or higher
MACINTOSH
Intel processor running Mac OS X v10.5.x or later
QuickTime® 6 or higher, 1 GB RAM, 250 MB available hard disk

20
Screen 2.7”
Lens 120°
ImaginG-Sensor 3.0MP
Camera Rotation 180°
Minimum Light 1 Lux
Video Resolution FHD 1080p* / HD 720p / 480p
Video Format .AVI
Frames 30 fps
Image Resolution 12M* / 10M* / 8M* / 5M* / 2M* / 1.3M / VGA
Photo Format .JPG
Motion Detection Supported
Cycle Recording Off / 1min / 2min / 3min / 5min / 10min
Memory Card Type Micro SD Card (up to 32GB)
Capacity Support up to 32GB / class 4 upward
USB Port USB 2.0
Power Port USB 5V / 1000mAh
Frequency 50Hz / 60Hz
Battery Capacity 300mAh
Microphone / Speaker Built-In
Languages English / French / Spanish / Deutsch / Italian /
Traditional Chinese / Simplified Chinese / Japanese
Charging Time 1 hour
Dimensions 105 x 47 x 30 mm
Weight 114g
TECH SPECS
*Video & Images are by Software Interpolation.
Please Note: We do our best to reflect accurate specifications, however periodic updates and changes may
occur after this manual was printed. We reserve the right to change the parameters without prior notification.
Table of contents


