THIEYE Safeel Zero User manual

Dash Cam Safeel Zero
USER MANUAL
PSFZ - V2.0
Warranty
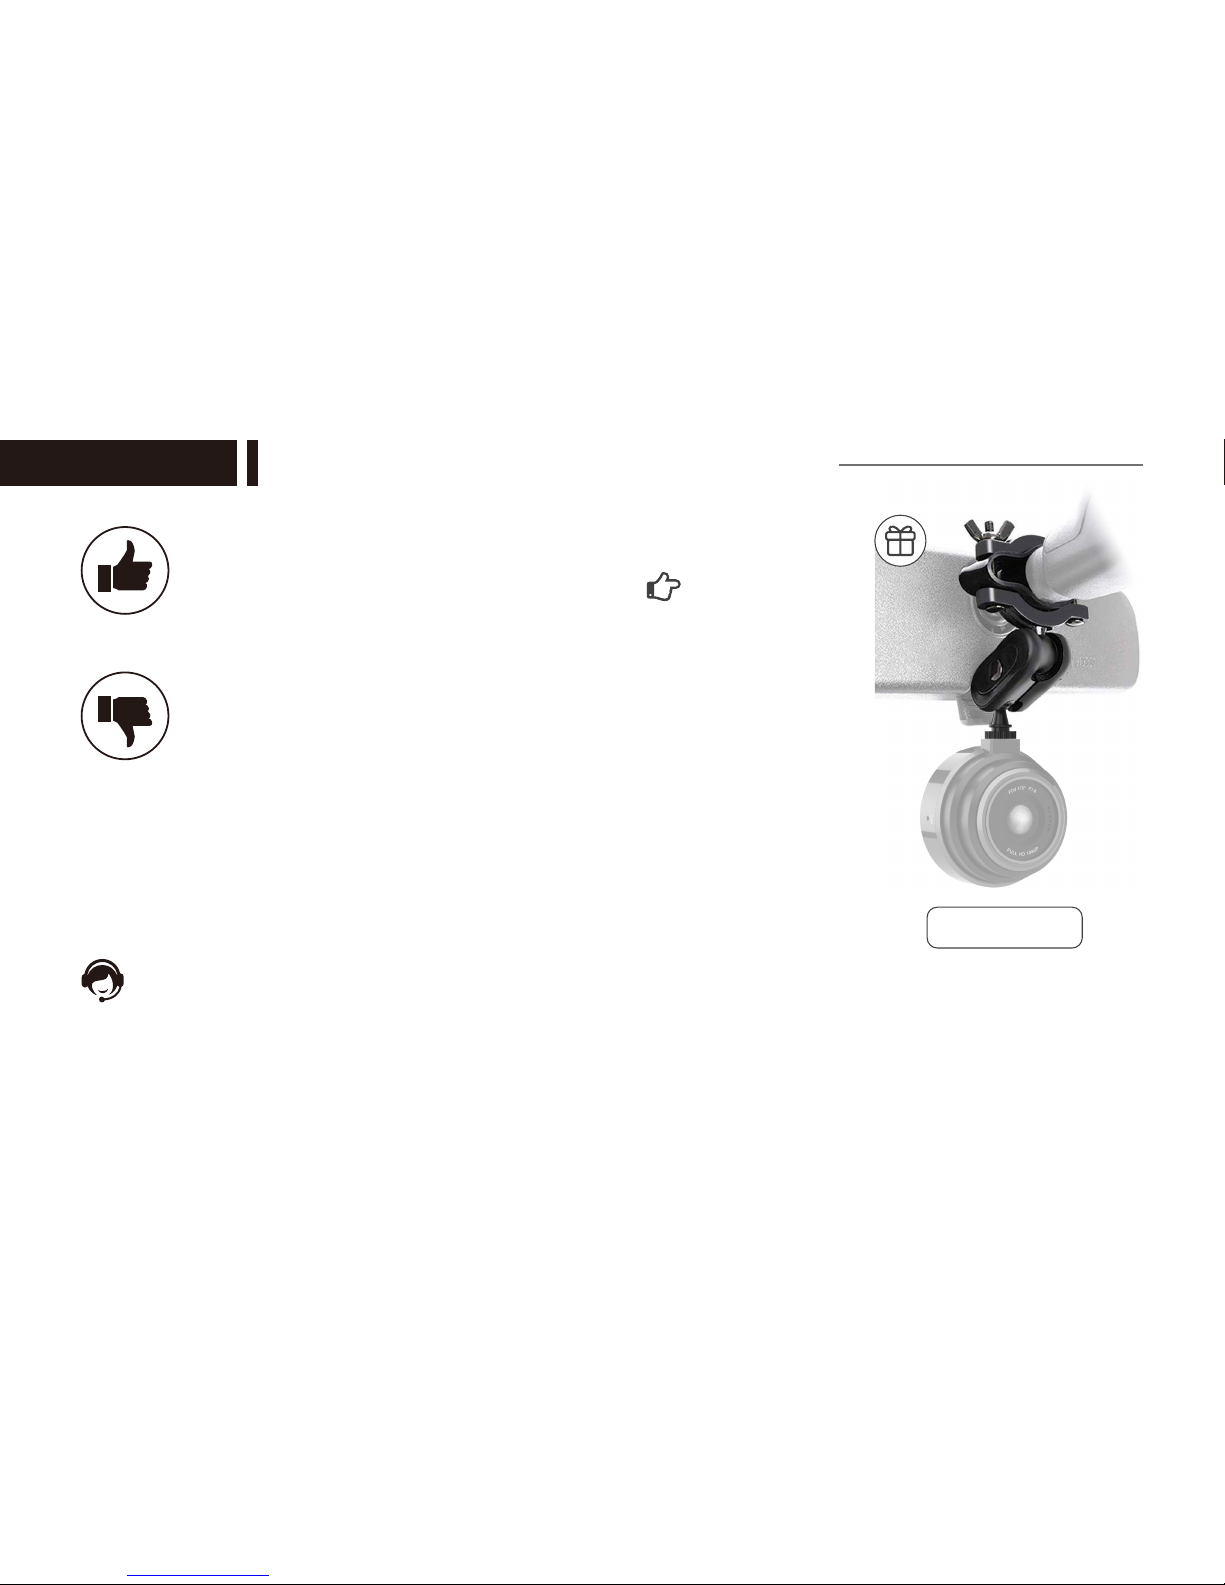
Contact Us
12 Months Warranty & Lifetime Tech Support
If you like our products, please share your shopping
experience and contact us to get the gift.
If you meet any questions, please feel free to contact us
anytime, we'll try our best to help you all the time based
on our 24/7 customer service.
Mirror Mount

Contents
Part 01 - Get Started
1. Packing List
2. Product Overview
3. LCD Screen
4. LED Indicators
Part 02 - Basic Operation
1. Insert TF Card
2. Power On/Off
3. Mode Switching
4. Video Mode
5. Photo Mode
6. Playback Mode
7. Settings Mode
Part 03 - Menu Settings Instruction
1. Video Settings
a. Resolution
b. Loop Recording
c. Motion Detection
d. Voice Recording
e. Date Stamp
f. G-sensor
g. Parking Monitor
h. WDR
2. Photo Settings
a. Capture Mode
b. Resolution
c. Sequence
d. ISO
3. System Menu Settings
a. Screen Saver
b. Auto Power Off
c. Frequency
d. Beep Sound
e. Language
f. Screen Rotation
g. Date/Time
h. Format
i. Default Setting
j. Upgrade Firmware
Part 04 - Installation
Part 05 - Connect to Computer
Part 06 - Frequently Asked Questions
..............................................01
......................................02
...............................................03
...........................................04
...........................................04
............................................05
..............................................06
...............................................06
..........................................08
..........................................09
............................................10
................................................................12
.................................................................13
.........................................................13
.........................................................13
.........................................................14
.................................................................14
.................................................................15
.........................................................16
.........................................................................16
...............................................................17
.............................................................17
..................................................................17
...................................................................18
..............................................................................18

Part 01 - Get Started
1. Packing List
2. Product Overview
3. LCD Screen
4. LED Indicators
Part 02 - Basic Operation
1. Insert TF Card
2. Power On/Off
3. Mode Switching
4. Video Mode
5. Photo Mode
6. Playback Mode
7. Settings Mode
Part 03 - Menu Settings Instruction
1. Video Settings
a. Resolution
b. Loop Recording
c. Motion Detection
d. Voice Recording
e. Date Stamp
f. G-sensor
g. Parking Monitor
h. WDR
2. Photo Settings
a. Capture Mode
b. Resolution
c. Sequence
d. ISO
3. System Menu Settings
a. Screen Saver
b. Auto Power Off
c. Frequency
d. Beep Sound
e. Language
f. Screen Rotation
g. Date/Time
h. Format
i. Default Setting
j. Upgrade Firmware
Part 04 - Installation
Part 05 - Connect to Computer
Part 06 - Frequently Asked Questions
.......................................................18
..................................................................19
................................................................19
.......................................................................19
....................................................................20
........................................................................20
...............................................................20
........................................................................20
............................................................................21
.................................................................21
........................................................21
...................................22
.................23
.....24
01
Part 01 - Get Started
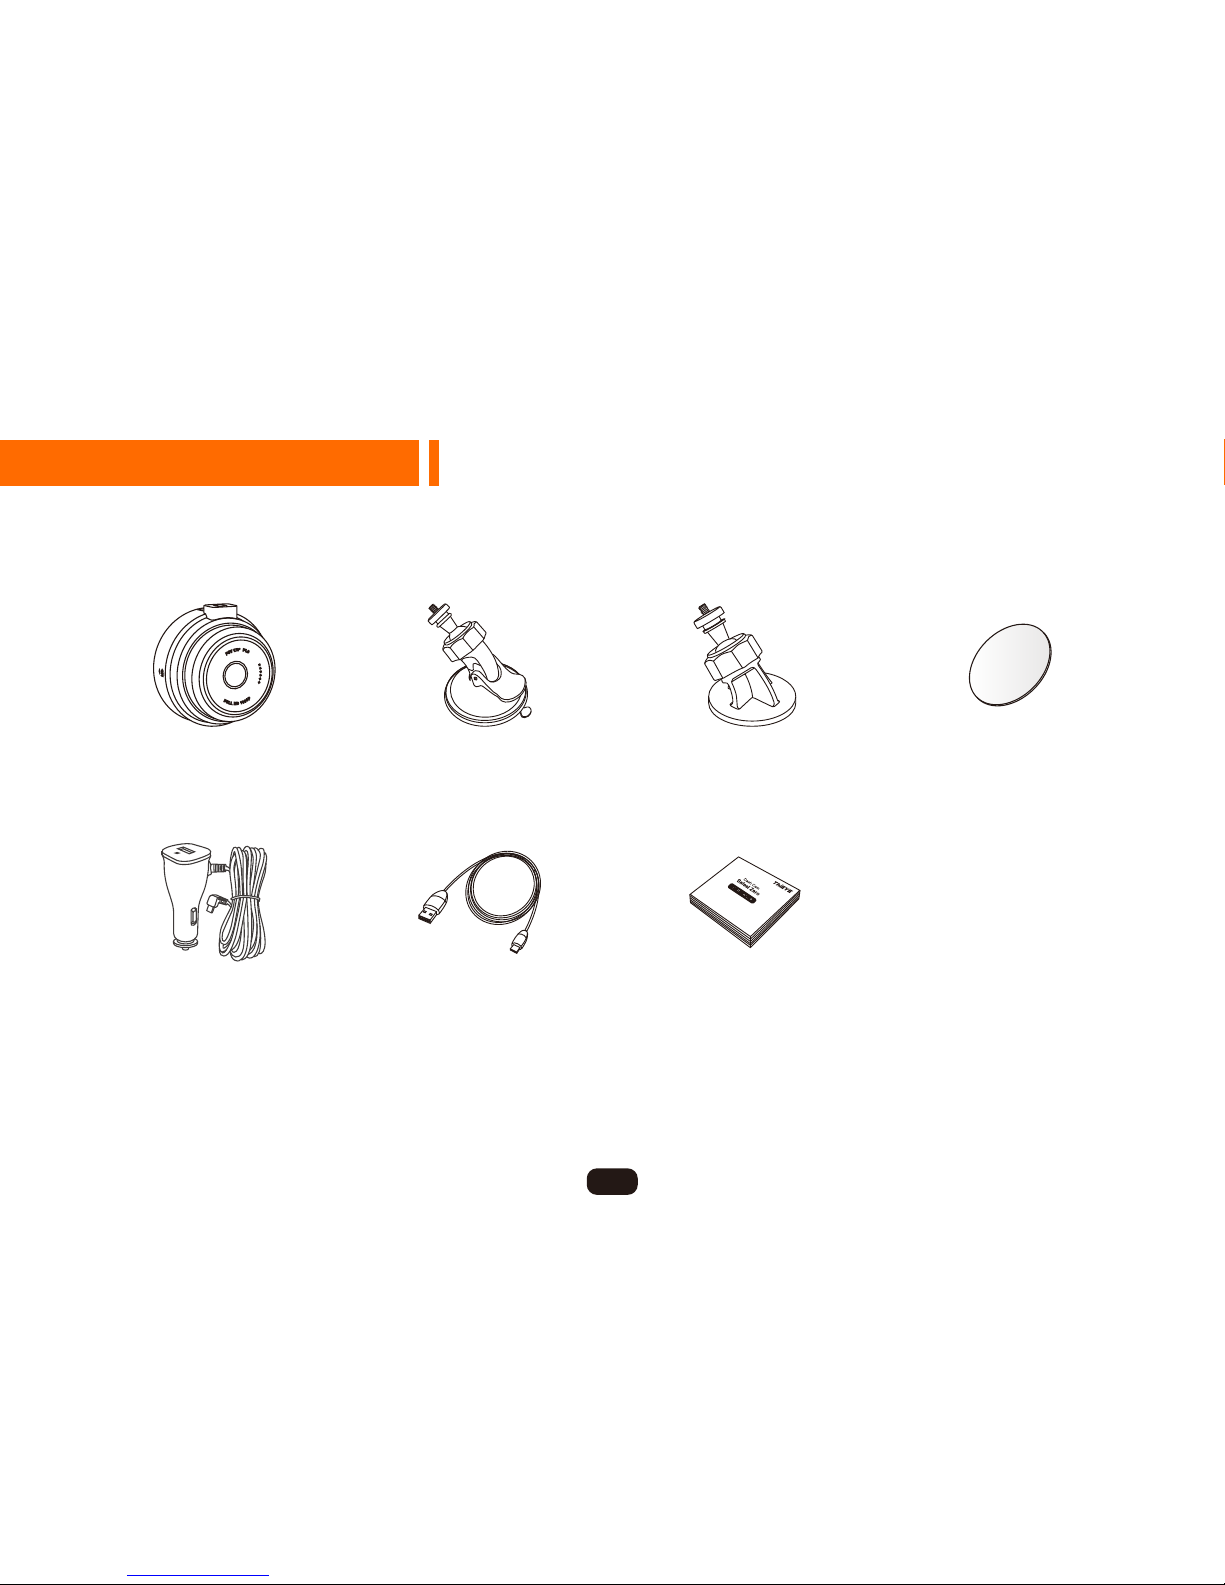
1. Packing List
Suction Cup Mount Adhesive Mount Static StickersDash Cam
Micro USB Cable User ManualCar Charger with
Additional USB
02
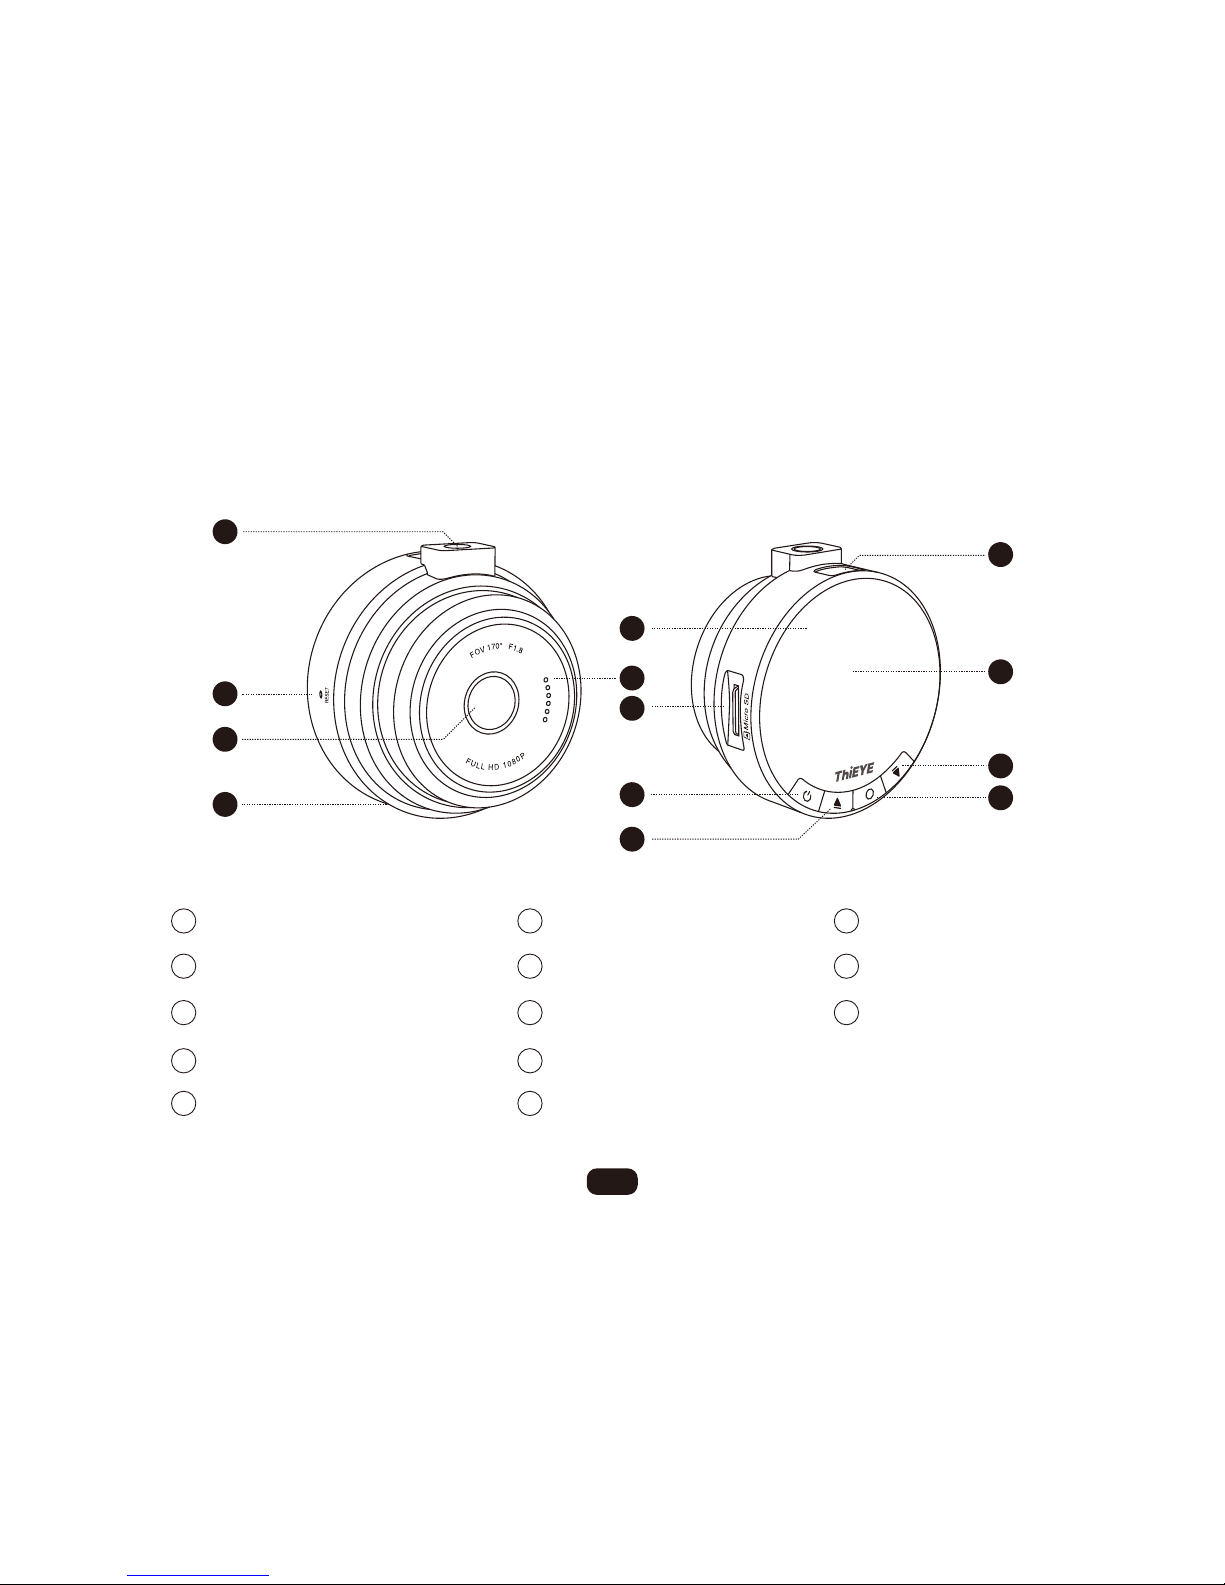
2. Product Overview
Speaker
Micro SD Slot
Power / Mode Button
Up Button
OK Button
Down Button
1.5” LCD Screen
Micro USB Port
Threaded Insert
Reset
170° Wide Angle Lens
Microphone
Status Indicator
1
2
3
4
6
7
8
9
11
12
13
5 10
1
2
3
4
5
6
11
10
7
13
9
12
8

03
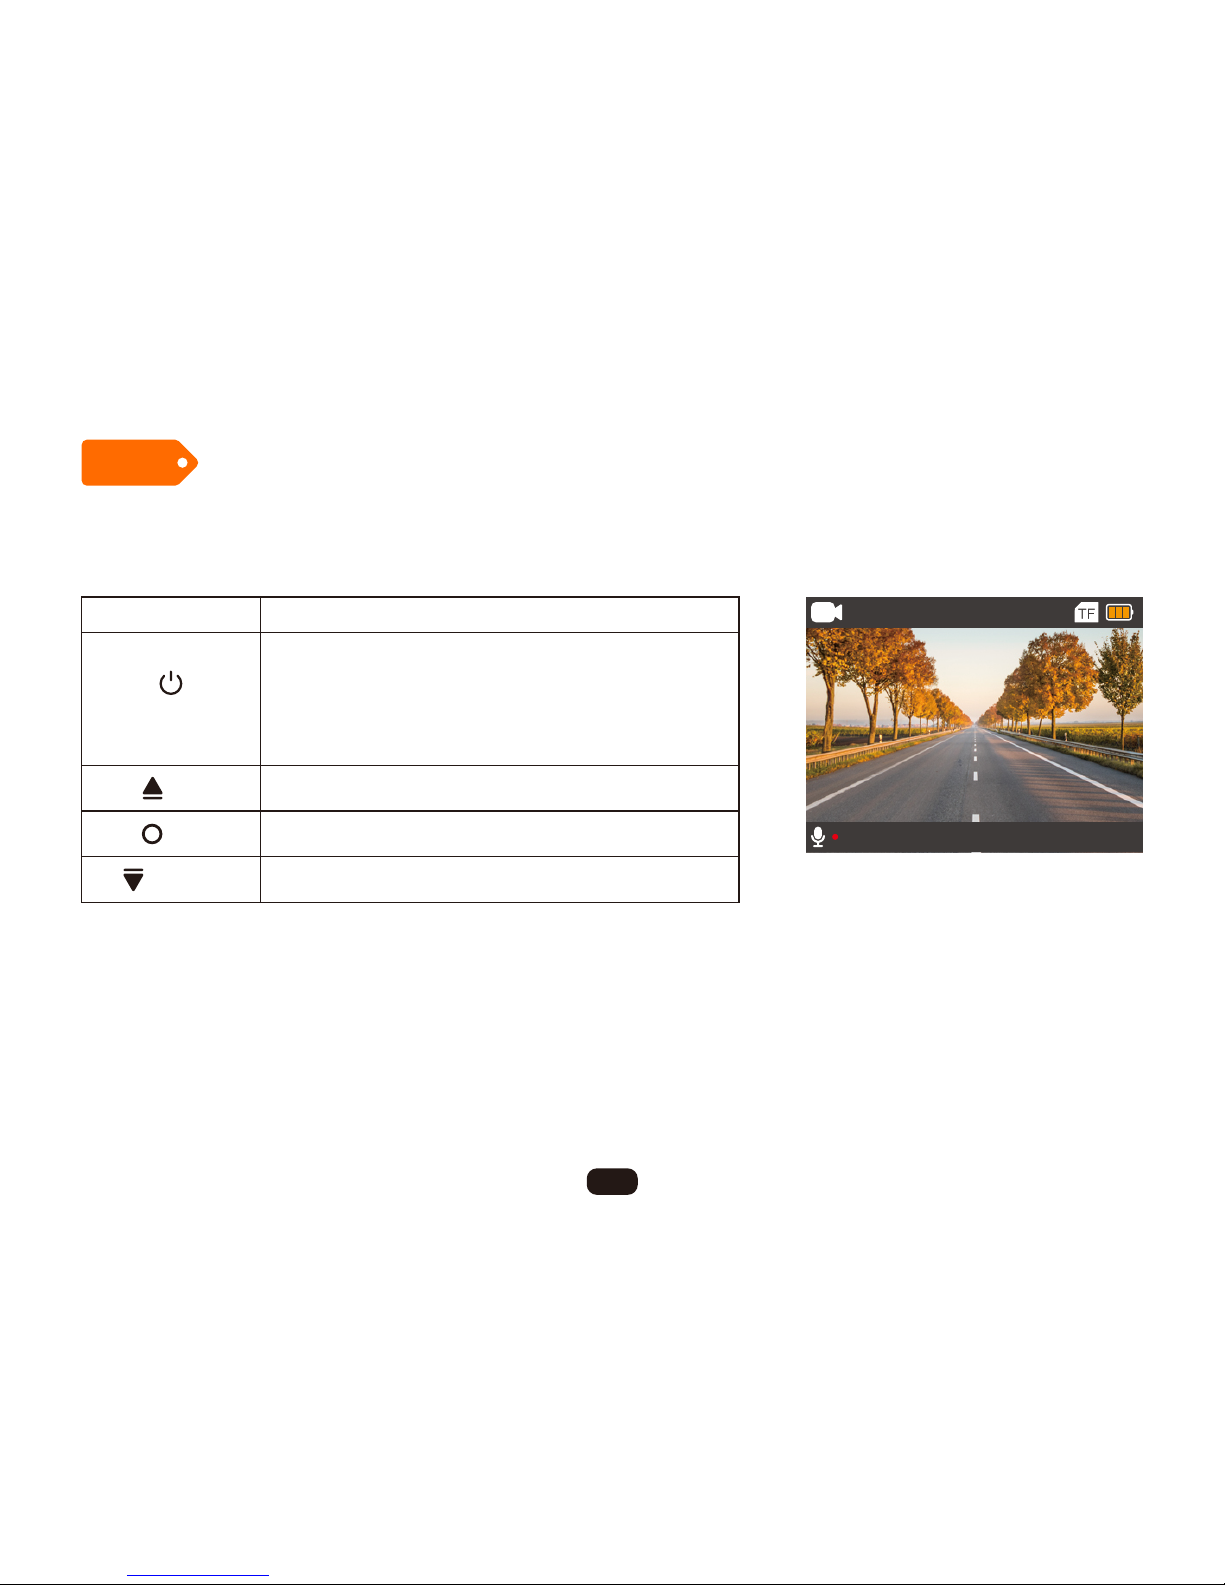
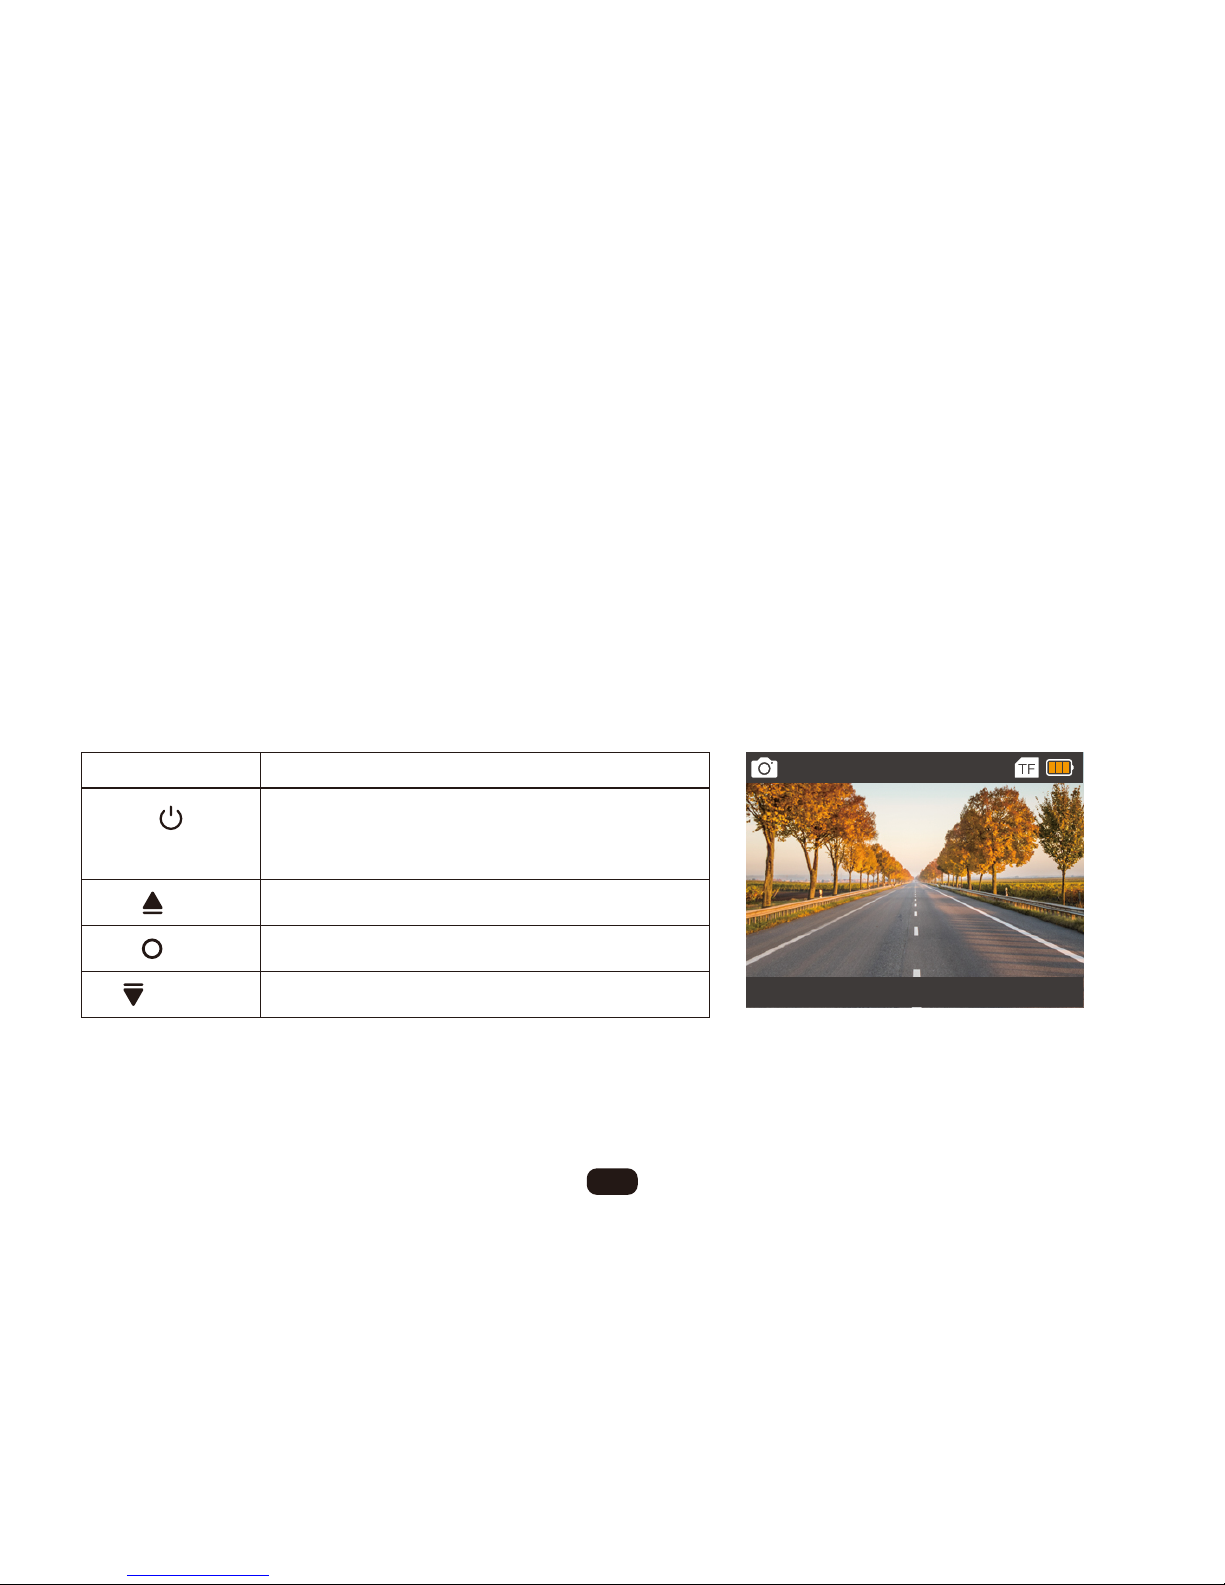
3. LCD Screen
1080P 30FPS
00:02:58 2019/02/03 04:56:06
Video Resolution
Microphone Icon Date/Time
File Lock Icon
Motion Detection Icon
TF Card Icon
Battery Status
Recording Status: When Not Recording
Recording Status: When Recording
00:00:00 2019/02/03 04:56:06

04
Part 02 - Basic Operation
4. LED Indicators
Status
When Recording
When Not Recording
Blue Indicator Light
Continuous Flash
Constant ON
1. Insert TF Card
★ We recommend to use up to 32G
Class 10 or UHS-1 Micro SD Card.
★ Please format the Micro SD Card
in the camera before first use.
· Micro SD Card File
There are two folders on the SD card, one is named “1”, which contains UNLOCK files, the other
one is called “Lock” and it’s the LOCK files.
Insert the Micro SD Card
Remove the Micro SD Card

05
★ To keep your Micro SD card in good condition, please format it regularly. As reformatting
erases all of your contents, be sure to back up your photos and videos first.
★ Ensure that the device is completely power off before removing the Micro SD card to avoid
damages to the memory card.
★ To prevent loss of important data, frequently copy recorded videos from Micro SD card to
another storage device such as personal computer.
2. Power On/Off
The camera is designed to power on and start recording automatically when the car power
adapter is plugged to power source.
★ Auto Power On/Off with Ignition - When powered by the car charger, the dash camera will
automatically turn on when you start your car engine. When turning off your car, the camera will
automatically turn off after approximately 10 seconds.
Cautions

06
★ Manual Power On/Off - To manually turn the camera on/off, press and hold the power button
for at least 3 seconds.
· Switching the camera OFF manually and pulling off the car charger is required for vehicles
where the vehicle’s power socket provides continuous power after the engine is turned OFF.
3. Mode Switching
★ When the dash cam is Powered ON, it’ll automatically start recording.
★ Press OK Button to stop recording.
★ Repeatedly press Power/Mode Button to switch to switch mode, there will be modes:
Video, Photo, Playback, Settings.
4. Video Mode
Automatic Video Recording - When powered by car charger, the dash cam will automatically
turn on and start recording when car is started. Press OK Button to stop recording.
Manual Video Recording - When battery powered (not connected to car charger), turn on the
dash cam by pressing and holding the POWER button. Press the OK button to start/stop
recording.
07
The blue indicator light FLASHING means the dash cam is recording, and it’s CONSTANT ON
means the dash cam is not recording.
Tips
Button Function
UP
DOWN
POWER / MODE
OK
When not recording:
Switch to Photo/Playback/Settings Mode
When recording: Manually Lock File
Enable/Disable Audio
Start / Stop Video Recording
Turn ON/OFF the LCD display
1080P 30FPS
00:02:58 2019/02/03 03:56:06
08
★ When being powered on, the dash cam enters into the video mode and automatically starts
recording.
★ Press OK Button to stop recording.
★ Press Power/Mode Button to switch to photo mode. The photographing icon is displayed on the
upper left corner of the screen.
★ Short press OK Button to take a photo.
5. Photo Mode
Button Function
UP
DOWN
POWER / MODE
OK
Switch to Playback/Settings Mode
×
Take a Photo
Turn ON/OFF the LCD display
12M
2019/02/03 04:06:58

09
★ When being powered on, the dash cam enters into the video mode and automatically starts
recording.
★ Press OK Button to stop recording.
★ Press Power/Mode Button twice to switch to playback mode.
★ When you preview the recorded files, the default is to preview Unlocked files, if you need to
preview the Locked files, please LONG PRESS Up Button.
6. Playback Mode
Button Function
UP
DOWN
POWER / MODE
OK
Switch to Settings Mode
Navigate UP to choose video/photo file
Long Press to preview the LOCK files
Play/Pause
Navigate DOWN to choose video/photo file
Note: If in video mode, please stop video recording first, and then press Power/Mode
Button twice to switch to playback mode.
00:00:34 VID_002MOV
1080P 30FPS

10
★ When being powered on, the dash cam enters into the video mode and automatically starts
recording.
★ Press OK Button to stop recording.
★ Press Power/Mode Button to switch to settings mode.
★ Short press OK Button to enter menu settings.
7. Settings Mode
Button Function
UP
DOWN
POWER / MODE
OK
Switch to Video Recording Mode, and
automatically start recording.
×
Enter Menu Settings
×
11
1080P
3 Min
Resolution
Cyclic Record
Motion Detection
Voice Recording
Date Stamp
MUST Press OK Button
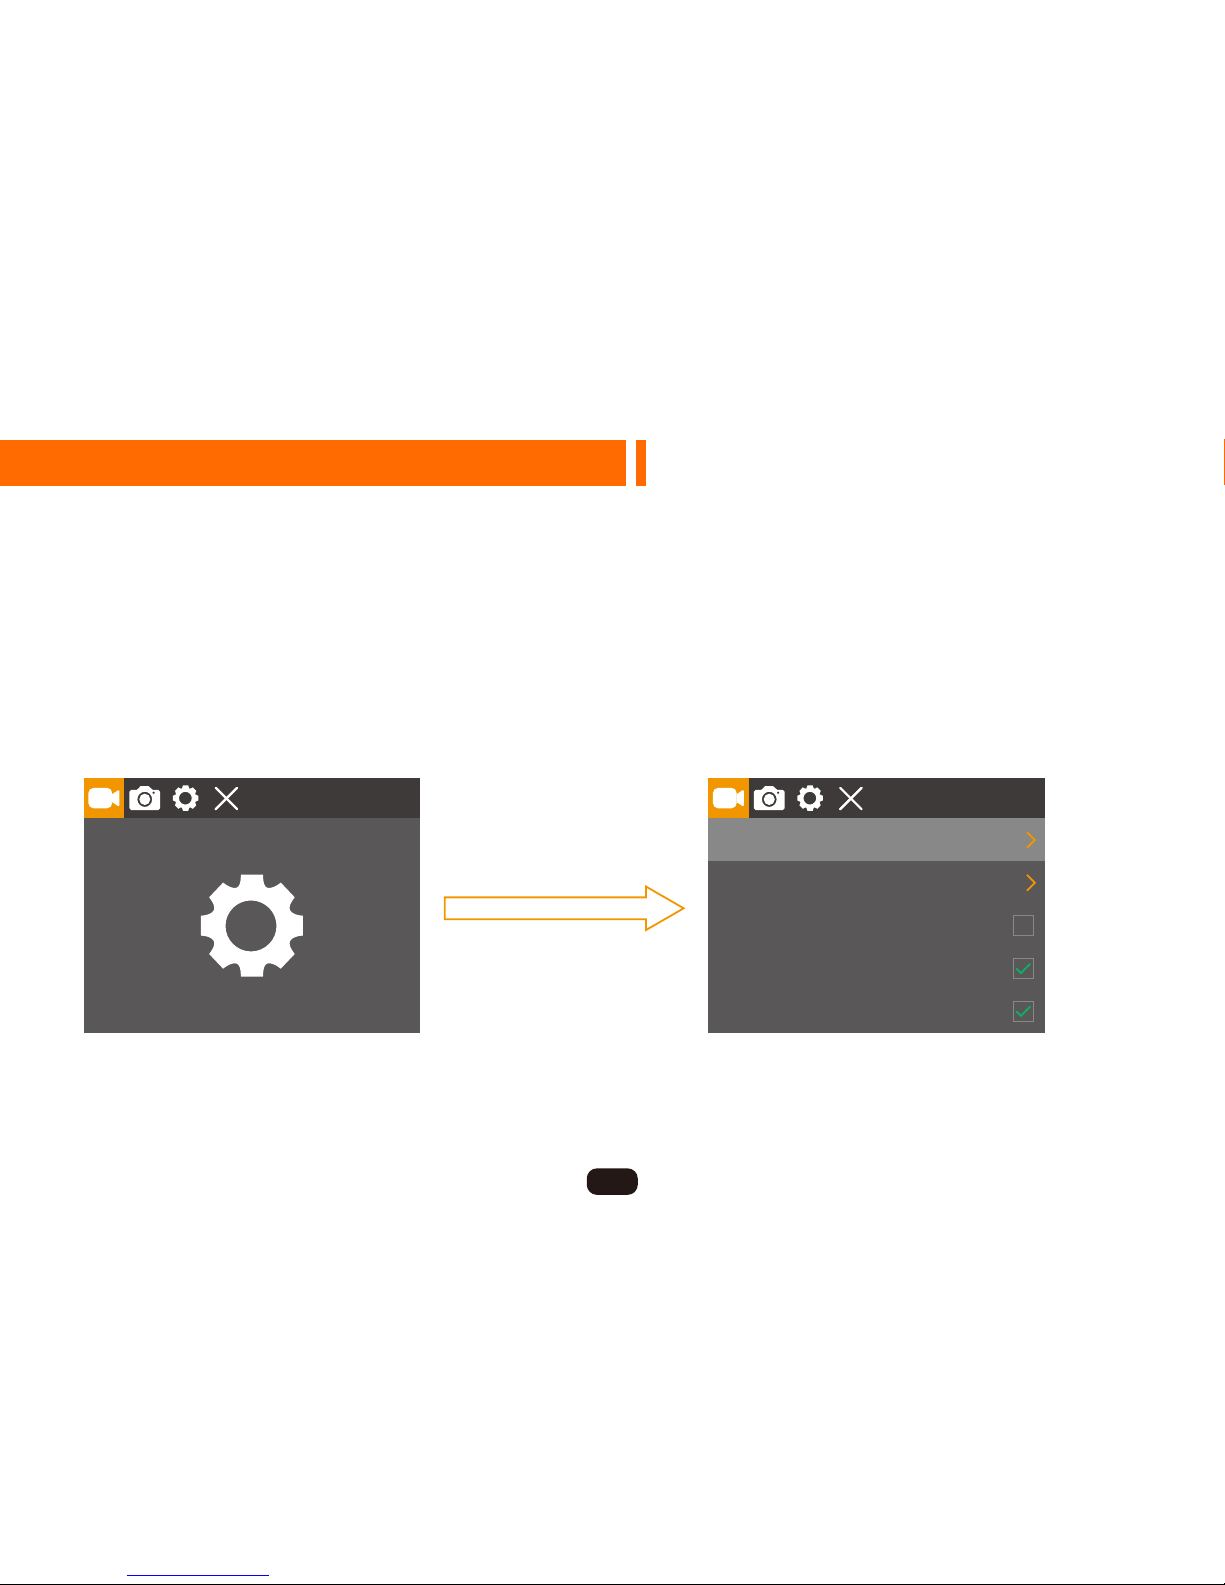
Part 03 - Menu Settings Instruction
★ Menu Switching
◇ When the dash cam is Powered ON, it’ll automatically start recording.
◇ Short press OK Button to stop recording.
◇ Repeatedly press Power / Mode Button to switch to Settings.
◇ Press OK Button to enter menu settings, there will be:
Video Settings, Photo Settings, System Settings, Exit Settings.

12
1. Video Settings
★ When the camera is Powered ON, it enters into the video mode and automatically starts
recording. Short press OK Button to stop recording.
★ Repeatedly press Power / Mode Button to switch to Settings mode, then you MUST Press OK
Button to enter menu settings.
★ When in video settings, press Up/Down Button to choose Resolution, Cyclic Record (Loop
Recording), Motion Detection, Voice Recording, Date Stamp, G-sensor, Parking Monitor, WDR.
1080P
3 Min
Resolution
Cyclic Record
Motion Detection
Voice Recording
Date Stamp

13
① Video Resolutions: FHD 1080P 30fps / HD 720P 30fps
② Loop Recording
Default: 3 Minutes
In the case of recording and saving at interval of 3 / 5 / 10 minutes, the dash cam will
automatically overwrite the earliest file in the memory card once the card is full.
If you turn off the loop recording function, the dash cam will record every five-minute segment of
video when recording.
③ Motion Detection
Default: OFF
When the camera is turned ON and the motion detection is ON, the dash camera will
automatically activate and record any movement that is detected in front of the camera, and it
stops recording when no dynamic motion appears.
Tips

14
· If you turn on the motion detection function, it only works when the dash camera is Powered
ON, the camera will record when it detects motion, which will cause discontinuous recording.
· If you need record continuously, we suggest you to turn off the motion detection function.
④ Voice Recording
Default: ON
Press Up/Down Button in video menu settings to choose the Voice Recording, then press OK
Button to turn on/off the audio recording.
* When recording, press the UP Button can enable/disable audio recording.
⑤ Date Stamp
Default: ON
A correct time and date stamp on the video will help to provide proof of any fault by providing an
accurate record of the event.
Tips

15
⑥ G-sensor
Default: Medium
G-sensor will lock the file when detecting a collision during the recording, please check the “Lock”
file in the card and back up your important files regularly in case of overwritten by loop recording
once the card is full.
The G-sensor sensitivity can be selected OFF / High / Medium / Low in the menu.
1080P 30FPS
00:02:58 2019/02/03 04:56:06

16
⑦ Parking Monitor
Default: OFF
When the car is parked and the Parking Monitor has been turned on, the dash cam will activate
and start recording automatically once it detects motion. And it will turn off after continuously
recording about 20 seconds.
Only turn on the Parking Monitor while parking, the dash cam will record when detecting a
collision. It means that you do not need to turn on G-sensor and Motion Detection.
⑧ WDR ( Wide Dynamic Range)
Default: ON
Wide Dynamic Range (WDR) retains a greater level of detail and color in an image. This setting is
especially useful for scenes that include shadows or bright areas.
Tips
Other manuals for Safeel Zero
2
Table of contents
Other THIEYE Dashcam manuals


