Car and Driver EAGLEEYE CDC-570 User manual

HD Dash Cam
CDC-570
User Manual Manual de usuario
2.2
2.2
ENHANCED LOW LIGHT RECORDING
GRABACIÓN MEJORADA CON BAJA LUZ
2.2
2.2

Table of Contents
Precautions and Notices.................................................................................................2
1. Basics...........................................................................................................................3
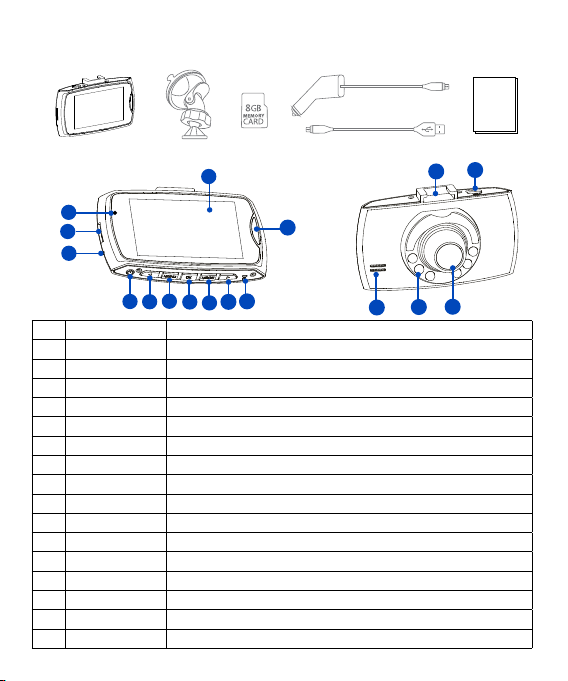
1-1 In the Box......................................................................................................................................................3
1-2 Buttons and Parts........................................................................................................................................3
2. Getting Started...........................................................................................................4
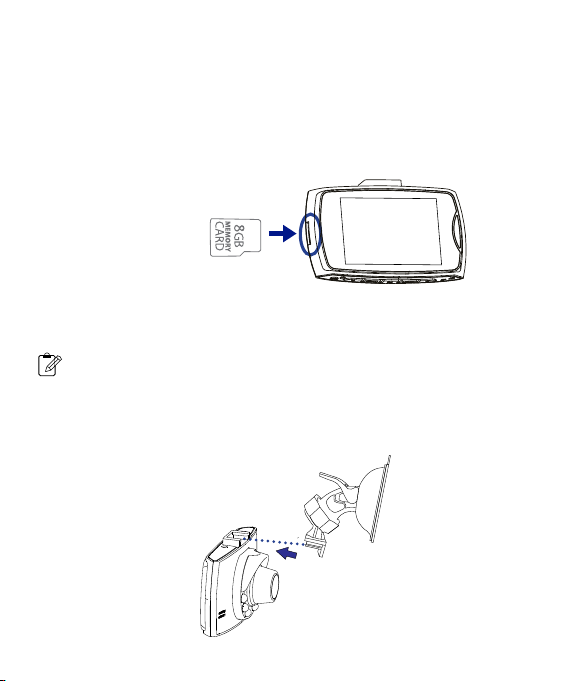
2-1 Inserting a memory card..........................................................................................................................4
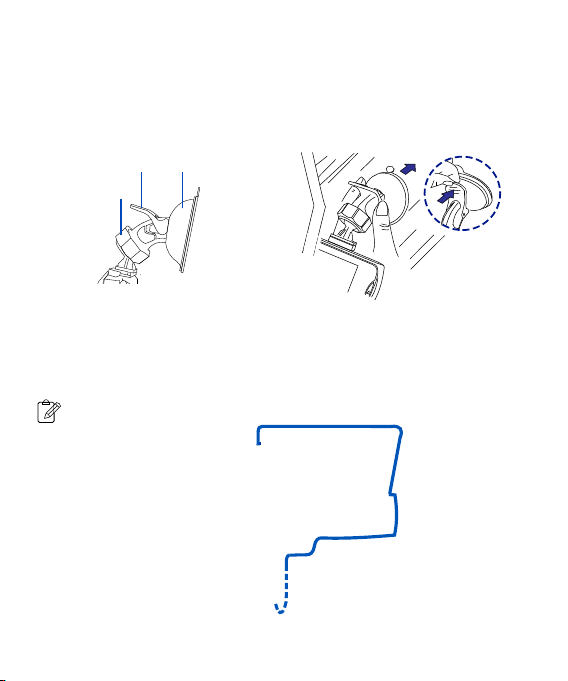
2-2 Mounting the Dash Cam..........................................................................................................................4
2-3 Connecting the Dash Cam to power supply........................................................................................5
3. Operations...................................................................................................................6
3-1 Turning the device on/off.........................................................................................................................6
3-2 Date and Time settings.............................................................................................................................7
3-3 Recording Mode.........................................................................................................................................7
3-3-1 Continuous recording..................................................................................................................................7
3-3-2 Manual recording........................................................................................................................................8
3-4 Photo Mode................................................................................................................................................8
3-5 Voice Recording Mode............................................................................................................................8
3-6 Playback Mode..........................................................................................................................................8
3-7 Connecting to Computer.........................................................................................................................9
3-7-1 Playback or backup on your computer ................................................................................................9
3-7-2
Use your Dash Cam as your computer’s webcam
.................................................................................9
3-8 Formating a memory card......................................................................................................................9
4. Settings.....................................................................................................................10
4-1 Video Recording Settings......................................................................................................................10
4-2 Capture Settings......................................................................................................................................11
4-3 Playback Settings....................................................................................................................................11
4-4 System Settings.......................................................................................................................................12
Specifications................................................................................................................13
FCC Statement...............................................................................................................14
Notice............................................................................................................................14
SUMMIT ELECTRONICS LLC One Year Limited Warranty............................................15
English
1 EN

Precautions and Notices
• Due to local laws and vehicle safety considerations, do not manually operate the device
while driving.
• Keep the windshield and the Dash Cam lens clean for optimal video quality. If there is a
foreign object attached to the lens, this might reduce the quality of the recorded videos.
• Before attaching to your windshield, please check in with your local DMV about trac
laws that dictate the positioning/method of mounting the device.
• Keep the device away from excessive heat, such as direct sunlight , fire or the like.
• Use original or certified cables.
• Do not use any corrosive cleaner/oil to clean.
• Keep out of reach of children. It contains small parts which may be a choking hazard.
• Observe local laws and regulations while using the device.
• To prevent damage to your device’s parts or internal circuits, do not use it in dusty,
smoky, damp or dirty environments.
• Do not use, store or transport the device where flammables or explosives are stored.
Using your device in these environments increases the risk of explosion or fire.
• CAR AND DRIVER is NOT responsible for the loss of any data/content during operation.
• CAR AND DRIVER does NOT guarantee recording of accidents where the impact may
cause the device to be damaged.
• Install the device near your vehicle’s rear-view mirror to obtain the best open-field
view.
• Do NOT install the Dash Cam in a location that will obstruct your view of the road
while you’re driving.
• Make sure that the lens is within wiping range of your windshield wipers to ensure a
clear view even when it rains.
• Do not touch the lens with your fingers. Finger grease left on the lens will result in
unclear videos or snapshots. Clean the lens on a regular basis.
• Do not install the device on a tinted window. Doing so may damage the tint film. Make
sure that the camera’s view is not hindered by a tinted window.
• For some vehicles, a DC power socket will keep providing power after the engine is
turned o. To avoid draining your car battery, please manually unplug the Dash Cam
when the engine is turned o.
• Do not disassemble this device.
• Do not expose this device to rain or moisture or submerge in water.
• Ideal temperatures are 0°C to 35°C. Avoid extreme temperatures.
2 EN

1. Basics
1-1 In the box
1-2 Buttons and Parts
Front View Rear View 13 14
15
16
17
1
No. Definition Description
1 Display Displays the recorded or captured contents.
2 LED Indicator Indicates the device operating status.
3 TF Card Slot Slot for included memory card.
4 Microphone For recording audio.
5 Power button Press and hold for 1 second to manually turn the device on/o.
6,10 Left/Right button Press to skip to previous/Next item.
7 Menu button Press to display settings menu.
8 OK button Press to confirm a selection or stop recording.
9 Mode button
Press to toggle between Recording/Photo/Voice Recording/ Playback mode.
11 Reset button Press to restore all the system settings to factory defaults.
12 Lock button Press and hold to save the current recording as undeletable file.
13 Mounting slot For mounting the device on your car’s windshield or dashboard.
14 Mini USB port For DC power input or connecting to computer.
15 Camera Lens Front facing camera for video recording.
16 Night Light LED For enhancing brightness when driving and recording at night.
17 Speaker For audio sound output
User Manual
10 11
12
56789
2
3
4
3 EN
User Manual

2. Getting started
2-1 Inserting a memory card
2-2 Mounting the Dash Cam
Class 10 or higher TF memory card must be used with a storage capacity of 8GB ~ 32GB.
It is strongly recommended that minimum 8GB memory card is used for HD recording.
1. Place the mount so it is aligned with the mounting slot, and push it in until it clicks into
place. Then remove the protective film from the camera lens and protective film from the
suction cup.
1. As shown in the illustration, hold the edge of the TF memory card, and insert the TF
memory card into the slot with the label facing up and push until you hear a click.
To remove the TF memory card, gently push on the edge of the card in until it clicks out
from the slot, then pull out the card.
Make sure the label of the
TF memory card are facing
the same direction as the
display.
Inserting a TF card
Do not apply excessive force to the TF memory card or attempt to insert it in the
wrong direction. This may cause damage to the TF memory card and the card slot.
Note
5
-
Note
4 EN

1. Connect one end of the supplied power cable to the Mini USB port of the Dash Cam.
2. Plug the other end of the power cable into your car’s DC power outlet, and route the
power cable around the ceiling/passenger seat so that it does not interfere with driving.
You may tuck the cable between the paneling of your windshield and/or A-pillar
space if available.
4. Turn the knob of the mount to adjust the camera’s angle. Make sure the Dash Cam always
faces forward, and level with the vehicle and the road. Turn the Dash Cam on to check the
camera angle.
2. Clean the area on the windshield where the Dash Cam will be installed.
3. Press the Suction Cup of the mount down onto the windshield where it has unobstructed
view of the road but does not interfere with the driver’s view, then push the lock down to
secure it in place.
Suction Cup
Lock
Knob
2-3 Connecting the Dash Cam to power supply
5 EN
Note
5
-
Note

3. Operations
3-1 Turning the device on/o
The device will automatically turn on when you start your car’s engine, and automatically
turn o when you shut o your car.
To manually turn your Dash Cam on/o, press and hold the Power button for 1 second.
LED
Indicator
LED Indicator on the device Description
Restarting the Dash Cam
Occasionally, you may need to perform a hardware reset if the Dash Cam stops responding or
if it appears to be “frozen” or unresponsive. To restart the Dash Cam, press and hold the Pow-
er button until the system powers o. Press the Power button again to turn the Dash Cam on.
If the system does not shut down by holding the Power button, you may do a forced reboot
by inserting a paper clip into the “RESET” button hole on the device.
REC indicator
REC
indicator
When you turn on the device, the REC
indicator glows blue. While recording,
the REC indicator flashes blue to indi-
cate that recording is in progress.
6 EN

3-2 Date and Time Settings
3-3 Video Recording Mode
Make sure you set the date and time before your recording to “Protect Your Side of The Story”.
1. Press the MENU button to enter the menu screen. Press the Menu button again to go into
System settings, then select “Date Input” to enter date and time settings.
2. Press the Left/Right buttons on the Dash Cam to make changes to date or time, then
press the OK button to confirm.
By default, the system will automatically begin continuous recording a few seconds after
start-up. The Recording icon will appear on the upper right corner of the display screen.
The blue light should flash, indicating that recording is in progress. You can manually stop
the recording by pressing the OK button. Pressing the OK button again will restart contin-
uous recording.
The recorded video will be saved under the “DCIM” folder on your Dash Cam’s TF memory
card.
Night Mode
When recording at night, you can press the Power button to enable Night mode. The Night
Light LED will then enhance brightness for the recording.
• In Recording mode, press the Menu button to open video recording settings. You can
enable or disable voice recording along with video, and set recording time for video
clips: 1 mins / 3 mins / 5 mins/ 10 mins.
• When the memory card is full, new videos will record over the oldest videos.
3-3-1 Continuous Recording
7 EN
Notes
5
-
Note

You can press the OK button on the Dash Cam to begin manual recording.
Press the OK button again to stop manual recording.
Press the Mode button to exit the Recording mode.
1. When in Recording mode, press the Mode button once to select Photo mode, and the
icon will appear on the upper right corner of the display screen.
2. Press the OK button to take a picture. A shutter sound will indicate that a picture has
been successfully taken.
Press the Menu button to enter photo capture settings menu. Press the Mode button to exit
Photo mode.
1. When in Recording mode, press the Mode button three times to shift to Playback mode,
the icon will appear on the upper left corner of the display screen.
2. Press the Up/Down buttons to select your desired video clip or photo, and press the OK
button to start playback.
3. Press the Menu button to open playback settings. Press the Mode button again to exit
playback mode.
1. When in Recording mode, press the Mode button twice to shift to Voice Recording mode,
and the icon will appear on the upper right corner of the display screen.
2. Press the OK button to begin voice recording. You can stop the voice recording by press-
ing the OK button.
3. Press the Mode button again to exit the Voice Recording mode.
3-3-2 Manual Recording
3-4 Photo Mode
3-6 Playback Mode
3-5 Voice Recording Mode
8 EN

Your Dash Cam can act as a “Removable Disk”; you can copy recorded files for backup and
playback on your computer.
1. Press the Menu button twice to access System Settings on your Dash Cam, and select
USB > Disk Drive to enter Disk Drive mode.
2. Connect your supplied USB cable to the Mini USB port of the Dash Cam, and to your
computer’s USB Port, then the Dash Cam will be recognized on your PC.
3. Click to select your desired recorded files to copy and/or play back on your computer.
The Dash Cam can act as a secondary camera and take photos and videos via your desktop
computer or laptop.
To use this feature, make sure your computer’s built-in webcam is disabled.
1. Press the Menu button twice to access System Settings on your Dash Cam, and select
USB > PC Cam to enter PC Cam mode.
2. Connect the supplied USB cable to the Dash Cam’s Mini USB port, and to your comput-
er’s USB port. Click the Camera App Icon in the Start menu on your computer to open the
Camera, then the Dash Cam will be identified.
3-7-1 Playback on your computer
3-7-2 Use your Dash Cam as your computer’s webcam
3-7 Connecting to computer
3-8 Formatting TF Memory Card
We recommend you format the TF memory card every 2 weeks to maximize its lifetime.
To format the memory card, press the Menu button twice to enter system settings, select
Format, and all data will be erased.
9 EN

Use the Up/Down buttons to navigate the settings, press the OK button to select an option.
Press the Menu button again to exit settings and return to previous menu.
When in Recording mode, press the Menu button to enter Video recording settings.
Size
Set your video output resolution (1080P, 720P or VGA).
Video Time
Set the length of each video clip for a continuous recording (O, 1 min., 3 min., 5 min. or 10
min.).
Motion detect
1. To enable “Motion Detection”, check the settings menu and make sure “On” is selected.
2. When enabled in standby mode, an object coming into your camera’s field of view will
automatically begin recording. It will only stop when it doesn’t see any movement for 20
seconds.
Attention: Please do not use the Motion Detection feature while driving. The recording will
repeatedly play/pause, which will aect the video’s quality and duration.
Time stamps
Enable/Disable date and time display.
Voice Record
Allows you to turn ON and OFF audio recording for video. The default is on.
Screen Saver
Allows you to set the Auto O time for the display screen after user inactivity.
Press the OK button to wake up the display screen. If you set the Screen Saver to 3 minutes,
the display screen of the Dash Cam will automatically turn o after 3 minutes of inactivity.
The available options are O (default), 1 min., 3 min., and 5 min..
4. Settings
4-1 Video Recording Settings
3-7-1 Playback on your computer
10 EN

4-3 Playback Settings
Lock/Unlock
To lock recorded or captured media, choose an option (Lock One, Lock All, Unlock One,
Unlock All), and press Execute. When you lock a file, it is protected and cannot be replaced
by new files until you delete the file or reformat the memory card.
Delete
To delete recorded or captured media, choose Delete One or Delete All, and press Execute.
Thumbnail
Set the thumbnail view for your video. Press execute to confirm.
Volume
Adjust the video playback volume level (4,5,6).
In Playback mode, press the Menu button to enter playback settings.
4-2 Capture Settings
Size
Set the camera pixel (1.3M, 2M, 3M or VGA).
In Photo mode, press the Menu button to enter photo capture settings.
11 EN

4-4 System Settings
Date Input
Set the system date and time.
Auto O
Set the Auto O time (O, 1 Min., 3 Min.,5 Min.) in standby mode. If you set the Auto O
time to 3 minutes, the Dash Cam will automatically turn o after 3 minutes of inactivity.
Language
Set the system language.
Light frequency
Set the light frequency (50Hz, 60Hz).
Format
Format a memory card (All data will be erased). Press Excute to take eect.
System Reset
Restores the system settings to factory defauts. Press Excute to take eect.
Firmware Version
Display the system firmware version.
USB
Set the device as Removable Disk or PC Camera by connecting it to a computer via USB
cable.
Press the Menu button twice to enter system settings.
12 EN

Specifications
Model Number CDC-570
Display 2.2 inch LCD screen
Lens Wide angle lens
Languages English/Dutch/ Simple Chinese/ Japanese/French/German
/ Korean/ /Italian/Czech/Russian/Spanish/Polish
Storage TF memory card, Max 32GB
Video Resolution 1080P (FHD1920x1080), 720P (HD1280x720),
VGA (640 x480)
Photo Resolution 3M (2048x1536), 2M (1600x1200), 1.3M (1280x960),
VGA (640x480)
Video Format AVI
Photo Format JPEG
Enhanced Low Light
Recording Supported
Microphone Supported
Built-in speaker Supported
Power Input/Output Input: DC 12-24 V, Output: 5 V /0.3 A
Battery Capacity Polymer Li Battery 150 mAh
13 EN

FCC Statement
This device complies with Part 15 of the FCC Rules. Operation is subject to the following two
conditions:
(1) this device may not cause harmful interference, and (2) this device must accept any interfer-
ence received, including interference that may cause undesired operation.
Warning: Changes or modifications not expressly approved by the party responsible for com-
pliance could void the user’s authority to operate the equipment.
Note: This equipment has been tested and found to comply with the limits for a Class B digital
device, pursuant to Part 15 of the FCC Rules. These limits are designed to provide reasonable
protection against harmful interference in a residential installation.
This equipment generates, uses and can radiate radio frequency energy and, if not installed and
used in accordance with the instructions, may cause harmful interference to radio communica-
tions. However, there is no guarantee that interference will not occur in a particular installation.
If this equipment does cause harmful interference to radio or television reception, which can
be determined by turning the equipment o and on, the user is encouraged to try to correct the
interference by one or more of the following measures: (1) Reorient or relocate the receiving
antenna. (2) Increase the separation between the equipment and receiver. (3) Connect the
equipment into an outlet on a circuit dierent from that to which the receiver is connected. (4)
Consult the dealer or an experienced radio / TV technician for help.
14 EN
Disclaimer
CAR AND DRIVER IS A REGISTERED TRADEMARK OF HEARST COMMUNICATION, INC.
AND USED UNDER LICENSE BY SUMMIT ELECTRONICS, LLC.
©2022 HEARST COMMUNICATION, INC. ALL RIGHTS RESERVED AND ANY USE OF SUCH
MARKS BY SUMMIT ELECTRONICS LLC IS UNDER LICENSE.
OTHER TRADEMARKS AND TRADE NAMES ARE THOSE OF THEIR RESPECTIVE OWNERS.
All information, design and specifications contained in this manual were correct at the time of
this publication. As the product goes under continuous upgrades and changes, however, the final
device may have slight dierences. The contents of this manual are subject to change without
prior notice, and CAR AND DRIVER will not be liable for any errors contained herein or for
incidental or consequential damages in connection with the furnishing performance or use of
this manual.

SUMMIT ELECTRONICS LLC LIMITED WARRANTY (“Warranty”) ― For Product Categories
Listed in Chart Below (as applicable, “Product”) Before returning your Product for service un-
der this Warranty, please (i) read the instruction manual carefully. If you are still having trouble
with your Product, please contact Technical Support at
Warning: Some Products may contain components that are small enough to be swallowed.
Please keep out of reach of children.
Subject to the terms and conditions herein, SUMMIT ELECTRONICS LLC (hereinafter called
“SUMMIT ELECTRONICS LLC”) warrants to the original purchaser of the Product (“Custom-
er”) that for the applicable Warranty Period listed below, the Product will be free from defects
in material or workmanship under normal, non-commercial use (“Defects”). Warranty Period
encompasses, as listed below, separate “Coverage Periods” for Parts and Labor, each Coverage
Period for one year, to begin from the original date of Customer purchase. If Customer returns
a defective Product (or any component thereof) during the applicable Warranty Period, SUM-
MIT ELECTRONICS LLC will, as its option, during the specified Coverage Periods for Parts and
Labor (as applicable) either: (i) repair the Product (or, as applicable, any component thereof)
or (ii) replace the Product (or, as applicable, any component thereof) with a new or refurbished
Product (or, as applicable, any component thereof), in either case free of charge to Customer
for Parts and/or Labor (as applicable) during the specified Coverage Period only, and excluding
applicable shipping charges (noted below), for which the Customer is responsible. The forego-
ing states the Customer’s exclusive remedy and SUMMIT ELECTRONICS LLC’s sole liability for
breach of the limited warranty contained herein.
This Warranty specifically excludes any Product (or, as applicable, any component thereof)
that has been subject to or Defects resulting from: (a) any neglect or misuse by a Customer,
an accident, improper application, violation of operating instructions for the Product, any other
Customer-induced damage, or the alteration or removal of any Product serial number; (b) any
modification or repair to Product (or, as applicable, any component thereof) by any party other
than SUMMIT ELECTRONICS LLC or a party authorized in writing by SUMMIT ELECTRONICS
LLC; (c) any damage to Product (or, as applicable, any component thereof) due to power surg-
es, incorrect electrical voltage, misconnection to any device, or malfunction of any device used
with the Product (or, as applicable, any component thereof); (d) cosmetic damage to the Prod-
uct (or, as applicable, any component thereof) caused by normal wear and tear; (e) shipping
damage that occurs while the Product is in transit; (f) damage caused by heat sources, sunlight,
electromagnetic conditions, or other climatic conditions; or (g) any acts of God. Product is sold
to Customer for personal, non-commercial use only. Product is not warranted for Customer’s
commercial or rental use. In addition, Product is not warranted against failure, and should not
be used by Customer for any application where (i) there is a risk that any data stored on Prod-
uct will be breached or otherwise compromised, or (ii) the data stored on Product is relied upon
for medical or lifesaving applications.
SUMMIT ELECTRONICS LLC disclaims any Warranty for any of the foregoing uses to the full-
est extent permitted by law. Customer assumes any and all risks associated with such uses
of Product, and agrees to indemnify SUMMIT ELECTRONICS LLC for any damages claimed
against SUMMIT ELECTRONICS LLC for such uses. EXCEPT FOR EXPRESS WARRANTIES
STATED ABOVE AND TO THE MAXIMUM EXTENT PERMITTED BY LAW, THE PRODUCTS
ARE PROVIDED “AS IS”, AND SUMMIT ELECTRONICS LLC DISCLAIMS ALL OTHER
SUMMIT ELECTRONICS LLC One Year Limited Warranty
1 5 EN

WARRANTIES, INCLUDING WITHOUT LIMITATION ANY IMPLIED WARRANTY (I) OF
MERCHANTABILITY, (II) OF FITNESS FOR A PARTICULAR PURPOSE, OR (III) OF NON-IN-
FRINGEMENT OF THIRD PARTY RIGHTS. TO THE MAXIMUM EXTENT PERMITTED BY AP-
PLICABLE LAW, IN NO EVENT WILL SUMMIT ELECTRONICS LLC BE LIABLE TO CUSTOMER
OR ANY THIRD PARTY FOR ANY INDIRECT, SPECIAL, INCIDENTAL, CONSEQUENTIAL,
EXEMPLARY OR PUNITIVE DAMAGES, INCLUDING, WITHOUT LIMITATION, ANY LOST
PROFITS OR REVENUES, LOSS OR INACCURACY OF ANY DATA OR COST OF SUBSTITUTE
GOODS, REGARDLESS OF THE THEORY OF LIABILITY (INCLUDING NEGLIGENCE) AND
EVEN IF SUMMIT ELECTRONICS LLC HAS BEEN ADVISED OF THE POSSIBILITY OF SUCH
DAMAGES, SUMMIT ELECTRONICS LLC’S AGGREGATE LIABILITY TO CUSTOMER FOR
ACTUAL DIRECT DAMAGES FOR ANY CAUSE WHATSOEVER SHALL BE LIMITED TO THE
CUMULATIVE PRODUCT FEES PAID BY THAT CUSTOMER FOR THE PRODUCT CAUSING
THE DAMAGES, IF ANY. This Warranty gives Customer specific rights, and Customer may
also have other rights that vary from jurisdiction to jurisdiction. To obtain Warranty service,
Customer must email SUMMIT ELECTRONICS LLC Technical Support prior to making a
Product return. Customer must include with Product return the following items (failure to
enclose any of these items may result in a delay in the processing of your Warranty claim):
(i) a dated sales receipt that indicates the place of purchase, model number of Product, and
amount paid; (ii) a detailed description of Customer’s problem with Product; (iii) Customer’s
full name, phone number, and return address, and; (iv) a money order made out to SUMMIT
ELECTRONICS LLC to cover return shipping charges to US destinations only, for the applicable
dollar amount shown for the Product in the table above. SUMMIT ELECTRONICS LLC will not
make return shipments to a P.O. Box. For shipping to international addresses, actual freight
will be charged to Customer. Return your Product freight-prepaid in its original packaging,
or packaging that aords an equal measure of protection. Please allow 4 to 6 weeks for the
processing of your claim (6 to 8 weeks from November to February).
You must email SUMMIT ELECTRONICS LLC Technical Support prior to making a return.
*US destinations only.
16 EN

Tabla de Contenido
Precauciones y avisos......................................................................................................2
1. Conceptos básicos........................................................................................................3
1-1 En la caja..........................................................................................................................................................3
1-2 Botones y piezas...........................................................................................................................................3
2. Comenzando.................................................................................................................4
2-1 Insertar una tarjeta de memoria...............................................................................................................4
2-2 Montaje de la Dash Cam...........................................................................................................................4
2-3 Conexión de la Dash Cam a la fuente de alimentación.....................................................................5
3. Operaciones.................................................................................................................6
3-1 Encendido / apagado del dispositivo......................................................................................................6
3-2 Configuración de fecha y hora..................................................................................................................7
3-3 Modo de grabación.....................................................................................................................................7
3-3-1 Grabación continua..........................................................................................................................................7
3-3-2 Grabación manual..........................................................................................................................................8
3-4 Modo foto......................................................................................................................................................8
3-5 Modo de grabación de voz........................................................................................................................8
3-6 Modo de reproducción...............................................................................................................................8
3-7 Conexión a la computadora......................................................................................................................9
3-7-1 Reproducción o copia de seguridad en su computadora .....................................................................9
3-7-2 Use su Dash Cam como la cámara web de una computadora...........................................................9
3-8 Formateo de una tarjeta de memoria......................................................................................................9
4. Configuración.............................................................................................................10
4-1 Configuración de grabación de video ....................................................................................................10
4-2 Configuración de captura ........................................................................................................................11
4-3 Configuración de reproducción .............................................................................................................11
4-4 Configuración del sistema ......................................................................................................................12
Especificaciones..............................................................................................................13
Declaración de la FCC ....................................................................................................14
Darse cuenta.................................................................................................................. 14
Garantía limitada de un año de SUMMIT ELECTRONICS LLC ......................................15
ESPAÑOL
1 ES

Precauciones y avisos
• Debido a las leyes locales y las consideraciones de seguridad del vehículo, no opere
manualmente el dispositivo mientras conduce.
• Mantenga limpios el parabrisas y la lente de la Dash Cam para obtener una calidad de
video óptima. Si hay un objeto extraño adherido a la lente, esto podría reducir la calidad
de los videos grabados.
• Antes de colocarlo en su parabrisas, consulte con su DMV local acerca de las leyes de
tránsito que dictan el posicionamiento / método de montaje del dispositivo.
• Mantenga el dispositivo alejado del calor excesivo, como la luz solar directa, el fuego o
similares.
• Utilice cables originales o certificados.
• No utilice ningún limpiador / aceite corrosivo para limpiar.
• Mantener fuera del alcance de los niños. Contiene piezas pequeñas que pueden repre-
sentar un peligro de asfixia.
• Respete las leyes y normativas locales al utilizar el dispositivo.
• Para evitar daños a las partes o circuitos internos de su dispositivo, no lo use en ambien-
tes polvorientos, con humo, húmedos o sucios.
• No utilice, almacene ni transporte el dispositivo donde se almacenen inflamables o
explosivos. El uso de su dispositivo en estos entornos aumenta el riesgo de explosión o
incendio.
• CAR AND DRIVER NO es responsable de la pérdida de datos / contenido durante el
funcionamiento.
• CAR AND DRIVER NO garantiza el registro de accidentes en los que el impacto pueda
dañar el dispositivo.
• Instale el dispositivo cerca del espejo retrovisor de su vehículo para obtener la mejor
vista de campo abierto.
• NO instale la Dash Cam en un lugar que obstruya su vista de la carretera mientras
conduce.
• Asegúrese de que la lente esté dentro del rango de limpieza de los limpiaparabrisas para
garantizar una vista clara incluso cuando llueve.
• No toque la lente con los dedos. La grasa de los dedos que quede en la lente dará como
resultado videos o instantáneas poco claros. Limpia la lente con regularidad.
• No instale el dispositivo en una ventana tintada. Hacerlo puede dañar la película de tinte.
Asegúrese de que la vista de la cámara no se vea obstaculizada por una ventana tintada.
• Para algunos vehículos, una toma de corriente CC seguirá proporcionando energía
después de que se apague el motor. Para evitar agotar la batería de su automóvil, desen-
chufe manualmente la Dash Cam cuando el motor esté apagado.
• No desmonte este dispositivo.
• No exponga este dispositivo a la lluvia ni a la humedad ni lo sumerja en agua.
• Las temperaturas ideales son de 0 ° C a 35 ° C. Evite las temperaturas extremas.
2 ES

1. Conceptos básicos
1-1 En la caja
1-2 Botones y piezas
Rear View 13 14
15
16
17
1
No. Definición Description
1 Monitor Muestra el contenido grabado o capturado.
2 Indicador LED Indica el estado operativo del dispositivo.
3
Ranura para tarjetas TF
Ranura para tarjeta de memoria incluida.
4 Micrófono Para grabar audio.
5 Botón de encendido Mantenga pulsado durante 1 segundo para encender /
apagar manualmente el dispositivo.
6,10
Botón Izquierda / Derecha
Presione para saltar al elemento anterior / siguiente.
7 Botón de menú Presione para mostrar el menú de configuración.
8 Botón Aceptar Presione para confirmar una selección o detener la grabación.
9 Botón de modo
Presione para alternar entre el modo de grabación / foto / grabación de voz / reproducción.
11 Botón de reinicio Presione para restaurar todas las configuraciones del sistema a los
valores predeterminados de fábrica.
12 Botón de bloqueo
Manténgalo pulsado para guardar la grabación actual como archivo imborrable.
13 Ranura de montaje
Para montar el dispositivo en el parabrisas o el tablero de su automóvil.
14 Puerto mini USB
Para entrada de alimentación de CC o conexión a computadora.
15 Lente de la cámara Cámara frontal para grabación de video.
16 Luz de noche LED Para mejorar el brillo al conducir y grabar de noche.
17 Orador Para salida de sonido de audio
User Manual
Front View
10 11
12
56789
2
3
4
User Manual
3 ES
Table of contents
Languages:
Other Car and Driver Dashcam manuals

Car and Driver
Car and Driver ZX-1222 User manual

Car and Driver
Car and Driver CDC609 User manual

Car and Driver
Car and Driver CDC-646 User manual

Car and Driver
Car and Driver Eye1Pro CDC-632 User manual

Car and Driver
Car and Driver CAD-BUC100 User manual

Car and Driver
Car and Driver CDC-E4000 User manual

Car and Driver
Car and Driver MINIOPRO CDC-628 User manual

Car and Driver
Car and Driver CDC-629 User manual

Car and Driver
Car and Driver CDC-900 User manual

Car and Driver
Car and Driver CDC-634 User manual