Dasaita DAS-X9s User manual

4k Dash Camera DAS-X9s
Please read this manual carefully before using the product
Please keep this instruction manual properly
User manual

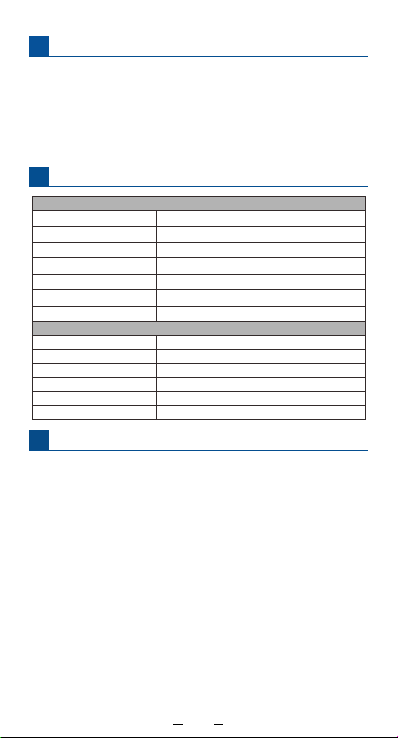
Catalogue:
1. Accessories
2. Product introduction
3. Installation Guide
4. About mobile APP
5. Main Menu
6. Introduction of Main Functions
7. Play Videos On Computer
8. Technical Specifications
9. Trouble-shooting
--------------------------------------02
-------------------02~03
------------------------03~05
-----------------------------05
----------------------------------06~07
-------------
---------------------------------------------------------07~11
-----------11~12
--------------------12
-------------------------------12

To Users:
Dear users and friends, thank you for purchasing the high-end
wireless WIFI driving recorder product produced by our
company. This product is a high-tech intelligent driving recorder
based on the smartphone platform. It is mainly used for the safe
driving of various types of automobile industry.
Precautions:
Before using the recorder, please format the TF card or built-in
memory on this device.
(1) The driving recorder can only be installed inside the car.
(2) Please do not operate this product or use the assisted driving
control APP while driving.
(3) Avoid using and storing this product at abnormal temperature.
(4) Do not use this product in an environment with strong
magnetic field or severe vibration.
(5) Only the officially configured power cords are used, and the
use of non-standard power cords may cause unforeseen
problems.
Disclaimers:
We hereby remind users to read carefully before using this
system and fully understand the terms in this statement. If you
use this system, you will be deemed to have accepted the
following terms of this statement, and you will be liable for any
irregularities due to irregularities. Consequences of use.
(1) This product is a driving assistance product. If you rely too
much on this system, it may cause a traffic accident.
(2) Due to the large viewing angle of the camera, the image
display of this product is different from the real environment,
please use it with care.
(3) Do not operate the system when driving at high speed, so as
to avoid traffic accidents caused by distraction.
(4) Do not replace product parts without the guidance of
professionals, otherwise it will cause damage to the machine.
(5) It is forbidden to put this product in wet environment and
water to avoid electric shock, unnecessary damage and fire
alarm caused by short circuit.
1
(6) The external output voltage of the host of this product is 5V,
please do not use an external power supply on this host.
(7) Illegal power failure during video recording will cause the last
video file to be damaged or lost. The recorded video is
damaged or lost due to the destructive collision of the machine
during the recording process.
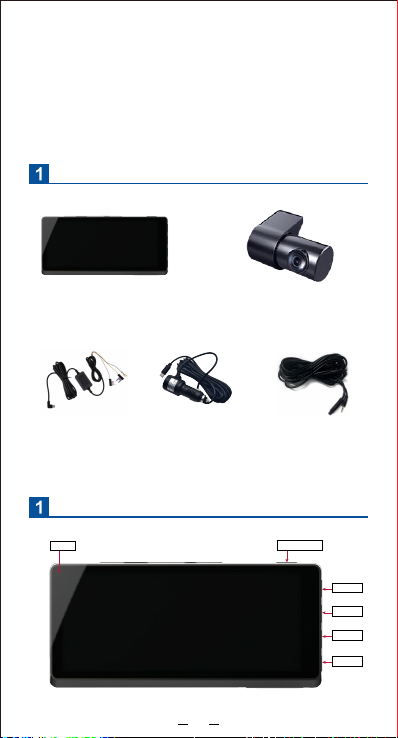
ACCESSORIES
Product introduction
(Main Device) (Rear Camera)
(ACC Hard wire) (Car charging wire)
(Rear Camera
Extension Cable)
6.LED 1.Power key
2.OK
3.Menu
4.Up
5.Down
2

2Product introduction
3Installation Guide
10. Sticker14. GPS Receiver
7. Reset
8.Micro SD 9. USB-C 13.Rear Camera Interface
12.Front Camera
11.Speake
3. Memu
6. LED
9. USB -C
12. Camera Lens
2. OK
5. Down
8. SD Slot
11. Speaker
14. GPS Receiver
1. Power
4. Up
7. Reset
10. Sticker
13. Rear Cam Input
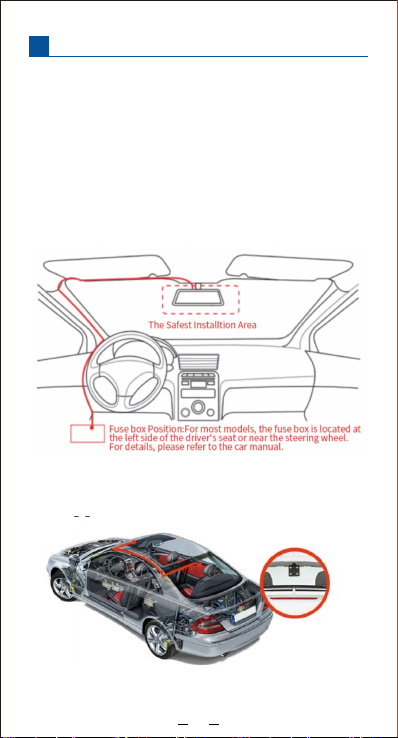
1. Turn off the car engine.
2. Find an appropriate position on the car, install the recorder, and
the installation position should not affect the driving, and then
wipe the glass of the installation position clean.
3. Adjust the lens position to ensure that the lens is level with the
ground.
4. Car Charger Version: connect the car charger to the cigarette
lighter of the dashcam, and connect he other TYPE-C to the
dash cam interface
3
3Installation Guide
6. Install the Rear Camera
Installation method 1. The position where the rear camera is
installed on the rear windshield is only for real-time rear view
4
5. The fuse box power version ( 12V to 5V ACC cable) also called
Hardware kits is connected to the matching interface B+, ACC.
GND, (optional version)
Another end of TYPE-C is connected to the TYPE-C interface of
dashcam.
Note: 1. B+ yellow wire connects to DC-12V power supply and
make it power on always.
2.The ACC red wire connects to the ignition control DC-12V
power supply.
3 .The GND black wire connects to the metal of car body

3Installation Guide
4About APP
Hint:
1. After the installation is completed, please clean the front lens
and rear lens, and check that the Sticker is firmly steady.
2. If you choose installation method 1, please clean the rear
windshield and the rear camera regularly
3. If you choose installation method 2, please clean the external
rear camera and the fixing screw for rear camera regularly
4. After installation, please adjust the camera angle to keep the
video in the middle of the road
1. Please scan the above QR code with your mobile phone,
follow the hint to download the Viidure APP and install
it successfully.
(Note: During the installation process, please follow the hint
and select all "YES" until the installation is successful)
2. Please connect the to the power supply to turn on the recorder,
select the WIFI option in the setting menu and turn it on.
3. Please check that the WIFI name on the phone is exactly the
same as the WIFI name on the recorder. SSID: DASAITA****
4. Enter the initial password: 12345678,and the phone will
automatically connect.
5.Open Viidure-APP and add the WIFI connected to the recorder.
Warning:
When the car is running, do not try to operate it, please operate
the device when the car is stopped.
(APP:Viidure)
5

5APP Main Menu
After the recorder is connected to the mobile APP, the current
real-time image of the recorder can be displayed in the APP:
1. Find the setting option at the main menu, check out the
setting option and the option of formatting TF card.
2. Find the album option at the main menu to check out
videos and photo.
1. Enlarge the picture
3. Video Resolution
5. File browse/File download
The Video And Picture Playback of APP Album
The album is where you can find everything your camera has
recorded. (including recorded videos, pictures, and locked
videos), can be edited and downloaded normally (Note: Only
share the content you download.)
6
2. Video Recording Button
4. Photo Album
6. Setting

5APP Main Menu
6Video Recording/playback:
Video Recording
When the machine is turned on, it will enter the recording mode,
and the upper left corner of the screen will display the recording
icon to start recording, and a red dot will flash on the screen
in the recording state. At the same time, during the recording,
you can’t operate the menu and change working mode. At this
time, short press OK to stop recording。
Video Playback
Playback method 1: Press and hold the M key at the photo mode ,
switch to the playback mode, and the playback icon will be
displayed in the upper left corner of the screen ;
Short press the up button to select files upwards;
Short press the key to select the file down;
Short press the OK button to play the selected video file;
Short press the menu key to enter the menu settings, where you
can delete or unlock files.
56
1. File list 2. Select 3. Play
4. Video Downloading 5. Video montage 6. Delete
7

6Video Recording/playback:
Playback method 2: Connect the TF card to the computer through
the card reader, select the content in the removable disk, and
then play back.
Parking monitoring: instant time-lapse video, ACC cable is
required
1* Select "Off" to close the parking monitoring.When the car is
turned off, the recorder will automatically shut down.
2* Select "24H",When the car is turned off, it will enter the
parking monitoring and time-lapse recording status.
In the case of not starting the car, the recorder will
automatically shut down after 24 hours of continuous work.
(Choose 12H, it will automatically shut down at 12H after
turning off the car, and select 48H, it will automatically shut
down at 48H after turning off the car)
3. When the car is turned off, it will automatically switch to
time-lapse video, which 90 minutes are saved as a 3-minute
video (saving video storage memory)
Powering on the Car automatically switches to normal
recording
4. The machine with time-lapse video is equipped with a wire
that supports a low-voltage protection box as standard.When
the detection of the car battery voltage is lower than 11.6V
(which is the low voltage),
The protection box automatically cuts off the power supply.
Formatting MICRO-SD Card
1. To ensure the compatibility of the TF card with the recorder,
the TF card needs to be formatted on the camera. This driving
recorder supports TF card up to 256GB,
TF card speed must be level 10 and above.
2. Insert the TF card into the recorder at the non-recording
situation, click the M menu button, select the format option,
Note: 1. After successful formatting, all data will be deleted.
Please remember to back up your important data on
other devices in advance.
2. Please regular formatting can effectively prevent data
loss. Under normal use, it is recommended to format
the TF card regularly every month.
8
6Video Recording/playback:
7Main Functions Introduction
3. Every time you insert a TF card, please format it inside your
dash camera to ensure that the TF card is compatible with
the camera.
The recorder starts recording when it powers on, click the OK
button (to stop recording).
Note: 1. Stop recording, the red dot icon flashing on the left
disappears;
2. It has been prompted to start recording, but the recording
time is displayed: 00:00:00, indicating that the TF card is full
3. If the loop recording is turned on, there is no need to
format the TF card, the newly recorded files will
automatically overwrite the old files
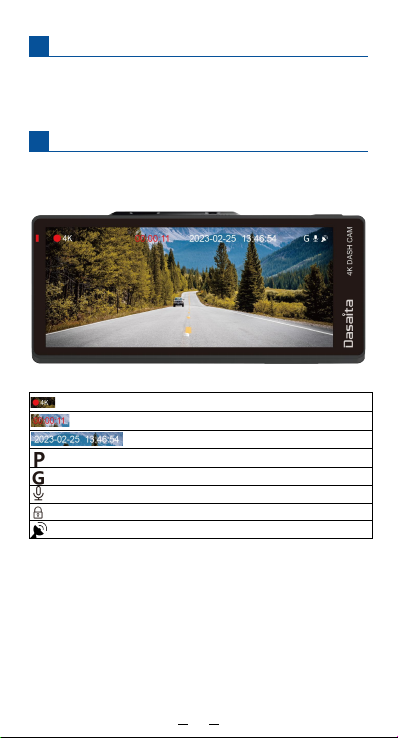
:Video Resolution
:Recording Time
:Current Date and Time
:Parking Monitoring On
:G-sensor On
:Audio Recording on or off
:Video Lock
:GPS on
9

8Setting
When the recorder is at pause , press the M key for a long time
to enter the menu "Settings" option.
Back:Return to previous interface
Resolution:Select the video recording resolution: 4K/2K/1080P,
different resolutions represent the resolution of the recorded
video
Speaker Volume:Select the external sound volume: mute/low/
medium/high, different levels represent different volume output
1. Collision Sensitivity: Select G-SENSOR: Off/High/Medium/Low,
different levels represent different G-SENSOR sensitivity.
2. The built-in G sensor will detect the collision and lock the
current video file, the locked file will not be overwritten.
3. If the road is bumpy when driving, please adjust to a low
position or turn it off directly, in case the memory card is full
and the camera can’t work.
Screen Saver:Select off/1 minute/3 minutes/5 minutes,
different times represent the time when the screen is
automatically closed, select "Off", the screen will be on
for a long time
Date/Time:Select Current Date and Time
Rear Screen flip: Represents selecting the mirror and original
video of the video of rear camera
10
8Setting
9Play Videos on your computer
Audio Recording can also be viewed on computer. For this you
need a separate TF card reader to read the files in the recorder.
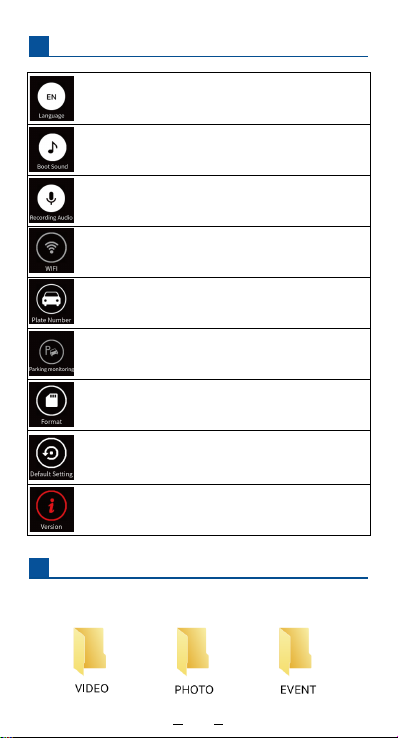
Language:Multi-language English/Simplified Chinese/Japanese,
etc., the selection matches up the current menu language
Boot Sound:Select On/Off to turn on or off the switch sound
Recording Audio: select On/Off, which means turning on or off
the audio recording
WIFI:Select On/Off, which means turning on or off WIFI (pop-up
WIFI name and password)
Plate Number:Select Settings Display license plate number
Parking monitoring: This option needs to support the ACC line
connected to the car fuse box (B+, ACC.GND) to realize time-lapse
video
Format: format the current TF card (Note: Formatting will delete
all data, please back up data in advance)
Default Setting: restore factory default settings
Version: the current software version number of the recorder
11
9Play Videos on your computer
10 Specifications:
11 Trouble-shooting
Most common Questions:
Q1: What should I do if I forget the WIFI password of the recorder?
Answer: The initial password of the recorder is: 12345678. If you
forget the password after changing it, please contact the
manufacturer to reset the software to restore the factory settings.
Q2: Why format the memory card? How often do you format the
TF card?
Answer: Regular formatting can effectively prevent data loss.
Under normal use, it is recommended to format the TF card
regularly every month. Please back up all data before formatting.
Q3: How to format the memory card?
Answer: At the main settings menu, format option, click format,
confirm the format is completed
connect the recorder in the APP, enter the setting option - select
the format option, click the format button to confirm that the
format is completed.
VIDEO: Video recorded by the recorder
PHOTO: Photos saved by the recorder
EVENT: Lock file saved by the recorder
(Note: For devices that use dual camera recording, the file name
end with "M" is called the front camera, and the file end
with "S" is called the rear camera)
Hardware Parameters:
Features:
Sensor High Definition 5M Image Sensor
Screen 4Inch IPS High Definition Screen
Video format MOV Format
Speaker Support
Working Voltage DC 5V
Storage TF Card,Maximum support 128GB high-speed card
Working Temperature(℃)(-10℃-60℃)
Language Multi Languages
Loop Recording Support
Parking Monitoring Support(Require ACC cable)
G-sensor Support
Audio Support
Storage Compression H.264 Coding
12
Table of contents


