3TO BRACE Setup guide

SET OF
INSTRUCTIONS

2

3
TABLE OF CONTENT
1. Introduction
1.1. Foreword 4
1.2. Treatment objectives
4
2. Work materials
2.1. Braces and loo s 5
2.2. Instruments 6
3. Ho to place the 3TO-Brace
3.1. Pre aring the nail fold 7
3.2. Pre aring the brace 7
3.3. Bending the 1. brace side 8
3.4. Placing the 1. brace side 11
3.5. Placing the 2. brace side 12
3.6. Installing the loo 13
3.7. Cutting off wire ends 15
3.8. Fix and seal connection area 16
4. Remove and re-adjust the 3TO-Brace
4.1. Remove the brace 17
4.2. Re-adjust the brace 18
5. Patient notes
19
6. Therapist notes
6.1. Safety hints 19
6.2. General treatment information 20
The information contained in this document must not be assed on or du licated,
ex loited or shared, unless ex ressly a roved in writing. Any violation shall result in
ayment of damages.
May 2013

4
1. Introduction
1.1. Foreword
These detailed instructions will hel rofessional thera ists to a ly
the 3TO-brace correctly. It contains ractical hints and describes all
ste s of the a lication in great detail.
Please read these instructions carefully after you have attended the
seminar and ay articular attention to the safety information for
your own and your atients’ safety.
1.2. Treatment objectives of the 3TO thera y
The 3TO thera y hel s to restore the natural growth of the damaged
nail.
The 3TO-BRACE
®
hel s to reduce ain by immediately lifting the
ingrown nail and it im roves the overall condition of the atient
quickly and effectively.
Toe before treatment Toe 10 days after start of
thera y
5
2. Work materials
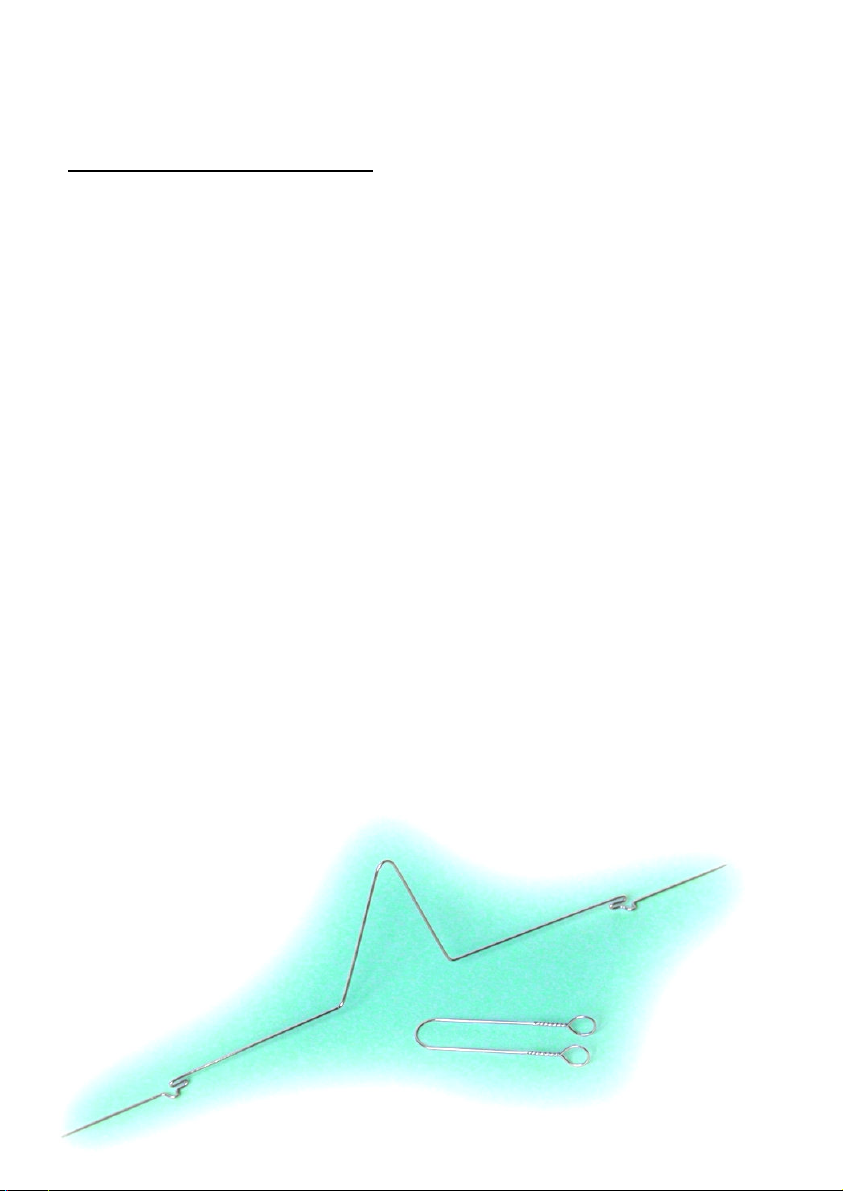
2.1. Braces and loo s
Our 3TO-Brace
®
comes in four different variants:
Normal 3TO-Brace
®
Our normal 3TO-Brace is made of 0.4 mm thick, stainless s ring
steel wire and is suitable for almost all kinds of a lications.
3TO children braces
The 3TO children brace is designed for children braces and for all
small nails and fingernails. Like the normal brace, it is 0.4 mm thick,
only the distance between the S-bend and the omega is articularly
small in this design.
Strong 3TO-Brace
®
Our strong 3TO-Brace’s sha e is similar to our normal brace, but it is
made of 0.45 mm thick wire and is used for very thick and solid nails
only. The strong loo is used in order to contract it.
Our 3TO-Loops come in two different variants:
Normal loop
Our normal loo is made of a 0.3 mm thick wire and is suitable for
most a lications.
Strong loop
The strong loo is used for thick and solid nails. Wire thickness: 0.35
mm.

6
2.2. Instruments
Side-cutting- 3TO Combination- Fixation- Hook
ni ers liers liers

7
3. How to lace the 3TO-Brace
Please ensure that the entire area to be treated is
disinfected prior to treatment:
Please use either skin disinfection (i.e. Kodan
Tinktur Forte) or
suitable skin disinfection tissues (i.e. Kodan
tissues). Please
observe the a lication times recommended by the manufacturer.
Also protect your o n health hen treating your patients
ith our brace: Please wear gloves, mask and also wear rotective
s ectacles when cli ing off the wires.
3.1. Pre aring the nail fold
Reduce mani ulation of the nail fold to a minimum before lacing the
brace in order to avoid unnecessary irritation of the wound.
lease robe for a free s ot to fasten the brace
lease clean the nail fold as required to lace the brace
3.2. Pre aring the brace
The brace must be disinfected in an immersion bath using a
disinfectant generally acknowledged by your local medical
association for hygiene and microbiology (i.e. Lysetol
®
Med). Always
follow the instructions regarding concentration and a lication times
on the ackage or in the atient information leaflets. Please rinse the
brace with clear water after disinfection.

8
3.3. Bending the hook on the first brace side
Establish a diagnosis of the anatomic sha e of the nail
Defining a connection area (2) of a rox. 5 mm width (guess by
eye) for the loo . This area is normally located in the middle of the
toe but may also be located more to the side, if the nail is heavily
war ed or rolled-in. (see Picture 1 + drawing 1a
Drawing 1a Picture 1
Bend the hook with the combination liers:
Fix the brace in the area of the omega into the fixation liers
Pre-bend the first hook with the combination liers ( ictures 2a, 2b)
Picture 2a Picture 2b

9
Press together the hook in a borehole of the combination liers.
The size of the holes will define the size of the hooks. The further
you move to the rear, the bigger the borehole.
Im ortant: The bend of the hook must be in the liers com letely
and may not look out on the other side.
Cut off the hook very short with the side-cutting ni ers (Picture 3
Picture 3

10
Deburr the hook using a sandstone milling device or a nail file
(Picture 4
Picture 4 Picture 5
Cut off the first brace side within the S-bend with the side-cutting
ni ers (Picture 5
Clam the “S-loo ” in the needle holder (Picture 6 and further
adjust the bend of the side to the war ing of the nail again.
Picture 6

11
3.4. Placing the 1. brace side
Pull down the nail fold with your thumb, insert the 1. brace side
from above into the nail fold and ress downwards – the ti of the
hook shows to the front (Picture 7
Picture 7
Turn the brace side by 90° (¼ turn) and bring it down towards the
nail (Picture 8
Picture 8
You may need to clam and fix the brace side by soft tam oning of
the nail fold with a tam onment stra .
Note: If the nail is extremely rolled in, you can fix the brace using
su erglue

12
3.5. Placing the 2. brace side
Use the same procedure like you did for the first one as described in
chapters 3.3-3.5. (Picture 9 and 10
Picture 9 Picture 10

13
3.6. Installing the loo
Place the loo around the two sides (Picture 11
Picture 11: Installing the loop
Press together the eyes of the loo s and insert the hook into both
eyes.
ress both sides at the „S-loo s“ together with your thumb and
forefinger and turn together the loo clock ise with your other
hand – while doing so, hold the loo a little downwards (Picture
12,13 . As soon as the atient feels some tension, sto turning and
remove the hook.
Picture 12 Picture 13
Check the brace for tight fit. The brace is correctly laced, when it
rovides sufficient hold and when the atient does not feel any
tension yet.

14
How to avoid tearing of the l
oo s:
▪ The tension of the 3TO-Brace is not a lied with the loo directly, but
with your thumb and forefinger instead. The loo is used for setting
and fixing afterwards. (see Picture 12
▪ While turning, lease make sure that the s iral created is located in
the middle of the two sides of the brace.
right rong
▪ While turning, the loo is slightly tightened with the hook.
▪ Hang the hook into the eyes of the loo . Do not stick it through:
right
rong
15
3.7. Cutting off the wire ends
Loo :
Cut off short - 2 threads must be maintained – hold the side-cutting
ni ers in a vertical osition to the loo and kee the cutting surface
towards the brace (Picture 14 .
Picture 14
“S-loo s of the brace”:
Hold the side-cutting ni ers in a flat osition and cut off the wire
ends in the “s-loo “.(Picture 15 and 16 – ut the fingers on the wire
ends for rotection to avoid the wire arts to jum off.
Be careful – risk of injury! – it is recommended that both the
atient and the thera ist wear rotective s ectacles.
Picture 15 Picture 16

16
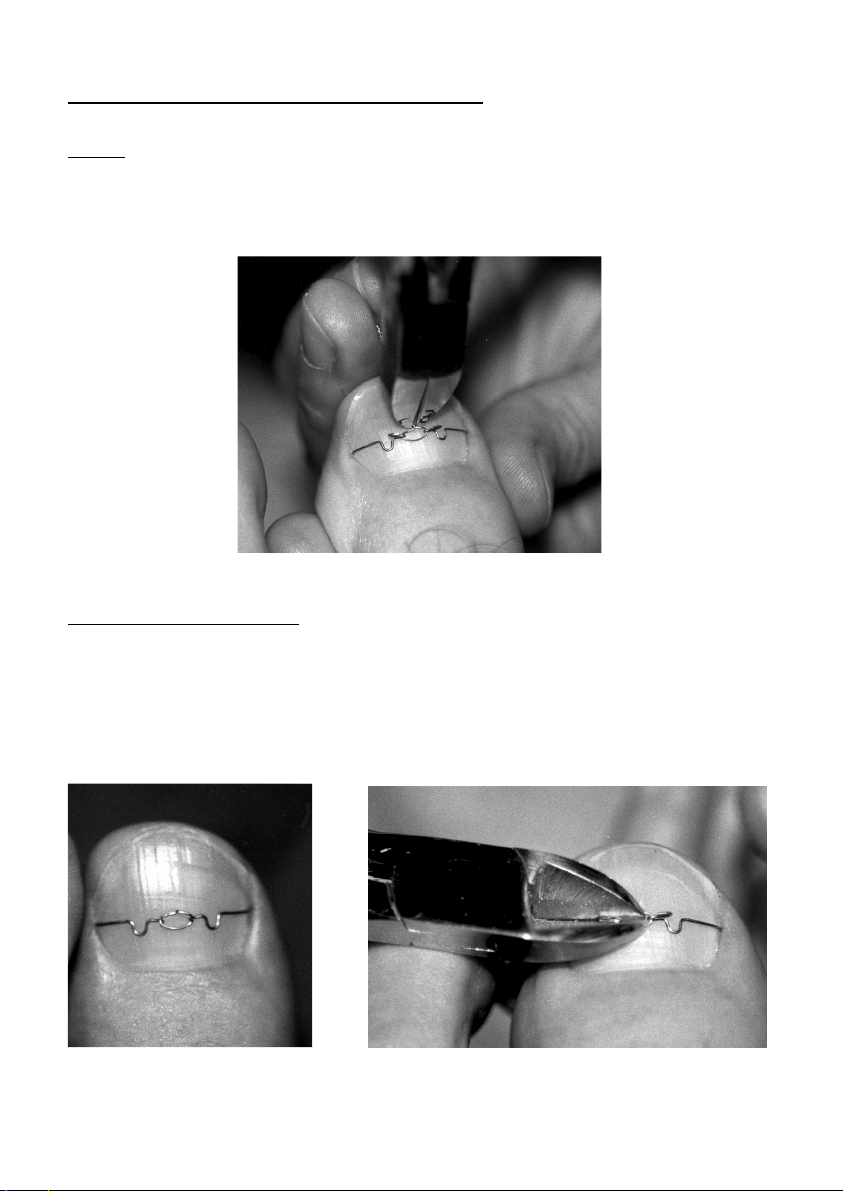
3.8. Fix and seal the connection area
Create a cover in the connection area:
Use the s atula and a ly one dro of PediGel onto all shar wire
arts (Picture 17
Picture 17
Harden the PediGel with the 3TO Micro Lam for about 30 seconds.
Kee the distance between the lam and the PediGel as short as
ossible. (Picture 18
A fluid and adhesive film will be formed on the sealing surface
during hardening. Remove this film with a swab (or anything similar)
(Picture 19
Picture 18 Picture 19

17
4. Remove and re-adjust the brace
4.1. Removing the brace
If you do not want to re-adjust the brace, you may cut off the wire at
any desired lace with the side-cutting ni ers and remove the brace
arts.
However, if you want to re-adjust the brace, the brace sides must
remain intact. That is why the brace should be cut in the middle of
the loo :
For sealing removal, use the side-cutting ni ers to se arate the
sealing from the nail late (Picture 20 .
Picture 20
You can cut through the lastic dro with the loo from the side.
Picture 21
The remaining lastic nail material on the brace sides can be
removed from the brace wire with flat liers similar to using a
nutcracker.

18
4.2. Readjusting the brace
Once the nail has ada ted the form of the brace, the brace may
become loose and may fall off. If that ha ens, it is recommended to
remove the brace and re-adjust it roximally to the revious
osition.
Before re-adjusting the brace must be disinfected in an immersion bath using a
disinfectant generally acknowledged by your local medical association for hygiene and
microbiology (i.e. Lysetol
®
Med). Always follow the instructions regarding
concentration and a lication times on the ackage or in the atient information
leaflets. Please remove any adhering contaminations and rinse the brace with clear
water after disinfection.
Please lace the two brace sides on the nail again with a new loo as
described in cha ters 3.4-3.8:
Hang the two sides into the nail fold again (see 3.4. & 3.5.
Contract the sides with a new loo (see 3.6.
Cut off any excess loo wire short – 2 threads must be maintained
– then seal it (see 3.7. & 3.8.

19
5. Patient notes
The atient should contact the thera ist right away, if he/she feels
ain shortly after installing the brace.
The reasons that cause ingrown nails should be avoided in the
future.
Use a hair-dryer to dry moist feet and nails.
No trainers or safety shoes should be worn. Change moist shoes.
Change socks (cotton) several times a day, if ossible.
Even if the atient does not feel any ain any longer, he/she should
not do s orts until the inflammation has disa eared.
The toe must be ke t absolutely dry in case of hy ergranulation
(a rox. 3 to 5 days)
; use a lastic cover in order to rotect the foot against wetness
while taking a shower.
Cut off the nails flat and slightly round them off at the edges – do
not cut or tear with the liers out of the edges.
6. Thera ist notes
6.1 Safety hints
The 3TO-Brace may only be used by trained thera ists. That is why
the brace and loo s may not be given to third arties.
The brace may not be transferred from one atient to the next!
The following side effects may occur after im ro er use:
- Stitching due to wrongly bent wire arts or wire arts that
were not deburred
- Infection due to insufficient disinfection in connection with
stitching
- Injury caused by flying wire arts when ni ed off

20
6.2 General treatment information
Any inflammatory areas must be treated.
Once the nail has ada ted the form of the brace, the brace may
become loose and may fall off. If that ha ens, it is recommended to
remove the brace and re-adjust it roximally to the revious
osition.
The tension caused by the brace is hel ful in case of an
onychomycosis (ringworm of the nail), since it rovides better access
to the areas affected that can be treated more easily.
Ask the atient to show u again for control de ending on the
severity of the condition:
- after 1-3 days in case of a severe condition
- after 3-6 days in case of mild condition
Please rovide the atient with any relevant information
- Provide information about the method of action and any ossible
undesired side effects of the brace
- Try to ex lore the causes for ingrown nails together with the
atient and come u with a ro osal how to manage the roblem in
the future.
These instructions should be used in order to avoid any
accidents and injuries and all notes and rules regarding
disinfection must be observed!
__________________________________________________
3TO GmbH
Birkenstraße 8
D-82041 Deisenhofen
Tel.: +49 89 4520833-0
Fax: +49 89 4520833-99
info@3to-gmbh.de
www.3to-s ange.com
Table of contents
Popular Medical Equipment manuals by other brands


Getinge
Getinge Arjohuntleigh Nimbus 3 Professional Instructions for use

Mettler Electronics
Mettler Electronics Sonicator 730 Maintenance manual

Pressalit Care
Pressalit Care R1100 Mounting instruction

Denas MS
Denas MS DENAS-T operating manual

bort medical
bort medical ActiveColor quick guide

AccuVein
AccuVein AV400 user manual


