manuals.online logo
Brands
  1. Home
  2. •
  3. Brands
  4. •
  5. 4M
  6. •
  7. Science Education Product
  8. •
  9. 4M Green Science Potato Clock User manual

4M Green Science Potato Clock User manual

CHOCKING HAZARD
- Small parts.
Not for Children under 3 years.
WARNING:
A. SAFETY MESSAGES
To Parents: Read all instructions before providing
guidance to your children.
1. Please read through these instructions before you start.
2. Adult supervision and assistance are required at all times.
3. Intended for children of ages 8 and up.
4. This kit and its finished product contain small parts which may cause choking if misused. Keep away from
children under 3 years old.
5. Metal parts may have sharp edges. Adult assistance is required when assembling these parts.
6. Do not connect any of the parts provided to any AC wall socket or any batteries. This may cause electric shock or
a short circuit.
7. The LCD watch may temporary lose its function at electrostatic discharge environment, but it resumes its normal
function by resetting the device.
B. CONTENTS
H. FuN FACTS
Put some soft drink into the pots provided. Insert the
copper and zinc plates into the pots, as shown in the
diagram, taking care that the metal plates do not touch
each other. The clock should now start to work. You may
experiment with different liquid like salt water, fruit
juices; or fruit like lemon, orange, tomato etc. The fun
is unlimited.
G. FuRTHER EXPERIMENTS
Digital clock with wires Pots
Transparent tapes
Copper and zinc strips
Connecting Wire
• The copper and zinc strips are called electrodes, and the potato is called an electrolyte.
• The potato battery works in the same way as the batteries used in electrical and electronic devices, such as torches,
radios and MP3 players. These batteries all contain different chemicals that produce electricity.
• Fruit and vegetables work well too. They contain plenty of particles that allow current to ow between the metal
strips.
• Battery types are named after the chemicals used inside them. Common types are zinc-carbon, nickel metal hydride
(NiMH), nickel cadmium (Ni-Cad).
• The chemicals in a battery are used up as the battery provides electricity. When no chemicals are left, the battery
is dead.
• Some batteries can be recharged when they are dead. Feeding electricity into a rechargeable battery reverses the
chemical changes inside the battery that happen when it produces electricity.
• The rst battery was made by Italian scientist Alessandro Volta (1745-1827). He built a pile of metal discs with
card soaked in salty water between them. It produced a small electric current. The battery is now known as a Voltaic
pile.
• A fuel cell is a special type of battery. It produces electricity by the reaction between two chemicals. For example,
a hydrogen fuel cell produces electricity from the reaction between hydrogen and oxygen, which produces water. The
chemicals are constantly fed into the cell, so it never runs out.
• A non-rechargeable battery can’t be recharged. Never try!
• Batteries contain some dangerous chemicals. Never open them up or cut them open, and always try to dispose of
them properly at a recycling centre.
• Copper is a very good conductor of electricity. It is used to make wires and cables.
• Zinc is used to galvanise steel objects such as garden tools and screws. The objects are coated with zinc, which
protects the steel from rusting.
I. QUESTION AND COMMENTS
We treasure you as a customer and your satisfaction with this product is important to us. In case you have any
comments or questions, or you find any parts of this kit missing or defective, please do not hesitate to contact
our distributor in your country, whose address is printed on the package. You are also welcome to contact our
marketing support team at Email: [email protected], Fax (852) 25911566, Tel (852) 28936241, Web site:
WWW.4M-IND.COM
41-03275/1
COPYRIGHT 2008 4M INDuSTRIAL DEVELOPMENT LIMITED
A
B
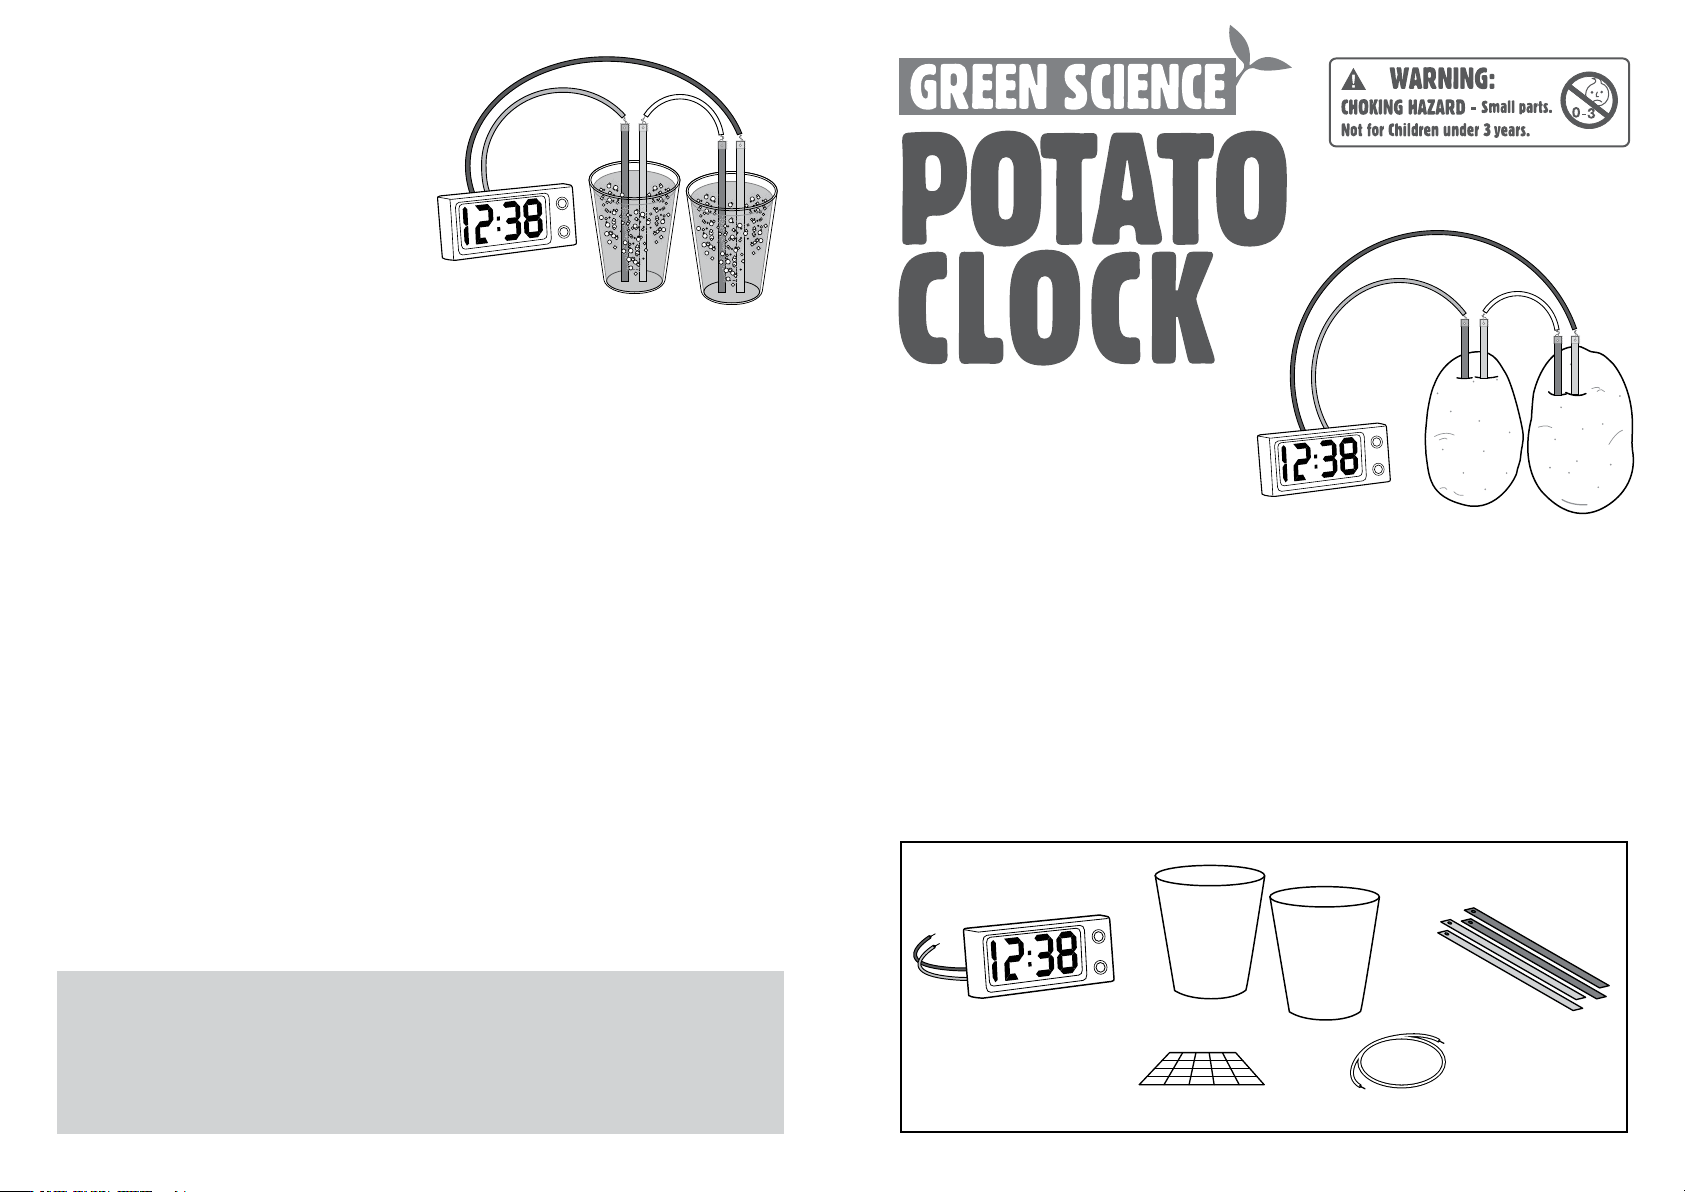
C. MAKING THE POTATO CLOCK
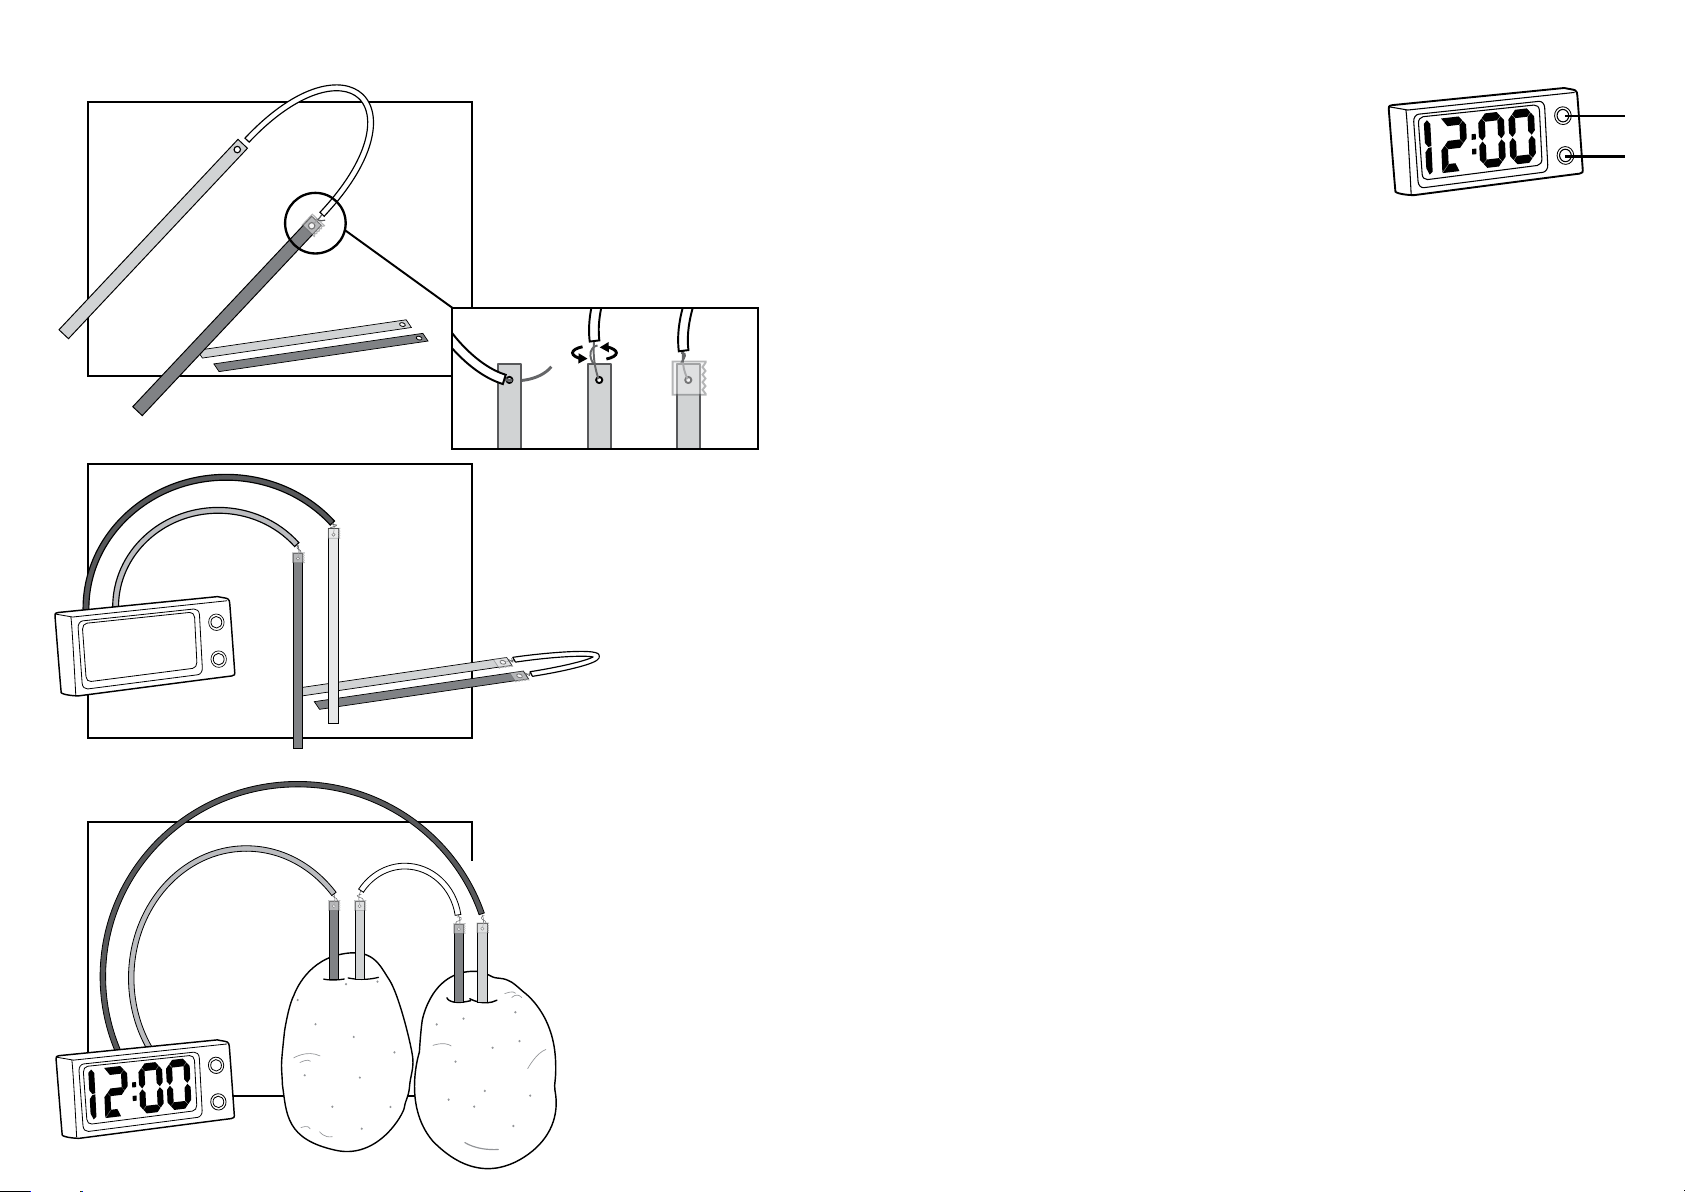
2. Afterwards, connect the black wire
from the LCD clock (negative) to one of
the zinc plates. Then connect the red wire
from the LCD clock (positive) to a piece of
copper plate. Now all the components are
connected.
3. Insert the copper and zinc plates into
the potatoes, as shown in the diagram,
taking care that the metal plates do not
touch each other. The clock should now
start to work.
D. SETTING THE CLOCK
1. Setting the clock
When all the metal plates are first inserted into the potatoes, the LED
screen will be lighted up and will show a static display of “12:00”.
Press A once, the clock will start working. You will see the two dots in the
middle start ashing.
Press B twice to obtain the set month mode, then press A to adjust to the right month. Press B to conrm and the
display will switch to the set day mode.
Press A to adjust to the right day. Press B to conrm and switch to the set hour mode.
Press A to adjust to the right hour. Press B to conrm and switch to the set minute mode.
Press A to adjust to the right minute and press B to conrm.
After the minute is confirmed, press A once. The set time will be displayed.
2. Viewing the clock
By default, the clock display shows the current time.
To view the Date: Press A once. The clock display will resume showing the current time after 2 seconds.
To view the Seconds, press A twice. To resume to current time, press A again.
E. TROuBLE SHOOTING
If your potato clock produces a weak display, try one of the following:
1. Give it time, the signal is sometimes weak at the beginning, but gets stronger after a short while.
2. Examine the metal plates for rust (oxidization). Use sand paper to remove any rust.
3. Try putting the metal plates closer together (but not touching each other). Conduction will be better if the distance
between the plates is shorter.
4. If there is no reaction whatsoever, check all the connection points. Make sure that the connection points are
correctly and rmly placed. Also, check if the polarities are correct - make sure that the negative (black wires) and
positive (red wires) terminals are connected properly.
5. Check if the metal plates/wires are touching each other, this causes short circuits.
The metal strips and potatoes make a simple battery that creates the electricity to operate the clock. Each potato
works as a device called a electrochemical cell. It converts the chemical energy stored in the metal strips into
electrical energy. Two potatoes are needed to make electricity strong enough to run the clock.
A cell works because of the chemical properties of the metals inside (in this case the copper and zinc). The different
properties cause tiny particles charged with electricity (called ions) to move between the two strips of metal. This
ow is an electric current. The potato contains the particles that allow the current to ow, but it stops the metals
touching. Electric current also ows along the wires between the zinc and copper strips and the clock. This current
makes the clock work.
F. HOW IT WORKS?
white wire
zinc plate
copper plate
1. Assemble a “connection pair” by
connecting the pair of copper and zinc
plates with a connection wire as shown.
Carefully thread the wire’s exposed
metallic end through the hole on the plate.
Gently twist the wire to secure it to the
plate. Cover and secure the connection
with the adhesive tape provided.
adhesive
tape
wire
red wire
black wire
black wire
red wire
white wire
copper plate
zinc plate
copper plate
zinc plate

Other manuals for Green Science Potato Clock

1

Other 4M Science Education Product manuals

4M Electric Dragster User manual

4M

4M Electric Dragster User manual

4M Green Science SOLAR ROVER User manual

4M

4M Green Science SOLAR ROVER User manual

Popular Science Education Product manuals by other brands

PASCO Spark SLS user guide

PASCO

PASCO Spark SLS user guide

Ambu Man manual

Ambu

Ambu Man manual

Murata GYROSTAR ENC-03JA Operation manual

Murata

Murata GYROSTAR ENC-03JA Operation manual

KOKEN LM-104 instruction manual

KOKEN

KOKEN LM-104 instruction manual

Educational Insights GeoSafari Jr. Kidscope Instruction guide

Educational Insights

Educational Insights GeoSafari Jr. Kidscope Instruction guide

Elenco Electronics Snap Circuits Beginner instruction manual

Elenco Electronics

Elenco Electronics Snap Circuits Beginner instruction manual

Opitec 111.563 instructions

Opitec

Opitec 111.563 instructions

Utopia 360 4D+ Animal Zoo user manual

Utopia 360

Utopia 360 4D+ Animal Zoo user manual

3B SCIENTIFIC PHYSICS U21910 instruction sheet

3B SCIENTIFIC PHYSICS

3B SCIENTIFIC PHYSICS U21910 instruction sheet

DEWESOFT VIBRO KIT V20-2 Technical reference manual

DEWESOFT

DEWESOFT VIBRO KIT V20-2 Technical reference manual

Dentsply Sirona Sim Multi Bench installation instructions

Dentsply Sirona

Dentsply Sirona Sim Multi Bench installation instructions

SPECTRO FES 27 Original operating instructions

SPECTRO

SPECTRO FES 27 Original operating instructions

GSC LSOPT7 quick start guide

GSC

GSC LSOPT7 quick start guide

3D Molecular Designs Dynamic DNA Kit manual

3D Molecular Designs

3D Molecular Designs Dynamic DNA Kit manual

KOKEN LM-025 instruction manual

KOKEN

KOKEN LM-025 instruction manual

PASCO ME-7001 instruction manual

PASCO

PASCO ME-7001 instruction manual

CAE Luna user guide

CAE

CAE Luna user guide

3D Molecular Designs Synapse Construction Kit Assembly instructions

3D Molecular Designs

3D Molecular Designs Synapse Construction Kit Assembly instructions

manuals.online logo
manuals.online logoBrands
  • About & Mission
  • Contact us
  • Privacy Policy
  • Terms and Conditions

Copyright 2025 Manuals.Online. All Rights Reserved.