4titude a4S Instruction manual

4titude Ltd. • The North Barn • Surrey Hills Business Park • Damphurst Lane • Wotton • Surrey • RH5 6QT
4ti-FL-0010 Quick User Guide a4S Automatic Heat Sealer VA en1/0/25/07.2015 OP
Automatic Heat Sealer a4S Quick User Guide • Version A
Note: This quick user guide is not a replacement for the a4S Operation Manual which must be read before using the heat sealer
for the rst time. All users must know and observe all safety instructions as detailed in the operation manual.
Important!
Shipping Bracket
The a4S is shipped with a transportation bracket to prevent the plate shuttle moving during shipping. It is essential that this
bracket is removed before the unit is powered up for the rst time.
Sensor Protection Screw
To protect the rear foil sensor during transportation, the a4S is shipped with a protective screw highlighted with a white washer,
inserted into the rear of the instrument. Before the unit is switched on, please make sure that the screw is removed from the
instrument and retained with the other transportation packaging.
Please also refer to the a4S Operation Manual.
Operation of the a4S Automatic Heat Sealer
1. Connect the power cord and turn on the device.
2. Place the seal roll, along with its holder, on the device
locating the ends of the Axle in either Seal Roll Support 1
or 2. The orientation of the seal roll should be as indicated
by the purple arrow.
Seal Roll Support 1
(seal roll with large diameter)
Seal Roll Support 2
(seal roll with small diameter)
3. Perform the seal roll loading procedure (Please refer
to the a4S Operational Manual, section 2.4 Seal Roll
Loading Procedure).
4. Perform the ne adjustment of the seal position (Please
refer to the a4S Operational Manual, section 2.5 Fine
Adjustment of the Seal Position).
5. Adjust sealing temperature and time settings (Please see
reverse page).
6. Place the plate to be sealed on the plate carrier, using
an appropriate adaptor if necessary (Please see section
Plate Adaptors).
7. The
Seal
icon will remain grey while the unit is heating
or cooling. Once the set temperature is reached, the icon
will turn green.
8. Sealing can then commence by touching
Seal
Plate Adaptors
Plate Type / Plate Height Adaptor / Side of adaptor to use
96well PCR plates
0116
14.4 mm
0120
26.54 mm
0136
41.20 mm
0960
16.1 mm
0384
10.6 mm
Adaptor B
Side with 96 holes
384well PCR plates
0116
14.4 mm
0120
26.54 mm
0136
41.20 mm
0960
16.1 mm
0384
10.6 mm
Adaptor B
Side with 384 holes
1536well plates,
standard height plates
0116
14.4 mm
0120
26.54 mm
0136
41.20 mm
0960
16.1 mm
0384
10.6 mm
4mm ‒ 20mm
Adaptor B
Side with 384 holes
Mid-height plates
0116
14.4 mm
0120
26.54 mm
0136
41.20 mm
0960
16.1 mm
0384
10.6 mm
14mm ‒ 33mm
Adaptor A
Deep well plates
0116
14.4 mm
0120
26.54 mm
0136
41.20 mm
0960
16.1 mm
0384
10.6 mm
34mm ‒ 53mm
No adaptor needed

4titude Ltd. • The North Barn • Surrey Hills Business Park • Damphurst Lane • Wotton • Surrey • RH5 6QT
Protocol and Password Settings
Creating a Protocol
• Touch
Protocol
in the left hand corner of the main screen.
• Touch
New
to create a new protocol.
• Touch the respective columns and key-in the desired
name, sealing temperature, sealing time and any additional
information to your protocol.
• Touch
Save
to store your protocol.
• Select your Protocol Security Level:
Low Level Security
High Level Security
No Password Protection (do not touch , touch
Enter
to leave this window)
• Touch
Select
to go back to the main screen.
Editing a Stored Protocol*
• Touch
Protocol
in the left hand corner of screen.
• Touch the column you would like to edit.
• Key-in the desired temperature, time or note.
• Touch
Save
to store your new settings and
Return
to
go back to the main screen.
Selecting a Protocol*
• Touch the desired protocol in the list.
• Touch
Select
.
• Touch
Return
to return to the main screen.
• The protocol setting will appear on the main screen.
Deleting a Stored Protocol*
• Touch the protocol you want to delete in the list.
• Touch
Delete
.
• A warning message will appear for conrmation.
• Touch
Yes
and the protocol will be deleted.
• Touch
Esc
if you don’t want to delete the protocol.
*Note: You may need to enter a password depending
on the level of security that was set with any particular
protocol. Keying-in the password is required for editing,
deleting or selecting a protected protocol.
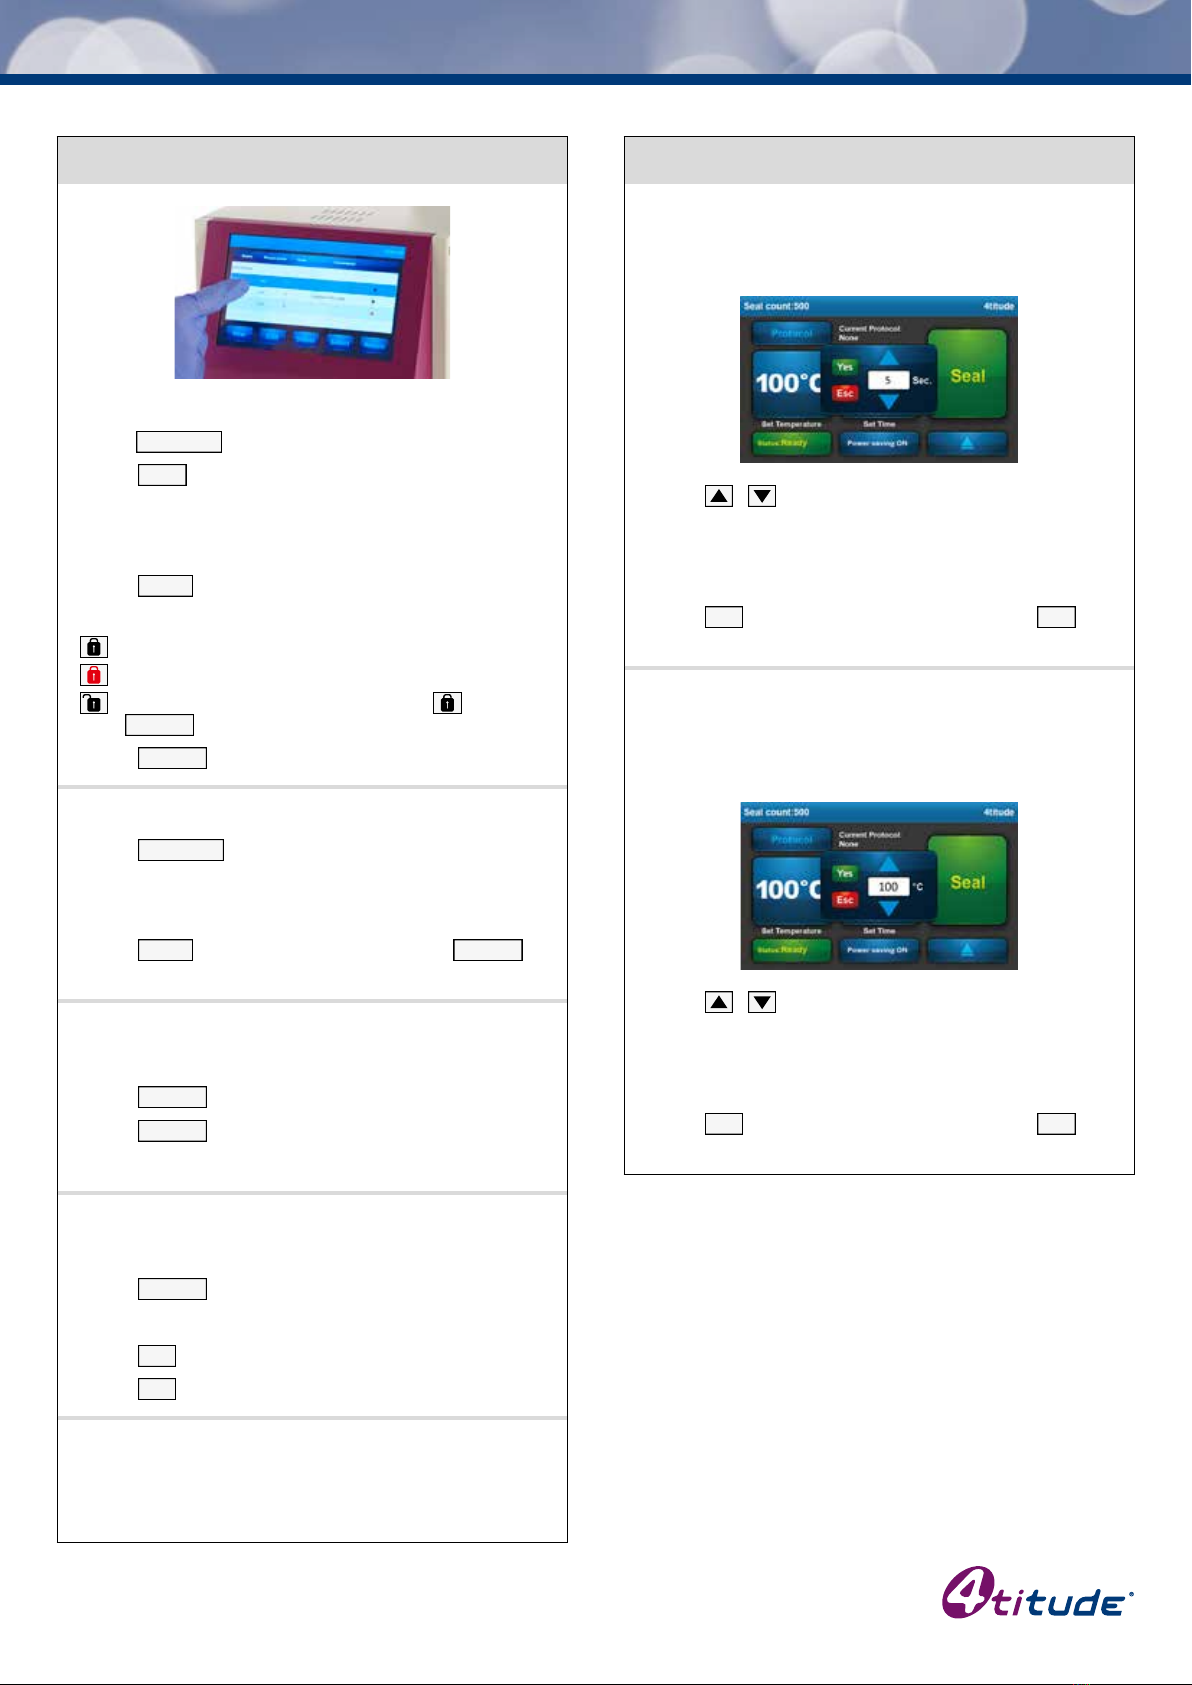
Setting the Sealing Parameters
Time Setting
• Touch the icon on the touch screen showing the current
sealing time. The time adjustment window will pop-up.
• Touch / to adjust the time setting to your desired
sealing time. Pressing the touch screen repeatedly will
adjust the time in 0.5 second intervals. Pressing and
holding your nger on the screen will initiate scrolling
through the time settings.
• Touch
Yes
to conrm the displayed setting, or
Esc
to
revert to the original setting.
Temperature Setting
• Touch the icon on the touch screen showing the current
sealing temperature. The temperature adjustment window
will pop-up.
• Touch / to adjust the temperature setting to your
desired sealing temperature. Pressing the touch screen
repeatedly will adjust the temperature in 1 degree intervals.
Pressing and holding your nger on the touch screen will
initiate scrolling through the temperature settings.
• Touch
Yes
to conrm the displayed setting, or
Esc
to
revert to the original setting.
Other 4titude Food Saver manuals