A.I.&.E Toronto User manual

871125224943
A.I.&E. Adriaan Mulderweg 9-11,
5657 EM Eindhoven, The Netherlands
Edco UK Ltd,Two Chamberlain Square,
Birmingham B3 3AX,
United Kingdom
UK Electric heater with replace effect
DE Elektrische Heizung mit Holzfeuereffekt und Kaminsims
FR Chauffage électrique, effet cheminée et manteau de cheminée
NL Elektrische kachel met haardeffect en schoorsteenmantel
IT Radiatore elettrico con effetto caminetto e mensola
ES Chimenea eléctrica con efecto llama y repisa
Instruction manual
Bedienungsanleitung
Manuel d’utilisation
Gebruiksaanwijzing
Manuale di istruzioni
Manual de instrucciones
TORONTO

TORONTO
INSTRUCTION MANUAL
Model: RO2716-32Z
Item number 871125224943
A.I.&E Adriaan mulderweg 9-11
5657 EM Eindhoven
The Netherlands
ATTENTION:
1. Find a location for the electric heater that is protected
from direct sunlight.
2. Do not plug the electric heater into the power outlet
before you read all instructions.
3. READ ALL INSTRUCTIONS BEFORE USE
AND SAVE IT.

Important
• Please read all instructions carefully before using
this product.
• Make sure that the voltage rating label on the type
plate corresponds to your main voltage. If not see
your retailer and do not connect the appliance.
• Never use the appliance unsupervised when in
use.
• If you have to leave even for a short moment
please stop the appliance.
• Keep out of reach of children and do not allow
them to operate this appliance
• Only use the appliance for domestic purposes and
in the way indicated in these instructions.
• From time to time check the cord for damages.
Never use the appliance if the cord or any part of
the appliance shows any signs of damage.
• If the supply cord is damaged, it must be replaced
by the manufacturer, its service agent or similarly
qualied persons in order to avoid a hazard.
• Make sure the connection cord does not touch
any hot surfaces.
• WARNING: In order to avoid overheating, do not
cover the heater.
• Keep the appliance at least 15cm (6inches) from
side walls and any other objects, to permit a good
air circulation.
• Do not use the appliance outdoors
• Do not use if you have wet hands.

• Never use the appliance on or near hot surfaces.
• Never move the appliance by pulling the cord.
• Before cleaning the appliance, make sure it is
unplugged from the power and that it is completely
cooled.
• Do not clean the appliance with abrasive
chemicals.
• Never use accessories that are not recommended
or supplied by the manufacturer. It could cause
danger to the user or damage to the appliance
• Never route the mains cable beneath carpet.
• Never use the heater to dry clothes or any other
similar items.
• The heater must not be located immediately below
a socket outlet.
• This heater must not be used with an extension
lead.
• Dot use this heater with a programmer, timer
or any other device that switches the heater on
automatically, since a re risk exists if the heater
is covered or positioned incorrectly.
• Do not use this heater in the immediate
surroundings of a bath, a shower or a swimming
pool.
• CAUTION: In order to avoid a hazard due to
inadvertent resetting of the thermal cutout, this
appliance must not be supplied through an
external switching device, such as a timer, or
connected to a circuit that is regularly switched on
and off by the utility.
• This appliance can be used by children aged from
8 years and above and persons with reduced

physical, sensory or mental capabilities or lack
of experience and knowledge if they have been
given supervision or instruction concerning use of
the appliance in a safe way and understand the
hazards involved. Children shall not play with the
appliance. Cleaning and user maintenance shall
not be made by children without supervision.
• Children of less than 3 years should be kept away
unless continuously supervised.
• Children aged from 3 years and less than 8 years
shall only switch on/off the appliance provided
that it has been placed or installed in its intended
normal operating position and they have been
given supervision or instruction concerning use of
the appliance in a safe way and understand the
hazards involved. Children aged from 3 years and
less than 8 years shall not plug in, regulate and
clean the appliance or perform user maintenance.
• CAUTION — Some parts of this product can
become very hot and cause burns. Particular
attention has to be given where children and
vulnerable people are present.
• WARNING: This heater is not equipped with a
device to control the room temperature. Do not
use this heater in small rooms when they are
occupied by persons not capable of leaving the
room on their own, unless constant supervision is
provided.

Electrical Parameter model: RO2716-32Z
Power supply: AC220-240V
Frequency: 50-60Hz
Power: 2000W
Dimensions WxDxD(mm): 812x220x410
Weight (KG): 16,5
NOTE: If the supply cord is damaged, it must be replaced by the manufacturer,
its service agent or similarly qualied persons in order to avoid a hazard.
Meaning of crossed –out wheeled dustbin:
Do not dispose of electrical appliances as unsorted municipal waste, use
separate collection facilities.
Contact your local government for information regarding the collection systems
available.
If electrical appliances are disposed of in landlls or dumps, hazardous
substances can leak into the groundwater and get into the food chain, damaging
your health and well-being.
Parts list
REF NO DESCRIPTION QTY
A 3 PCS
B 3 PCS
C 1 PC

Installation
Please be aware: that no products should be sealed against the wall/opening as
this can effect the performance of the heater unit.
Minimum Installation Height:
From oor level to bottom edge of product, Minimum 300mm.
This suite is supplied with a wall xing Bracket. The suite can be installed
at any height as long as it is not below the recommended 300mm. (Please
note the 700mm measurement is given as a common installation height). The
recommended installation height is a minimum of 300mm from the oor level to
the underside of the hearth.
Warning: Installing this product below 300mm will
cause overheating issues.
The suite is designed as a wall mounted suite; it is
not suitable to be installed at oor level.
Installation:
This model is provided with a wall mounting bracket along with x3 screws and
wall plugs.
PLEASE NOTE: The screws and plugs provided are only suitable for a solid wall
xing. If the installation is onto a hollow/stud wall, we recommend that heavy
duty wall anchors or equivalent are used.

To install the product:
1. Measure 700mm from the oor level up the wall, Mark this measurement
with a pencil.
2. Place the bottom edge of the wall bracket on the 700mm mark, level using a
spirit level and mark and drill the x3 xing holes.
3. Using the correct wall xings screw and x the wall bracket in place.
4. Locate the x3 slots in the rear of the product, carefully align these slots with
the prongs on the wall bracket, lift and slot the product into place.
5. Locate the power cable socket on the bottom right hand side, underneath the
hearth on the re, and plug the power lead in.
6. Keep the appliance at least 15cm (6inches) from side walls and any other
objects, to permit a good air circulation.
7. The product is now ready to use.
Operating Instructions
Once the electric heater has been properly installed and connected to a ground
electrical outlet, it is ready to operate.
Note: Ensure the circuit breakers for the power supply are turned on.
The heater controls are located right of the heater outlet.
Control Panel
LED Screen Remote Control
O/I: Press this switch, the unit power-on. When the O/I switch is turned off, all
other functions will stop even though the buttons may be in the ON position.
: Press this button, the unit will enter standby mode. The unit will beep and
the indicator light will be on. Then you can select the following functions as
desired. Press again to turn off the heater.

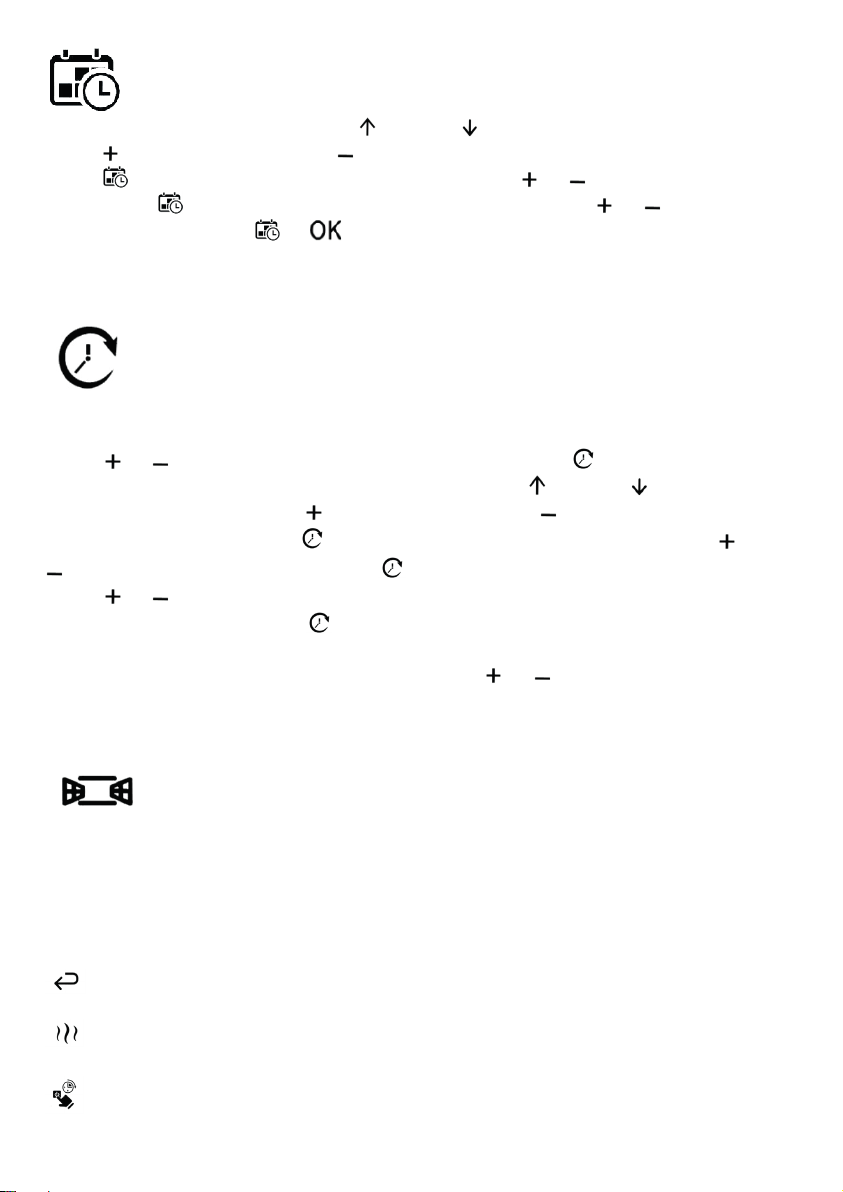
: For modication time function - Press this button, the ‘SUN’ on the LED
screen starts to twinkle. Press up or down button to the desired date, and
press button to select, press button to cancel. After set the desired date,
press button switch to the ‘hour’ position. Press or button to the desired
hour. Press button switch to the ‘minute’ position. Press or button to the
desired minute. Press or button to complet date setting.
NOTE: The date will be reset after power interrupt.
: For automatic working time setting function - There are 10 time
periods you can set to make the unit work automatically. Press this button,
time serial number starts to twinkle. The ‘ON’ on the LED screen lights up.
Press or button to the desired serial number. Press button again, the
‘SUN’ on the LED screen starts to twinkle. Press up or down button to
the desired date, and press button to select, press button to cancel. After
set the desired date, press button switch to the ‘hour’ position. Press or
button to the desired hour. Press button switch to the ‘minute’ position.
Press or button to the desired minute. At this time you have completed
the boot time setting. Press button again, the ‘ON’ extinguished and the
‘OFF’ lights up. Complete the shutdown time in the same way. Finally, you need
to set a temperature which stop heating. Press or button to the desired
temperature. When desired ambient temperature is reached, the heater will
automatically stop heating.
: For Window detection function - Press this button to turn on the
window detection function. During the heating process, if the room temperature
drops obviously caused by the outdoor cold air blowing, such like open windows
or open the door. In order to save energy, the heater will automatically stop
heating. The corresponding icon on the screen will twinkle. Press again to turn
off the window detection function to normally heating.
: For reset function - Press this button to clear the Timing parameters.
: For heat function - Press this button to turn on the heat function.
Press again to turn off.
: For timer function - Press this button to turn on the timer function.
Press again to turn off.

Note: the working state of the time period is the same as that before start timer
function. That is to say, adjust the working state you want and turn on the timer
function, then the machine will work according to your working state in the
time period.
: For ame function - Press this button to turn on the ame.
Press again to turn off.
: For ame effect function - Press this button to change ame effect.
Press again to decrease the ame intensity. There are 4 light intensities for your
selection. The ame optics will go lower under the sequence of 4,3,2 and 1.
Pressing the button again will go higher under the sequence of 1,2,3 and 4.
NOTE: After the display screen is extinguished, it can be activated by any key.
NOTE: In the absence of timing mode, you can press or button to the
desired temperature directly. When desired ambient temperature is reached, the
heater will automatically stop heating.
Fast Menu:
Press the standby button and the heating button, the unit can heating
immediately.

Maintenance:
WARNING: Completely disconnect power before attempting any
maintenance or cleaning, to reduce the risk of re or electric shock.
Maintenance should only be performed by a certied technician.
Cleaning:
Before cleaning any parts of the replace make sure to rst turn off the
controls and then unplug the unit from power source.
CAUTION: Wait until the unit has completely cooled before attempting
any cleaning.
Cleaning Glass Panel: Remove dust with clean dry cloth. Remove
ngerprints and other marks from glass door by using a clean damp cloth.
Do not use abrasive cleaners or spray liquids on glass door surfaces.
Metal and metal painted parts should be cleaned with clean damp cloth only.
Do not use abrasive cleaners or spray liquids on these surfaces.

Information requirements for electric xed local space heaters
Model identier(s): RO2716-32Z
Item Symbol Value unit Item unit
Heat output Type of heat input, for electric storage local
space heaters only (select one)
Nominal heat output Pnom 2,0 kW manual heat charge control, with
integrated thermostat [no]
Minimum heat output
(indicative) Pmin 0 kW Manual heat charge control with room
and/or outdoor temperature feedback [no]
Maximum continuous
heat output Pmax,c 2,0 kW
Electronic heat charge control with
room and/or outdoor temperature
feedback
[no]
Auxiliary electricity
consumption Fan assisted heat output [no]
At nominal heat output elmax 0 kW Type of heat output/room temperature
control (select one)
At minimum heat
output elmin 0 kW single stage heat output and no room
temperature control [no]
In standby mode elsb 0 kW Two or more manual stages, no room
temperature control [no]
with mechanic thermostat room
temperature control [yes]
with electronic room temperature
control [no]
electronic room temperature control
plus day timer [no]
electronic room temperature control
plus week timer [yes]
Other control options (multiple selections
possible)
room temperature control, with
presence detection [no]
room temperature control, with open
window detection [yes]
with distance control option [no]
with adaptive start control [no]
with working time limitation [yes]
with black bulb sensor [no]
Contact details:
A.I.&E Adriaan mulderweg 9-11
5657 EM Eindhoven
The Netherlands

13
TORONTO
BEDIENUNGSANLEITUNG
Modell: RO2716-32Z
Artikel-Nummer 871125224943
A.I.&E Adriaan Mulderweg 9–11
5657 EM Eindhoven
Niederlande
ACHTUNG:
1. Wählen Sie für das elektrische Heizgerät einen
Standort, der vor direkter Sonneneinstrahlung
geschützt ist.
2. Stecken Sie das elektrische Heizgerät nicht an die
Steckdose, bevor Sie alle Anweisungen gelesen haben.
3. LESEN SIE VOR DER VERWENDUNG DES GERÄTS
ALLE ANWEISUNGEN UND BEWAHREN SIE DIESE
BEDIENUNGSANLEITUNG AUF.

14
Wichtig
• Bitte lesen Sie alle Anweisungen sorgfältig durch,
bevor Sie dieses Produkt verwenden.
• Vergewissern Sie sich, dass die
Spannungsangabe auf dem Typenschild mit Ihrer
Netzspannung übereinstimmt. Wenn dies nicht
der Fall ist, wenden Sie sich an Ihren Fachhändler
und schließen Sie das Gerät nicht an.
• Verwenden Sie das Gerät niemals unbeaufsichtigt,
wenn es in Betrieb ist.
• Wenn Sie das Gerät auch nur für einen kurzen
Moment unbeaufsichtigt lassen müssen, schalten
Sie es bitte aus.
• Bewahren Sie das Gerät außerhalb der
Reichweite von Kindern auf und erlauben Sie
ihnen nicht, das Gerät zu bedienen
• Verwenden Sie das Gerät nur für
Haushaltszwecke und in der in dieser Anleitung
angegebenen Weise.
• Überprüfen Sie das Kabel von Zeit zu Zeit auf
Beschädigungen. Verwenden Sie das Gerät
niemals, wenn das Kabel oder ein Teil des Geräts
Anzeichen von Schäden aufweist.
• Wenn das Versorgungskabel in irgendeiner Weise
beschädigt ist, muss es zur Gefahrenvermeidung
vom Hersteller, dessen Kundendienst oder ähnlich
qualizierten Personen ausgetauscht werden.
• Achten Sie darauf, dass das Anschlusskabel keine
heißen Oberächen berührt.

15
• WARNUNG: Um Überhitzung zu vermeiden,
decken Sie das Gerät nicht ab.
• Halten Sie das Gerät mindestens 15 cm von
Seitenwänden und anderen Gegenständen
entfernt, um eine gute Luftzirkulation zu
ermöglichen.
• Verwenden Sie das Gerät nicht im Freien
• Verwenden Sie das Gerät nicht mit nassen
Händen.
• Verwenden Sie das Gerät niemals auf oder in der
Nähe von heißen Oberächen.
• Bewegen Sie das Gerät niemals durch Ziehen am
Kabel.
• Vergewissern Sie sich vor der Reinigung des
Geräts, dass es vom Stromnetz getrennt und
vollständig abgekühlt ist.
• Reinigen Sie das Gerät nicht mit scheuernden
Chemikalien.
• Verwenden Sie niemals Zubehör, das nicht vom
Hersteller empfohlen oder bereitgestellt wird. Dies
könnte zu einer Gefährdung des Benutzers oder
einer Beschädigung des Geräts führen
• Verlegen Sie das Netzkabel niemals unter einem
Teppich.
• Verwenden Sie das Heizgerät niemals zum
Trocknen von Kleidung oder ähnlichen
Gegenständen.
• Das Heizgerät darf sich nicht unmittelbar unter
einer Steckdose benden.

16
• Dieses Heizgerät darf nicht mit einem
Verlängerungskabel verwendet werden.
• Verwenden Sie dieses Heizgerät nicht mit einem
Programmsteuergerät, einem Timer oder einem
anderen Gerät, das das Heizgerät automatisch
einschaltet, da eine Brandgefahr besteht, wenn
das Heizgerät abgedeckt oder falsch positioniert
ist.
• Verwenden Sie dieses Heizgerät nicht in der
unmittelbaren Umgebung einer Badewanne, einer
Dusche oder eines Schwimmbeckens.
• ACHTUNG: Um eine Gefährdung durch
versehentliches Rücksetzen des Thermoschutzes
zu vermeiden, darf dieses Gerät nicht über
eine externe Schalteinrichtung, wie z. B. einen
Timer, versorgt oder an einen Stromkreis
angeschlossen werden, der regelmäßig vom
Versorgungsunternehmen ein- und ausgeschaltet
wird.
• Dieses Gerät kann von Kindern ab 8 Jahren
und Personen mit eingeschränkter körperlicher,
sensorischer oder geistiger Leistungsfähigkeit
oder mangelnder Erfahrung und unzureichendem
Wissen nur dann verwendet werden, wenn diese
beaufsichtigt werden oder eine Unterweisung in
der sicheren Verwendung des Geräts erhalten
haben sowie die damit verbundenen Gefahren
verstehen. Kinder dürfen nicht mit dem Gerät
spielen. Reinigung und Wartung des Geräts
dürfen von Kindern nur unter Aufsicht eines
Erwachsenen durchgeführt werden.
• Kinder unter 3 Jahren müssen vom Gerät

17
ferngehalten werden, wenn sie nicht
ununterbrochen unter Aufsicht eines Erwachsenen
stehen.
• Kinder im Alter von 3 bis 7 Jahren dürfen das
Gerät nur dann ein- und ausschalten, wenn es
in der vorgesehenen normalen Betriebsposition
aufgestellt oder installiert ist und sie beaufsichtigt
oder bezüglich des sicheren Gebrauchs des
Geräts unterwiesen wurden sowie die damit
verbundenen Gefahren verstehen. Kinder im
Alter von 3 Jahren bis 8 Jahren dürfen das Gerät
nicht mit der Steckdose verbinden, Einstellungen
vornehmen oder die Reinigung bzw. Wartung
durchführen.
• VORSICHT — Einige Teile dieses Produkts
können sehr heiß werden und Verbrennungen
verursachen. Bei Anwesenheit von Kindern
und schutzbedürftigen Personen ist besondere
Aufmerksamkeit erforderlich.
• WARNUNG: Dieses Heizgerät ist nicht mit einer
Vorrichtung zur Regelung der Raumtemperatur
ausgestattet. Verwenden Sie dieses Heizgerät
nicht in kleinen Räumen, wenn diese von
Personen bewohnt werden, die nicht in der Lage
sind, den Raum selbstständig zu verlassen,
es sei denn, es wird eine ständige Aufsicht
gewährleistet.

18
Elektrisches Parameter-Modell: RO2716-48Z
Stromversorgung: AC 220 – 240 V
Frequenz: 50 – 60 Hz
Stromversorgung: 2000 Watt
Maße B × H × T (mm): 812x220x410
Gewicht (kg): 16,5
HINWEIS: Wenn das Versorgungskabel in irgendeiner Weise beschädigt ist,
muss es zur Gefahrenvermeidung vom Hersteller, dessen Kundendienst oder
ähnlich qualizierten Personen ausgetauscht werden.
Bedeutung des durchgekreuzten Mülleimers mit Rädern:
Elektrogeräte nicht im unsortierten Hausmüll entsorgen, sondern bei einer
separaten Sammelstelle abgeben.
Wenden Sie sich an die örtlichen Behörden, um Informationen zu den
verfügbaren Sammelsystemen zu erhalten.
Wenn Elektrogeräte auf Deponien oder Müllhalden entsorgt werden, können
gefährliche Stoffe in das Grundwasser und in die Nahrungskette des Menschen
gelangen und Ihre Gesundheit sowie Ihr Wohlbenden beeinträchtigen.
Teileliste
REF-NR BESCHREIBUNG MENGE
A 3 STÜCK
B 3 STÜCK
C 1 STÜCK

19
Installation
Bitte beachten Sie: dass keine Produkte gegen die Wand/Öffnung abgedichtet
werden dürfen, da dies die Leistung der Heizeinheit beeinträchtigen kann.
Minimale Installationshöhe:
Vom Boden bis zur Unterkante des Produkts mindestens 300 mm.
Diese Garnitur wird mit einer Wandbefestigungskonsole geliefert.
Die Garnitur kann in jeder beliebigen Höhe installiert werden, solange sie nicht
unter den empfohlenen 300 mm liegt. (Bitte beachten Sie, dass das Maß von
700 mm als übliche Installationshöhe angegeben ist).
Die empfohlene Installationshöhe beträgt mindestens 300 mm vom Boden bis
zur Unterseite der Feuerstelle.
Warnung: Wenn Sie dieses Produkt unterhalb
einer Höhe von 300 mm installieren, kann es zu
Überhitzungsproblemen kommen.
Die Garnitur ist als Wandgarnitur konzipiert. Sie ist
nicht für eine bodennahe Montage geeignet.
Installation:
Dieses Modell wird mit einer Wandhalterung zusammen mit 5 Schrauben und
Dübeln geliefert.
BITTE BEACHTEN SIE: Die mitgelieferten Schrauben und Dübel sind nur
für eine feste Wandmontage geeignet. Wenn die Installation an einer Hohl-/
Bolzenwand erfolgt, empfehlen wir die Verwendung von Schwerlastdübeln oder
gleichwertigen Dübeln.

20
So installieren Sie das Produkt:
1. Messen Sie 700 mm vom Boden aus die Wand hinauf und markieren Sie
diesen Abstand mit einem Bleistift.
2. Legen Sie die Unterkante der Wandhalterung auf die 700-mm-Markierung,
richten Sie sie mit einer Wasserwaage aus und markieren und bohren Sie
die 5 Befestigungslöcher.
3. Schrauben Sie die Wandhalterung mit den richtigen Wandbefestigungen an
und xieren Sie sie.
4. Suchen Sie die 5 Aussparungen auf der Rückseite des Produkts, richten
Sie diese Aussparungen vorsichtig an den Zinken der Wandhalterung aus,
heben Sie das Produkt an und setzen Sie es ein.
5. Suchen Sie die Buchse für das Netzkabel auf der rechten unteren Seite
unter der Feuerstelle und stecken Sie das Netzkabel ein.
6. Halten Sie das Gerät mindestens 15 cm von Seitenwänden und anderen
Gegenständen entfernt, um eine gute Luftzirkulation zu ermöglichen.
7. Das Produkt ist nun einsatzbereit.
Bedienungsanleitung
Nachdem das elektrische Heizgerät ordnungsgemäß installiert und an eine
geerdete Steckdose angeschlossen wurde, ist es betriebsbereit.
Hinweis: Stellen Sie sicher, dass die Schutzschalter für die
Spannungsversorgung eingeschaltet sind.
Die Bedienelemente des Heizgeräts benden sich rechts neben dem Auslass
des Heizgeräts.
Bedienfeld
LED-Bildschirm Fernbedienung
This manual suits for next models
1
Table of contents
Languages:
Popular Electric Heater manuals by other brands

Heatscope
Heatscope MHS-SM1600BK.100 Original installation and instruction manual

KALOS
KALOS KLEH103-0100 Assembly instructions

Dunham-Bush
Dunham-Bush Evo-Lite Style CG installation instructions

Chemin'Arte
Chemin'Arte 111 instruction manual

Gasmate
Gasmate Radion GM135-040 manual

Bromic Heating
Bromic Heating Tungsten 2000W Installation, instruction and service manual

HUUM
HUUM CLIFF Installation and operation manual

Trane
Trane BAYHTRS309 Installer's guide

CONVECTAIR
CONVECTAIR FLB 5100 Installation and user guide

Endless Summer
Endless Summer EWTR800B owner's manual

flowair
flowair LEO EL 23 Technical documentation operation manual

GÜDE
GÜDE GEH 3000 Translation of the original instructions