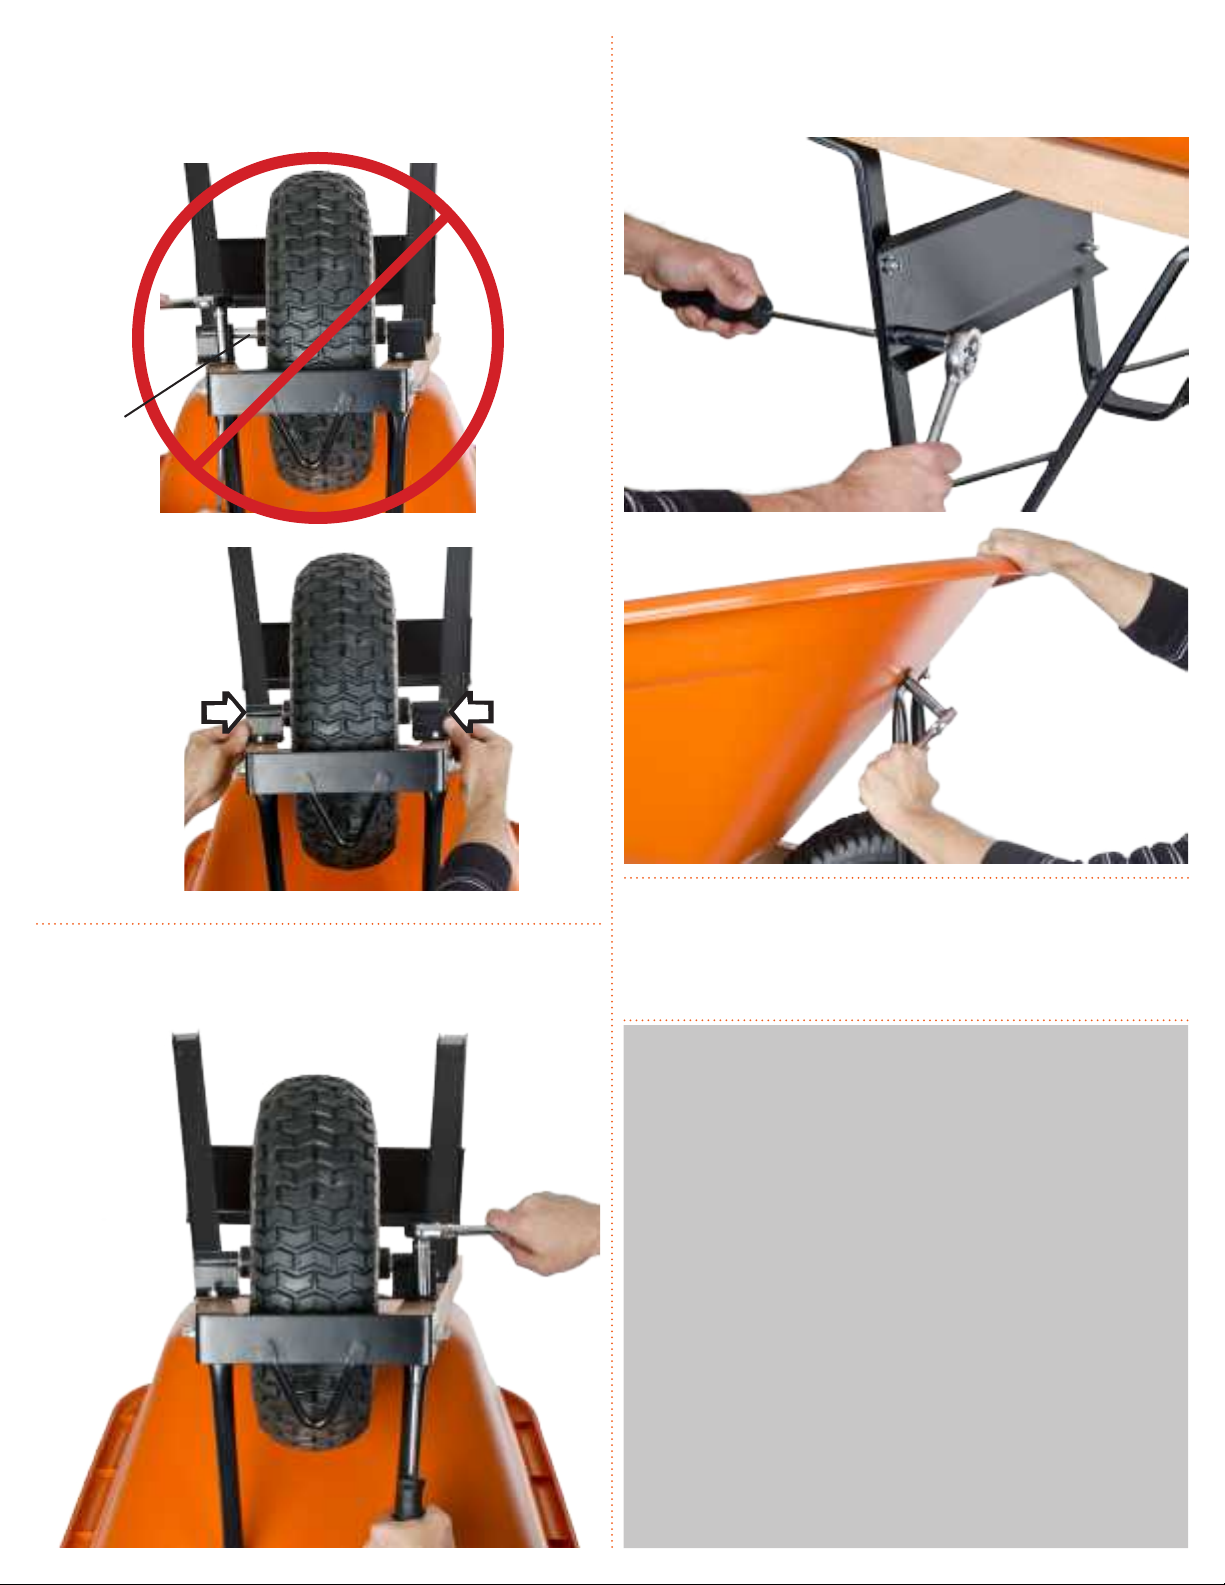
manuals.online logo
Brands
  1. Home
  2. •
  3. Brands
  4. •
  5. A.M.Leonard
  6. •
  7. Outdoor Cart
  8. •
  9. A.M.Leonard WB08 User manual

A.M.Leonard WB08 User manual

The wheelbarrow consists of four main shipping components:
tray, handles, component box, and wheel assembly. Please check
to make sure that all parts have been included from the parts list.
Clear a at work surface and allow room to assemble the wheel-
barrow.
Suggested tools: Wide Flat Screw Driver, Socket Driver with 13mm
Deep Socket, Electrical or Duck Tape.
For any questions contact customer service at 800-543-8955
WB08 - Pneumac Tire Model
FWB08 - Flat Free Tire Model
NOTE:
Install hardware only by hand ghtening unl instructed to com-
pletely ghten.
Step 1)
Install Tray Bolts - Insert the (4) 3” square shank bolts through the
boom tray holes and (2) 3/4” square shank bolts through the front
tray holes. Then secure bolt heads with electrical tape or duck tape.
Lay the tray upside down on a at work surface.
Step 2)
Install Tray Supports - Place the #WB1009 Front Tray Support
and #WB1010 Rear Tray Support over the bolts that are extended
through the tray boom. Raised surface away from boom of tray.
Step 3)
Install Handles - Posion the #WB1004 Handles over the tray bolts.
Step 4)
Install Both Legs - Place a #WB1003 Leg over one handle and bolts,
then secure with Serrated Flange Nuts. Then install the second leg
Step 5)
Install Leg Brace -Keeping the #WB1002 Leg Brace to the inside of
the Leg, line up holes in Brace and Legs, then secure using (4) 3/4”
Slot Head Bolts, washers, and nylon lock nuts.
Holes
toward
rear
ASSEMBLY
Step 11)
Install Second Axle Bracket - Place the second #WB1006 Axle
Bracket over the axle end, align with handle holes, and secure with a
2-1/2” slot head bolt and 2-3/4” slot head bolt (front hole).
Step 6)
Install Front Tray Braces - Posion the lower angle end of #WB1007
Tray Braces onto the 3/4” bolts already secured to tray. Finger
ghten with Serrated Flange Nuts.
Step 7)
Install Nose Brace - Posion the #WB1001 in place on outside of
handles, tow ring toward the tray. Slide the (4) 2-3/8” Slot Head
Bolts through the handles, from the inside, and secure Nose Brace
on outside with washers and nylon lock nuts.
Step 8)
Tighten Nose Brace Hardware - Completely ghten the Nose Brace
bolts/nuts at this me.
Step 9)
Install One Axle Bracket - Place a #WB1006 Axle Bracket into posi-
on, bracket dimple to the outside. Insert a 2-1/2” Slot Head Bolt
through the handle and rear hole. Fasten washer and nylon lock nut.
Poson #WB1007 Front Tray Brace over front hole, install a 2-3/4”
Slot Head Bolt through the brace, handle, and axle bracket, then
secure with washer and nylon lock nut.
Step 10)
Install Wheel and Axle - Slip the#WB1008 axle through the Wheel.
Poson wheel between handles and slide axle into the installed axle
bracket.
Tow
Ring
Toward
Tray
Front bolt secures both tray brace and axle bracket.
Step 12)
Align Wheel Assembly - IMPORTANT. Slide the axle brackets in-
ward unl they contact the wheel. Next slide the Wheel and Brack-
ets le & right unl the wheel is centered between the handles.
Keep the axle brackets against the wheel.
Step 13)
Tighten the Axle Bracket Bolts - Completely ghten the axle bracket
bolts/nuts at this me, while keeping wheel assembly centered.
Step 14)
Tighten Remaining Hardware - Flip the wheelbarrow upright on a
at surface. Completely ghten the (4) Cross Brace Bolts and (6) Tray
Bolts.
Step 15)
Check Tire Pressure and Grease Wheel - Check and adjust re
pressure per indicated PSI on re, using a re gauge. Install grease
via the 1/4” grease ng on the wheel hub. Wheelbarrow assembly
is now complete.
Note:
Flat Free Wheelbarrow Models - Flat Free Wheels will retain their
shape, however, if le under load for extended length of me, a
at spot can develop. The wheel will go back to original shape af-
ter use. But to avoid any inconvenience, do not store wheelbarrow
with materials in the tray for extended lengths of me.
Roune Maintenance:
• Hardware includes serrated ange nuts and nylon lock nuts
which resist loosening. It is best to rounely check hardware and
ghten as may be required.
• Install wheel grease periodically to keep axle and bearings
lubricated. This will also prevent rust formaon on the steel wheel
parts.
• Check re pressure with a gauge. Over inaon may cause
injury and re damage. Under inated res will cause premature
wear. Check and adjust pressure using a re gauge.
• Wood Handles are coated for weather resistance. Excessive ex-
posure to sun and weather will cause deterioraon. To maximize
handle life, recoat with a wood preservave as necessary.
WRONG
• Slide axle bracket
against wheel
• Center the axle
bracket/wheel assem-
bly between handles
• Completly ghten
remaining hardware
• Brackets not
against wheel
• Wheel not cen-
tered
a
a
Hardware Included
DESCRIPTION ITEM # QTY.
8 Cubic Feet Poly Tray WB0899 1
Nose Brace WB1001 1
Leg Brace WB1002 1
Legs WB1003 2
Handle 1 3/4” x 2” WB1004 2
Pnuemac Wheel WB1005 1
Flat Free Wheel FF16BB 1
Axle Bracket WB1006 2
Front Tray Brace WB1007 2
Axle WB1008 1
Front Tray Support WB1009 1
Rear Tray Support WB1010 1
Wheel Bearing (included in wheel) BBWB1005 2
Hardware Bag* WB1011 1
* 3” Square Shank Tray Bolts and Serrated Flange Nuts 4
* 3/4” Square Shank Tray Bolts and Serrated Flange Nuts 2
* 2-3/8” Slot Head Nose Brace Bolts, Washers, Nylon Lock Nuts 4
* 2-3/4” Slot Head Axle Bracket Bolts, Washers, Nylon Lock Nuts 2
* 2-1/2” Slot Head Axle Bracket Bolts, Washers, Nylon Lock Nuts 2
* 3/4” Slot Head Leg Brace Blots, Washers, Nylon Lock Nut 4
241 Fox Drive - P.O. Box 816
Piqua, Ohio 45356
800•543•8955
www.amleo.com
Included Parts

This manual suits for next models

1

Other A.M.Leonard Outdoor Cart manuals

A.M.Leonard WBST6 User manual

A.M.Leonard

A.M.Leonard WBST6 User manual

A.M.Leonard AM70LP User manual

A.M.Leonard

A.M.Leonard AM70LP User manual

A.M.Leonard WB6 User manual

A.M.Leonard

A.M.Leonard WB6 User manual

A.M.Leonard AM50P User manual

A.M.Leonard

A.M.Leonard AM50P User manual

A.M.Leonard HW300 User manual

A.M.Leonard

A.M.Leonard HW300 User manual

Popular Outdoor Cart manuals by other brands

Copernicus BC300 Assembly guide

Copernicus

Copernicus BC300 Assembly guide

Anthro Yes Cart owner's manual

Anthro

Anthro Yes Cart owner's manual

Southwire UCTS-LG Operating and assembly instructions

Southwire

Southwire UCTS-LG Operating and assembly instructions

Bretford BASICS TC15-BK Specifications

Bretford

Bretford BASICS TC15-BK Specifications

STEEL GLIDE HOUC28A2B1AAA Use and care guide

STEEL GLIDE

STEEL GLIDE HOUC28A2B1AAA Use and care guide

Vivo STAND-TV03W instruction manual

Vivo

Vivo STAND-TV03W instruction manual

ONKRON TS1551 user guide

ONKRON

ONKRON TS1551 user guide

Westfalia TC1840 instruction manual

Westfalia

Westfalia TC1840 instruction manual

Wen 73015 manual

Wen

Wen 73015 manual

SherrillTree 35686 Assembly instructions

SherrillTree

SherrillTree 35686 Assembly instructions

Northern Tool and Equipment NTE2540D owner's manual

Northern Tool and Equipment

Northern Tool and Equipment NTE2540D owner's manual

Zipper Mowers ZI-EWB150-100L user manual

Zipper Mowers

Zipper Mowers ZI-EWB150-100L user manual

voestalpine bohler GT 150 instruction manual

voestalpine

voestalpine bohler GT 150 instruction manual

Makita DCU602 instruction manual

Makita

Makita DCU602 instruction manual

SAW TRAX Dolly Max instruction manual

SAW TRAX

SAW TRAX Dolly Max instruction manual

Spectrum Industries InTouch42 quick start guide

Spectrum Industries

Spectrum Industries InTouch42 quick start guide

Farm&Ranch NTE110 owner's manual

Farm&Ranch

Farm&Ranch NTE110 owner's manual

Universal Attachment 610-24356 user guide

Universal Attachment

Universal Attachment 610-24356 user guide

manuals.online logo
manuals.online logoBrands
  • About & Mission
  • Contact us
  • Privacy Policy
  • Terms and Conditions

Copyright 2025 Manuals.Online. All Rights Reserved.