AA Aquarium Deco O User manual


We thank you for supporting AA with your purchase. Before operating this aquarium, please read
the following safety precautions and operation instructions carefully.
“Like” & “Follow” AA Aquarium on Facebook to stay connected and see our latest offerings.
“ADDS LIFE TO YOUR ENVIRONMENT”
www.aa-aquarium.com
IMPORTANT SAFETY PRECAUTIONS:
Indoor use only.
Keep the aquarium away from main socket outlet and all electrical appliances. Keep the
enough distance that under the abnormal situation, e.g. aquarium break, water can’t affect the
main power supply and other electrical appliances.
Max. water temperature: 35℃
Keep electrical appliances out of reach from Children or infirm persons. Do not let them use
the appliances without supervision
Only use this aquarium and its components for its intended use as described in this manual
Always unplug when not in use.
Do not plug or unplug any power supply when hands are wet.
Do not use or repair by yourself if the appliance is defective.
If the supply cord is damaged, it must be replaced by the manufacturer or its service agent or a
similarly qualified person in order to avoid a hazard.
Use only together with the adaptor which is supplied within the aquarium package.
The normal function of the aquarium may be disturbed by Strong Electro Magnetic
Interference. If so, simply unplug and reset the aquarium to resume normal operation. If it still
not work, place the aquarium away from the strong electro magnetic source.
Warning: If there should be condensed water inside the luminaire, please pull the power plug!
Please remove the LED light and return to your retailer for replacement.
Warning: Unplug or switch off the aquarium before carrying out maintenance
Weight of aquarium when filled with water is
Deco O mini – 13.5kg
Deco O – 25.5kg
Before use, filled up the tank with water to check if there’s leakage
Do not transport, or move the aquarium when it’s filled up with water
Do not use toxic substances to clean the aquarium
All cables leading out of the aquarium and the main cables should have a drip loop, so that
water which may possibly run down cannot get into the adapter or the main socket. (Ref. “ Drip
Loop”)
Drip Loop
English

Aquarium tank
LED light on top cover
Stone stacking ornament
water pump with filter cartridge
decoration gravels
USB adaptor and 2-way USB port
colour lens
a)
b)
c)
d)
e)
f)
g)
3.
- Try to avoid a location with direct sunlight as this can encourage algae growth & cause
“green water” problems.
DECORATE your tank with gravels & stone stacking ornament.Remember: rinse all
decorative items before putting them in the aquarium.
The water pump power cord can position along the edge inside the aquarium, there’re slots
at the back for cord management. (Ref. Fig. 1)
FILL the aquarium with water slowly to the mid frame (Ref. Fig. 2).
4.
5.
6.
a
bc
d
e
f
g
Fig. 1 Fig. 2
POSITIONING your tank, please
use the following guidelines when
positioning your tank:
- Choose a strong support surface
for the tank; remember, when the
tank is full of water, it can be heavy!
- The tank should put on a flat
surface without inclination.
7.
Fig. 4
Connect pump and light to the USB adaptor. (Ref. Fig. 3).
8.
light to bring out the colours of your fish. (Ref. Fig.5) Pink for gold fish & blue to look like
saltwater setup.
9.
10.
Select daylight just by a touch on the top cover. (Tips:
Fishes require sufficient rest also; we suggest the day light
to be left on for max 12 hours per day). (Ref. Fig.4)
Before adding your fish, please add “Chlorine Neutral” (not
included) into aquarium (check dosage on packaging). Let
the filtration run for about 2 hours before adding fish. If you
do not have Chlorine Neutral, we recommend to run the
filtration for 12 hours before adding fish.
There’re colour rings included. Simply clip onto the LED
Fig. 3
Fig. 5
INSTRUCTIONS:
1.
2.
Carefully remove the aquarium and its components from the box and packing materials.
Please check for damages, should there be damages, please kindly return to your retailer
immediately.
Check for components inside package:

Fig. 6
MAINTENANCE:
For best performance, maintenance should be carried out once every 3 to 5 weeks,
depending on water conditions.
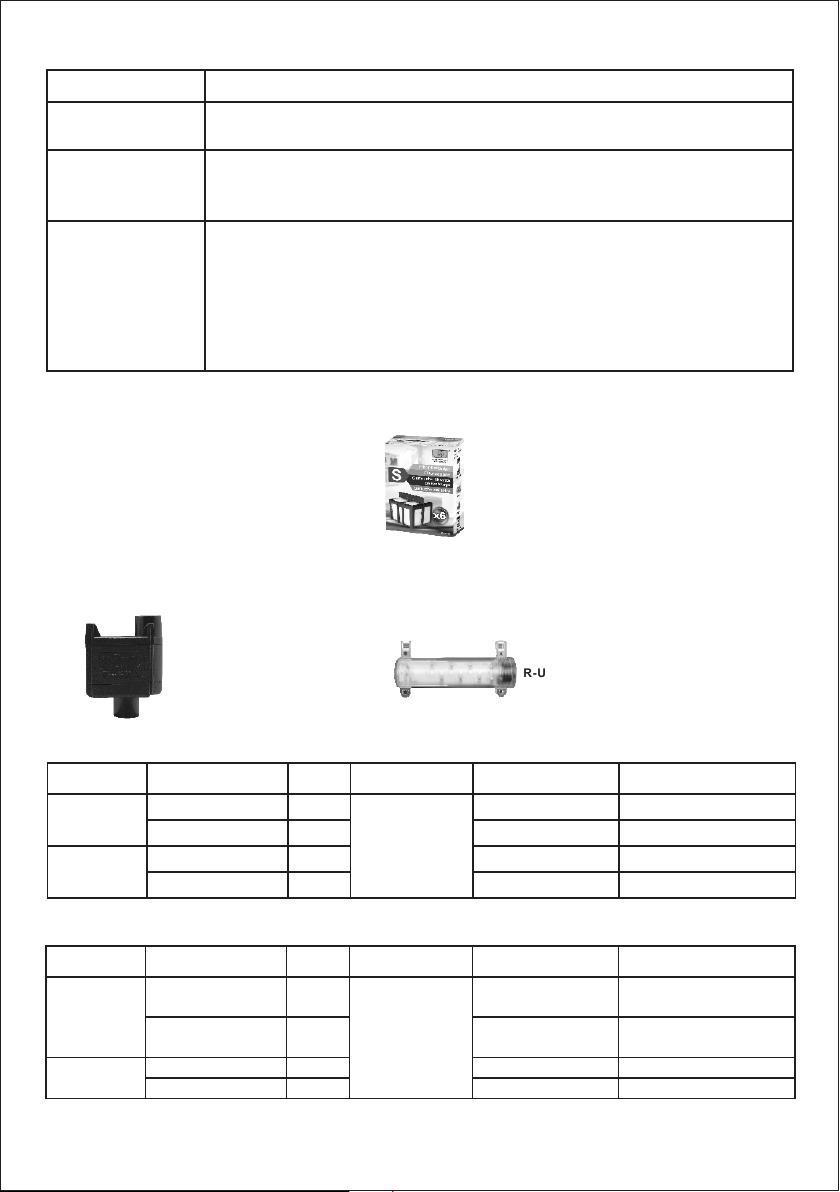
To achieve maximum efficiency, the filter cartridge should be replaced every month.
Do not use detergents to clean the aquarium, its components or filtration materials.
Always unplug the adaptor and disconnect before carrying
out maintenance.
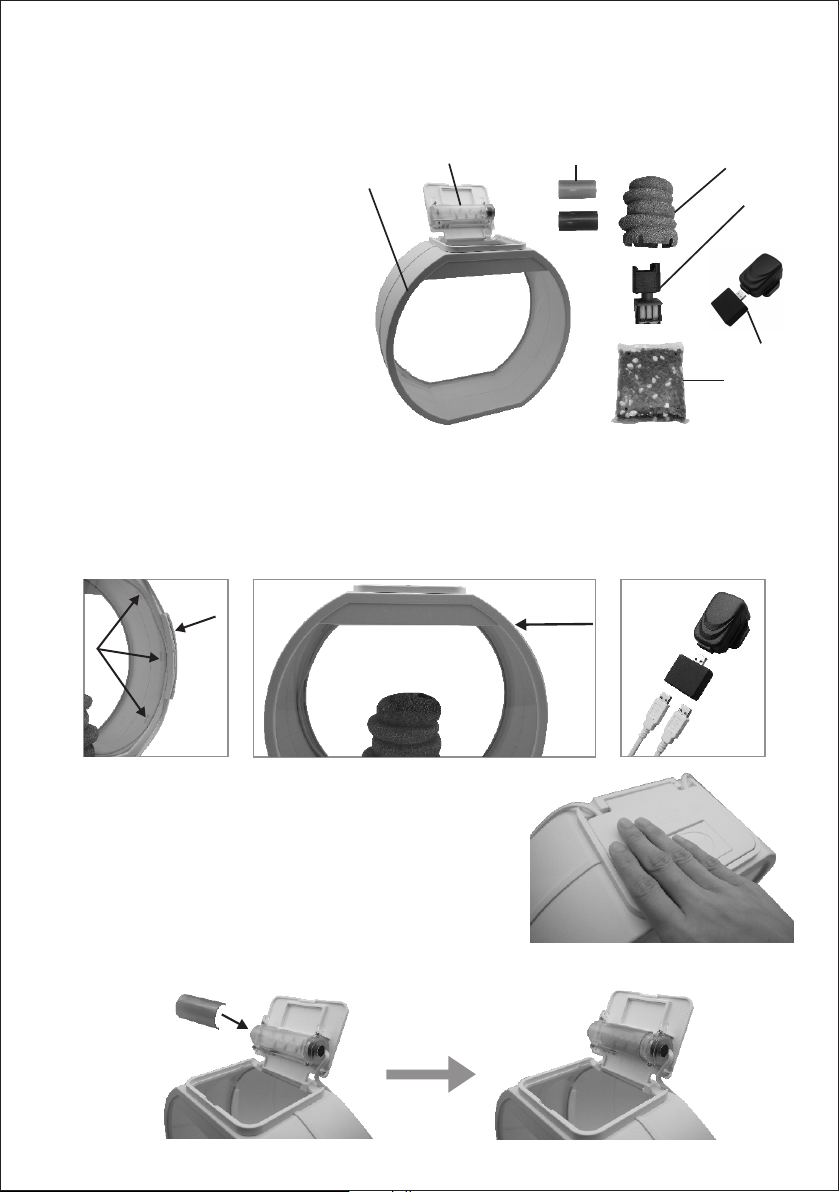
Take out stone stacking ornament.
Replace the filter cartridge (refer to “Replacement parts
and accessories” at the end of this
manual), rinse the filtercartridge with water taken
from the aquarium. (Ref. Fig. 6).
Rinse the stone stacking ornament under running water.
To avoid damages/scratches to the aquarium, use SOFT
WOOL/CLOTH material for cleaning.
When changing water, only change 25% of the water and
re-fill the tank with tap water. Remember to add Chlorine Neutral!
1.
2.
3.
4.
5.
6.
7.
8.
9.
10.AA recommends cleaning the impeller of the pump once
every 6 months to ensure smooth and reliable performance.
i)Remove the pump from the stone stacking ornament.
Ref.to Fig. 7a Remove the filter cartridge from the pump.
ii)Slightly bend the front cover; the impeller
housing will be disassembled from the pump.
(Ref. To Fig. 7b)
iii) Remove the impeller assembly to
clean / brush under running water.
iv)Re-assemble the pump, filter
cartridge & the stone stacking ornament. Fig. 7b
LAMP MAINTENANCE TIPS
My Deco O tank worked well, but recently the light doesn't seem to be working properly. It
seems like the touch function is no longer working.
You can first try to reset the electronics by unplugging the USB plug between the lighting and
the USB adapter. Re-connect after 10 seconds to see if it works.
Sometimes there could be some water droplets or algae growth around the silicone o-ring
between the sensor of the Uni-Module and the top plate, which may affect the sensor.
Unplug the USB of the LED light. Remove the cover from aquarium, carefully line up the pivot
with the slot. Gently lift it from the pivot side of the plate (Ref. Fig.8A).
Unscrew. (Ref. Fig.8B)
Gently lift the Uni-Module and clean with a damp cloth. (Ref. Fig.8C)
* Note: you can re-connect the USB plug to see if the Uni-Module works. If it is still faulty,
please contact our servicing agent for replacement.
Q.
A.
1.
2.
3.
If the light still not function properly, please replace a new one. (Replacement LED model no.
refer to “Spare Part table” at the end of this manual)
Fig. 8a Fig. 8b Fig. 8c Fig. 8d
4. Pay attention to the silicone o-ring and the square area within the o-ring. Clean
o-ring to remove any algae or water droplets. Dry with a paper towel before re-assembling
(Ref. Fig.8D).
this area & the
Fig. 7a

TROUBLE SHOOTING GUIDELINES:
SYMPTOM SOLUTION
Water pump
doesn’t work
(1) Check if the water pump is connected to the USB adaptor
(2) Clean the water pump according to “MAINTENANCE”
If the light doesn’t
work
(1) Check if the LED light is connected to the USB adaptor
(2) If the lamp doesn’t light up, clean the light module according to
“LAMP MAINTENANCE TIPS” section.
If excess algae
grows
(1) Make sure aquarium is not under direct sunlight all the time.
Consider repositioning your tank.
(2) “Algae Cure” can be purchased from aquarium shops to help
control algae growth.
(3) If the light is turn on for 24 hours per day, please try to keep it on
for 12 hours max. Your fish will need time to rest and algae can
grow easily under lighting.
REPLACEMENT PARTS & ACCESSORIES:
Below are replacement parts available at the retailer where you have purchased this aquarium.
Filter cartridge:
Contains sponge & activated carbon,
replace approx. every 4-6 weeks,
depending on water conditions.
Replacement LED:
for both Deco O & Deco O mini
R-025-6
AA190-DC R-USBLED-1W
Spare Part Table:
For UK & Ireland:
Name Model Colour Filter Cartridge Water Pump Replacement LED
Deco O mini AA10L-OGK-BLK
AA10L-OGK-WHT
AA20L-OGK-BLK
AA20L-OGK-WHT
Black
White
Black
White
R-025-6
AA190-DC-B
AA190-DC-W
AA190-DC-B
AA190-DC-W
Deco O
R-DCLED-1W-B
R-DCLED-1W-W
R-DCLED-1W-B
R-DCLED-1W-W
Name Model Colour Filter Cartridge Water Pump Replacement LED
Deco O mini FRF-DECO-
MINI/B
Black AA190-DC-B R-DCLED-1W-B
Deco O
FRF-DECO-
MINI/W
FRF-DECO-O/B
FRF-DECO-O/W
White
Black
White
FRF-025CT AA190-DC-W
AA190-DC-B
AA190-DC-W
R-DCLED-1W-W
R-DCLED-1W-B
R-DCLED-1W-W
*1 year limited warranty for the aquarium. Do not include tear and wear parts like filter media.
Water pump:
for both Deco O & Deco O mini

If you are interested in our products, please kindly visit our homepage at www.aa-aquarium.com
Comments and Inquiries
Please write to us at info@aa-aquarium.com.
Ref.#: DECO TANK-IB-E_E06
Discarding electrical and electronic e quipment at the end of life.ln
everybody's interest and to participate actively in protecting the
environment:
-Do not discard theses items with your household waste.
-Use the available trade-in and collection systems.
Some materials can in this way be recycled or recovered.
Table of contents
Other AA Aquarium Aquarium manuals
Popular Aquarium manuals by other brands

AquaCare
AquaCare Kalkwasser Series instruction manual

Hydor
Hydor Pico Filter user guide

Vision Assessment
Vision Assessment 1054 Patient Instructions For Use

AQUAMAXX
AQUAMAXX ConeS DFC Series installation guide

AQUA DREAM
AQUA DREAM AD-1060-WS Assembly instructions

Reef Factory
Reef Factory Reef flare Pro Series user manual