CPR CS150 User manual

CPR Aquatic, INC•P.O. Box 1111•3749 West End Road, Arcata, CA 95521
CPR’s Continuous Siphon Overflows provide the most efficient means of getting water to an external
filter without expensive modifications to the tank. These precision-engineered overflows skim water from
the surface of your aquarium at flow rates up to six times greater than units with tubes. Advantages
such as water level adjustment, quiet operation, fish screen, and a black top to reduce algae growth all
make the CPR Continuous Siphon Overflow the best on the market. Please read through the set up
directions before and during the actual set up to ensure it is done correctly.
To place your overflow into operation:
1. Open the packaging carefully and inspect the unit for damaged or missing parts. You should have:
(1) Overflow body
(1) 1 1/2” Bulkhead assembly
(4) Adjustment screws
(1) Airline
(1) Aqua Lifter pump and Acrylic Lid (included in Deluxe models)
If any items are damaged or missing, please contact your dealer immediately.
2. Before using the overflow for the first time it is important to decide where to position the unit. It is
best to have the overflow as far away from the inflow as possible to reduce turbulence. It is also
important to check the capacity of your sump as well as the flow rate of your return pump on your
filtration system to prevent possible overflow. It will be necessary to add water to the system after
it begins running. The amount of water that you will need to add will depend on the sump size and
design.
3. Assemble the bulkhead fitting as shown in diagram A.
4. Connect the bulkhead fitting to the hose going into your filtration system. You should use 1 1/2”
Schedule 40 PVC inserted into the bulkhead. The PVC can be run directly into the filter or can be
attached to flexible line using fittings. The fewest bends in the line will ensure the quietest
operation. To prevent leaking from where the PVC inserts into the bulkhead, you should use PVC
cement to secure it into place. If using adapters other than PVC, All-Purpose Cement should be
used to secure the plumbing in place.
5. Place the unit on the edge of your tank and allow the water to fill the front chamber. Adjust the
lower adjustment screws so that the unit is parallel to the back of the tank.
6. Adjust the height of the unit with the two top adjustment screws so the water level is about ¼”
above the edge of the front chamber.(FIG 1) Make sure that the overflow is level with the water
surface, not necessarily the tank, as some tanks may not be perfectly level.
CS150
Continuous Siphon Overflow
CPR Technical Support (707) 826-9636 • FAX (707) 826-9623

7. Using a container of water from your aquarium, fill the narrow chamber in the back of the overflow to
the top.(FIG 2) To start and maintain the siphon overflow, draw the air out through the nipple on top
of the overflow by one of the following methods:
a) With Aqua Lifter (highly recommended by CPR): Connect the nipple on top of the overflow to the
inlet of the Aqua Lifter using airline tubing. Attach another piece of airline to the outlet of the
Aqua Lifter. The outlet line may be placed in any of three places for drainage: the tank, the sump,
or the overflow. Ensure that the end of the outlet line remains under water. This will prevent air
from entering the system if power is lost or the pump malfunctions. See Diagram B. The Aqua
Lifter not only constantly draws out air which can stop your siphon, but after a power outage they
can restart the siphon when the power comes back on.
b) With a Venturi powerhead: A Rejuvenation Venturi powerhead (Rio 600PT) draws in air prior to the
impeller and are very efficient. If placed inside the main tank, a check valve is needed to prevent
back siphon through the airline during a power outage. This, however, reduces the ability of the
powerhead to draw air out from the overflow, so a larger powerhead should be used. Another
option is to place the powerhead in the sump.
c) Plugging the air nipple: Use the airline that came with your overflow. Attach one end to the air
nipple on top of the overflow and a check valve on the other end to prevent air from being drawn in
through the airline. You will need to initially draw out the air using a Venturi powerhead or your
mouth and you will need to periodically draw out any air that accumulates.
d) Gravity siphon: Attach a long air line to the nipple on the overflow and, after drawing all the air
out, place the end of the airline into a sump (which should be at least two feet below the overflow).
This method is not as effective as those above.
8. When you initially start the siphon overflow, it will drain water from your aquarium down to the level of
the front edge of the overflow box. The sump part of the filter should begin to fill with water. It may be
necessary to add water to the sump if the return pump is not completely submerged. Make sure that
the return hose is firmly attached to the return pump before plugging in the pump.
9. Plug in the return pump. The flow rate of the return pump should closely match up with the overflow
rating of your CS Overflow model. Issues may arise if the return pump flow rate is significantly
different then the recommended overflow rating. Keep an eye on the water level in the tank after the
pump is plugged in to make sure the overflow starts its siphon. Water should start draining down the
overflow.(FIG 3) Look into the side of the overflow box for any air pockets accumulating at the top.
At this point, direct your attention to the sump to make sure the return pump is still completely
submerged, or that the sump is not overflowing. It may be necessary to add or remove water from the
sump at this point. Continue to monitor both the tank and the sump for a few minutes to ensure that
the system is working consistently.
10. The water level in the aquarium can be adjusted by using the two top adjustment screws on the
overflow. This is usually necessary once the overflow has been operational for a few minutes. By
lowering the water level in the aquarium you will raise the level in the sump and possibly overflow it. By
raising the water level in the aquarium you will lower the water level in the sump and the return pump
could possibly burn out if not completely submerged. Add or remove water as needed.

11. At certain flow rates, a flushing noise coming from the overflow may occur. This noise is caused by air
trying to escape back up through the bulkhead while the water is going down. A 3/16” standard airline
tube fed down through the bulkhead fitting will vent this air and reduce the flushing or gurgling sound.
You may need to adjust the level of the tubing up or down to find the point where the air is vented.
Your overflow is now in operation
The outside of your overflow may be cleaned with a non-abrasive cloth. Do not use detergent on any
surface that comes into contact with aquarium water.
Note: The CS150 does not include the sponge and vent tube seen in the diagrams below.
Fig. 1 Fig. 2
Fig. 3
NOTE: No slip
screen, vent tube or
gear sponge is in-
cluded with the
CS150.
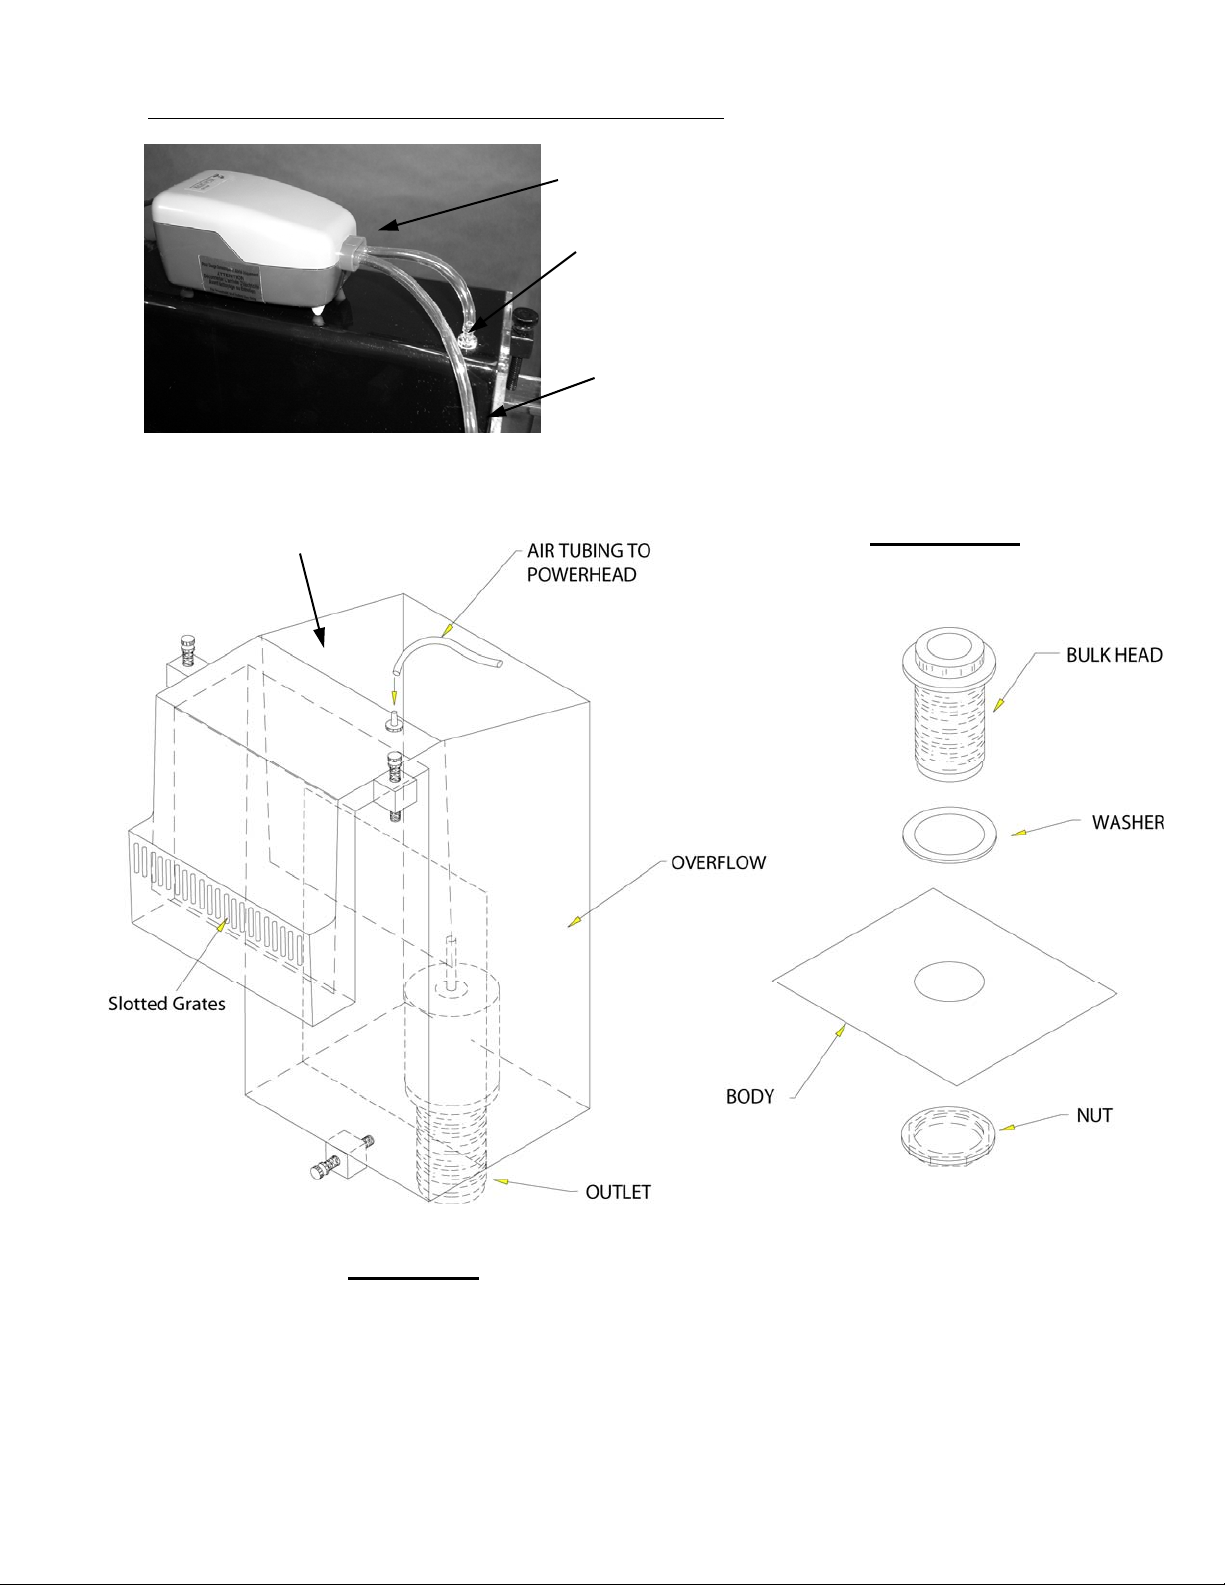
Diagram B
Inlet
Outlet tubing to sump,
tank, or overflow
Air Nipple
*Aqua Lifter and lid included in Deluxe models
*Lid (not shown) Diagram A
NOTE: No slip
screen, vent tube or
gear sponge is in-
cluded with the
CS150.
Table of contents
Other CPR Aquarium manuals


Popular Aquarium manuals by other brands


Royal Exclusiv
Royal Exclusiv Bubble King DeLuxe 300 datasheet

Sera
Sera Marin Precision Biotop LED Cube 130 Instructions for installation and use

Commodity Axis
Commodity Axis ViaAqua Titanium Heater manual

Sander
Sander Ozonizer P 2000 Instructions for use

Hagen
Hagen HALF MOON instructions

Dennerle
Dennerle Reusable 160 Primus / Special Edition operating instructions