manuals.online logo
Brands
  1. Home
  2. •
  3. Brands
  4. •
  5. Aamstamp
  6. •
  7. Power Tools
  8. •
  9. Aamstamp AAMStamp Sprite User manual

Aamstamp AAMStamp Sprite User manual

Popular Power Tools manuals by other brands

ISLAND HOPPER Power Egg HT-309 operating instructions

ISLAND HOPPER

ISLAND HOPPER Power Egg HT-309 operating instructions

Sioux Tools SSR6P25 Instructions-parts list

Sioux Tools

Sioux Tools SSR6P25 Instructions-parts list

Makita HM1317C technical information

Makita

Makita HM1317C technical information

ABB Smart Tool + quick start guide

ABB

ABB Smart Tool + quick start guide

Baumr-AG BMJK-24S user manual

Baumr-AG

Baumr-AG BMJK-24S user manual

Bosch Professional GST 18 V-LI S Original instructions

Bosch

Bosch Professional GST 18 V-LI S Original instructions

Ronix RA-2702 quick start guide

Ronix

Ronix RA-2702 quick start guide

Nordson ProBlue user guide

Nordson

Nordson ProBlue user guide

aoyue int6028 instruction manual

aoyue

aoyue int6028 instruction manual

Hitachi CJ 65VA2 Instruction manual and safety instructions

Hitachi

Hitachi CJ 65VA2 Instruction manual and safety instructions

Makita HM1304 instruction manual

Makita

Makita HM1304 instruction manual

Kurtz Ersa Ersa X-TOOL VARIO operating instructions

Kurtz Ersa

Kurtz Ersa Ersa X-TOOL VARIO operating instructions

SCHUNK KSO 65 Installation and operating instruction

SCHUNK

SCHUNK KSO 65 Installation and operating instruction

Harken LokHead 500 user manual

Harken

Harken LokHead 500 user manual

Senco DuraSpin ExTPro installation instructions

Senco

Senco DuraSpin ExTPro installation instructions

Ferm JSM1020 Original instructions

Ferm

Ferm JSM1020 Original instructions

Milwaukee M12 FUEL 2559-20 Operator's manual

Milwaukee

Milwaukee M12 FUEL 2559-20 Operator's manual

EINHELL BT-CD 12/2 operating instructions

EINHELL

EINHELL BT-CD 12/2 operating instructions

manuals.online logo
manuals.online logoBrands
  • About & Mission
  • Contact us
  • Privacy Policy
  • Terms and Conditions

Copyright 2025 Manuals.Online. All Rights Reserved.

AAMStamp Sprite
Stamping Machine
Instruction Manual
AAmstamp Machine Company
Hot Stamping Machines and Accessories
PHONE: (888) 375-8375 FAX: (661) 272-0500
www.aamstamp.com / [email protected]
Sprite Owners Guide
For use in the EU and USA
Home of the Perfect Impression
Revised 2014
Sprite Owners Guide
Table of Contents
Introduction and Safety Precautions……………….........………………. 3
Startup Instructions……………………………………...........………….…. 4
Heat, Pressure and Dwell….........…….............…………………………… 5
Loading Foil…………………………………...............……………………… 6
Foil Advance …….…………………..............…………………..………….. 6
Sprite Diagram, Left …………………………………………………………. 6
Sprite Diagram, Right ………………………………………………………. 7
ChoosingtheProperCushionBoard….........…………………………….. 8
Gauge Bar …………………………………………………………………….. 8
10 X 12 Base Plate ……………………………………………………………. 9
Type and Die Holders ……………………………………………………….. 10
TypeHolderAdapterSleeves ………………………………………………. 12
Napkin Printing Instructions ………………………………………………. 13
Pencil Printing ……………………………………………………………….. 14
Adjusting the typehead height ............................................................. 14
Helpful hints / Technical Support ......................................................... 15
Replacing The Heater ........................................................................... 16
Parts List,Specifacations,Inviornment................................................. 17
Wireing Diagram .................................................................................... 18
Warranty information ............................................................................... 19
AAmstamp Machine
Company LLC 38960
Trade Center Drive, Suite
B Palmdale, California,
93551, USA
661-272-0500
Fx 661-272-0505
2
3
PLEASE READ THIS MANUAL COMPLETELY BEFORE OPERATING EQUIPMENT
INTRODUCTION
For years nothing has equaled the appearance and quality of foil imprinting. Printing with ink does not offer
the vibrant color of foil. In addition, foil imprinting imparts a 3-dimensional effect that is not obtainable with
conventional ink printing. Foils are uniformly opaque, odorless, non-liquid and are smear free. The foil
imprinting process transfers the color of the foil to an item by the application of heat and pressure. The three
basic elements needed to create a quality foil imprint are the proper amount of heat, pressure and dwell (the
length of time the type and dies are in contact with the product.)
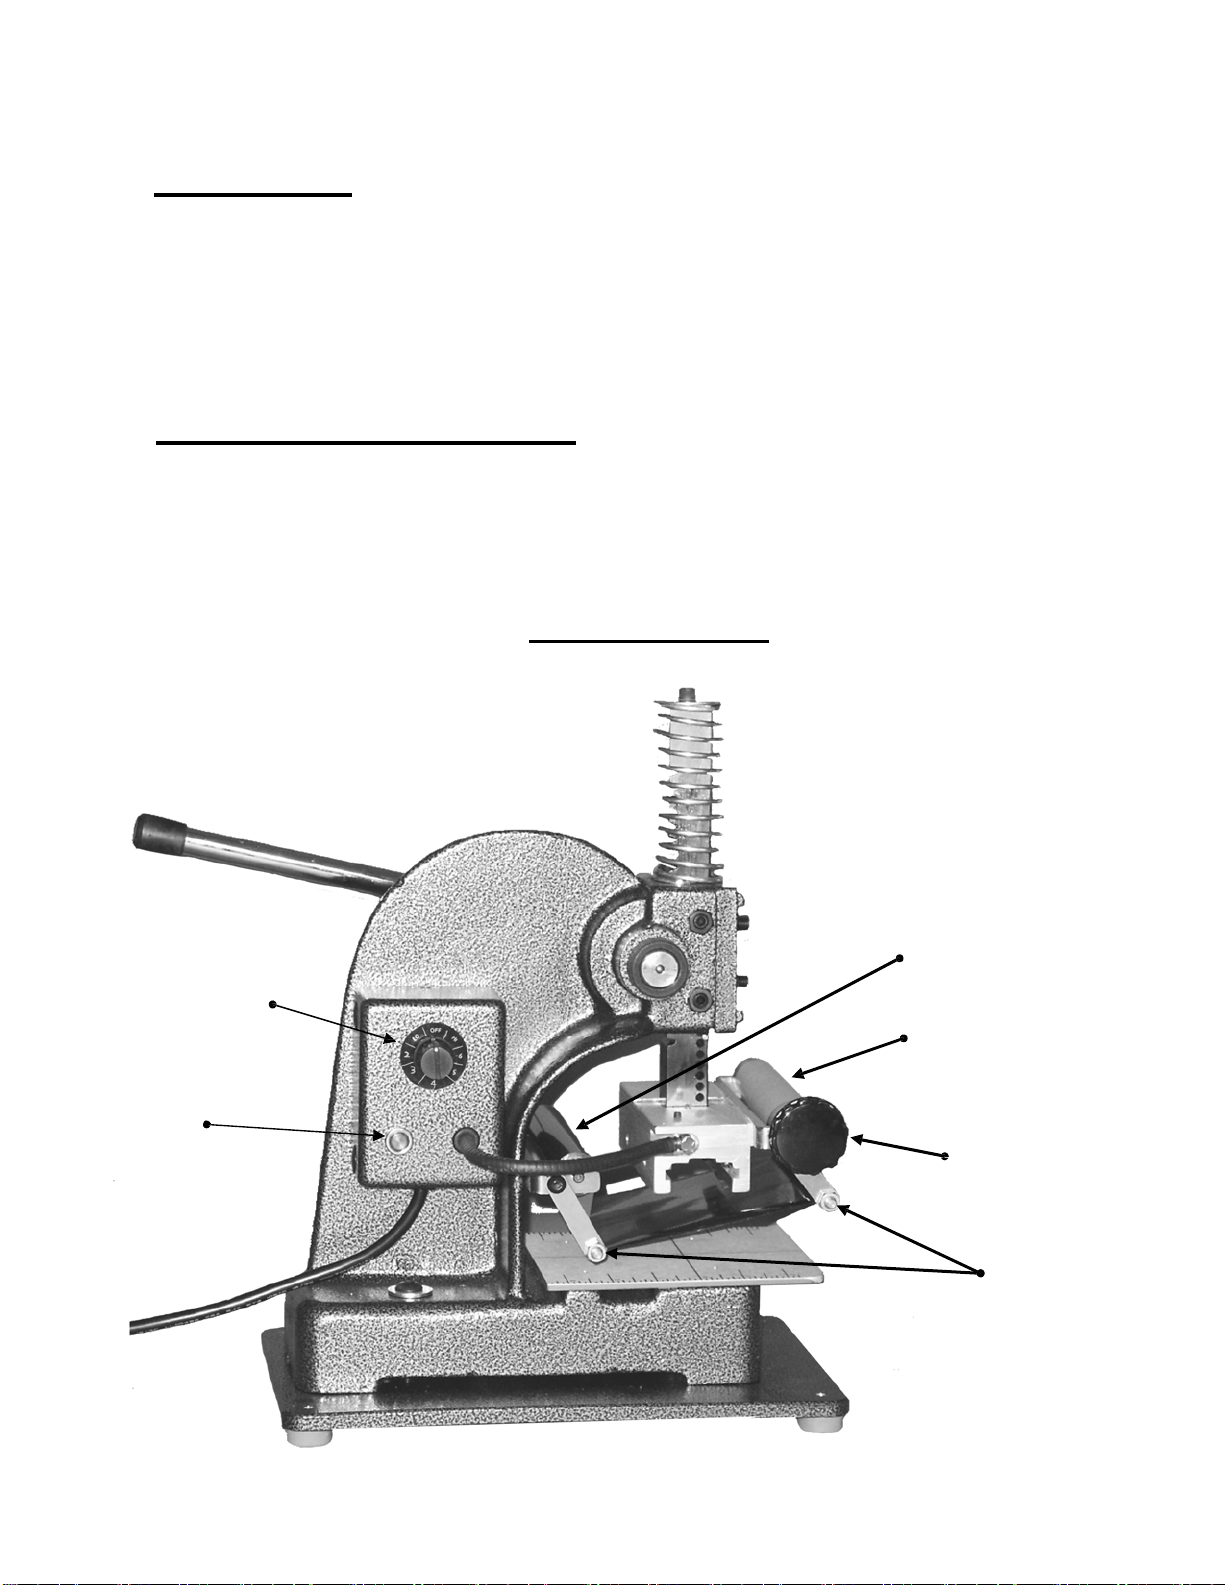
AAmstamp's personalizing machines are designed to give you the power of a big press in a table top
machine. The Sprite Machine and it’s accessories, type, dies, emblems and foils are the highest quality and
easiest to use products available today. This Equipment is not intended for use by persons(including
children) with reduced sensory or mental capabilities, or lack of experience and knowledge.Children should
not play with the equipment.
After reviewing this manual, please call our customer service department toll free, in USA (888) 375-8375
with any questions you may have.
SAFETY PRECAUTIONS - PLEASE READ CAREFULLY
AAmstamp's printing machine is anelectric tool and as such, basic safety precautions should be followed.
Taking these precautions will reduce the risk of fire, electric shock, or personal injury. The means of
disconnecting the power supply from the mains is by removing the plug from the socket-outlet.
1
Keep your area clean and clutter free.
2
Do not wear loose clothing or jewelry which could become entangled in the machine.
3
Machine for indoor use only. Do not use the machine in a damp or wet place, or
expose it to rain. Do not use the machine in the presence of flammable liquids or gases.
Maschine nur zur Verwendung im Innenbereich geeignet. Verwenden Sie das Gerät nicht in einer feuchten oder
nassen Platz, und setzen Sie es an zu regnen. Verwenden Sie das Gerät nicht in der Nähe von brennbaren
Flüssigkeiten oder Gasen.
4 Do not touch the Typehead/Ram Bar assembly. These parts of the machine
have operating temperatures that can cause serious burns.
Berühren Sie nicht die Kopf/Ram. Diese Teile der Maschine sind die Temperaturen, die zu schweren Verätzungen
führen kann.
5 If supply cord is damaged, it must be replaced by the manufacture, its service
agent or other qualified persons to avoid avoid hazards.
Wenn das Netzkabel beschädigt ist, muss es ersetzt werden durch die Herstellung, den Service Agenten oder andere
qualifizierte Personen zur Vermeidung von Gefährdungen.
6 Note the voltage on the power source. AAmstamp equipment runs on standard
230V~50Hz. in the EU. In the U.S. 120V~60Hz
Bitte beachten Sie die Spannung an der Steckdose. AAmstamp Ausrüstung läuft auf Standard 230V~ 50Hz
einstellen. In den USA 120V~ 60Hz
7 AAmstamp equipment should not be used while under the influence of alcohol or drugs.
AAmstamp Anlagen sollten nicht verwendet werden, während unter dem Einfluss von Alkohol oder Drogen.
4
GETTING STARTED
1.
Read this Owners Guide from cover to cover.
2.
Unpack and inspect all equipment, accessories and supplies
3.
Place the Sprite on a table capable of supporting 16 Kg (60 pounds).
4.
If you ordered a type style, please be aware that certain styles may take extra time to arrive. Use
extra caution when opening type, as the type is fragile and the characters can easily fall out of the
package. When first opening the package use special care to keep the type in order and place into
a type box in the appropriate locations to keep letters separate. It can take an extensive amount
of time to resort type if it should get mixed up. Also be aware that the amount of type you will
receive per character will vary depending on the frequency of it’s use in language (For example
you will receive more e’s then z’s).
5.
Ensure the temperature controller knob is turned to the OFF position
6.
Plug The Sprite into a standard (in EU)CEE 7/7 230V~50Hz(in US, NEMA 5-15 120V~60Hz)
electricaloutlet).
7.
Setup Type / Die Holder: Type is set right-side up and backwards. Use character spacers
between letters and block or line spacers to fill up blank lines. Always make sure
the type and dies are sitting flush to the bottom of the typeholder. This ensures a level
printing surface. You can use tweezers to make it easier to handle the type when hot.
8.
Load Foil.(See pg. 6)
9.
Insert the typeholder directly into the typehead unless you are using a single line or two
line holder. If you are using one of these holders you will need to use an appropriate adaptor
sleeve. To do this, you first insert the adaptor sleeve into the typehead and lock it in place using
the retaining lever on the adaptor sleeve. Then you can insert the appropriate typeholder into the
adaptorsleeve.
10.
Turn temperature controller to setting number 3 (233ºF/112º C). This should be a good starting
point after which you should gradually increase the temperature to find the ideal setting for your
application.. Most products print in the range between 220°F and 280°F.(104º-137ºC)
11.
Allow The Sprite to warm up for a period of 5-10 minutes.
12.
Choose the appropriate alignment tools for your job (Gauge Bar Guide, Ribbon Plate, Napkin
Guide, Business Card Guide, Match Guide, or Pencil Guide, etc.) and set up the alignment tools
on the table plate of the machine.
13.
Choose the proper cushion board. A cushion board of some kind is necessary so that damage to
the type will not occure.
14.
Begin printing by pulling down the machine handle. Control quality of print by varying pressure
and dwell (duration of print). A typical dwell is 1-2 seconds.
Additional Helpful Items
Ruler : To measure product and for aligning fixtures.
Tape : To secure foil onto take up spool.
Scissors : To Cut excess Foil.
5
HEAT, PRESSURE AND DWELL
Heat: Heat is controlled by using the analog temperature controller located on the
left rear of the machine.
Pressure: Pressure is controlled by the feel of the operator while pulling the
machine handle attached to the upper right quadrant of the machine. You need to
apply enough pressure to fully imprint your type and die setup into your product.
Larger print areas or hard materials require more pressure.
Dwell: Dwell is the amount of time the hot type is in contact with the foil and the product
to be printed. The user controls the dwell time by the length of time the handle is
pulled.
THE HEAT, PRESSURE AND DWELL TRIANGLE
The three aspects that control the quality of the foil imprint are heat, pressure and
dwell. These three aspects form the heat, pressure and dwell triangle (see
diagram). For example, you can increase the dwell and use less pressure. You will
need to experiment with your first printed article to determine the best combination of
heat, pressure and dwell.
HEAT
TEMPERATURESETTING
On the left rear of the machine there is an analog temperature controller with a
single knob. To change the setting, turn the knob counter-clockwise to setting one
(low) and continue counter-clockwise to setting eight (high). Alternatively you can
turn the knob clockwise (to the right) and go directly to the number eight high
setting. Temperatures above 350° are seldom used for foil printing and may melt
some brands of type. The following table illustrates the approximate temperature
at each setting.
SETTING 0: OFF
SETTING 1:
100°F
SETTING 2:
189°F
SETTING 3:
233°F
SETTING 4:
277°F
SETTING 5:
318°F
SETTING 6:
358°F
SETTING 7:
400°F
SETTING 8:
440°F
SETTING 0: OFF
SETTING 1: 38°C
SETTING 2: 88°C
SETTING 3: 112°C
SETTING 4: 135°C
SETTING 5: 160°C
SETTING 6: 181°C
SETTING 7: 205°C
SETTING 8: 226°C
NOTE: *** THE MOST COMMON OPERATING TEMPERATURE RANGE IS
BETWEEN 189° AND 277° DEGREES (SETTING 2 THROUGH 4) ***
HINWEIS: *** DIE HÄUFIGSTEN Betriebstemperaturbereich liegt zwischen 88°C
und 135°C Grad ***
6
LOADING FOIL
Remove the rear foil dereeler spool from the rear foil bracket by opening the brass
tension springs on both sides of foil bracket. The rear spool has markings used to
center 2, 3, 4 and 5 inch foil rolls. Slide the roll of foil onto the spool and put it back on
the foil bracket so that the foil feeds from the top of the roll and toward the operator.
Feed your foil under the foil guide bars and attach foil to the front foil take up spool with
a small piece of tape. Replace the spool on the front foil take up bracket. Foil color
should face up.
MANUAL FOIL ADVANCE KNOB
The foil advance knob is located on the left side of the front foil take
up spool and is 1 3/4” in diameter. To adjust your foil simply turn
the knob counter-clockwise between each print. Check to make
sure you that you pulled the used foil past the typehead, so that
during the next print there will be new unprinted foil underneath it.
SPRITEDIAGRAM
Foil Dereeler Spool
On/Off
Temperature
Control Knob
Power On Light
Foil Take-up Spool
Foil Advance Knob
Foil Guide Bars
Machine Handle
Ram Bar
Foil Take-Up Spool
Foil Advance Knob
Front Foil Bracket
Type Head
Type Holder
Type Holder Handle
Rear Foil Bracket
Foil Guide Bars
Table Plate
7
8
CHOOSING THE PROPER CUSHION BOARD
Cushion Boards are made of polyurethane material and are designed to give
cushion to your products while they are being printed.
Cushion boards serve two main purposes. They keep the type and dies from
penetrating your product while at the same time allowing the type and dies to gain
enough impression to give a crisp clear imprint.

HARD CUSHION BOARDS: For printing one or two small lines of type and
will keep the type from penetrating your product.

MEDIUM CUSHION BOARDS: Used most often, these cushion boards are
used for one to four line printing of 18 point or smaller type styles that have
medium to bold lettering.

SOFT CUSHION BOARDS: Used when doing more then four lines of print
or large print areas that contain big bold lettering.
AAMSTAMP ATTACHMENTS
AAmstamp attachments are designed to make printing particular products
easier. AAmstamp attachments are sold separately.
AAmstamp Currently has the following attachments available:
The 10 x 12 Base Plate
Optional Ribbon Guides for Base Plate
Optional Napkin Guide for Base Plate
Ribbon Supply Spindle
AAmstamp Gauge Bar with side guide
Napkin Guide
Pencil Attachment Guide
Poker Chip Fixture
Wire Marking Fixture
Shrink Tubing Fixture
Multi-Purpose Gauge Bar
The multi-purpose gauge bar is used as a hold down clamp for other attachments
such as cushion boards, match guides, etc.. The gauge bar will hold the attachments
firmly in place and has measuring marks to center the attachment being used.
9
THE 10 X 12 BASE PLATE
The AAmstamp 10x12 Ribbon and Stationary Plate offers you the most flexibility in printing
ribbon and stationary. This plate is commonly used for printing ribbon(Ribbon guides sold
seperatly) or stationary such as business cards, postcards, greeting cards and objects such as
photo albums, folders and portfolios.
Setup Instructions for printing ribbon Ribbon guides optional on base plate.
1.
Slide the 10x12 plate over the table plate of the sprite and push it all the way to the back.
Then lock the plate in place using the clamp knob on the top-right side of the 10x12 plate.
2.
When printing ribbon you should remove the side adjustment plate from the10x12 base plate.
3.
Load the ribbon onto the AAmstamp Ribbon Spindle. Place the ribbon spindle to the right
side of the 10x12 base plate so that the ribbon can be easily fed through the plate.Ribbon
Spindle sold seperatly.
4.
Loosen all four of the ribbon guide slider adjustment knobs located on the bottom side of the
10x12 plate. Ribbon guide attachment sold seperatly.
5.
Feed the ribbon through the 10x12 plate. Feed the ribbon from underneath the main base
plate and bring it up through the open slot on the right hand side, then continue across the
cushion board and then down through the slot on the left hand side.
6.
Now bring the top and bottom sliders on both sides of the 10x12 plate down to meet your
ribbon. Check the location of the ribbon to be sure that the your print will be centered on the
ribbon by pulling the machine operating handle down while lining up the ribbon. Make sure
that both sides of the ribbon are even by lining it up against the incremental marks engraved
on the main plate.
7.
Tighten the ribbon guide slider adjustment knobs. SETUP COMPLETE.
Setup Instructions for printing stationary, books and albums:
1.
Slide the 10x12 plate over the table plate of the machine. You can either align the vertical
positionby eye or use the formula: PAGE MARGIN + 1/2” (STOP RULER) + (PRINT
HEIGHT / 2). Lock the 10x12 plate in place using the clamp knob on the top-right side of the
plate.
Attach the side adjustment plate to the right or left side of the 10x12 plate. This plate acts as
2. a right hand or left hand stop when printing stationary products. If you would like to center
your print, divide the width of your product in half and align the side adjustment plateto that
location using the stop ruler on the top of the 10x12 plate. For example if you are trying to
center an 8.5” wide sheet of paper you would set the side adjustment plate to 4.25”. SETUP
COMPLETE.
Stationary Stop Guides Stop Ruler
Side Adjustment Plate
Side Plate
Adjustment Knob
Clamp Knob
Ribbon Slot
Main Plate
Cushion Board