ABB E-Hub 2.0 User manual

—
E-Hub 2.0
Getting started
—
LOW VOLTAG E
E-Hub 2.0
Getting started
• Make existing installations smart
without new components
• Meters integration via digital and
analog inputs
• Embedded interoperability
with third party systems

1E-HUB 2.0 GETTING STARTED

Cloud Platform
ABBAbilityTM
ABBAbilityTM
Modbus TCP
LAN
UPS, PCS, PDU
Modbus RS-485
3E-HUB 2.0 GETTING STARTED
Below is an example of a typical architecture:
A complete shopping list:
• E- Hub 2.0
• Ekip Connect 3.2.6.0 and above
—
E-Hub 2.0
E-Hub 2.0 is an independent IoT gateway which can gather data from field
devices as well as consumption of water, gas, etc. and connect to the system
to ABB AbilityTM cloud platform. As a result, all the downstream field devices
can be monitored from the cloud via ethernet cable, wi-fi or cellular
connectivity.
The Architecture
The device supported list is available here.

Ethernet SwitchEthernet Switch
M4M M4M
XT6
+
COM
XT4
+
COM
XT4
+
COM
XT2
+
COM
XT6
+
COM
XT4
+
COM
XT4
+
COM
XT2
+
COM
Emax 2 Emax 2
Internet cloud
E-Hub 2.0
RS-485 1/2
ETH
0ETH
1
COM 0 COM 1
4ARCHITECTURE
As an example, the illustration below shows how to
wire the system with separation of interfaces be-
tween field devices and internet connection.
It is mandatory to use two different networks.
Note:
Although E-Hub 2.0 has built-in firewall feature to block initiative access from internet and allows only initiative to internet from E-Hub 2.0, it's
still recommended to deploy dedicated firewall between E-Hub 2.0 and internet. It is recommended to configure rate limiter either at device
level or network level depending on the requirement.
Disclaimer
It is the sole responsibility of the customer to
provide and continuously ensure a secure con-
nection between the product and the customer
network or any other network.
The customer is required to establish and main-
tain any appropriate measures (including but
not limited to the installation of firewalls, appli-
cation of authentication measures, encryption
of data, installation of anti- virus programs,
For internet connectivity you can use:
• ETH0
• Wi-Fi
• 3G/4G
ETH1 must be connected to LAN (field devices)
etc.) to protect the product, the network, its
system and the interface against any kind of se-
curity breach, unauthorized access, interfer-
ence, intrusion, leakage and/or theft of data or
information.
ABB and its affiliates are not liable for damage
and/or losses related to such security breaches,
unauthorized access, interference, intrusion,
leakage and/or theft of data or information.

5E-HUB 2.0 GETTING STARTED
E-Hub 2.0 performance
Each E-Hub 2.0 can connect up to 60 devices (total
Modbus TCP/IP and Modbus RS-485). More than 60
devices in total can decrease the performances of
the data logging.
• Up to 30 Modbus RS-485 devices can be con-
nected to the RS-485 interface , equally split be-
tween the two COM ports,
- Devices with Modbus address between 2 and
127 must be connected to RS-485 interface
COM 0.
- Devices with Modbus address between 128
and 247 must be connected to RS-485 inter-
face COM 1.
- Note that a total number of 30 Modbus RS-485
devices ensure an optimal data logging (30sec)
• Up to 30 Modbus TCP/IP devices to ETH1 port.
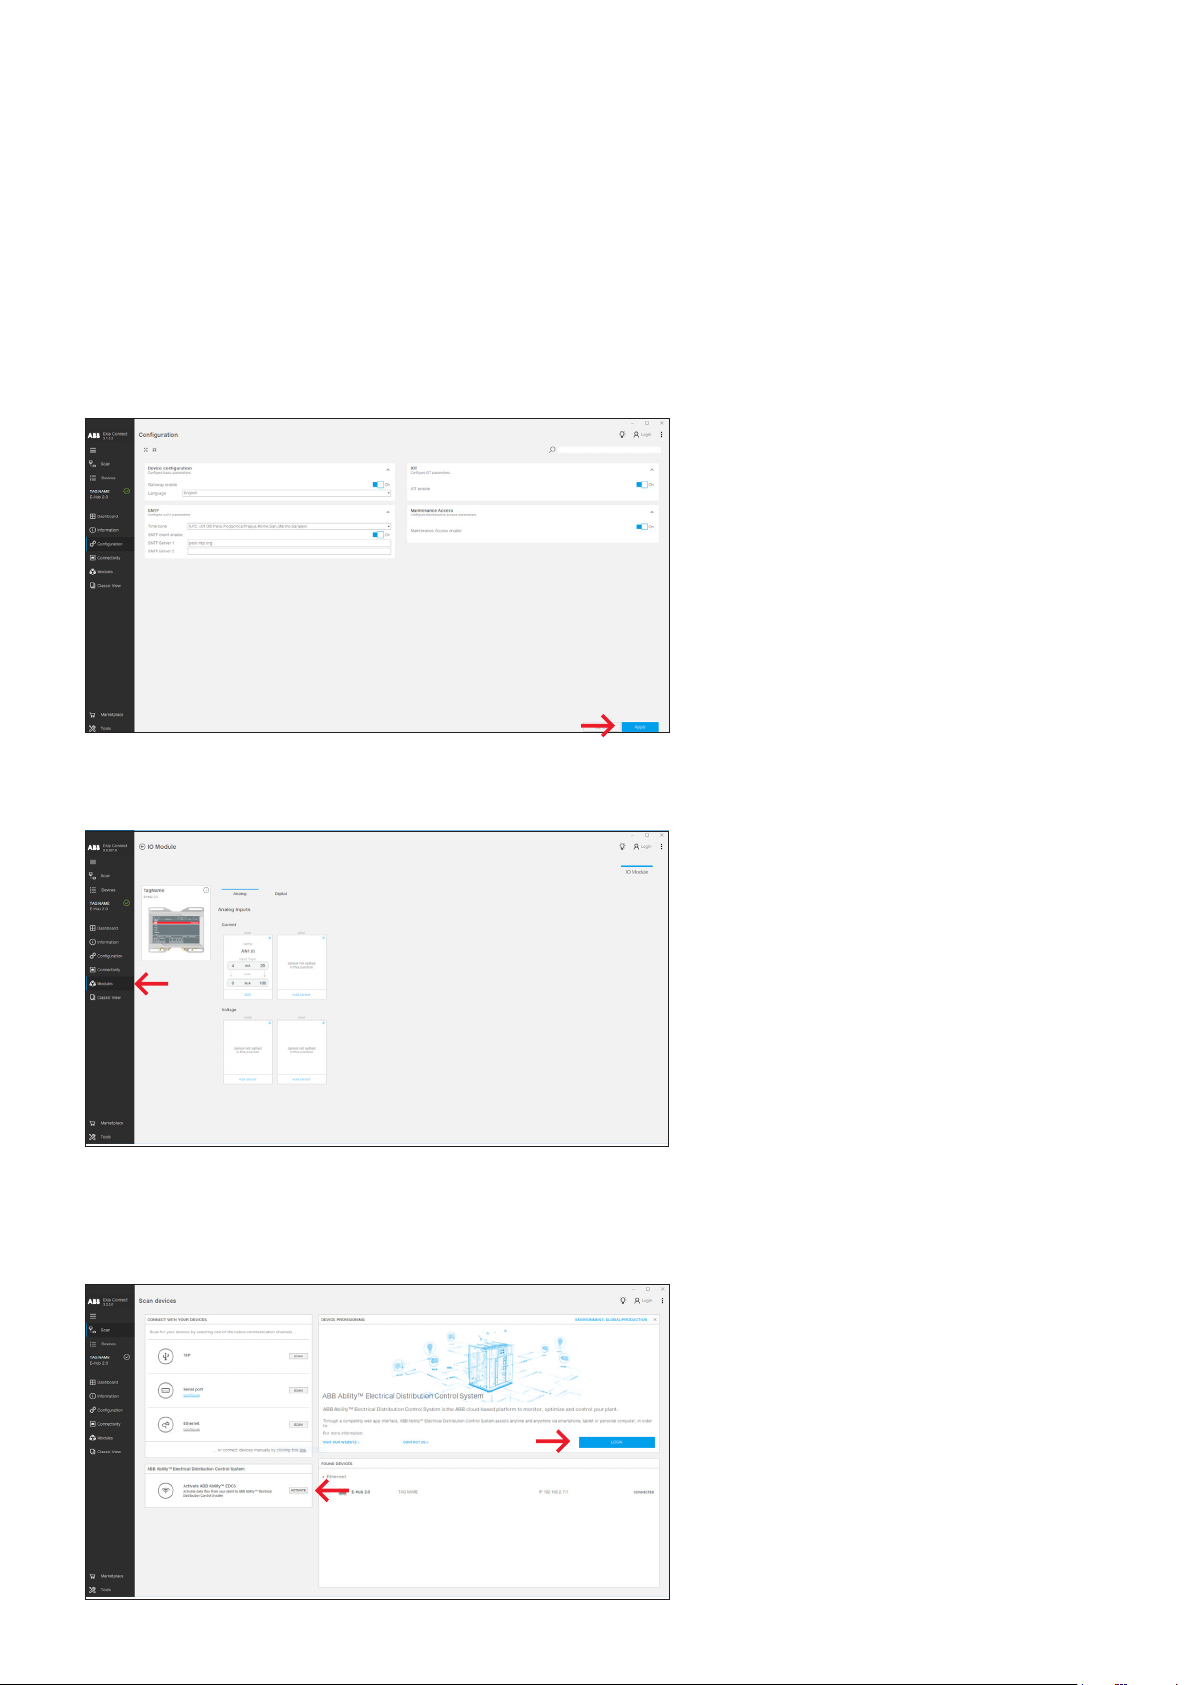
• Up to 4 channels of analog input supported.
- Analog Input 1 and 2 (AIN1 and AIN2) are for
current input. (4-20mA)
- Analog input 3 and 4 (AIN3 and AIN4) are for
voltage input. (0-36V)
• Up to 7 channels of digital input supported.
- Pulse meter and O/C contact can be selected
for different DI type.
Note:
All the AI and DI are set OFF as default.
• Data logging time and data refresh on the web
app is 30 seconds. However, performance could
decrease if a large number of devices (typically
more than 60) are connected to ABB Ability by
means of one single E-Hub 2.0.
Also, the type of devices that are connected and
the communication protocol used can affect the
performance. In order to ensure high data logging
performance, it is suggested to use more than
one E-Hub 2.0 when more than 30 devices have to
be connected via Modbus RS-485.
Internet data traffic
The estimated data traffic per connected device
amounts to 4 GB per year.
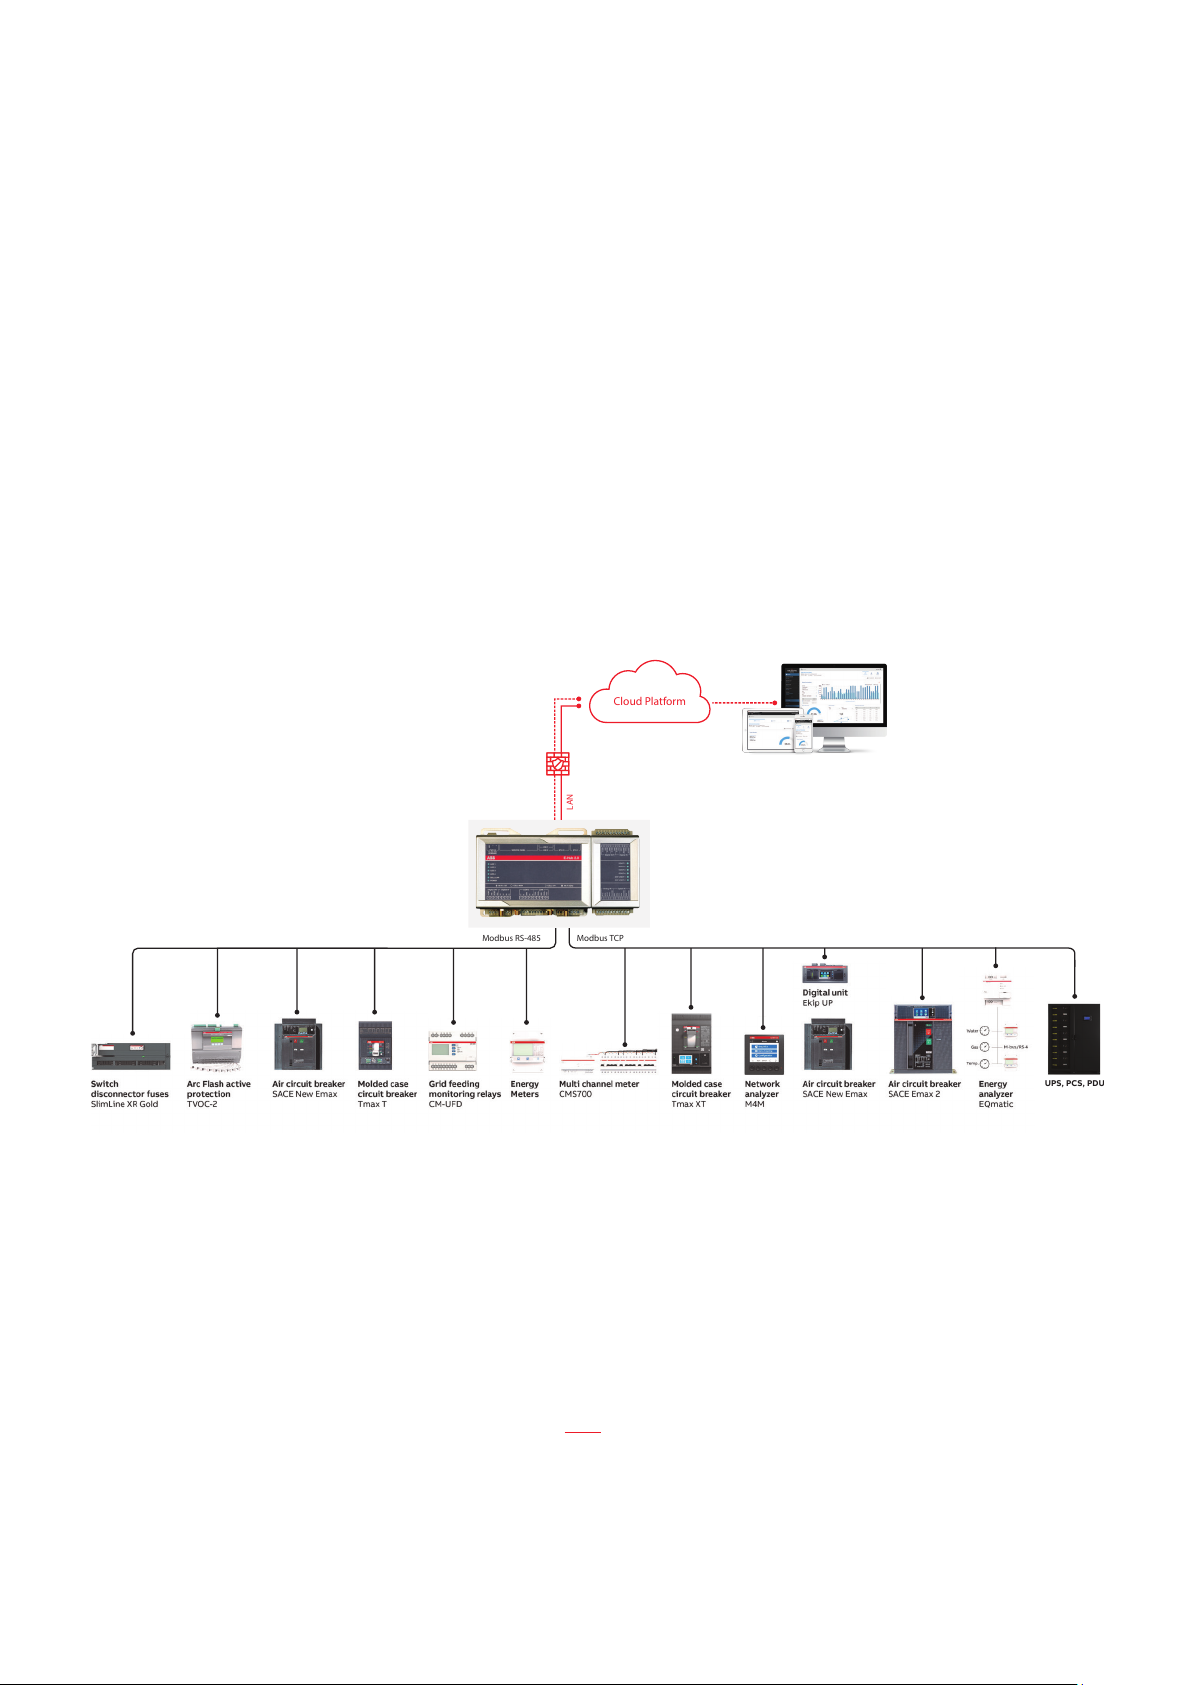
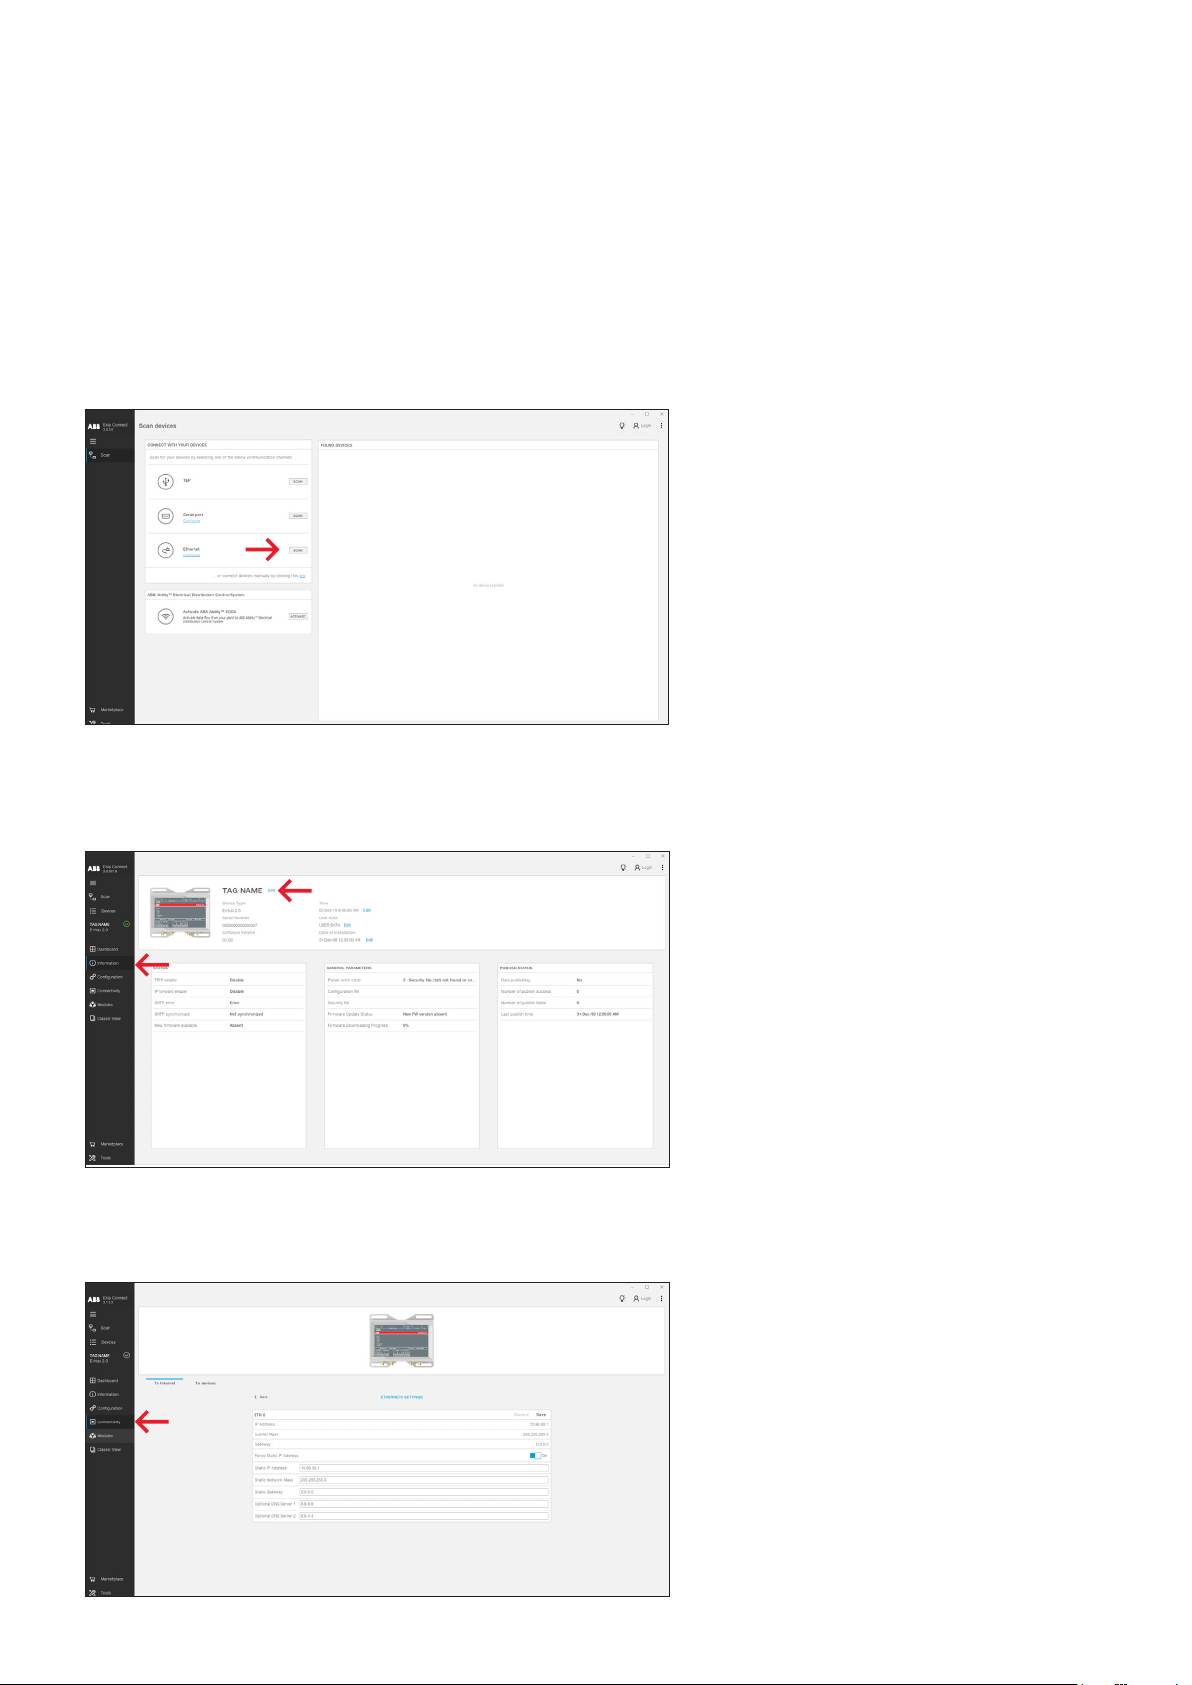
Configuring the system
The system configurations before provisioning
consist of four steps: E-Hub 2.0 Configuration,
Field Device Configuration, Network configura-
tion and Laptop Configuration.
E-Hub 2.0 Configuration
• E-Hub 2.0 ETH0 does not need a static IP ad-
dress, default configuration is DHCP client.
• E-Hub 2.0 Wi-Fi or 3G/4G has to be configured
using Ekip Connect 3. Please refer to the Ekip
Connect 3: Provisioning Steps.
• E-Hub 2.0 ETH1 default configuration is DHCP
server with the following parameters:
- Force Static IP Address: ON
- Static IP address: 192.168.2.1
- Static Subnet mask: 255.255.255.0
- DHCP Server IP Range Begin: 192.168.2.100
- DHCP Server IP Range End:192.168.2.255
- Enable DHCP Server: ON
Note:
If there is already one DHCP server on the ETH1 network, please be
sure to disable the existing DHCP server or disable the option "DHCP
enable" for the ETH1 port via Ekip Connect 3 to avoid conflict.
If you connect ETH0 to a network with an existing DHCP server, inter-
net connection should be guaranteed during the provisioning proce-
dure. Contact your network administrator in order to confirm.
For the configuration of the Digital Input and Analog Input of E-Hub
2.0 please refer to the Ekip Connect 3: Provisioning Steps.
Field Device Configuration
In case of connection via Modbus TCP, the down-
stream devices in the TCP network shall be con-
figured with the following parameters:
• Static IP address: ON
• Static IP address: select an address in the
192.168.2.2 … 192.168.2.99 range
• Subnet mask: 255.255.255.0
• Gateway: 192.168.2.1

6ARCHITECTURE
Network configuration
Connect your laptop via ethernet cable to the same ethernet network where the E-Hub 2.0 ETH1 interface
and all Modbus TCP field devices are connected;
Laptop Configuration
• Register on MyABB to activate an account.
• The user is not blocked by any firewall, device or software from reaching
prodabbauth.azurewebsites.net on port 443
• The user is generally able to connect to the internet and reach other internal (if connected to ABB Net-
work) or external internet websites.
• The user has cookies enabled in the browser.
Note: while devices provisioning process is running into ABB Ability, be sure your firewall is disabled.
Laptop
Ethernet SwitchEthernet Switch
Internet cloud
CMS-700 +
Open CTs on
MCBs
Emax Emax 2
Tmax T
RS-485 1/2
TCP/IP
ETH
0ETH
1
COM 0 COM 1
• E-Hub 2.0 must be provided with internet connection either via ETH0 (site network or dedicated
router with SIM card), Wi-Fi or cellular connectivity.
• For internet connectivity, you must ensure that the following destination ports are not forbidden by
the firewall, so that these ports could be accessible by E-Hub 2.0:
- 443/TCP: needed for the upload of the data via HTTPS
- 53/UDP: needed for public DNS
- suggested DNS server :
- 208.67.222.222 OpenDNS
- 8.8.8.8 Google
- 1.1.1.1 Cloudflare
- 123/UDP: if needed to use NTP server synchronization time
• Ekip Connect uses some local ports for data communication with the device:
- Port 502 TCP, Modbus TCP Communication
- Port 69 UDP, TFTP Communication

E-Hub 2.0 Communication – To Internet – ETH0
Follow the next instructions if you want to
connect the E-Hub 2.0 to internet through the
ETH0. Be sure that the E-Hub 2.0 ETH0 port is
connected to internet via an ethernet cable.
Click the “Connectivity” tab then select “To
Internet” and click on the “Ethernet 0” tile.
Configure the parameters according to the
network where ETH0 is connected, for example
you can force a static IP address.
7E-HUB 2.0 GETTING STARTED
—
Ekip Connect 3
Provisioning Steps
E-Hub 2.0 Connect
Configure the Ethernet option in the "Scan"
section and press "SCAN" as shown by pointer to
discover E-Hub 2.0.
Edit Tag Name
Click the “Information” section and edit device tag
name as shown by the pointer.
Click save after edit the device tag name.

E-Hub 2.0 Communication – To Internet – Wi-Fi
Follow the next instructions if you want to
connect the E-Hub 2.0 to internet through the
Wi-Fi network. Be sure that the E-Hub 2.0 ETH0
port is not connected to any network via an
ethernet cable.
Click the “Connectivity” tab then select “To
Internet” and click on the “Wi-Fi” tile.
Click on “Start Scan” and wait until your Wi-Fi
network is discovered, then click on it and fill in all
the parameters in the “SELECTED NETWORK” box
and then click “Connect”. Device will reboot.
If needed you can edit the TCP/IP parameters
according to the Wi-Fi network, for example you
can force a static IP address.
E-Hub 2.0 Communication – To Internet – Cellular
Follow the next instructions if you want to
connect the E-Hub 2.0 to internet through the
Cellular (3G/4G) network. Be sure that the E-Hub
2.0 ETH0 port is not connected to any network via
an ethernet cable.
Click the “Connectivity” tab then select “To
Internet” and click on the “Cellular (3G/4G)” tile.
Fill in all the parameters in the “CELLULAR” box
and then click “Connect”. Device will reboot.
E-Hub 2.0 Communication – To devices
Follow the next instructions to configure the
connectivity to field devices.
Click the “Connectivity” tab then select “To
devices”. In the boxes “RS-485 COM 0” and “RS-
485 COM 1” you can configure the connectivity
with Modbus 485 devices. In the box “ETH1” you
can configure the parameters according to the
network where ETH1 port is connected, for
example you can force a static IP address and
disable/enable the DHCP server.
8PROVISIONING STEPS

9E-HUB 2.0 GETTING STARTED
E-Hub 2.0 Configuration
Click the “Configuration” section and in the "SNTP"
box you can configure the SNTP server and enable/
disable the SNTP synchronization.
In the "Maintenance Access" box you can enable/
disable the maintenance access that can be use by
ABB technicians to help you in case of issues with
the device.
Click apply and continue.
Before provisioning, please be sure that the
system time is correct
E-Hub 2.0 I/O Settings
Click the “Modules” section and the then “IO Mod-
ule” tile to configure the Digital Input and the Ana-
log Input of E-Hub 2.0.
E-Hub 2.0 Provisioning
Click the "Scan" section, press the "ACTIVATE"
button and then press the blue "LOGIN" button to
login with your credentials.

10
Select the tile "E-Hub 2.0" to start the configura-
tion of the unit.
In order to ensure that ABB Ability will work
properly, it is mandatory to follow these two
steps to check whether the system and the
device are configured in the right way
- System check
- Activate configuration session
Click “Go to discovery”.
PROVISIONING STEPS
Select the tile "Hub provisioning".

11 E-HUB 2.0 GETTING STARTED
Tick on the "Sniff gratuitous ARP packets" box.
Digit in the device IP address of E-Hub 2.0, and
click on plus symbol. Digit for each device
connected via Modbus TCP the device static IP
address and click on plus symbol.
Otherwise, input the IP address range where to
scan those devices. In the slave address drop-
down menu, it is possible to select the addresses
of the slaves connected with Modbus RTU
communication protocol.
Then press “OK”
Select “Start Discovery”.
Once the E-Hub 2.0 module has been found, digit
the 16 character password code that you can find
printed on the left side of the devices and press
“Let me in”.
With Automatic discovery, Ekip Connect will scan
the whole Modbus network looking for devices to
provision.
With Manual discovery, it is possible either to
provide the list of specific Modbus RTU or IP
addresses or to narrow the scan to a particular
range of addresses.
The Manual discovery is recommended: in the
new Page select “Manual Discovery settings”

12
Now you will be able to see all the devices con-
nected to the E-Hub 2.0.
For each device, you can set:
• Tag Name, if not already present
• Set it to be on one of the main feed lines
(e.g. an incomer breaker)
• Set it to be on a generator line
(e.g. diesel generator, PV system, turbine…)
• If it has to send data to the ABB Ability™
• Note: at least one Main or Generator device must
be set inside a plant.
Once all the settings on each device have been
completed. Click on “Add to ABB Ability™”. You
can add the devices to an existing plant or to a
new one.
Add to an existing plant: select the desired
plant from the menu then click "Publish".
PROVISIONING STEPS
Manually added devices
Devices that doesn't support automat-
ically discovery can be added by click-
ing on.
Add device". Select the device and pro-
vide the information required."
Automatically discovered devices

13 E-HUB 2.0 GETTING STARTED
Now you have to set the plant owner.
The plant owner is the one who accepts the EULA
and renews the license. Moreover, he can edit and
view everything inside ABB Ability™.
If you are the owner of the plant, please select
“Become Owner”, otherwise insert the email ad-
dress of the person who will be the owner.
Then click “Publish Owner”
New plant: insert all the data for the new plant.

14PROVISIONING STEPS
Click “Ok” to agree to the terms of service.
Click “Finish”.
Ekip Connect will automatically open the default
internet browser and access the ABB Ability™
page.
From the home page, you can access all the func-
tions and the plants for which you have access.
From each plant it is possible to browse to Set-
tings, then Profiles section. In Profiles section, it
is possible to manage the users' access to the se-
lected plant, e.g. user role or access removal

15 E-HUB 2.0 GETTING STARTED
Note:
Performing a second provisioning on an E-Hub 2.0 module already provisioned to an ABB Ability plant,
is allowed only for updating the plant’s devices configuration (e.g. when you need to add a new device
to the plant).
In order to create a new plant you will need to delete all the devices and E-Hub 2.0 connected to the
specific plant directly from the ABB Ability webapp (Select the plant, then Devices > Delete device).
This will remove the association of the devices and the E-Hub 2.0 from a plant and make them
available for a provisioning on a new plant.
During the first 15 minutes after completing the provisioning, you could not be able to see any data on
the ABB Ability™ webapp. This is a normal situation as security checks are occurring between the
module and the platform.
If you still cannot visualize the provisioned devices afterwards, this could be due to communication
issues between field network and cloud platform, i.e. the UDP 53 port is not open.

© Copyright 2017 ABB. All rights reserved.
Specifications subject to change without notice.
1SDC200100B0201 REV B 12.2020
—
ABB SACE
A division of ABB S.p.A.
L.V. Breakers
Via Pescaria 5,
24123 Bergamo - Italy
Phone: +39 035 395.111
Fax: +39 035 395.306-433
abb.com/lowvoltage

16
Other manuals for E-Hub 2.0
1
Table of contents
Other ABB Industrial Equipment manuals
Popular Industrial Equipment manuals by other brands

Ingersoll-Rand
Ingersoll-Rand IR60VR Series Operation and maintenance manual

DROPSA
DROPSA MaXtreme Operation and maintenance manual

Giebel
Giebel Adsorber Vario VG Assembly and maintenance manual

WEISS
WEISS CR1300C Mounting instructions

KTR-Group
KTR-Group KTR-STOP L light A Series Operating & assembly instructions

SECOP
SECOP 101N2740 instructions