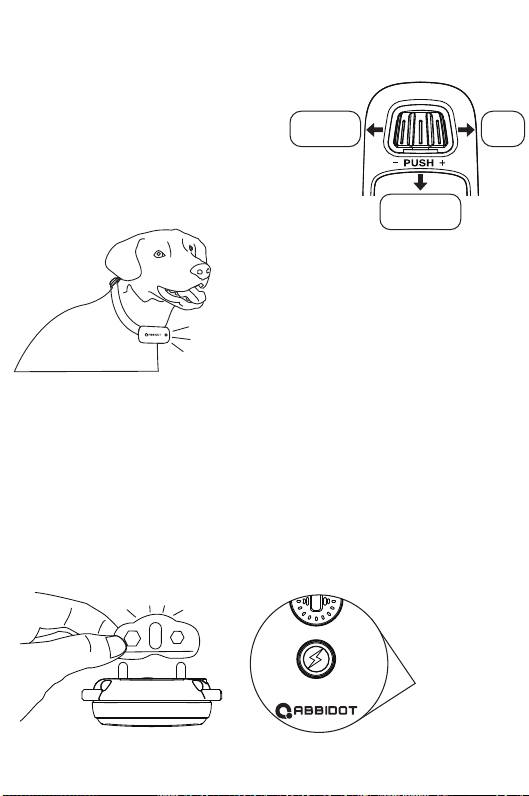
1. Rotate the shock level knob, set to level 1 .
2. Place two finger over both contact points of the training collar.
3. Press and hold the Smulaon Buon on the remote for 1-2 seconds. At
this level, you should feel connuous smulaon.
4. Keep going up the levels unl the sensaon starts to feel uncomfortable.
3
5
46
7
User Manual
0.3.0.02.T30010-24-01
T30
E- collar
Dear Pet Parent!
Thank you for purchasing AbbiDot.
Here at Abbi, we are happy if you and your pet are happy. We know that
nurturing a lasng bond with a pet takes paence, commitment and just a
lile bit of help. This is why we dedicate all of our me and creave
resources to making pet care accessories that are smart and simple.
Our products are not meant to replace the training process — they are
here to aid it. They should never be used as punishment, overused or
treated as an one-fit-all soluon. They are the most effecve at the very
start of the training process and when showing your pet the danger of
certain behaviors: like crossing the road or picking up food on the street.
We strongly recommend focusing on reward training and making posive
reinforcement the base of your training roune. Your pet’s safety and
well-being should always stay a priority throughout this experience.
We know that any training process is a two-way street. We learn just as
much from our pets as they do from us. Help us make our products beer
by sharing your training success stories with us.
AbbiDot Team
Yours
TABLE OF CONTENTS
Overview .......................................................................................... 04
Product Setup .................................................................................. 05
How to Charge the Remote and Collar?........................................... 05
Get the Remote Ready ..................................................................... 06
How to Increase/Decrease Shock Level?.......................................... 08
How to Use the Light Test Tool? ...................................................... 08
How To Pair Remote With the Collar? ............................................. 09
How To Pair the Second Collar With the Remote ............................ 09
How To Find The Best Smulaon Level For Your Pet ..................... 10
Device Informaon........................................................................... 11
Troubleshoong Guide..................................................................... 12
Dog Training Guide........................................................................... 13
Teaching Basic Obedience................................................................ 14
The “Come” Command .................................................................... 15
The “Stay” Command ....................................................................... 16
Eliminang Unwanted Behavior....................................................... 17
Jumping Up....................................................................................... 17
Digging.............................................................................................. 18
Chasing ............................................................................................. 19
Trash Raiding.................................................................................... 20
General Tips ..................................................................................... 20
Terms of Use and Limitaon of Liability.......................................... 21
Frequently Asked Quesons ............................................................ 22
Warranty and Repair Informaon.................................................... 24
OVERVIEW
Note:
PRODUCT SETUP
HOW TO CHARGE THE REMOTE AND COLLAR?
Before Using the Dog Training Collar, Follow These Setup Steps:
1. Charge the Remote and Collar.
2. Get the Remote ready and turn it on.
3. Get the Collar ready and turn it on.
4. Test all buon funcons before placing the collar on your pet.
5. Use the Light Test Tool.
Please use the Output: DC 5V 500-2000mA charger to charge the product.
Don’t use a charger that does not meet the above specificaons to charge
the product.
Make sure to turn the collar off when it’s not in use to save baery.
Before starng the training, place the collar on yourself and test it to see
how it feels. We recommend starng with the lowest seng and then
moving on to higher sengs up to your personal comfort level.
Smulaon intensity can be adjusted from level 1 to level 36. Make sure to
make these adjustments carefully based on your dog’s reacon.
Connuous smulaon will go on for no more than 10 seconds.
To reacvate smulaon, release and press the buon again.
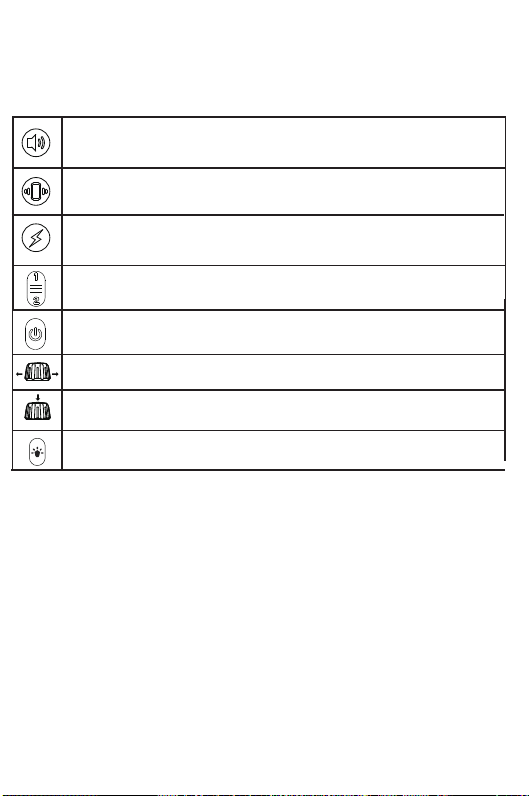
Tone: sends a tone (non-adjustable level) to the training collar.
Vibraon: sends a vibraon (non-adjustable level) to the
training collar.
Smulaon: sends stac smulaon (adjustable in 1-36 levels)
to the training collar.
Switch between channels (Dog 1 and Dog 2).
Press and hold to turn on/off.
Press to turn on/off LED light on collar.
Rotate to increase/decrease Smulaon level.
Press down to lock/unlock all buons.
1. To turn on the remote, press and hold the ON/OFF buon.
2. The screen will light up and display current channel data and baery
level. If the screen doesn’t light up, charge the remote.
3. To turn off the remote, press and hold the ON/OFF buon for over 2
seconds.
1. To turn on the collar, press the ON/OFF buon.
2. The LED light on the collar will turn green. In standard mode, the Green
LED will flash every 4 seconds indicang that the collar is on and ready to
receive a signal from the remote.
3. To turn off the collar, press and hold the ON/OFF buon for over 2
seconds.
1. Please use the supplied charging cable to charge the collar.
2. Once the collar is fully charged, its red LED indicator will turn green.
Once the remote is fully charged, its baery indicator will show up as full.
3. Once the collar is fully charged, place the rubber cap covering the
charging port back in its place.
1. Excessive charging will shorten baery life. Try to only charge the
remote and collar when they are low on baery.
2. When you’re not using the collar, turn the device off to save baery.
3. Use the following output: DC 5V 500-2000mA
Don’t use chargers that don’t meet necessary specificaons to charge the
remote and collar.
8910 11 12
HOW TO USE THE TEST LIGHT TOOL?
HOW TO INCREASE/DECREASE STIMULATION LEVEL?
We strongly suggest TESTING the collar before putting it on your pet.
GET THE REMOTE READY
Note:
Note:
Note:
Do not press and hold the Vibraon/Smulaon Buon for extended periods
of me. This may cause physical or psychological pain to your pet.
Important!
How To Turn ON/OFF the Remote?
How To Turn On the Collar?
1. Make sure the collar is off your dog.
2. Turn on the collar.
3. Hold the test light’s contacts against the contact points of the collar.
4. Press the Smulaon Buon — the test light tool will light up. Its
brightness will increase or decrease depending on the level of smulaon
you are using.
1. Rotate right to increase Smulaon level.
2. Rotate le to decrease Smulaon level.
3. Press down to lock/unlock all buons.
HOW LED LIGHT WORKS?
When you can't find your dog in the
dark, you can find it by lighng the LED
light.
Do not shave your pet’s neck as this may increase
the risk of skin irritaon. Your dog shouldn’t wear
the collar for more than 12 hours per day.
Caution:
HOW TO FIND THE BEST STIMULATION LEVEL FOR YOUR PET?
Signs you need to charge the device:
Follow the steps below:
Important: always start with the vibraon mode first and use the stac
Smulaon mode as the last resort.
Depending on the model of your training collar, you may be able to access
anywhere from one to 36 different smulaon levels. This can help you find
the level that is best for your dog.
Once you’ve placed the collar on your pet, it’s me to find the most suitable
smulaon level.
At this stage of the process, you will need to watch your pet carefully for
the slightest changes in behavior like looking around in curiosity, scratching
at the collar or flicking ears. All these behaviors are indicators that you have
found a suitable smulaon level. This is also known as Recognion Level.
1. The LED indicator on the collar is red and flashing rapidly.
2. The baery indicator on the remote’s screen is flashing.
3. The LED light on either the collar or remote doesn’t turn on.
4. The LED light on either the collar or remote blinks but doesn’t turn on
when you press any of the mode buons.
Make sure the Collar is turned on.
Check if the baery level is low on either the Collar or
the Remote.
The range of the remote may be affected by a number
of factors like terrain, weather, vegetaon, transmis-
sion from other radio devices and so on.
Try tesng the Collar using the test light tool (see
above).
Try increasing the smulaon level (please refer to the
How To Find The Best Smulaon Level For Your Pet
secon).
Make sure the Collar’s contact points are in good
contact with your pet’s skin. Refer to the Collar Fing
secon for more informaon.
Make sure the Collar is charged.
When charging the Collar for the first me, charge it
for at least 4 hours. Subsequent charges only take 2-3
hours.
Make sure the Collar is turned on.
Check if both the Collar and the remote are sufficiently
charged.
Try pairing the Remote and Collar again (refer to the
How to Pair the Remote with the Collar secon).
1. Start at the lowest smulaon level: press and hold the Vibraon or
Smulaon Buon connuously (further referred to as the [S] buon).
2. If your pet shows no reacon, repeat the first step several mes before
moving up to a higher smulaon level.
3. Your pet should not bark or panic when receiving smulaon. If this
happens, the smulaon level is too high and you need to go back to the
previous level and repeat the process.
4. Move up through the available smulaon levels unl your pet responds.
5. If your pet connues to show no response at the highest smulaon level,
check if the collar is fied properly. If your pet has long or thick fur, try using
the longer set of contact points. Then go back to step 1 and repeat the
process. If there is no change, you might need to trim your dog’s hair around
the contact points.
1. On the remote, use the channel switch to select Dog 1.
2. With the remote turned on and the collar turned off, press and hold
the ON/OFF buon on the collar for 4-5 seconds.
3. The LED on the collar will flash for about 10 seconds to indicate that
it’s ready for pairing.
4. Press and hold Tone Buon and Vibraon Buon at the same me for
2-3 seconds. The green LED on the training collar will blink 5 mes to
indicate successful pairing.
On the remote, use the channel switch to select Dog 2. Next, follow the
above steps (2-4) to complete the pairing process.
For the best results, it’s important to select suitable contact points based
on the thickness of your dog’s coat.
You can use the contact points separately or together with the spring sheet.
When placing the collar on your dog, make sure it fits properly and the
contact points are pressed firmly against the dog’s skin. If the collar is
fied too loosely, it may move during the training process and the
contact points may hurt the dog’s skin.
The collar should also not be fied too ghtly: you should be able to
place a finger between the dog’s neck and the training collar. If placed
too ghtly, the collar may cause breathing difficules for your dog.
HOW TO PAIR REMOTE WITH THE COLLAR?
DOG TRAINING
DEVICE INFORMATION
HOW TO PAIR THE SECOND COLLAR WITH THE REMOTE?
How to Select Contact Points and Contact Spring Sheet?
COLLAR FITTING
TROUBLESHOOTING GUIDE
My pet doesn’t
react to
stimulation
The collar
won’t turn on
The collar isn’t
responding to
the remote
A. Smulaon Level Knob & Lock
B. Switch Dog 1 or Dog 2 Mode
C. On / Off Buon
D. LED Indicaor
E. Light Up Buon
F. Tone Buon
G. Vibraon Buon
H. Smulaon Buon
Tone Indicaon
Vibraon Indicaon
Smulaon Indicaon
Light Indicaon
Dog 1 or Dog 2 Mode
Shock Level Display
Lock
Training Indicaon
Baery Indicator
I. LED Light
J. On/Off Buon
K. Contact Points (x2)
L. Charging Port (with cover)
Remote
Collar
A
B
H
D
E
F
G
L
I
J
K
C
Specification
*Remote Baery Life: 10 Days (Every 1 Min/Time, 4 H/Day)
*Collar Baery Life: 16 Days (Max. Level, Shock Every 1 Min/Time, 4 H/Day)
Lock/Unlock
All Buons
Level
Down
Level
Up
T30 Dog Training Collar
AB-T30
3 (Tone/Vibraon/Smulaon)
36 Levels
Detachable
Included
Up to 900m (3000 feet) in Open Space
Yes
Yes
Yes
2
Rechargeable Li-ion Baery
Remote: 10 days / Collar: 16 days
2 Hours
15.2 – 68.7 cm (6”– 27”)
7 x 3.6 x 2.4 cm (2.75” x 1.4” x 0.94”)
13.2 x 4.4 x 2 cm (5.2” x 1.7” x 0.78”)
Collar 77g (with strap) / Remote 62g
Not Waterproof (Keep Away From Water)
IEC 60529 IPX7, Waterproof
From 0-40℃ (From 32-104℉)
20dBm
Product Name:
Model:
Training Modes:
Stac Smulaon:
Contact Points:
Long Contact Points:
Wireless Range:
Momentary/Connuous Correcon:
Smulaon Safety Lock:
Night-vision Light:
Mul-dog Compability:
Baery:
Baery Life:
Charging Time:
Collar Strap Fits Neck Sizes:
Collar Size:
Remote Size:
Weight:
Remote Waterproof Rang:
Collar Waterproof Rang:
Operang Temperature:
Wireless Power: