Accent DUO II User manual

DUO II ELECTRIC
SINGLE DESK
ASSEMBLY AND
INSTRUCTION GUIDE

2www.accentworkspaces.co.nz
Tools Required
Battery Drill 4mm Hex Bit #2 Square Drive Bit
Assembly
Instructions 3-6
User Instructions 7-13
Care and
Maintenance 14
TABLE OF CONTENTS

0800 126 826 | support@accentworkspaces.co.nz 3
A. ASSEMBLY DIAGRAM
DUO II ELECTRIC
SINGLE DESK

4www.accentworkspaces.co.nz
NO. HARDWARE SECTION QUANTITY
1Foot 2pcs
2 Lifting Column (Motor) 1pc
3 Upper Side Support 2pcs
4 Steel Hanger 1pc
5Extendable Tube 1pc
6 Framework 2pcs
7Transmission Tube 1pc
8 Hex Bar 1pc
9 Lifting Column 1pc
B. PACKING LIST
ACCESSORY PACKAGE QUANTITY
10 Screw ST6x23 15pcs
11 Bolt M6x10 5pcs
12 Bolt M6x16 8pcs
13 Glide 4pcs
14 Cable Ties 2pcs
15 Hex Wrench-(2mm) 1pc
16 Hex Wrench-(4mm) 1pc
17 Hex Wrench-(8mm) 1pc
18 Spanner - I(8mm) 1pc
19 Spanner - I I (18mm) 1pc
CONTROL SECTION QUANTITY
20 Power Cord 1pc
21 AC Adaptor 1pc
22 Control Box 1pc
23 Handset 1pc

0800 126 826 | support@accentworkspaces.co.nz 5
C. HOW TO INSTALL THE DESK
STEP 1STEP 2
STEP 3STEP 4
Take out the framework, release the M6x10 bolt with
4MM hex wrench.
Install foot and levelling glides.
Install the lifting column, insert the screw into the
keyhole of the lifting column and pull to one side,
then fasten the M6x10 with a 4mm hex wrench.
Insert hex bar and transmission tube with the help of
spanner, and 2.5mm hex wrench.
M6x10
4pcs
M6x16
8pcs
Levelling Glide
4pcs
CSTEP: 2.5 mm WRENCH DSTEP: Spanner

6www.accentworkspaces.co.nz
Tighten
STEP 5STEP 6
STEP 7STEP 8
Install upper side support.
Install the desktop and handset.
Our control box and AC adaptor are pre-fixed to the
bracket, hang the bracket to frame and put on desktop.
Tighten the bolt x4 (M6x10) and transmission tube.
M6x10
4pcs
ST6x23
14pcs
Refer to page 9 on how to connect all the cords.
Check the
Transmission tube
is connected to
both legs.

0800 126 826 | support@accentworkspaces.co.nz 7
DUO II ELECTRIC
SINGLE DESK
USER INSTRUCTIONS
SECTION PAGE
Parts List A 9
Technical Specifications B 9
Directions of use C 10
Trouble Shooting D 10
Warranty E 11
Changing between CM and Inch – 1UN F 11
Setting Handset Display Brightness - 2BR G 11
Adjust Upward Sensitivity - 3FU H 12
Adjust Downward Sesitivity - 4FD I 12
Adjust the Lowest Height Display and Height Range - 5SH J 12
Switching Between Modes - 6HC K 13
Adjust Bounce Height - 7H L 13
Restore Factory Settings - 8R M 13
Fatigue Test Mode - 9D N 13
Handset Lock O 14

8www.accentworkspaces.co.nz
NO. HARDWARE SECTION QUANTITY
1 Lifting Column 2pcs
2 Handset 1pc
3 Control Box 1pc
4AC Adaptor 1pc
5Power Cord 1pc
A. PARTS LIST
NO.
1 Input 110~240VAC
2 Output Power 24VDC
3 Load Capacity 800N
4 Speed 20mm/s
5 Stroke 450mm
6 Min Install Dimension 700mm
7Operation Temperature 0-40C
8 Duty Cycle Max.22% or 5min on and 18min o
B. TECHNICAL SPECIFICATIONS

0800 126 826 | support@accentworkspaces.co.nz 9
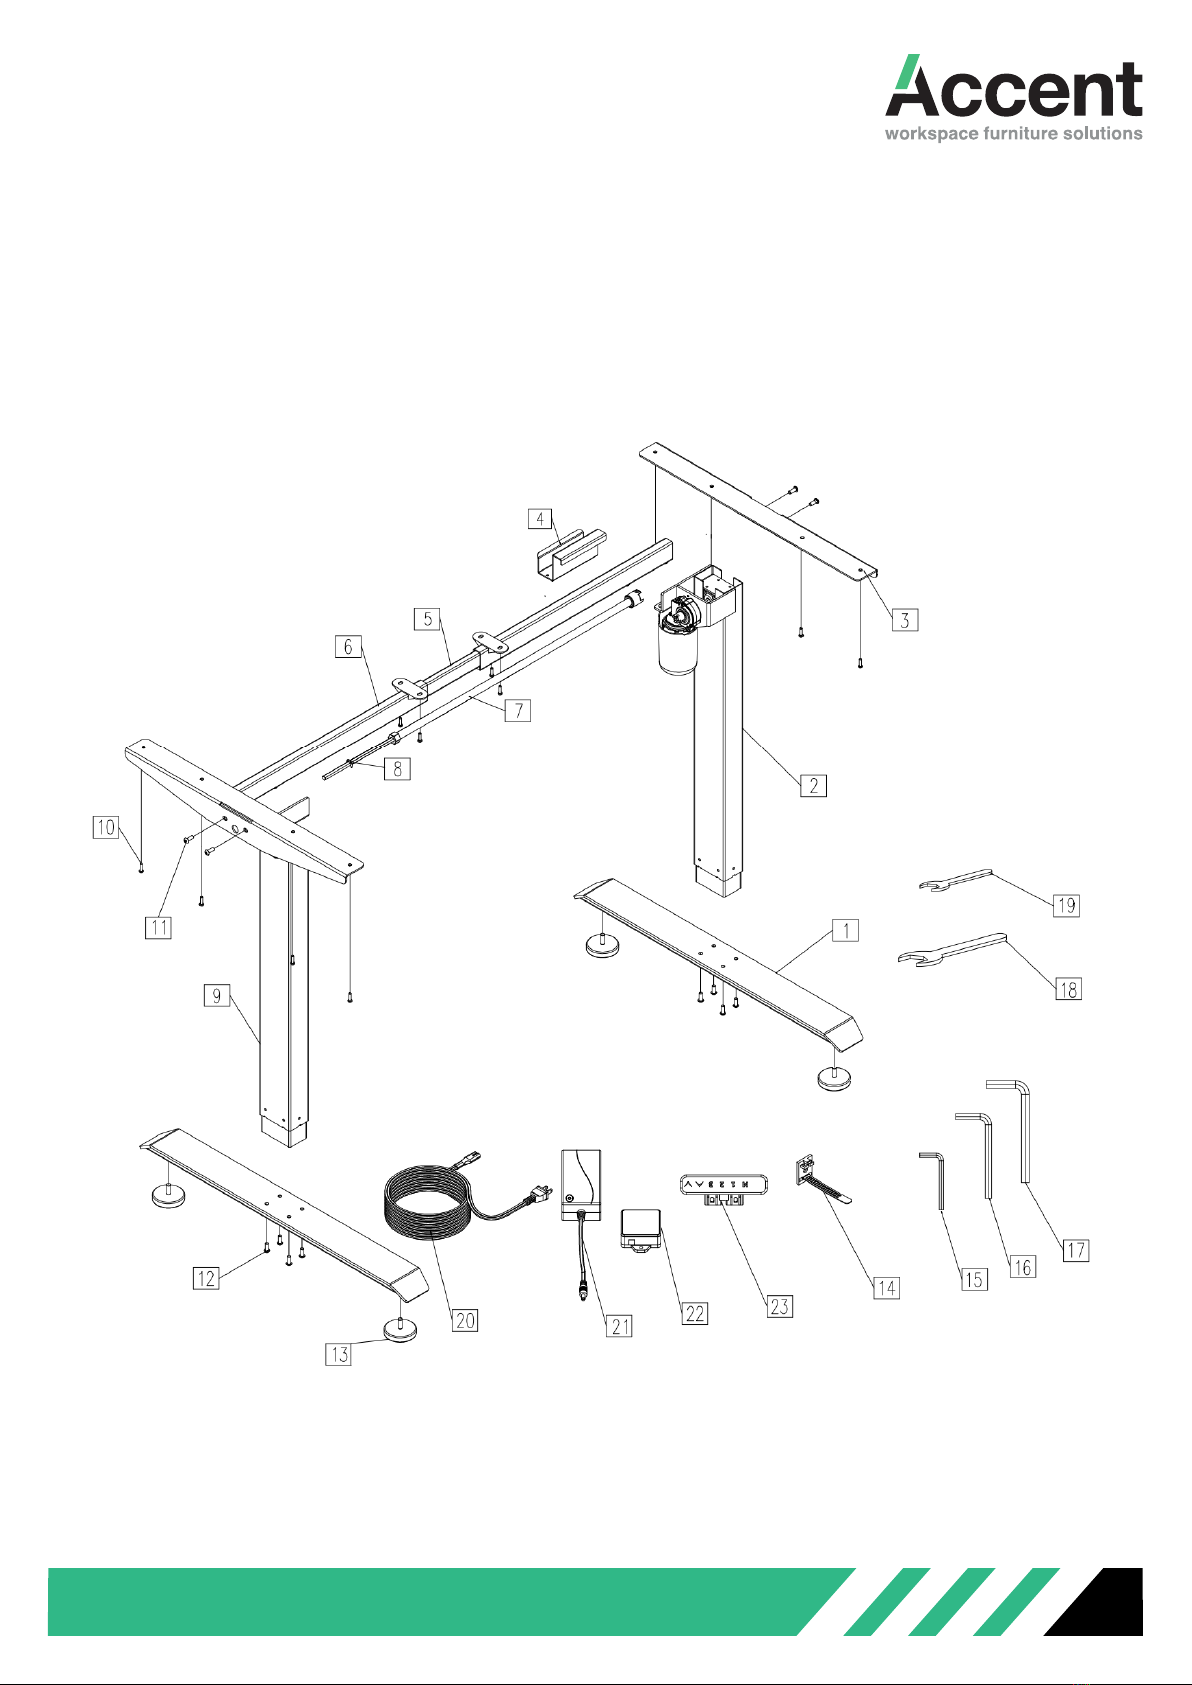
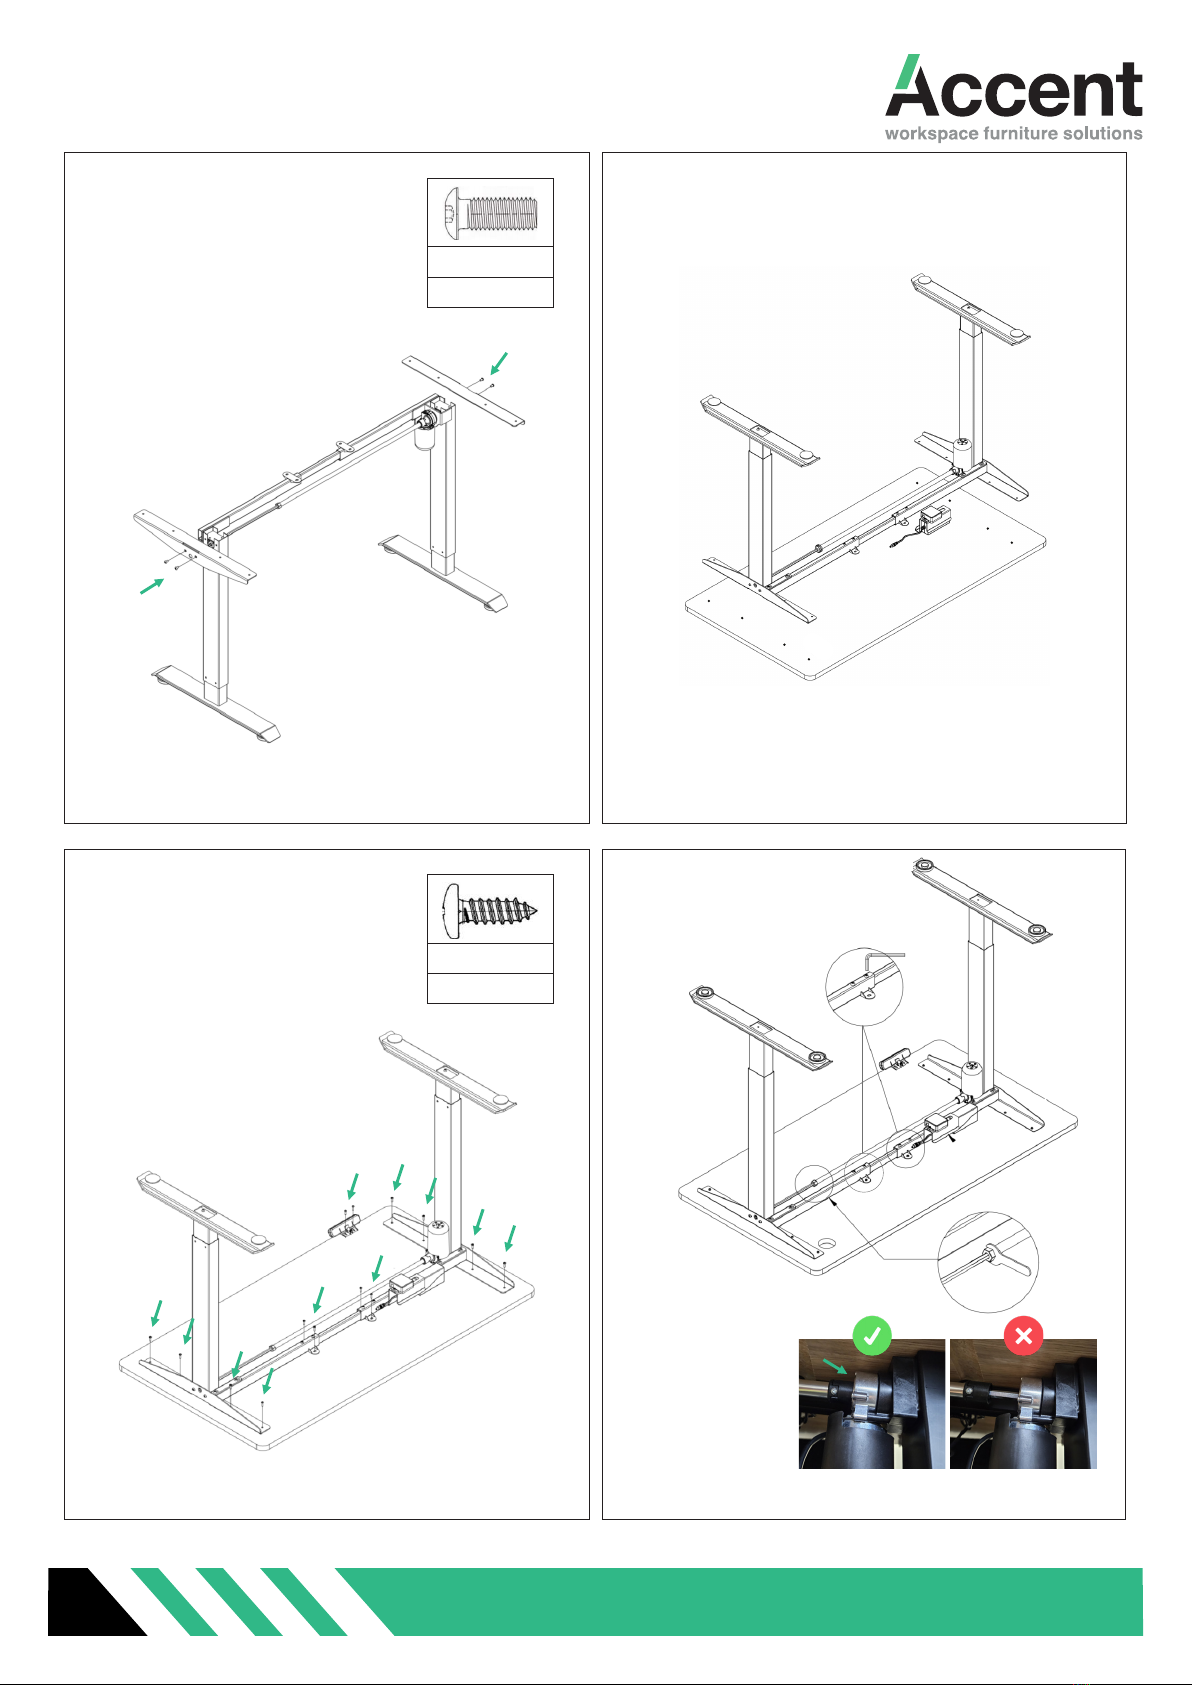
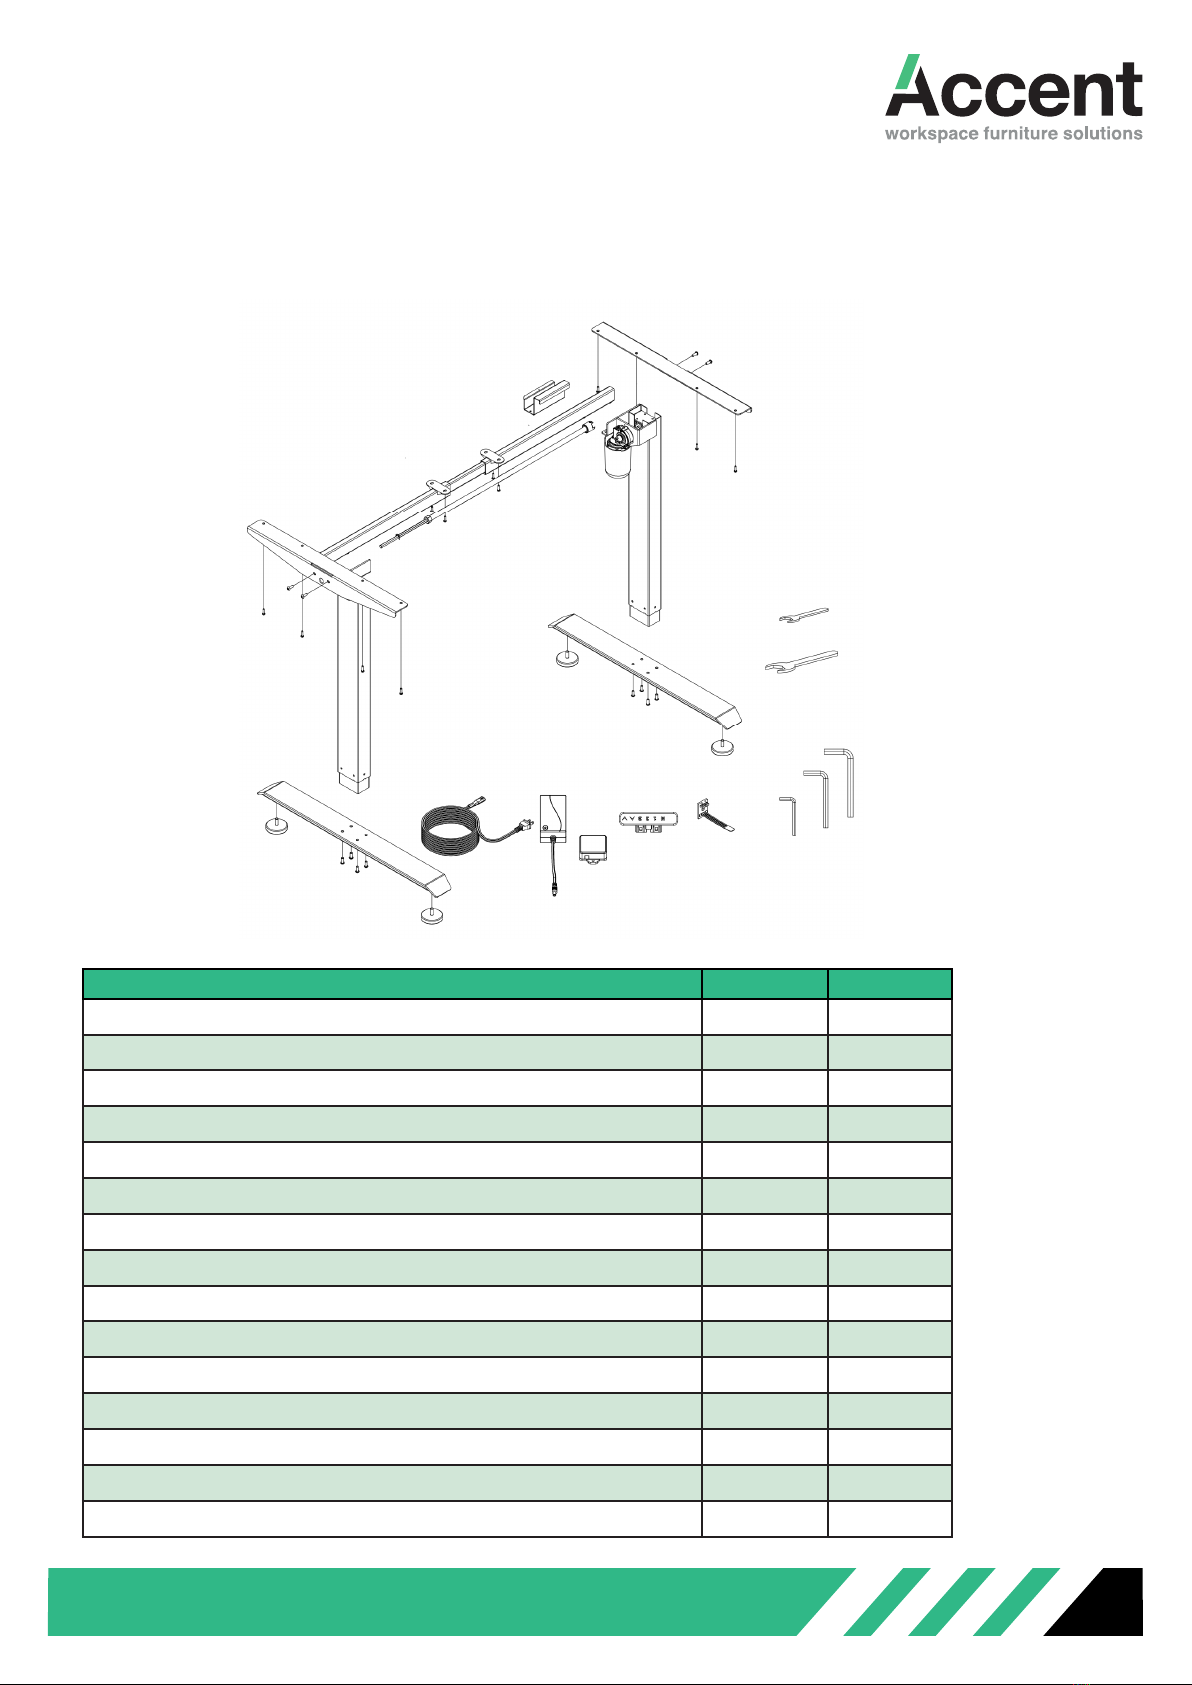
1. Correctly connect the Control Box, Handset, Power Cord, Lifting Column & Patch Cord. (Picture 1).
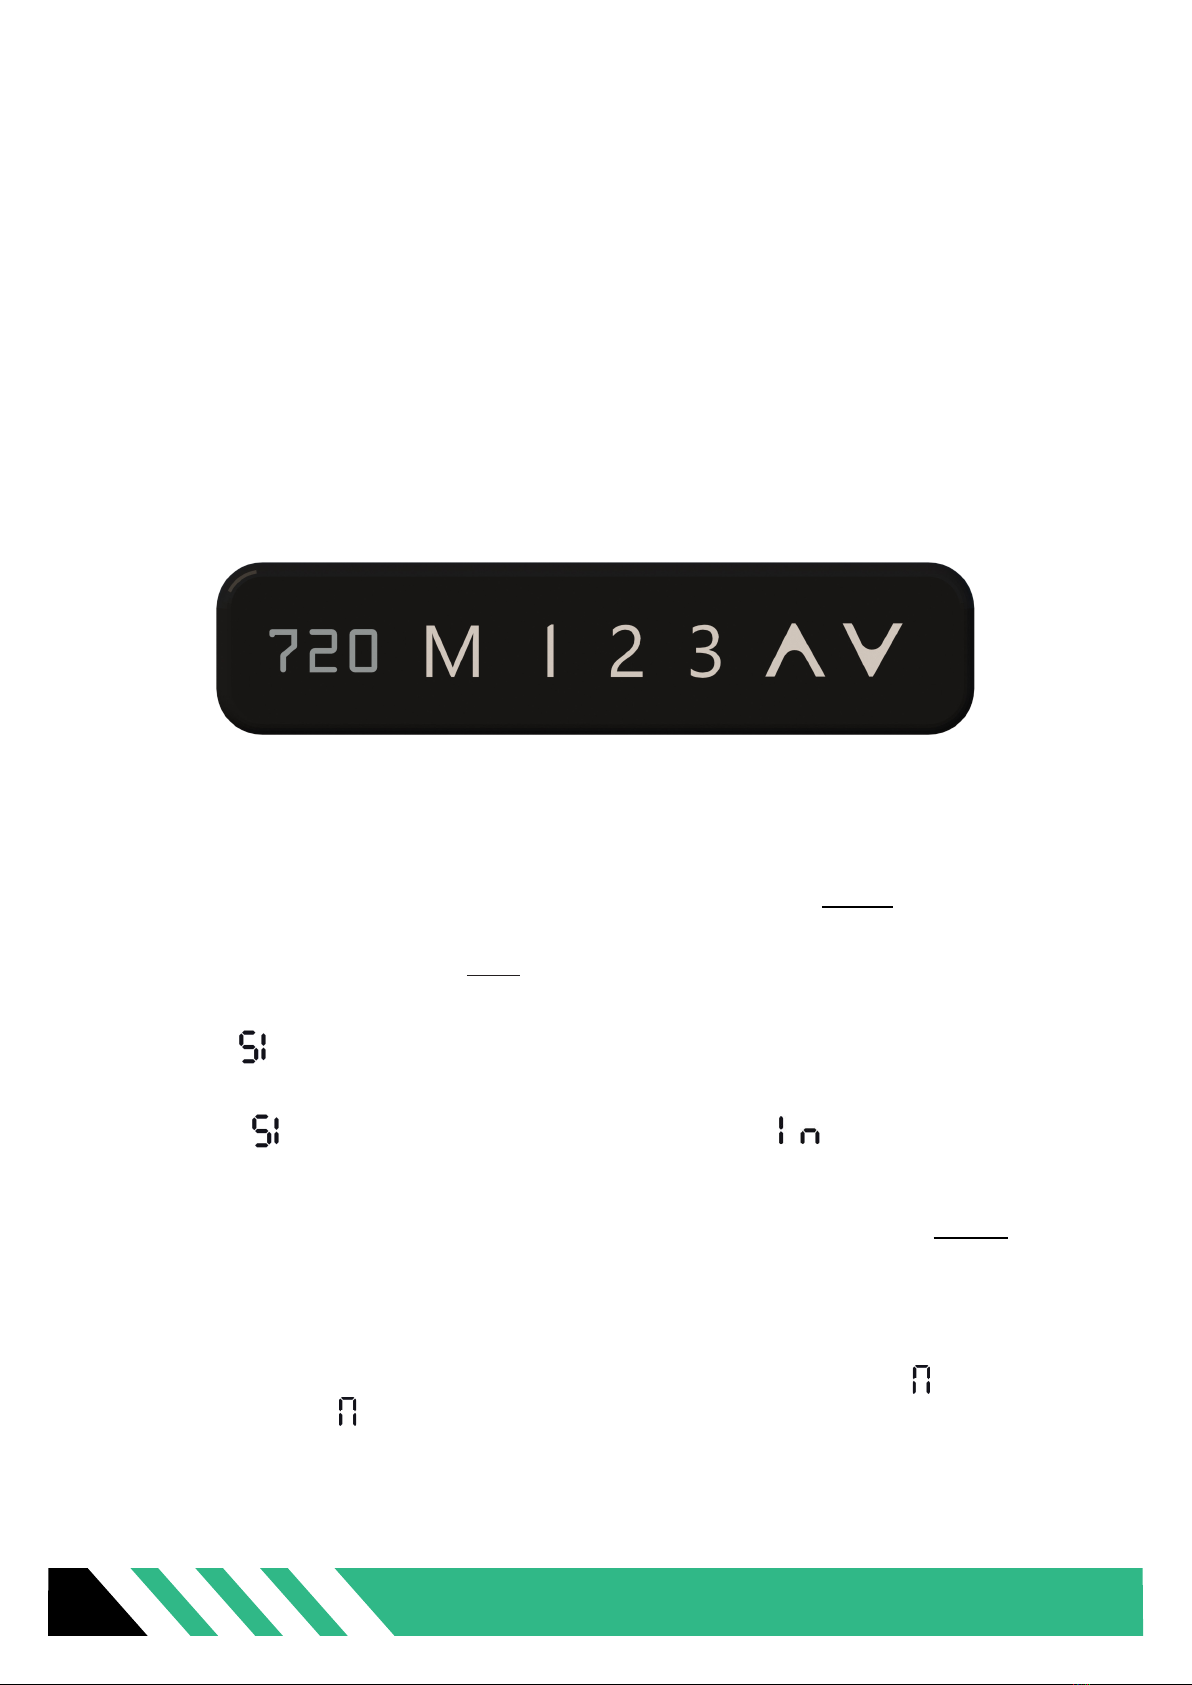
Plug the power cord into 110~220VAC outlet the LCD display will display will display current height.
Reset (Initialization):
Press and hold the down button, the handset will display “rES” and the desk will begin to lower, until
to the lowest height then slightly rise. Continue holding the down button until the Handset displays the
lowest height.
If the handset continues to display “rES” once the down button has been released, press and hold the
down button until the Handset displays the lowest height.
3. After reset, press and hold “UP” button, lifting column will rise, release to stop.
4. After reset, press and hold “DOWN” button, lifting column will lower, release to stop.
Setting Memory Positions:
After pressing and holding UP/DOWN button to a height, press button M first, then press button 1, this
height will be remembered by button 1.
Still pressing and holding UP/DOWN button to another height, press button M, then press button 2, this
height will be remembered by button 2.
The same way, the button 3, 4 can remember other heights. After memory, press 1/2/3 button, desk will
motion to the height it remembers, press “UP” and “DOWN” button. The motion will be stopped.
C. DIRECTION FOR USE
D. TROUBLE SHOOTING
If the LCD Controller displays error codes when raising or lowering the desk, a reset will be required.
1. Motor error (E01, E02 or E03, E04)
Control box cannot detect motor halt plate signal or Control box detect one lifting column is over loaded.
This is a safety protection.
Please take away any large loads from the desk top and reset the controller. Should a reset fail to resolve
the issue one or more motors will need to be replaced.
2. Control box temperature protection (HOT)
This indicates that the control box temperature is above 75C or the system has been in continuous use for
2min or more. The lifting columns are locked out for up to 18mins as a safety precaution. For an urgent
reset, unplug the power cord.
3. Overload protection (E07)
Desk load in excess of 100kg, user needs to reduce load, then reset or just need to wait for 3 seconds,
it will recover.

10 www.accentworkspaces.co.nz
4. Low Voltage protection (E08)
Power Voltage is too low for the controller, this is a safety cut out protection. System will recover as soon
as voltage returns to normal.
5. High Voltage protection (E09)
Power Voltage is too high for the controller, this is a safety cut out protection. System will recover as
soon as voltage returns to normal.
6. Control Box or Handset Issue (E10)
If Handset display E10 and will not disappear, control box or handset is broken.
E. WARRANTY NOTICE
1. This product must be used under the correct technical parameters.
2. Keep away from liquids, corrosives, gases and dusty environments.
3. Do not open any of the components, doing so will void any and all service support and manufactures
warranties.
“1” Button - Return to previous menu
“UP” / “DOWN” Button - Select menu
“M” Button - Confirm menu
F. CHANGING BETWEEN CM AND INCH-1UN
Keep pressing Button “M” for 3 seconds, Handset will display “S---”, then release pressing Button “M”
and press Button “M” again, the code “1Un” will then appear.
Press Button “M” to enter.
1. It will display , you can press “M” button to preserve cm display and please wait for 2 seconds it
will display current height(cm).
2. After it displays , you can press button “Up”/“Down” to change it to , press button “M” to preserve
inch display and please wait for 2 seconds it will display current height(inch).
G. SETTING HANDSET DISPLAY BRIGHTNESS-2BR
1. Keep pressing button “M” for 3 seconds. Handset will display “S---”, then release pressing button “M”
and press button “M” again to enter, the code “1Un” will then appear.
2. Press button “Up”/“Down” to be 2br.
Then press button “M” to enter, this will display current display brightness level (L/ /H).
L: Means low brightness, :Means normal brightness, H: Means high brightness.
3. Press button “Up”/“Down” to select your favorite brightness level, then press button “M” to preserve
and quit, please wait for 2 seconds and it will display current height.

0800 126 826 | support@accentworkspaces.co.nz 11
H. ADJUST UPWARD SENSITIVITY-3FU
1. Keep pressing Button “M” for 3 seconds. Handset will display “S---”, then release pressing Button “M”
and press Button “M” again to enter, the code “1Un” will then appear.
2. Press button “Up”/“Down” to be “3Fu”. Then press button “M” to enter, this will display current upward
sensitivity level (L5). We have 9 levels of upward sensitivity, from L1 to L9, L1 is the most sensitivity, L9 is
the least sensitivity. L5 is our factory setting upward sensitivity.
3. Press button “Up”/“Down” to select your favorite upward sensitivity level, then press Button “M” to
preserve and quit, please wait for 2 seconds and it will display current height.
I. ADJUST DOWNWARD SENSITIVITY-4FD
1. Keep pressing Button “M” for 3 seconds. Handset will display “S---”, then release pressing Button “M”
and press Button “M” again to enter, the code “1Un” will then appear.
2. Press button “Up”/“Down” to be “4Fd”.
Then press button “M” to enter, this will display current upward sensitivity level (L5).
We have 9 levels of upward sensitivity, from L1 to L9, L1 is the most sensitivity, L9 is the least sensitivity.
L5 is our factory setting upward sensitivity.
3. Press button “Up”/”Down” to select your favourite upward sensitivity level, then press button “M” to
preserve and quit, please wait for 2 seconds and it will display current height.
J. ADJUST THE LOWEST HEIGHT DISPLAY
AND HEIGHT RANGE-5SH
1. Keep pressing Button “M” for 3 seconds. Handset will display “S---”, then release pressing Button “M”
and press Button “M” again to enter, the code “1Un” will then appear.
2. Press button “Up”/“Down” to be “5SH”, then press button “M” to enter, this will display , you also
can press button “Up”/“Down”, so that it will display and .
: Mean to set the lowest position display height.
: Mean to set a new lowest position.
: Mean to set a new highest position
3. Press button “Up”/“Down” to be , then press button “M” to enter, will display current lowest
height, you can press button “Up”/“Down” to adjust the lowest height display, then press button “M” to
preserve and quit, please wait for 2 seconds and it will display new lowest height.
4. Press button “Up”/”Down” to be , then press button “M” to enter, will display current lowest
height, you can press button “Up” set a new lowest position, then press button “M” to preserve and quit,
please wait for 2 seconds and it will display height. New lowest position finished setting.
5. Press button “Up”/“Down” to be , then press button “M” to enter, will display current highest
height, you can press button “Down” to set a new highest position, then press button “M” to preserve
and quit, please wait for 2 seconds and it will display height. New highest position finished setting.
6. After setting, desk can only motion between new lowest position and new highest position.

12 www.accentworkspaces.co.nz
K. SWITCHING BETWEEN MODES-6HC
1. Keep pressing Button “M” for 3 seconds. Handset will display “S---”, then release pressing button “M”
and press button “M” again to enter, the code “1Un” will then appear.
2. Press button “Up”/“Down” to be “6Hc”, then press button “M” to enter, this will display current mode:
“001”. You also can press button “Up”/“Down”, so that it will display “002”.
We have two modes for your choosing.
“001” mode: You need to keep pressing up or down button so that desk will motion.
“002” mode: You only need to press one time up or down button, the desk will motion, click press any
button the motion will be stopped.
3. Press button “Up”/“Down” to select your favorite mode (001 or 002), then press button “M” to preserve
and quit, please wait for 2 seconds and it will display current height.
M. RESTORE FACTORY SETTINGS-8R
1. Keep pressing button “M” for 3 seconds. Handset will display “S---”, then release pressing button “M”
and press button “M” again to enter, the code “1Un” will then appear.
2. Press button “Up”/“Down” to be “8r”, press button “M” to enter, will flash.
3. Press button “M” to preserve and quit, “rES” will appear, need a reset to finish restoring factory setting.
(About reset, please refer to Step C)
L. ADJUST BOUNCE HEIGHT-7H
1. Keep pressing button “M” for 3 seconds. Handset will display “S---”, then release pressing button “M”
and press button “M” again to enter, the code “1Un” will then appear.
2. Press button “Up”/“Down” to be “7H”, then press button “M” to enter, this will display current bounce
height.
3. Press button “Up”/“Down” to set a favourite bounce height, then press button “M” to preserve and quit,
please wait for 2 seconds and it will display current height.
N. FATIGUE TEST MODE-9D
1. Keep pressing button “M” for 3 seconds. Handset will display “S---”, then release pressing Button “M”
and press button “M” again to enter, the code “1Un” will then appear.
2. Press button “Up”/“Down” to be “9d”, then press button “M” to enter. It will appear , press 5 times
button “1” continuously, you can enter into fatigue mode selecting menu. There will be 5 modes for your
choosing.
OFF: No fatigue test.
51: Level 1 fatigue test, continue working,no stop.
52: Level 2 fatigue test, upward and downward 1 time then rest for 4 minutes.
53: Level 3 fatigue test, upward and downward 1 time then rest for 6 minutes.
54: Level 4 fatigue test, upward and downward 1 time then rest for 10 minutes.

0800 126 826 | support@accentworkspaces.co.nz 13
3. Please press “up” and “down” to select your favorite fatigue mode, then press button “M” to preserve.
4. You can press “UP” button to begin fatigue test, also you can quit the fatigue test by unplugging the
power cord.
O. HANDSET LOCK
1. Keep pressing “Up” and “Down” button for 5 seconds, handset will lock and will flash.
2. Keep pressing “Up” and “Down” button for 5 seconds, handset will be unlock and handset will display
current height.

14 www.accentworkspaces.co.nz
FACTSHEET
CARE & MAINTENANCE
GENERAL CARE – INFORMATION
• Avoid scourers and abrasives as they will damage the surface.
• Don’t place hot objects, electrical appliances or pots straight from the oven or cooker onto your
laminate surface.
• Don’t cut on the laminate surface.
• Keep waxes and polishes well away as they dull the natural shine.
• Do not use strongly acidic, alkaline cleaners or bleach for normal cleaning as these might etch
the surface.
GENERAL CARE – STREAKS
Streaky marks sometimes show on dark colours after cleaning. An all-purpose cleaner such as
Mr. Muscle Surface & Glass or Ajax Spray n Wipe usually removes them.
GENERAL CARE – GREASE
Using a mild dishwashing detergent in water will remove greasy marks. Dab, wait and wipe away.
Finish with an all-purpose cleaner such as Mr. Muscle Surface & Glass or Ajax Spray n Wipe.
GENERAL CARE – SPILLS
Laminate surfaces resist staining from most household chemicals. With some accidental spills
however, prompt action is essential. Wipe o beetroot, grape and berry juices, first aid
preparations, concentrated bleach, oven cleaners, dishwasher detergents, artificial dyes,
hair colouring and solvent based pen ink immediately. Specialty glues such as Super Glue
must also be removed straight away with acetone (nail polish remover).
GENERAL CARE – STAINS
If the stain won’t budge with Mr. Muscle Surface & Glass, try methylated spirits or dab the stain
with a diluted bleach mixture (1 part bleach to 8 parts water); leave for 3 minutes then wash
o with water and dry. Finish o with Mr. Muscle Surface & Glass. Only as a last resort if a stain
persists try 2 or 3 rubs with a crème cleanser or white toothpaste, wash and dry. Please note that
bleach or these abrasive cleaners may irreversibly damage the laminate surface.
GENERAL CARE – SCRATCHES
Laminate surfaces will withstand normal wear and tear, but can be damaged by scratching
or cutting with utensils, knives and unglazed pottery. Darker colours will show scratches more
readily than lighter colours. In general, dark colours and high gloss surfaces require more
care and maintenance than lighter colours or lower gloss colours. To minimise scratching,
always place and lift objects from the surface – never drag or slide them across the surface.

0800 126 826 | support@accentworkspaces.co.nz 15
SCAN TO REGISTER
WARRANTY
REGISTRATION
At Accent Group, we are committed to delivering not only exceptional products
but also exceptional customer experiences. We take immense pride in crafting
each item with the utmost care to meet your expectations and your purchase is
backed by our 15-year Warranty (terms and conditions apply). To make the most
of this extended warranty and to facilitate any future claims seamlessly, we kindly
request you to complete our Warranty Registration Form by scanning the QR code
below. Providing us with your details will enable us to serve you better and ensure
your peace of mind throughout the warranty period.
View full Warranty details on our website – www.accentgroup.co.nz
CUSTOMER PRODUCT REVIEW TEAM
As a company committed to excellence, we continuously seek ways to enhance our oerings and deliver
the finest in the NZ market. We invite you to take part in a Customer Product Review. Your valuable feedback
matters to us, and joining the team is eortless. Approximately three months after your product delivery,
one of our team members will reach out to you for a brief call. During this conversation, we will enquire about
your product experience. Your insights on what’s working well and what’s not, whether the products have met
your expectations, and if you would consider purchasing from Accent again are highly appreciated.
By joining our Customer Product Review Team, you play an integral role in shaping the future of our products,
ensuring they align perfectly with your needs and preferences. Your voice will guide us in crafting even better
oerings that resonate with customers like you.
We are truly excited about this opportunity to collaborate with you closely.
If you wish to participate in the program, please tick YES when you complete your Warranty Registration.
Every quarter we’ll select 4-5 customers to take part in the 3 month product review each customer we receive
feedback from will receive a $50 Prezzy card.
Don’t hesitate to reach out to us if you have any queries or need assistance, give our
team a call on 0800 826 126. Thank you again for choosing Accent Group products.
Best regards,
The Accent Group Team

0800 126 826
support@accentworkspaces.co.nz
22 Hood Street Wellsford, Auckland 0900 New Zealand
Version #011123
Table of contents
Other Accent Indoor Furnishing manuals

Accent
Accent 80586S User manual

Accent
Accent BALANCE DESK User manual

Accent
Accent Antique OC2500 User manual

Accent
Accent CLASSIC TABLE User manual

Accent
Accent CONNECT User manual

Accent
Accent Modella II Table User manual

Accent
Accent OSLO TABLE User manual

Accent
Accent DUO User manual

Accent
Accent BALANCE User manual
Popular Indoor Furnishing manuals by other brands

Naber
Naber Concept Kitchen manual

Cozzia
Cozzia MC-520 Use & care manual

Whittier Wood Furniture
Whittier Wood Furniture 1143DUETb Assembly instructions

Balzar Beskow
Balzar Beskow KOLONN EXTEND 6 LEG Assembly instructions

Furniture of America
Furniture of America CM-BK603 Assembly instructions

SEI
SEI HO664200TX Assembly instructions