Accumax SMART User manual

USER GUIDE

| 2
SMART PIPETTE - USER GUIDE
INTRODUCTION
Congratulations on making a SMART choice. You are now the proud
owner of an Accumax SMART pipette.
This user guide lists details on how you can take care of your SMART
pipette and benefit the most from its advanced features as follows:
•SMART is one of the most lightweight pipette with durable working.
•Designed to dispense accurate volume of liquid with long term
precision.
•Ergonomically designed for ease in operation and user safety.
•Color coded for easy identification.
CHECK LIST
Your Accumax SMART pack would carry...
•SMART Pipette
•Sample pack of tips
•Recalibration / Ellen Key
•Silicone Grease
•Shelf Mounting Stand
•User Guide
•Warranty Card
•Certificate of Conformity including Calibration Certificate
PRODUCT DESCRIPTION
SMART pipettes operate on air displacement principals and uses
disposable tips.
Variable volume pipette
CAT No. Volume Range [ µl ] Increments [ µl ]
SVA-125 0.1-2.5 0.002
SVA-100 0.5-10 0.02
SVA-200 5-50 0.1
SVA-500 10-100 0.1
SVA-600 100-1000 1
SVA-700 2-20 0.02
SVA-800 20-200 0.2
SVA-905 500-5000 10
SVA-1000 1000-10000 20

3 |
SMART PIPETTE - USER GUIDE
Fix Volume pipette
Multichannel pipette
8-channels
12 channels
CAT No. Volume Range [ µl ] Increments [ µl ]
SMA8-010 0.5 - 10 µl 0.02
SMA8-020 2- 20 µl 0.02
SMA8-050 5- 50 µl 0.1
SMA8-100 10 - 100 µl 0.1
SMA8-200 20 - 200 µl 0.2
SMA8-300 30 - 300 µl 0.2
CAT No. Volume Range [ µl ] Increments [ µl ]
SMA12-010 0.5 - 10 µl 0.02
SMA8-020 2- 20 µl 0.02
SMA12-050 5 - 50 µl 0.1
SMA12-100 10 - 100 µl 0.1
SMA12-200 20 - 200 µl 0.2
SMA12-300 30 - 300 µl 0.2
CAT No. Volume [ µl ]
SFA-205 2.5
SFA-5 5
SFA-10 10
SFA-20 20
SFA-25 25
SFA-50 50
SFA-100 100
SFA-200 200
SFA-250 250
SFA-500 500
SFA-1000 1000
SFA-2000 2000
SFA-5000 5000
SFA-10000 10000

| 4
SMART PIPETTE - USER GUIDE
Raw Material
The SMART pipette is made of mechanically robust and chemically
resistant materials, making it a durable and stable pipette giving
consisting performance for long time.
Digital Display
In SMART pipette, delivery volume is evidently indicated in the large
digital display on the handle.
In variable volume pipette, the last wheel of the counter has a
scale that assists to set precise delivery volume.
In some of the variable volume pipettes the last one or two counter
wheels will be in grey color which indicates the value after decimal.
A pointer is used to set exact or intermediate volumes with the help of
scale on last wheel.

5 |
SMART PIPETTE - USER GUIDE
Parts Description
ASPIRATION / DISPENSING KNOB
(OPERATING KNOB)
VOLUME CHANGING KNOB
TIP EJECTOR PUSHER
COUNTER LOCK
COUNTER WINDOW COVER
COUNTER WHEELS
MAIN HANDLE COMFORT GRIP
MAIN HANDLE
TIP EJECTOR CLOSER
TIP EJECTOR
TIP CONE

| 6
SMART PIPETTE - USER GUIDE
PIPETTE OPERATION
Setting the Volume
With the SMART pipette, the delivery volume of liquid is set using the
digital counter. A pointer is used to set exact or intermediate volmes
using the scale on the last wheel of digital counter. In some of the
variable volume pipettes, counter wheels are in black & grey color.
Grey wheel indicates value after the decimal.
You can set the delivery volume
using the volume changing knob
on the upper side of pipette after
unlocking the counter by pulling
up the counter lock. To decrease
the delivery volume, turn it
clockwise and to increase, turn
it anti-clockwise. Do make sure
that the desired delivery volume is
set in-line with pointer. Pull down
the lock to ensure that volume
doesn’t accidently changed during
pipetting.
- +
Volume
Changing
Knob
Push up to un-lock
Locked Position Un-locked Position
Pull down to Lock
1) Counter lock mechanism is to ensure volume changing knob remains in its
position while aspirating or dispensing liquids. Any forced efforts to rotate the
volume changing knob while counter lock mechanism is in lock position will either
make it in unlock position or may damage the locking mechanism.
2) Setting the volume beyond the specified volume range is not advisable. Using
excessive force to turn the volume-changing knob outside the specified range,
may jam the mechanism and eventually damage the pipette.

7 |
SMART PIPETTE - USER GUIDE
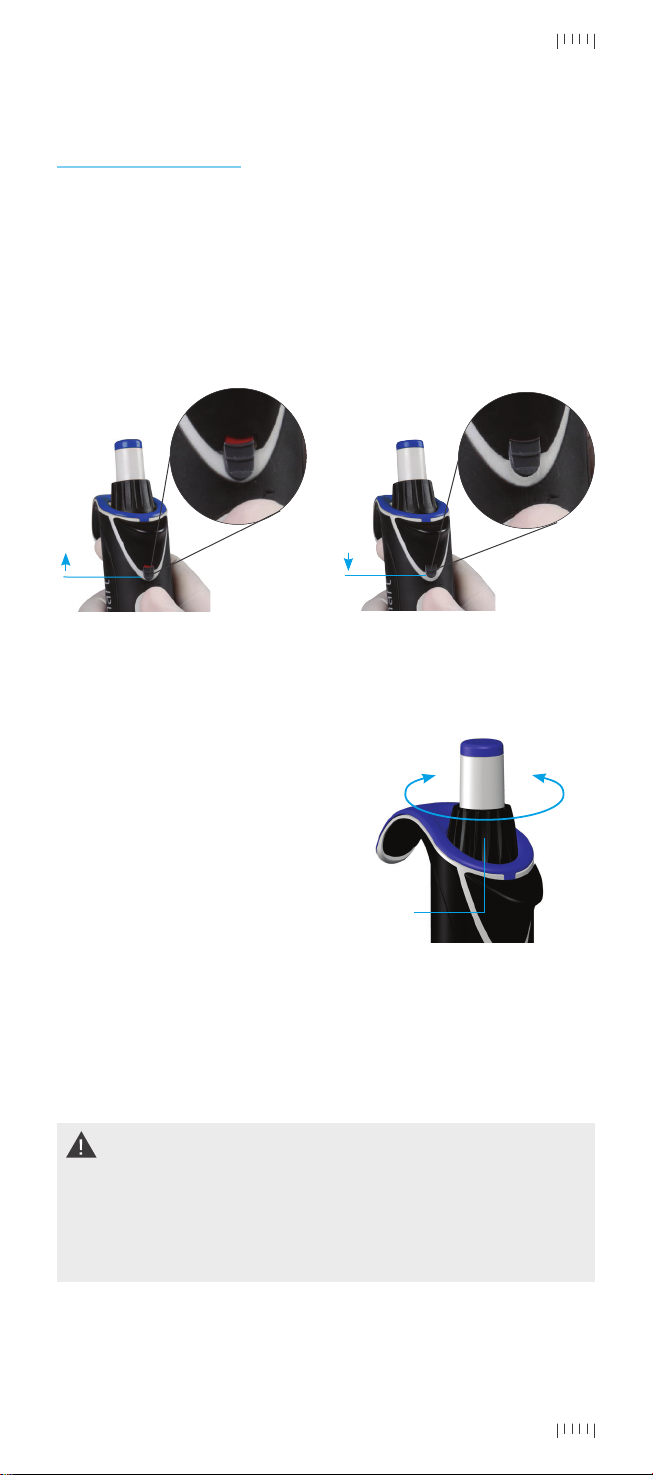
Loading and Ejection Tips
Each SMART pipette is fitted with a tip ejector which helps eliminate
safety hazards associated with contamination.
It is necessary to check that the tip cone is clean before fitting a tip.
Press the tip on the cone of the pipette firmly to ensure an airtight
seal. The seal is set tight when a visible sealing ring forms between
the tip and the tip cone.
The tip ejector needs to be pressed downwards firmly with the thumb
to ensure proper tip ejection. Once the process is complete, make
sure that the tip is disposed of into a suitable waste container.
PIPETTING GUIDELINES
•While using the pipette make sure that operating knob has been
handled slowly and smoothly.
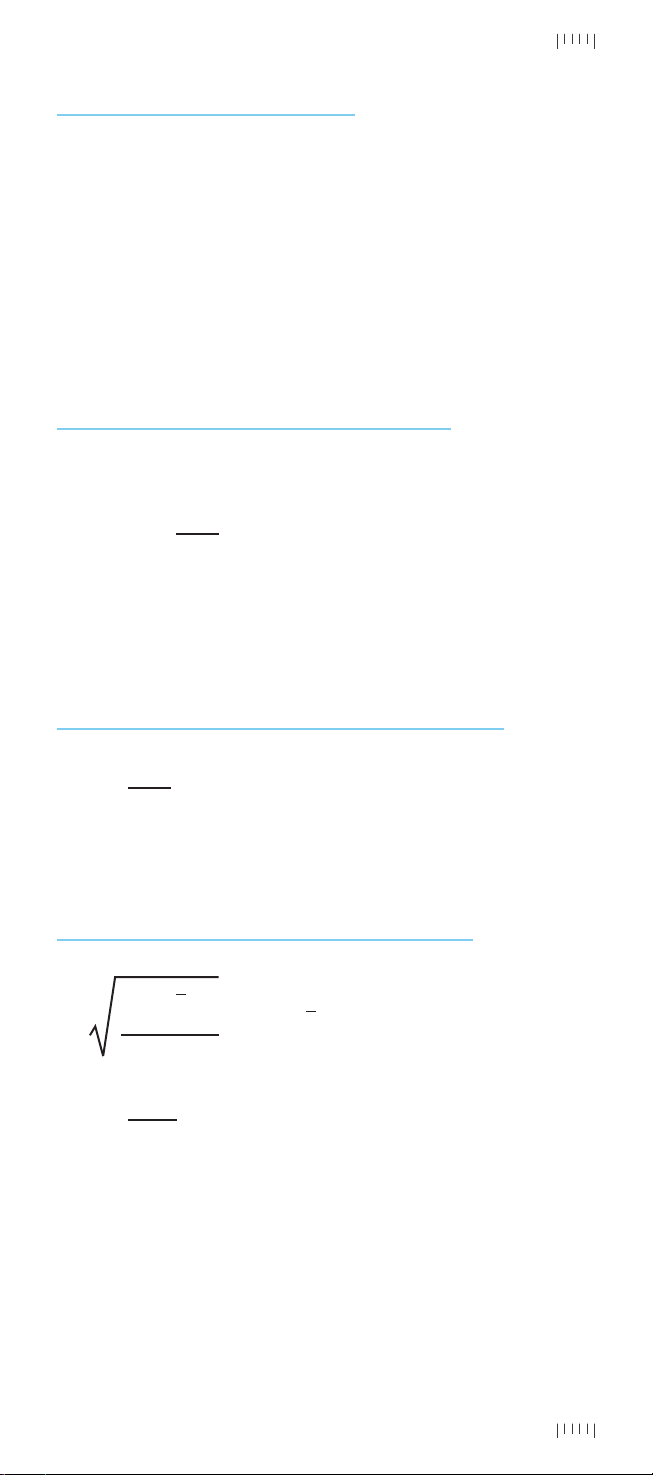
•Ensure that the tip is firmly attached on the tip cone. Please check
for foreign particles and remove if any, around the tip cone.
•Make sure that the temperature of tip, pipette and liquid are at
equilibrium.
•While holding the pipette, its main handle should be resting on your
index finger.
•While aspirating, hold the pipette in upright position and keep the
tip at a constant depth below the surface of the liquid.
•You should pre-rinse the tip before aspirating the liquid by filling
and emptying the tip 5 times. This is important especially when
dispensing liquids, which have a viscosity and density different
from water.
•For the volatile solvents you should saturate the air-cushion of your
pipette by aspirating and dispensing the solvent repeatedly before
aspirating the sample.
•When pipetting liquids with temperatures different to the ambient
temperature, pre-rinse the tip several times before use.
•After pipetting acids or other corrosive liquids that emit vapors,
remove the tip-cone and rinse the piston, O-ring and seal with
distilled water.
•Do not pipette liquids having temperatures above 70°C or below
4°C.
Make sure that liquids never enter the tip-cone, to prevent this:
•Never lay the pipette on its side when there is liquid in the tip.
•Press and release the push knob slowly and smoothly.
•Never turn the pipette upside down

| 8
SMART PIPETTE - USER GUIDE
Forward Pipetting
1. Press the operating knob to the first stop.
2.Dip the tip under the surface of the liquid in the reservoir to a depth
of about 1cm and slowly release the operating knob. Withdraw the
tip from the liquid touching it against the edge of the reservoir to
remove excess liquid.
3.Dispense the liquid by gently
pressing the operating knob to
the first stop. After a delay of
about one second, continue to
press the operating knob all the
way to the second stop. This ac-
tion will empty the tip.
4. Release the operating button to
the ready position. Change the tip
and continue pipetting.
First Stop
Second Stop
1 2 3 4
Reverse Pipetting
The reverse technique is suitable for dispensing liquids that have
a high viscosity or a tendency to foam easily. The technique is also
recommended for dispensing very small volumes.
1. Press the operating knob all the way to the second stop.
2.Dip the tip under the surface of the liquid in the reservoir to a depth
of about 1cm and slowly release the operating knob. This action
will fill the tip. Withdraw the tip from the liquid touching it against
the edge of the reservoir to
remove excess liquid.
3.Deliver the preset volume by
gently pressing the operating
knob to the first stop. Hold the
operating knob at the first stop.
Some liquid will remain in the tip
and it should not be dispensed.
4. The remaining liquid should
either be discarded with the tip
or should be dispensed back into
the reagent reservoir.
First Stop
Second Stop
1 2 3 4
PIPETTING TECHNIQUES

9 |
SMART PIPETTE - USER GUIDE
CALIBRATION AND ADJUSTMENT
All SMART pipettes are been quality tested according to ISO8655/DIN
12650. The quality control according to ISO 8655/DIN 12650 involves
gravimetric testing of each pipette with distilled water (quality 3, DIN
ISO3696) at 25°C +- 1° C.
All SMART pipettes are been calibrated in ISO/IEC 17025 accredited
laboratory. Each Pipette is calibrated, inspected and validated by
qualified technicians according to defined quality system.
SMART pipettes are constructed to permit re-adjustment for other
pipetting techniques or liquids of different temperature and viscosity.
Devise requirements and test conditions
An analytical balance must be used. The balance selection depends
upon selected model of the pipette and sensitivity of balance reading.
Test liquid: Water, distilled or deionized, grade 3 water conforming
ISO 3696.
Calibration should be carried out in a draft-free room at a constant
(+- 0.5°C) temperature of water, pipette and air between 15°C to 30°C.
The relative humidity must be above 50%, especially with volumes
under 50ul, the air humidly should be as high as possible to reduce
the effect of evaporation loss.
Special accessories for analytical balance, such as the evaporation
trap are recommended for the calibration of volumes under 50ul.

| 10
SMART PIPETTE - USER GUIDE
Conversion of weight readings to volume
Xi = Balance Reading
n = number or reading
Z = Conversion factor
[example Z=1.0040 ul/mg at 25°c and 1013 hPa]
Mean Value V = X · Z
__
MeanValueX=∑ Xi
n
_
Calculation for in-accuracy (Systematic Error)
_
V = Mean Value
Vo = Particular volume at which readings are taken
A% = V - Vo
_
Vo
· 100
Procedure to check calibration
The pipette is checked at maximum volume, at 50% of maximum
volume and at minimum or 10% of maximum volume, whichever is
higher.
•A new tip is first pre-wetted 3-5 times and a series of ten pipetting
is done at each volume.
•Use of forward pipetting technique is recommended.
•Calculate the inaccuracy and imprecision for all three volumes as
per EN ISO 8655/ DIN 12650 standards on the basis of the following
calculation
Calculation for Impression (Random Error)
CV% = 100 · S
_
V
S = Standard Deviation
V = Mean Value
n = number of readings
S= i=1
∑(Vi-V)2
n
n - 1
•Compare the results to the limits in the subsequent tables

11 |
SMART PIPETTE - USER GUIDE
CAT No. Color
code
Volume Range
[ µl ]
Incre-
ments
[ µl ]
Test
Volume
[µl]
Inac-
curacy
(±) %
Impreci-
sion
(±) %
SVA-125 0.1 - 2.5 µl 0.002
0.25 12 6
1.25 3 3
2.5 2.5 1.6
SVA-100 0.5-10 µl 0.02
1 2.5 1.8
5 2 1
10 1 0.6
SVA-200 5-50 µl 0.1
5 2 2
25 0.8 0.4
50 0.6 0.3
SVA-500 10-100 µl 0.1
10 3 1
50 1 0.5
100 0.8 0.2
SVA-600 100-1000 µl 0.1
100 3 0.6
500 1 0.4
1000 0.6 0.2
SVA-700 2-20 µl 0.02
2 3 2
10 1.5 1
20 0.9 0.4
SVA-800 20-200 µl 0.2
20 2.5 0.7
100 0.7 0.3
200 0.6 0.2
SVA-905 500-5000 µl 10
500 2.4 0.6
2500 1.2 0.25
5000 0.6 0.15
SVA-1000 1000-10000 µl 20
1000 3 0.6
5000 0.8 0.3
10000 0.6 0.2
Variable Volume Pipette

| 12
SMART PIPETTE - USER GUIDE
Fix Volume Pipette
CAT No. Color
code
Volume Range
[ µl ]
Test
Volume
[µl]
Inaccuracy
(±) %
Imprecision
(±) %
SFA-2.5 2.5 µl 2.5 2 1.6
SFA-0005 5 µl 5 1.3 1.2
SFA-0010 10 µl 10 1.2 0.8
SFA-0020 20 µl 20 1 0.5
SFA-0025 25 µl 25 1 0.3
SFA-0050 50 µl 50 0.7 0.3
SFA-0100 100 µl 100 0.6 0.2
SFA-0200 200 µl 200 0.6 0.2
SFA-0250 250 µl 250 0.6 0.2
SFA-0500 500 µl 500 0.6 0.2
SFA-1000 1000 µl 1000 0.6 0.2
SFA-2000 2000 µl 2000 0.3 0.15
SFA-5000 5000 µl 5000 0.3 0.15
SFA-10000 10000 µl 10000 0.6 0.2
Multi Channel Pipette
8 Channels & 12 Channels
CAT No. Color
code
Volume
Range
[ µl ]
Incre-
ments
[ µl ]
Test
Vol-
ume
[µl]
Inac-
curacy
(±) %
Impreci-
sion
(±) %
SMA8-010
SMA12-010 0.5-10 µl 0.02
1 8 5
5 4 2
10 2 1
SMA8-020
SMA12-020 2-20 µl 0.02
2 7 3
10 3 2
20 2 1.6
SMA8-050
SMA12-050 5-50 µl 0.1
5 3 2
25 1.5 1
50 1 0.7
SMA8-100
SMA12-100
10 – 100
µl 0.1
10 3 2
50 1 0.8
100 0.8 0.3

13 |
SMART PIPETTE - USER GUIDE
SMA8-200
SMA12-200
20-200
µl 0.2
20 5 1.4
100 1 0.4
200 0.7 0.25
SMA8-300
SMA12-300
30-300
µl 0.2
30 3 1
150 1 0.5
300 0.6 0.3
Calibration Adjustment
1. Calibration adjustment is done with the Recalibration (Ellen) key.
2.Remove the calibration guard and place the Recalibration (Ellen)
key into the opening of the calibration screw on the side of the
handle.
3.Turn the key clockwise to increase or counterclockwise to de-
crease the volume.
4. After adjustment, check the calibration according to the instruc-
tions above.
5.Once within permissible error range, place calibration guard in its
position to avoid accidental changes in calibration.
For more detail information about Calibration and Adjustment, visit
www.accumaximum.com/calibration
Depending upon use, we recommend checking of calibration every six months.
However this can be adjusted to individual requirements.

| 14
SMART PIPETTE - USER GUIDE
•Pull out the piston and other parts by unscrewing the tip cone.
Push out with piston the rest of the piston assembly including the
Seal and O-ring. Remember to keep all parts in order for reassem-
bly.
•Clean the piston, the piston spring, Seal and the O-ring with a iso-
propanol and lint free tissue. Allow them to dry.
•Check the tip cone for foreign particles and remove, if any.
•Grease the cleaned parts with the approved lubricant provided with
each pipette.
31 2
1. For opening press
the tip ejector closer
upwards
2. Rotate the tip ejector
closer in the direction
indicated until the
snap
3. Turn out the tip ejector,
slowly
MAINTENANCE
When the SMART pipette is not in use, please make sure that it is
stored in an upright position. Accumax recommends the SMART
stand for this purpose.
You should check the pipette at the beginning of each day for accu-
mulation of dust and dirt on the outside surfaces. Attention should
be paid to the tip cone. No other solvents except Iso-propanol should
be used to clean the pipette. If the pipette is used daily, it should be
inspected every three months.
The servicing procedure starts with the disassembly of the pipette.
Please refer to the spare parts lists for better understanding of the
components. Shown here is an example of dis-assembly and as-
sembly procedure of 100-1000 µl pipette, the basic procedure is to be
followed for all other volume pipettes.

15 |
SMART PIPETTE - USER GUIDE
For correct re-assembly, it is crucial that the slots on the tip ejector closer match
the notches on the inside of the main handle. Please follow the above procedure.
Align the notch on the tip ejector with the slots on tip
ejector closer as indicated
1
Ensure the notch on the main handle matches the
slots on the tip ejector closer. Push the tip ejector
closer upwards as indicated.
2
Insert both parts in the aligned manner as indicated.
3
Once completely closed, twist the tip ejector closer in
the indicated direction to close
4

| 16
SMART PIPETTE - USER GUIDE
List of Spare Parts
SP 377-1
SP 302-1
SP 70-1
SP 317-1
SP 392-1
SP 259-1
SP 44-1
SP 23-1
SP 314-1
SP 14-1
Variable Volume 100-100µl
Fix Volume 250µl
500µl
1000µl
Group 1

17 |
SMART PIPETTE - USER GUIDE
SP 41-1 SP 41-2
SP 301-1
SP 301-1
SP 48-2 SP 48-2
SP 48-1
SP 48-1
SP 38-1
SP 38-1
SP 25-1
SP 25-1
SP 314-1
SP 314-1
SP 14-1
SP 14-1
SP 258-1
SP 259-1
Group 2 Group 3
Variable Volume 0.1-2.5µl
Fix Volume 0.5µl
2.5µl
Variable Volume 0.5-10µl
Fix Volume 10µl

| 18
SMART PIPETTE - USER GUIDE
Variable Volume 2-20µl
Fix Volume 20µl
Variable Volume 5-50µl
Fix Volume 25µl
50µl
SP 301-1
SP 39-3
SP 40-1
SP 306-1
SP 47-1
SP 38-1
SP 24-1
SP 314-1
SP 14-1
SP 45-1
SP 391-1
SP 265-1
SP 48-2
SP 260-1
SP 48-1
SP 38-1
SP 25-1
SP 314-1
SP 14-1
Group 4 Group 5

19 |
SMART PIPETTE - USER GUIDE
Variable Volume 10-100µl
Fix Volume 100µl
Variable Volume 20-200µl
Fix Volume 200µl
SP 39-1 SP 366-1
SP 305-1
SP 45-1
SP 388-1
SP 264-1
SP 45-1
SP 303-1
SP 45-1
SP 386-1
SP 261-1
SP 46-1
SP 38-1 SP 38-1
SP 24-1
SP 314-1
SP 14-1
SP 14-1
SP 24-1
SP 314-1
Group 6 Group 7

| 20
SMART PIPETTE - USER GUIDE
Variable Volume 1-5ml
Fix Volume 2ml
5ml
Variable Volume 1-10ml
Fix Volume 10ml
SP 31-2 SP 30-2
SP 51-1 SP 50-1
SP 53-1 SP 52-1
SP 304-1 SP 304-2
SP 57-2 SP 57-1
SP 42-1 SP 43-1
SP 28-1 SP 29-1
SP 263-1
SP 353-1 SP 353-1
SP 262-1
SP 26-1 SP 27-1
SP 313-1 SP 312-1
SP 54-1
SP 55-1
Group 8 Group 9
Table of contents
Other Accumax Laboratory Equipment manuals
Popular Laboratory Equipment manuals by other brands

Markes International
Markes International ACTI-VOC PLUS C-FFP-01 Instructions for use

Hirschmann
Hirschmann Pipetus-Junior instruction manual

Labconco
Labconco FreeZone 70061 6L -50C Series user manual

LEGRAND
LEGRAND Wattstopper LMTI-100-120 installation instructions

Cypress Diagnostics
Cypress Diagnostics CYANExpert 130 user manual

Getinge
Getinge Decomat 4656 installation instructions